OVERVIEW
Virtual Assistants
Kore.ai Platform
Key Concepts
Natural Language Processing (NLP)
Accessing Platform
VIRTUAL ASSISTANTS
Virtual Assistant Builder
Virtual Assistant Types
Getting Started
Create a Simple Bot
SKILLS
Storyboard
Dialog Tasks
Introduction
Dialog Builder (New)
Dialog Builder (Legacy)
User Intent Node
Dialog Node
Entity Node
Supported Entity Types
Composite Entities
Supported Colors
Supported Company Names
Form Node
Logic Node
Message Nodes
Confirmation Nodes
Bot Action Node
Service Node
Custom Authentication
2-way SSL for Service nodes
Script Node
Agent Transfer Node
WebHook Node
Grouping Nodes
Connections & Transitions
Manage Dialogs
User Prompts
Knowledge Graph
Terminology
Building
Generation
Importing and Exporting
Analysis
Knowledge Extraction
Train
Build
Alert Tasks
Introduction
Ignore Words and Field Memory
How to Schedule a Smart Alert
Small Talk
Digital Views
Introduction
How to Configure Digital Views
Digital Forms
Overview
How to Configure Digital Forms
NATURAL LANGUAGE
Overview
Machine Learning
Introduction
Model Validation
Fundamental Meaning
Introduction
NLP Guidelines
Knowledge Graph
Traits
Introduction
How to Use Traits
Ranking and Resolver
Advanced NLP Configurations
INTELLIGENCE
Overview
Context Management
Overview
Session and Context Variables
Context Object
How to Manage Context Switching
Manage Interruptions
Dialog Management
Sub Intents & Follow-up Intents
Amend Entity
Multi-Intent Detection
Sentiment Management
Tone Analysis
Sentiment Management
Event Based Bot Actions
Default Conversations
Default Standard Responses
TEST & DEBUG
Talk to Bot
Utterance Testing
Batch Testing
Record Conversations
Conversation Testing
CHANNELS
PUBLISH
ANALYZE
Overview
Dashboard
Custom Dashboard
Overview
How to Create Custom Dashboard
Conversation Flows
NLP Metrics
ADVANCED TOPICS
Universal Bots
Overview
Defining
Creating
Training
Customizing
Enabling Languages
Store
Smart Bots
Defining
koreUtil Libraries
SETTINGS
Authorization
Language Management
PII Settings
Variables
Functions
IVR Integration
General Settings
Management
Import & Export
Delete
Bot Versioning
Collaborative Development
Plan Management
API GUIDE
API Overview
API List
API Collection
SDKs
SDK Overview
SDK Security
SDK App Registration
Web SDK Tutorial
Message Formatting and Templates
Mobile SDK Push Notification
Widget SDK Tutorial
Widget SDK – Message Formatting and Templates
Web Socket Connect & RTM
Using the BotKit SDK
Installing
Configuring
Events
Functions
BotKit SDK Tutorial – Agent Transfer
BotKit SDK Tutorial – Flight Search Sample Bot
Using an External NLP Engine
ADMINISTRATION
HOW TOs
Create a Simple Bot
Create a Banking Bot
Transfer Funds Task
Update Balance Task
Context Switching
Using Traits
Schedule a Smart Alert
Configure UI Forms
Add Form Data into Data Tables
Configuring Digital Views
Add Data to Data Tables
Update Data in Data Tables
Custom Dashboard
Custom Tags to filter Bot Metrics
Patterns for Intents & Entities
Build Knowledge Graph
Global Variables
Content Variables
Using Bot Functions
Configure Agent Transfer
RELEASE NOTES

チャネルの有効化

カスタムBotを定義した後、Botが導入された際にエンドユーザーがアクセスおよび対話できるよう、Botに配信チャネルを追加することができます。例えば、Kore.aiメッセジングアプリケーションでBotを有効にしたり、メールアドレスやTwilio SMSアカウントを介してBotとのやりとりを許可したりすることができます。また、FacebookSlackなどのサードパーティ製アプリケーション内でBotを有効にすることも可能です。このトピックでは、1つ以上の配信チャネルをBotに追加する方法について説明します。

デフォルトでは、Botに1つ以上のチャネルを定義しない限り、Botおよび定義済みの通知またはアクションタスクは、どのチャネルのユーザーも利用することができません。エンタープライズ向けBotの場合、Botにチャネルが定義されている場合でも、エンタープライズ内のユーザーが利用できるよう、Bot管理者がBotを承認および導入する必要があります。

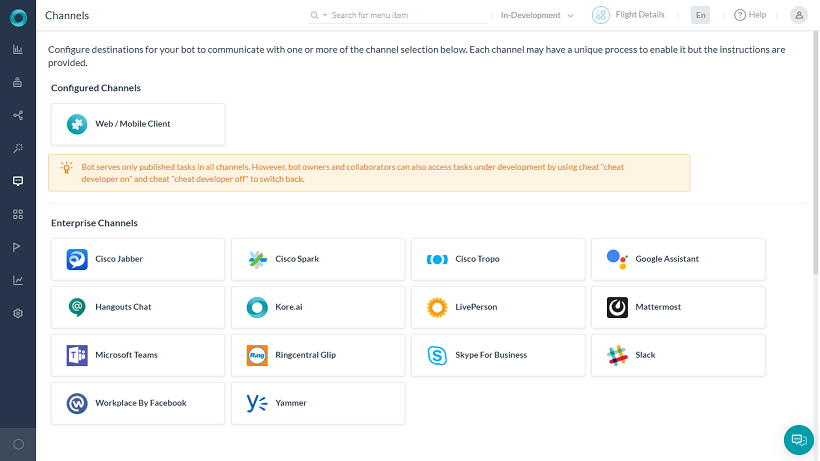
チャネルタブからBotにチャンネルを追加することができます。Kore.aiのBotプラットフォームでサポートされているチャネルは、機能と使用方法に基づいて分類されています。

チャネルを有効にする手順

Botに1つ以上のチャネルを有効にするには、以下の手順に従います。

  1. チャネルを追加するBotを開きます。
  2. サイドナビゲーションパネルにカーソルを合わせ、チャネルタブをクリックします。
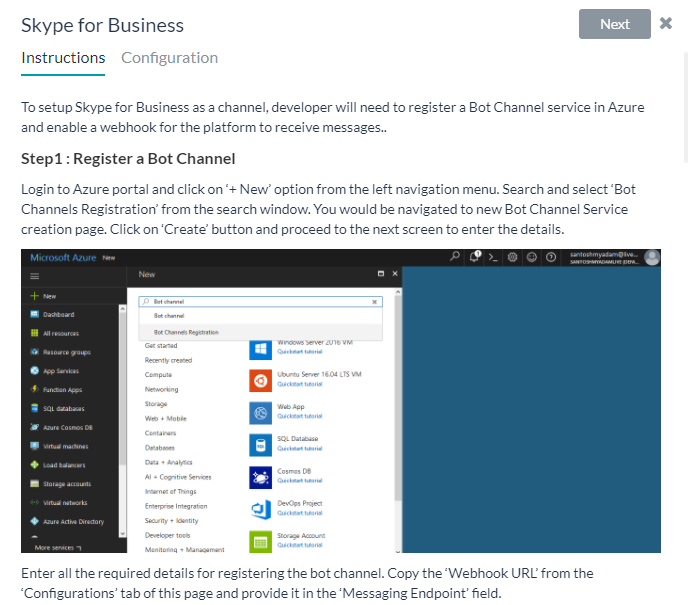
  3. ページに追加するチャネル名をクリックします。チャネルをインストールするための説明ページが開きます。
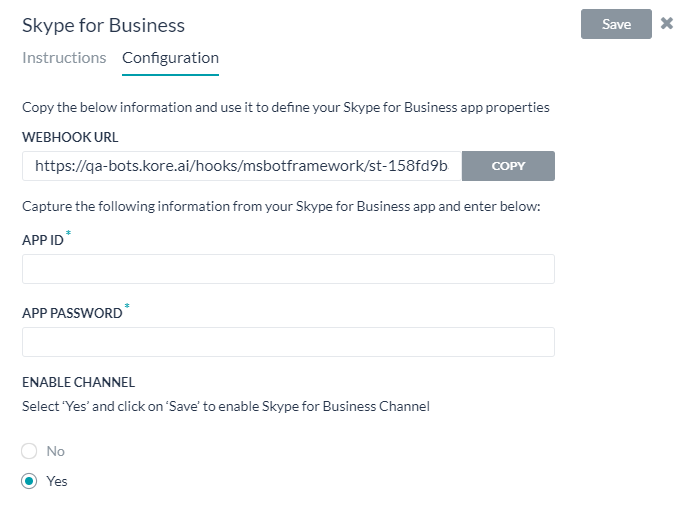
  4. 次へまたは設定タブをクリックして、チャネルの設定ページを開きます。こちらの画像は、Skype for Businessチャネルの設定ページを示しています。

– Botにチャネルを追加した後、承認のためにBotを公開し、Bot管理者がBotを承認する必要があります(新しいチャネル)。Bot管理者がそのチャネルをはっきりと承認するまで、ユーザーは新しいチャネルを利用することはできません。

OVERVIEW
Virtual Assistants
Kore.ai Platform
Key Concepts
Natural Language Processing (NLP)
Accessing Platform
VIRTUAL ASSISTANTS
Virtual Assistant Builder
Virtual Assistant Types
Getting Started
Create a Simple Bot
SKILLS
Storyboard
Dialog Tasks
Introduction
Dialog Builder (New)
Dialog Builder (Legacy)
User Intent Node
Dialog Node
Entity Node
Supported Entity Types
Composite Entities
Supported Colors
Supported Company Names
Form Node
Logic Node
Message Nodes
Confirmation Nodes
Bot Action Node
Service Node
Custom Authentication
2-way SSL for Service nodes
Script Node
Agent Transfer Node
WebHook Node
Grouping Nodes
Connections & Transitions
Manage Dialogs
User Prompts
Knowledge Graph
Terminology
Building
Generation
Importing and Exporting
Analysis
Knowledge Extraction
Train
Build
Alert Tasks
Introduction
Ignore Words and Field Memory
How to Schedule a Smart Alert
Small Talk
Digital Views
Introduction
How to Configure Digital Views
Digital Forms
Overview
How to Configure Digital Forms
NATURAL LANGUAGE
Overview
Machine Learning
Introduction
Model Validation
Fundamental Meaning
Introduction
NLP Guidelines
Knowledge Graph
Traits
Introduction
How to Use Traits
Ranking and Resolver
Advanced NLP Configurations
INTELLIGENCE
Overview
Context Management
Overview
Session and Context Variables
Context Object
How to Manage Context Switching
Manage Interruptions
Dialog Management
Sub Intents & Follow-up Intents
Amend Entity
Multi-Intent Detection
Sentiment Management
Tone Analysis
Sentiment Management
Event Based Bot Actions
Default Conversations
Default Standard Responses
TEST & DEBUG
Talk to Bot
Utterance Testing
Batch Testing
Record Conversations
Conversation Testing
CHANNELS
PUBLISH
ANALYZE
Overview
Dashboard
Custom Dashboard
Overview
How to Create Custom Dashboard
Conversation Flows
NLP Metrics
ADVANCED TOPICS
Universal Bots
Overview
Defining
Creating
Training
Customizing
Enabling Languages
Store
Smart Bots
Defining
koreUtil Libraries
SETTINGS
Authorization
Language Management
PII Settings
Variables
Functions
IVR Integration
General Settings
Management
Import & Export
Delete
Bot Versioning
Collaborative Development
Plan Management
API GUIDE
API Overview
API List
API Collection
SDKs
SDK Overview
SDK Security
SDK App Registration
Web SDK Tutorial
Message Formatting and Templates
Mobile SDK Push Notification
Widget SDK Tutorial
Widget SDK – Message Formatting and Templates
Web Socket Connect & RTM
Using the BotKit SDK
Installing
Configuring
Events
Functions
BotKit SDK Tutorial – Agent Transfer
BotKit SDK Tutorial – Flight Search Sample Bot
Using an External NLP Engine
ADMINISTRATION
HOW TOs
Create a Simple Bot
Create a Banking Bot
Transfer Funds Task
Update Balance Task
Context Switching
Using Traits
Schedule a Smart Alert
Configure UI Forms
Add Form Data into Data Tables
Configuring Digital Views
Add Data to Data Tables
Update Data in Data Tables
Custom Dashboard
Custom Tags to filter Bot Metrics
Patterns for Intents & Entities
Build Knowledge Graph
Global Variables
Content Variables
Using Bot Functions
Configure Agent Transfer
RELEASE NOTES

Channel Enablement

After you define a custom bot, you can add delivery channels to your bot that end-users can use to access and interact with your bot when it is deployed. For example, you can enable your bot for use in the Kore.ai Messaging application, or allow interaction with your bot through an email address or a Twilio SMS account. You can also enable your bot in third-party applications such as Facebook or Slack. This topic describes how to add one or more delivery channels to your bot.

By default, a bot and any defined notification or action tasks are not available to users in any channel unless you define one or more channels for your bot. For enterprise bots, even if the bot has a channel defined, the Bots Admin must approve and deploy the bot to make it available to users in the enterprise.

You can add channels to your bot from the Build -> Channels tab. Channels supported by the Kore.ai bots platform are categorized based upon their functionality and usage.

Enable a Channel

To enable one or more channels for your bot, follow the below steps:

  1. Open the bot for which you want to add the channels.
  2. Hover over the left pane and click the Channels tab.
  3. Click the name of the channel you want to add to the page. It opens the instructions page to install the channel.
  4. Click Next or the Configuration tab to open the configuration page for the channel. This image shows the configuration page of the Skype for Business channel.

Note – After adding the channel to the bot, the bot needs to be published for approval and the Bot Admin needs to approve the bot (with new channels). The new channel is not available to users until the Bot Admin explicitly approves that channel for your bot.

Available Channels

Click the icon of the channel you want to add, and then configure the channel to work with your Kore.ai bot. The page with Instructions and Configuration settings will slide out.

Following are the available channels:

Enterprise Channels
Cisco Jabber
Cisco Webex Teams
(formerly Cisco Spark)

Cisco Tropo
Google Assistant
Hangouts Chat
Kore.ai
Live Person
Mattermost
Microsoft Teams
RCS Business Messaging
Ringcentral Glip
Skype for Business
Slack
Unblu
WhatsApp Business Messaging
Workplace By Facebook
Yammer
Social Channels
Facebook Messenger
Line
Skype
Telegram
Twitter
WeChat
Voice Channels
Amazon Alexa
IVR – AudioCodes
IVR
Twilio Voice
And…
Email
Twilio SMS
Web / Mobile Client
Webhook
Widget SDK