Facebook Messengerチャネルをボットに追加するには、開発者の“Facebook”アカウントを使用して、“Facebook Mes​​senger”とKore.ai 間の接続を構成する必要があります。Facebook MessengerチャネルをKore.aiボットに追加すると、ボットのエンドユーザーが自分の“Facebook”アカウントを使用してボットと対話できるようになります。Facebook Messengerをチャネルとして追加するには、次のことを行う必要があります:

  1. Create App―Facebook開発者ポータルでアプリを作成します。
  2. Get Page Details―Facebookページをアプリに関連付け、Page Access Tokenを生成します。Facebookページをまだ作成していない場合は、それを作成する必要があります。
  3. Setup Webhook―Facebook Mes​​sengerをボットのチャネルとして有効にするには、アプリとボットプラットフォームの間にWebhookシステム連携をセットアップする必要があります。
  4. Submit for Approval―ボットのFacebook Mes​​sengerチャネルlを有効にするには、承認のためにFacebookアプリを送信します。

メールチャネルを追加

  1. ボットビルダーのBotsセクションで、Facebook Mes​​sengerチャネルを追加したいボットをクリックします。
  2. Channelsタブで、Facebook Messengerアイコンをクリックします。Facebook Messengerページが表示されます。
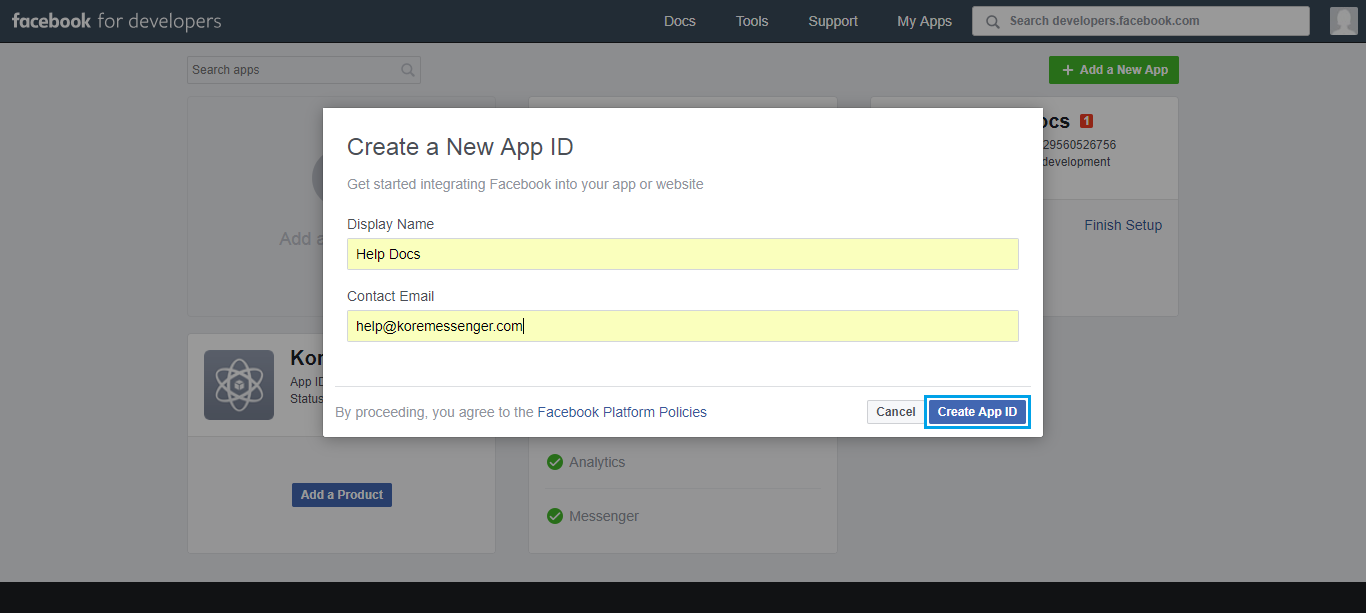
  3. 新しいブラウザで、Facebook開発者ポータルにログインし、My AppsセクションからAdd a New Appオプションを選択します。アプリに関連するすべての詳細を入力し、Create App IDをクリックします。
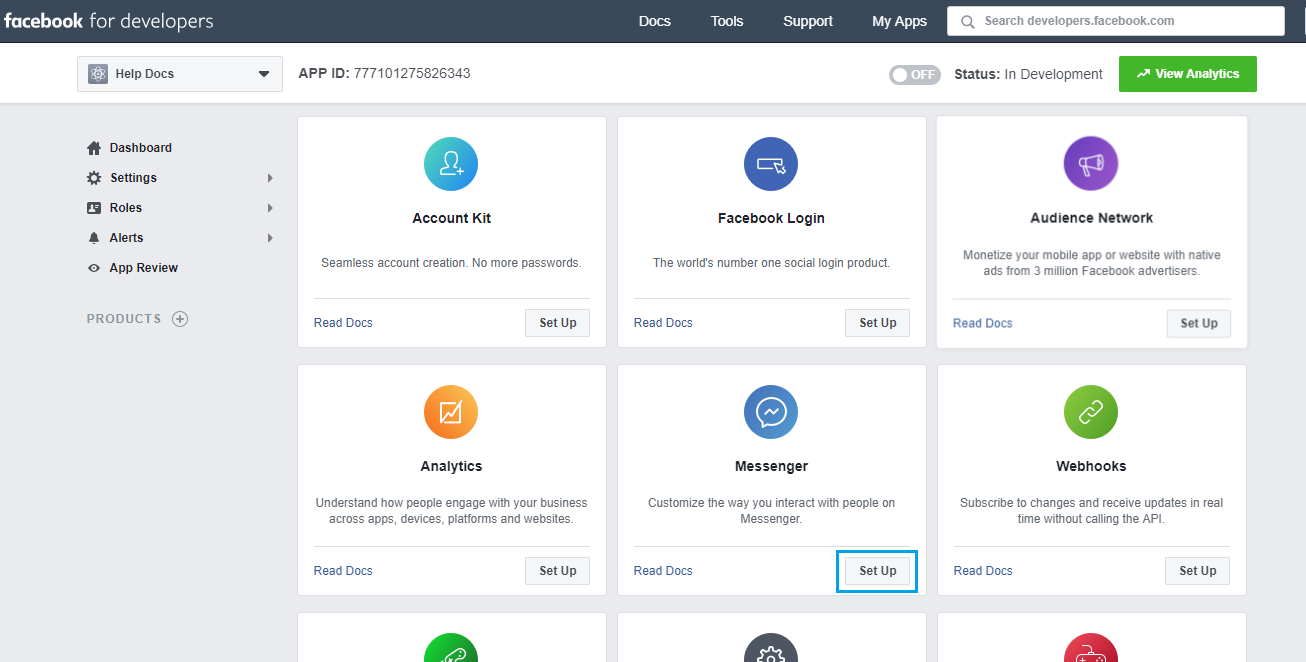
  4. アプリが作成され、App setup pageにリダイレクトされます。Messengerを選択し、Set Upをクリックして続行します。Settingsページにリダイレクトされます。
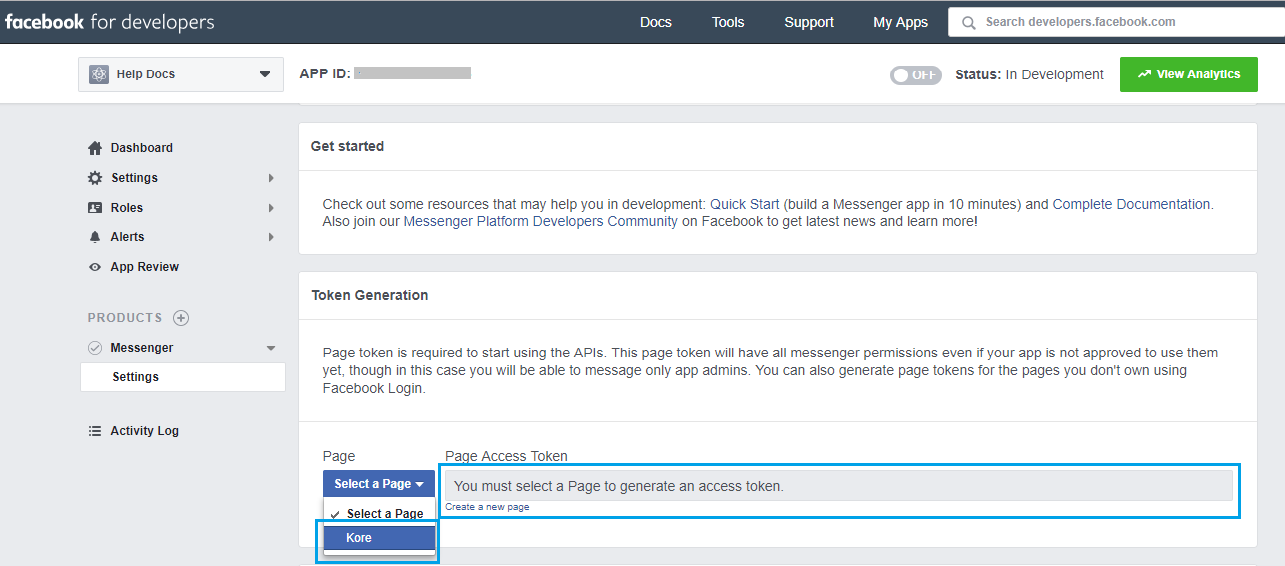
  5. ページをアプリに関連付け、Token GenerationセクションからPage Access Tokenを生成する必要があります。ページがない場合は、ここでFacebookページを作成できます。
  6. Page Access Tokenをコピーして、Facebook MessengerチャネルページのConfigurationsタブに入力します。
  7. このページの上部にあるApp IDを見つけて、Configurationsタブに入力します。
  8. メイン設定メニューに移動し、Basicを選択します。App Secretをキャプチャし、チャネルページのConfigurationsタブに入力します。
  9. Facebookアカウントから、上記で選択したFacebookページに移動します。AboutメニューからPage IDをコピーし、Facebook Mes​​sengerチャネルページのConfigurationsタブに入力します。
  10. 設定下のWebhooksセクションに移動し、Setup Webhooksをクリックして、アプリとボットプラットフォーム間のWebhookを構成します。
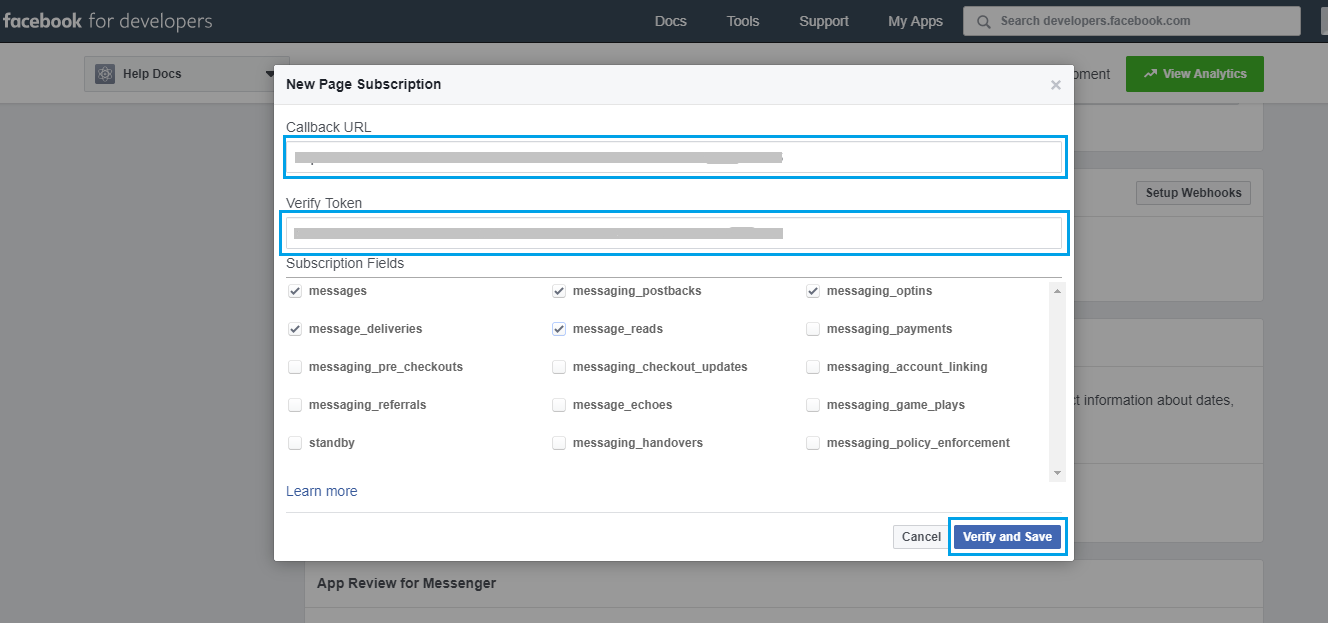
  11. チャネルページの構成タブにあるCallback URLVerify Tokenを使用して、それらをFacebookアプリ構成の適切なフィールドに入力します。
  12. Subscriptionフィールドで、messagesmessaging_postbacksmessaging_optinsmessage_deliveriesmessage_readsを選択します。
  13. Verify and Saveをクリックします。
  14. Webhooks sectionで、ページトークンの生成に使用したページを選択し、Subscribeをクリックします。
  15. 承認のためにFacebookアプリを送信します。承認されると、ボットのFacebook Mes​​sengerチャネルを有効にできます。アプリの送信方法の詳細については、ここをクリックしてください。

Facebook Messengerチャネルの編集

Facebook Messengerチャネルを編集するには、チャネルの上にマウスを置き、クリックして変更します。チャネル構成に必要な更新を加えて保存することができます。設定アイコンをクリックして、チャネル情報を無効にしたり削除したりすることもできます。 チャネルを変更するには、次のコマンドのいずれかを選択します:

  • 無効化/有効化無効化をクリックして、ボットのFacebook Mes​​sengerチャネルの使用を一時的に無効にします。Facebook Messengerチャネルの使用を有効にするには、有効化をクリックします。
  • 削除削除をクリックし、削除の確認ダイアログでOKをクリックして、ボットチャネル構成を完全に削除します。
警告:このアクションは恒久的であり、元に戻すことはできません。

봇에 Facebook Messenger 채널을 추가하려면, Facebook Messenger와 Kore.ai 간 연결을 설정하기 위한 개발자 Facebook 계정이 필요합니다. Kore.ai 봇에 Facebook Messenger 채널을 추가하면 봇의 최종 사용자가 사용자의 Facebook 계정을 사용하여 봇과 상호작용할 수 있습니다. 채널로 Facebook Messenger를 추가하려면, 다음을 수행해야 합니다.

  1. Create App– Facebook 개발자 포털에서 앱을 생성합니다.
  2. Get Page Details- 앱과 Facebook 페이지를 연결하고 페이지 액세스 토큰을 생성합니다. Facebook 페이지가 없는 경우 생성해야 합니다.
  3. Setup Webhook- 봇에 채널로 Facebook Messenger를 사용할 수 있게 설정하려면, 앱과 봇 플랫폼 간 Webhook 통합을 설정해야 합니다.
  4. Submit for Approval- 승인을 위해 Facebook 앱을 제출하여 봇에 Facebook Messenger 채널을 사용할 수 있도록 설정합니다.

이메일 채널 추가

  1. 봇 빌더의 Bots 섹션에서, Facebook Messenger 채널을 추가할 봇을 클릭하세요.
  2. Channels 탭에서, Facebook Messenger 아이콘을 클릭하세요. Facebook Messenger 페이지가 표시됩니다.
  3. 새 브라우저에서, Facebook developer portal에 로그인하고 My Apps 섹션에서 Add a New App를 선택합니다. 앱의 모든 관련 세부 정보를 입력하고 Create App ID을 클릭하세요.,
  4. 앱이 생성되고 App setup page로 리디렉션됩니다. Messenger를 선택하고 Set Up을 클릭하여 계속합니다. Settings 페이지로 리디렉션됩니다.
  5. 페이지를 앱과 연결하고 Token Generation 섹션에서 Page Access Token 생성합니다. 페이지가 없는 경우, here에서 Facebook 페이지를 생성할 수 있습니다.
  6. Page Access Token을 복사하고 Facebook Messenger 채널 페이지의 Configurations 탭에 입력합니다.
  7. 페이지 상단에 있는 이 페이지의 App ID를 찾고 Configurations 탭에 입력하세요.
  8. 메인 설정 메뉴로 이동하여 Basic 설정을 선택하고 App Secret을 확인한 후 채널 페이지의 Configurations 탭에 입력합니다.
  9. Facebook 계정에서 위에서 선택한 Facebook 페이지로 이동합니다. About 메뉴에서 Page ID를 복사하고 Facebook Messenger 채널 페이지의 Configurations 탭에 입력합니다.
  10. 설정의 Webhook 섹션으로 이동하고 Setup Webhooks을 클릭하여 앱과 봇 플랫폼 간의 Webhook을 설정합니다.
  11. 채널 페이지의 설정 탭에 있는 Callback URLVerify Token을 사용하여 Facebook 앱 설정의 해당 필드에 입력합니다.
  12. Subscription 필드에서 messagesmessaging_postbacks, messaging_optins, message_deliveries, message_reads를 선택합니다.
  13. Verify and Save를 클릭합니다.
  14. Webhooks section에서페이지 토큰 생성에 사용한 페이지를 선택하고 Subscribe를 클릭합니다.
  15. 승인을 위해 Facebook 앱을 제출합니다. 승인되면 봇의 Facebook Messenger 채널을 활성화할 수 있습니다. 앱 제출 방법에 대한 자세한 정보를 알아보려면 here를 참조하세요.

Facebook Messenger 채널 편집

Facebook Messenger 채널을 편집하려면, 마우스를 채널로 이동하고 클릭하여 수정합니다. 채널 설정에서 필요한 업데이트와 저장을 할 수 있습니다. 또한 Setting 아이콘을 클릭하여 채널 정보를 사용하지 않거나 삭제할 수 있습니다. 채널을 수정하려면 다음과 같은 명령 중 하나를 선택하세요.

  • Disable/EnableDisable을 클릭하여 봇의 Facebook Messenger 채널 사용을 일시적으로 비활성화합니다. Facebook Messenger 채널 사용을 활성화하려면, Enable을 클릭하세요.
  • DeleteDelete를 클릭한 후 Delete Confirmation 대화창의 OK를 클릭하여 봇 채널 구성을 영구적으로 삭제합니다.
Warning: 이 조치는 영구적이므로, 취소할 수 없습니다.

To add the Facebook Messenger channel to your bot, you need a developer Facebook account to configure the connection between Facebook Messenger and Kore.ai. Adding the Facebook Messenger channel to your Kore.ai bot allows end-users of your bot to interact with your bot using their Facebook accounts. To add Facebook Messenger as a channel, you need to:

  1. Create App– Create an app on the Facebook developer portal.
  2. Get Page Details- Associate your Facebook page with the app and generate the Page Access Token. You need to create a Facebook page if you do not have one already.
  3. Setup Webhook- To enable Facebook Messenger as a channel for your bot, you must set up a webhook integration between your app and the bots platform.
  4. Submit for Approval- Submit the Facebook app for approval to enable the Facebook Messenger channel for your bot.

Add Email Channel

  1. Under the Bots section of the Bot Builder, click the bot for which you want to add the Facebook Messenger channel.
  2. On the Channels tab, click the Facebook Messenger icon. The Facebook Messenger page is displayed.
  3. In a new browser, log in to the Facebook developer portal and select the Add a New App option from the My Apps section. Enter all the relevant details for your app and click Create App ID.
  4. Your App is created and you are redirected to the App setup page. Select Messenger and click Set Up to continue. You are redirected to the Settings page.
  5. You need to associate a page with the app and generate the Page Access Token from the Token Generation section. If you do not have a page, you can create a Facebook page here.
  6. Copy the Page Access Token and enter it in the Configurations tab of the Facebook Messenger channel page.
  7. Locate the App ID of this page present on top of the page and enter it in the Configurations tab.
  8. Go to the main settings menu and select Basic settings; capture the App Secret and enter it in the Configurations tab of the channel page.
  9. From your Facebook account, go to the Facebook page you have selected above. From the About menu, copy Page ID and enter it in the Configurations tab of the Facebook Messenger channel page.
  10. Go to the Webhooks section under Settings and click Setup Webhooks to configure the Webhook between your app and the bots platform.
  11. Use the Callback URL and Verify Token provided in the Configurations tab of the channel page and enter them in appropriate fields in your Facebook apps configuration.
  12. Select messages, messaging_postbacks, messaging_optins, message_deliveries, message_reads under Subscription fields.
  13. Click Verify and Save.

  14. Under the Webhooks section, select the page you have used to generate the page token and click Subscribe.

  15. Submit the Facebook app for approval. Once approved, you can enable the Facebook Messenger channel for your bot. For more info on how to submit the app, click here.

Edit the Facebook Messenger Channel

To edit the Facebook Messenger channel, hover your mouse over the channel and click to modify. You can make necessary updates to your channel configurations and save them. You may also disable or delete the channel information by clicking the Settings icon.

Select one of the following commands to modify the channel:

  • Disable/Enable – Click Disable to temporarily disable the use of the Facebook Messenger channel for your Bot. To enable the use of the Facebook Messenger channel, Click Enable.
  • Delete – Click Delete, and then click OK in the Delete Confirmation dialog to permanently delete the bot channel configuration.
Warning: This action is permanent, and cannot be undone.