Cisco JabberをチャネルとしてKore.aiボットに追加するには、JabberアプリケーションでWebhookシステム連携を有効にする必要があります。Kore.aiボットにJabberチャネルを追加すると、ボットのエンドユーザーが“Jabber”アカウントを使用してボットと対話できるようになります。ボットにJabberチャネルを追加するには、次のことを行う必要があります:

  1. Webhookシステム連携の有効化―ボットのチャネルとしてJabberを有効にするには、JabberアプリケーションでWebhookシステム連携を設定する必要があります。Jabberチャネルページの構成タブからWebhook URLをコピーし、システム連携のためにJabberアプリに必要なフィールドを入力します。
  2. チャネルを有効化―Webhookシステム連携を有効にし、ボットビルダーに構成データを入力した後、チャネルを有効にします。

“Jabber”ポータルで開発者アカウントを持っているか登録する必要があります。Cisco Jabberチャネルを追加するには、以下のステップに従います:

  1. ボットビルダーのボットセクションで、Jabberチャネルを追加したいボットをクリックします。
  2. チャネルタブで、Jabberアイコンをクリックします。Jabberチャネルページが表示されます。
  3. JabberアプリケーションでWebhookシステム連携を有効にするには、Jabberアプリにログインします。Jabberチャネルページの構成タブからWebhook URLをコピーし、システム連携のためにJabberアプリのWebhook URLフィールドに入力します。
  4. Jabberチャネルページの構成タブに移動して、チャネルのセットアップを完了します。
  5. JabberアプリからPOST URLの詳細をキャプチャし、POST URLフィールドに入力します。
  6. オプションで、Jabberシステム連携からアクセストークンの詳細を生成してキャプチャし、アクセストークンフィールドに入力して、Jabberとボット間の安全な通信を有効にすることもできます。
  7. はいを選択し、保存をクリックしてJabberチャネルを有効にします。

以下は、システム連携を検証するためのペイロード形式のコードの断片です。

投稿URLのペイロード

以下は、Configurationsタブに登録されているPOST URLによって受け入れられる必要があるボットからの応答メッセージです。

   {
                "message": {
                "text" : "Hi"
                }
                "to" : "<recipient-id/group-id>",
                "from" : "<sender-id>"
             }
Webhookペイロード

以下は、JabberからKore.aiボットプラットフォームにメッセージを投稿するためのWebhookペイロード形式です。

  {
                "message": {
                    "text" : "<Message>",
                    "attachments" : [<array of attachment links (optional)>]
                },
                "from" : {
                    "id": "<unique-id-of-sender(mandatory)>",
                    "userInfo" : {
                      "firstName" : "<first-name(optional)>",
                      "lastName" : "<second-name(optional)>",
                      "email" : "<email(optional)>"
                    }
                },
                "to" : {
                    "id": <unique-id-of-recipient(mandatory)>,
                    "groupInfo" : { //If message comes from a group/team/room conversations.
                        "id" : "<unique-id-of-group>",
                        "name": "<group-name(optional)>"
                    }
                }
            }

Jabberチャネルの編集

Jabberチャネルを編集するには、以下のステップに従います:

  1. チャネルにカーソルを合わせ、クリックして変更します。チャネル構成に必要な更新を加えて保存することができます。
  2. 設定アイコンをクリックして、チャネル情報を無効にしたり削除したりすることもできます。 チャネルを変更するには、次のコマンドのいずれかを選択します:
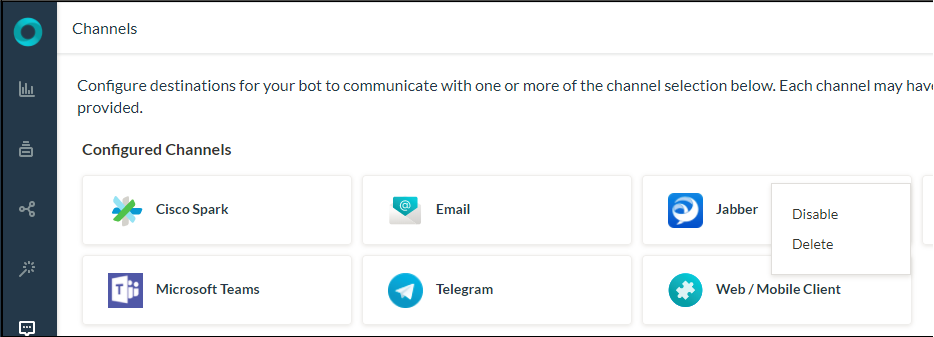
  • 無効化/有効化―ボットのJabberチャネルの使用を一時的に無効にするには、無効化をクリックします。Jabberチャネルの使用を有効にするには、有効化をクリックします。
  • 削除削除をクリックします。[削除の確認]ダイアログボックスで、OKをクリックして、ボットチャネル構成を完全に削除します。
警告:この操作は永久的で、元に戻すことはできません。

Jabber를 Kore.ai 봇의 채널로 추가하려면 Jabber 애플리케이션에서 Webhook 통합을 활성화해야 합니다. Kore.ai 봇에 Jabber 채널을 추가하면 봇의 최종 사용자가 사용자의 Jabber 계정을 사용하여 봇과 상호작용할 수 있습니다. 봇에 Jabber 채널을 추가하려면, 다음을 수행해야 합니다.

  1. Enable Webhook Integration – Jabber를 봇의 채널로 사용하려면 Jabber 애플리케이션에서 Webhook 통합을 활성화해야 합니다. Jabber 채널 페이지의 Configurations 탭에서 Webhook URL을 복사한 다음 통합을 위해 Jabber 앱의 필수 필드에 입력합니다.
  2. Enable Channel – Webhook 통합 활성화 및 봇 빌더에서 설정 데이터를 입력한 후, 채널을 활성화합니다.

Jabber 포털에서 개발자 계정을 가지고 있거나 등록해야 합니다. Cisco Jabber 채널을 추가하려면 다음 단계를 따르세요.

  1. 봇 빌더의 Bots 섹션에서, Jabber 채널을 추가하려는 봇을 클릭하세요.
  2. Channels 탭에서, Jabber 아이콘을 클릭하세요. Jabber Channel page가 표시됩니다.
  3. Jabber 애플리케이션에서 Webhook 통합을 활성화하려면, Jabber 앱에 로그인합니다. Jabber 채널 페이지의 Configurations 탭에서 Webhook URL을 복사한 다음 통합을 위해 Jabber 앱의 Webhook URL 필드에 입력합니다.
  4. Jabber 채널 페이지의 Configurations 탭으로 이동하여 채널 설정을 완료합니다.
  5. Jabber 앱에서 POST URL 세부 정보를 캡처하고 이를 POST URL 필드에 입력합니다.
  6. Jabber 통합에서 선택적으로 Access Token 세부 정보를 생성하거나 캡처할 수도 있고 Jabber와 봇 사이의 보안 통신을 활성화하기 위해 Access Token field에 입력할 수 있습니다.
  7. Yes를 선택하고 Save을 클릭하여 Jabber 채널을 사용하도록 설정합니다.

다음은 통합 검증을 위한 페이로드 형식의 코드 조각입니다.

POST URL용 페이로드

다음은 Configurations 탭에 등록된 POST URL 에서 수락해야 하는 봇의 응답 메시지입니다.

   {
                "message": {
                "text" : "Hi"
                }
                "to" : "<recipient-id/group-id>",
                "from" : "<sender-id>"
             }
Webhook 페이로드

아래는 Jabber의 Kore.ai 봇 플랫폼으로 메시지를 보내기 위한 Webhook 페이로드 형식입니다.

  {
                "message": {
                    "text" : "<Message>",
                    "attachments" : [<array of attachment links (optional)>]
                },
                "from" : {
                    "id": "<unique-id-of-sender(mandatory)>",
                    "userInfo" : {
                      "firstName" : "<first-name(optional)>",
                      "lastName" : "<second-name(optional)>",
                      "email" : "<email(optional)>"
                    }
                },
                "to" : {
                    "id": <unique-id-of-recipient(mandatory)>,
                    "groupInfo" : { //If message comes from a group/team/room conversations.
                        "id" : "<unique-id-of-group>",
                        "name": "<group-name(optional)>"
                    }
                }
            }

Jabber 채널 편집

Jabber 채널을 편집하려면 다음 단계를 따르세요.

  1. 채널 위로 마우스를 이동하고 클릭하여 수정합니다. 채널 설정에서 필요한 업데이트와 저장을 할 수 있습니다.
  2. 또한 Settings 아이콘을 클릭하여 채널 정보를 사용하지 않거나 삭제할 수도 있습니다. 채널을 수정하려면 다음과 같은 명령 중 하나를 선택하세요.
  • Disable/EnableDisable을 클릭하여 봇의 Jabber 채널 사용을 일시적으로 비활성화하세요. Jabber 채널 사용을 활성화하려면, Enable을 클릭하세요.
  • DeleteDelete를 클릭하세요. 삭제 확인 대화 상자에서, OK을 클릭하여 봇 채널 설정을 영구적으로 삭제합니다.
경고: 이 작업은 영구적이므로 취소할 수 없습니다.

To add Cisco Jabber as a channel to your Kore.ai bot, you must enable Webhook integration on your Jabber application. Adding the Jabber channel to your Kore.ai bot allows end-users of your bot to interact with your bot using their Jabber accounts. To add the Jabber channel to your bot, you must:

  1. Enable Webhook Integration – To enable Jabber as a channel for your bot, you must set up a webhook integration on your Jabber application. Copy the Webhook URL from the Configurations tab on the Jabber channel page and enter the required field in the Jabber app for integration.
  2. Enable Channel – After enabling webhook integration and entering configuration data in Bot Builder, enable the channel.

You must have or register for a developer account in the Jabber portal. To add the Cisco Jabber channel, follow the below steps:

  1. In the Bots section of the Bot Builder, click the bot you want to add the Jabber channel to.
  2. On the Channels tab, click the Jabber icon. The Jabber Channel page is displayed.
  3. To enable a webhook integration on your Jabber application, log in to your Jabber app. Copy the Webhook URL from the Configurations tab on the Jabber channel page and enter the Webhook URL field in the Jabber app for integration.
  4. Go to the Configurations tab on the Jabber channel page to complete the channel setup.
  5. Capture the POST URL details from your Jabber app and enter them in the POST URL field.
  6. You can also optionally generate and capture the Access Token details from your Jabber integration and enter in the Access Token field to enable secure communication between Jabber and bot.
  7. Select Yes and click Save to enable Jabber Channel.

Following are code snippets of the payload formats for verifying the integration.

Payload for Post URL

Below is the response message from the bot that must be accepted by the POST URL that is registered in the Configurations tab.

   {
                "message": {
                "text" : "Hi"
                }
                "to" : "<recipient-id/group-id>",
                "from" : "<sender-id>"
             }
Webhook Payload

Below is the Webhook payload format to post messages to Kore.ai Bots Platform from Jabber.

  {
                "message": {
                    "text" : "<Message>",
                    "attachments" : [<array of attachment links (optional)>]
                },
                "from" : {
                    "id": "<unique-id-of-sender(mandatory)>",
                    "userInfo" : {
                      "firstName" : "<first-name(optional)>",
                      "lastName" : "<second-name(optional)>",
                      "email" : "<email(optional)>"
                    }
                },
                "to" : {
                    "id": <unique-id-of-recipient(mandatory)>,
                    "groupInfo" : { //If message comes from a group/team/room conversations.
                        "id" : "<unique-id-of-group>",
                        "name": "<group-name(optional)>"
                    }
                }
            }

Edit Jabber Channel

To edit the Jabber channel, follow the below steps:

  1. Hover over the channel and click to modify. You can make necessary updates to your channel configurations and save them.
  2. You can also disable or delete the channel information by clicking the Settings icon.

    Select one of the following commands to modify the channel:
  • Disable/Enable – Click Disable to temporarily disable the use of the Jabber channel for your bot. To enable the use of the Jabber channel, Click Enable.
  • Delete – Click Delete. On the Delete Confirmation dialog box, click OK to permanently delete the bot channel configuration.
Warning: This operation is permanent and cannot be undone.