이 채널 활성화 흐름은 제품의 Facebook 게시물 v.7.2로 구현된 변경 사항에 따라 수정되었습니다.
봇에 Workplace by Facebook 채널을 추가하려면, Facebook Workplace와 Kore.ai 간 연결을 설정하기 위한 개발자 포털 Facebook 계정이 필요합니다. Kore.ai 애플리케이션은 Workplace by Facebook에서 메시지를 송수신하도록 권한을 부여받아야 합니다. Workplace by Facebook 채널 추가 다음 절차를 완료하려면 Facebook Workplace Developers Portal(https://<Your Domain>workplace.com/work/admin)의 관리자 계정이 있어야 합니다.
- 봇 빌더의 Bots 섹션에서, Workplace by Facebook, 채널에서 활성화하길 원하는 봇을 클릭합니다.
- Channels 탭에서, Workplace by Facebook 아이콘을 클릭하세요.
- Workplace by Facebook Channel 페이지가 표시됩니다.
- Configurations 탭으로 이동합니다.
- Communication Mode 섹션에서 다음 중 하나 혹은 두 가지를 선택합니다.
- Workplace 그룹에서 봇과 통신을 허용
- Work Chat을 통한 봇과 통신을 허용
- Manage Permissions 섹션에서, 필수 사항에 따라 다음을 설정합니다(click here for more on the permissions).
- Message any member – 모든 그룹 구성원에게 메시지 보내기 이 권한은 기본값으로 선택되어 있으며 필수적이므로 편집할 수 없습니다.
- Mention bot– 게시글에 봇이 멘션되면 게시글을 보고 의견에 회신할 때 필요합니다. 이 권한은 기본값으로 선택되어 있으며 그룹의 사용자에게 봇이 응답하려면 필요합니다.
- Manage group content– 그룹에서 게시 및 의견 달기를 하는데 필요합니다. 이 권한은 기본값으로 선택되어 있으며 그룹의 사용자에게 봇이 응답하려면 필요합니다.
- Create link previews – 특정 도메인에 대한 미리 보기를 표시하기 위해 게시물에 추가된 링크를 확인하려면 필요합니다.
- Read user email – 모든 그룹 구성원의 이메일 주소를 확인하는 데 필요합니다.
- Read work profile – 전화번호와 부서, 위치를 포함한 그룹 구성원 전체의 프로필을 확인하려면 필요합니다.
- Read org chart – 그룹 구성원 프로필을 확인하여 보고 대상자와 보고자를 확인하기 위해 필요합니다.
참고: 위에 언급된 링크를 신중히 평가한 후 권한을 올바르게 설정하는 것이 좋습니다. Kore.ai 애플리케이션을 Workplace 계정에 설치 후 봇의 사용 권한을 관리하려면 Workplace 계정에서 애플리케이션을 제거하고 봇 플랫폼에서 다시 권한을 부여해야 합니다.
- Communication Mode 섹션에서 다음 중 하나 혹은 두 가지를 선택합니다.
- Authorize를 클릭합니다.
- Workplace by Facebook 페이지로 리디렉션됩니다.
- Facebook Messenger 관리자 계정으로 로그인합니다.
- Add to Workplace를 클릭하여 Kore.ai 플랫폼에 대한 액세스를 활성화하도록 페이지 액세스 토큰을 생성합니다.
- Customize를 클릭하여 Workplace by Facebook 계정에 설치된 Kore.ai 애플리케이션에 대한 인스턴스에 다음 세부 사항을 입력합니다.
- 통합 로고
- name
- 설명
- Kore.ai 봇에 필요한 permissions은 4단계 4에 주어진 설정에 기반하여 선택됩니다.
- 봇이 추가되어야 하는 그룹을 선택하고 Add to Workplace를 클릭합니다.
- Kore.ai 애플리케이션의 인스턴스가 Workplace By Facebook 계정에 추가되면 Kore.ai 봇 빌더로 리디렉션됩니다.
- 봇 빌더의 Configuration 탭에서 Enable Channel 섹션의 Yes를 클릭하고 Save를 클릭합니다.
- 사용자가 사용할 수 있기 전 봇은 봇 관리자 승인과 할당이 필요합니다.
채널 편집
Workplace by Facebook 채널을 편집하려면,
- 수정하려면 채널로 마우스를 이동한 후 Settings
 아이콘을 클릭하여 다음 이미지에 보이는 것과 같이 명령 메뉴를 표시합니다.
 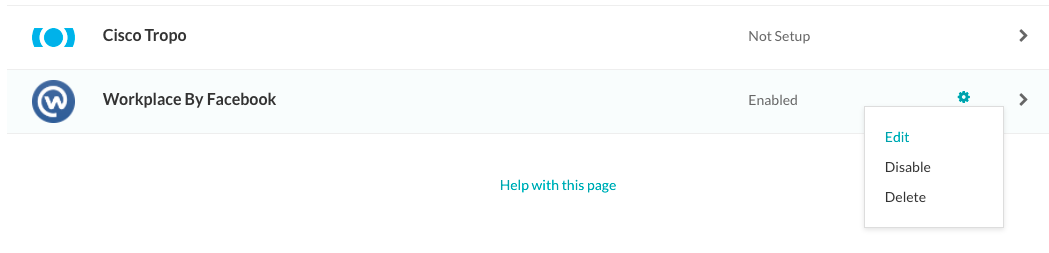 채널을 수정하려면 다음과 같은 명령 중 하나를 선택하세요.

- Edit – 클릭하여 Workplace by Facebook 채널 설정 페이지를 엽니다.
- Disable/Enable – Disable을 클릭하여 봇의 Workplace by Facebook 채널 사용을 일시적으로 비활성화하세요 채널이 사용 안 함으로 설정된 경우, Workplace by Facebook 채널 사용을 활성화하려면, Enable을 클릭하세요.
- Delete – Delete를 클릭하세요. Delete Confirmation 대화 상자에서, OK를 클릭하여 봇 채널 설정을 영구적으로 삭제합니다.
경고: 이 작업은 영구적이므로, 취소할 수 없습니다.
This channel enablement flow is modified as per the changes implemented by Facebook post v7.2 of the product.
To add the Workplace by Facebook channel to your bot, you need a developer portal Facebook account to configure the connection between Facebook Workplace and Kore.ai. Kore.ai application must be authorized to send and receive messages from the Workplace by Facebook channel.
Add Workplace by Facebook Channel
To complete the following procedure, you must have an admin account in the Facebook Workplace Developers Portal (https://<Your Domain>workplace.com/work/admin).
- In Bot Builder, under the Bots section, click the bot you want to enable the Workplace by Facebook channel.
- On the Channels tab, click the Workplace by Facebook icon.
- The Workplace by Facebook Channel page is displayed.
- Go to the Configurations tab:
- In the Communication Mode section, select one or both of the following:
- Allow communication with a bot in a Workplace Group
- Allow communication with a bot through a Work Chat
- In the Manage Permissions section, set the following as per your requirements (click here for more on the permissions):
- Message any member – To send messages to any group member. This permission is selected by default and is mandatory hence not editable.
- Mention bot – Needed when the bot is mentioned in a post, to see the post and to reply to comments. This permission is selected by default and is required for the bot to respond to users in groups.
- Manage group content – Required to post and comment in groups. This permission is selected by default and is required for the bot to respond to users in groups.
- Create link previews – Needed to see links added to posts in order to display a preview for certain domains.
- Read user email – Required to see any group member’s email address.
- Read work profile – Required to see any group member’s complete profile, including phone number, department, and location.
- Read org chart – Needed to check a group member’s profile to see who they report to and who reports to them;
Note: You are advised to set the permissions correctly after evaluating the above-mentioned link carefully. Managing the permissions for your bot after installing the Kore.ai application on your workplace account needs you to uninstall the application on the workplace account and re-authorize it in the bot platform.
- In the Communication Mode section, select one or both of the following:
- Click Authorize.
- You are redirected to Workplace by Facebook page.
- Log in to your Facebook Workplace admin account.
- Click Add to Workplace to generate a page access token to enable access for the Kore.ai platform.
- Click Customize to provide the following details for the instance of Kore.ai application installed on Workplace by Facebook account:
- integration logo
- name
- description
- The permissions needed by the Kore.ai bot is selected based upon the configuration given in step 4.
- Select the groups to which the bot needs to be added and click Add to Workplace.
- Once the instance of Kore.ai application is added to your Workplace by Facebook account, you are redirected to Kore.ai Bot Builder.
- In Bot Builder, from the Configuration tab, click Yes in the Enable Channel section; and click Save.
- The bot may require your Bots Admin approval and assignment before it is available to any users.
Edit the Channel
To edit the Workplace by Facebook channel,
- Hover over the channel to modify, and then click the Settings icon displayed to show the command menu displayed in the following image.
Select one of the following commands to modify the channel:
- Edit – Click to open the Workplace by Facebook channel setup page.
- Disable/Enable – Click Disable to temporarily disable the use of the Workplace by Facebook channel for your bot. When the channel is disabled, click Enable to enable the use of the Workplace by Facebook channel.
- Delete – Click Delete. On the Delete Confirmation dialog box, click OK to permanently delete the bot channel configuration.
Warning: This operation is permanent, and cannot be undone.