봇에 Skype 채널을 추가하려면, Skype와 Kore.ai 간 연결을 설정하기 위한 개발자 Microsoft Bot Framework 계정이 필요합니다. Kore.ai에 Skype 채널을 추가하는 것은 봇과 최종 사용자 간 상호작용 할 수 있도록 하는 3단계 과정으로 이루어집니다. 봇에 Skype 채널을 추가하려면, 다음 단계를 따르세요.

  1. Register the Bot Microsoft Bot Framework 개발자 계정에서, 모든 봇 세부 정보를 추가하고 App IDPassword를 추가하여 봇을 등록해야 합니다. 봇을 등록하려면, Microsoft Bot Framework 개발자 포털에서 무료 계정을 생성하고 등록해야 합니다.
  2. Enable Channel – 봇을 등록한 후, 채널을 활성화해야 합니다.
  3. Publish Channel – 채널이 활성화되고 모든 설정이 검증된 후, 봇을 게시하여 개발자가 사용할 수 있도록 해야 합니다.

Skype 채널 추가

이 과정을 완료하려면, Microsoft Bot Framework 개발자 포털의 새 개발자 계정이 있거나 계정을 등록해야 합니다.

  1. Bots 섹션 아래의 봇 빌더에서, Skype 채널을 추가하려는 봇을 클릭하세요.
  2. Channels 탭에서, Skype 섹션의 Expand 아이콘을 클릭합니다. Skype Channel 페이지가 표시됩니다.
  3. Microsoft Bot Framework 포털에 로그인한 후 Register a bot을 클릭합니다.
  4. Register a bot 탭에서, Bot profile섹션에 Bot Name, 봇 핸들Bot handle, Description을 입력합니다.
  5. Configuration 섹션에서, 봇 빌더의 Webhook URLMessaging endpoint 필드에 붙여넣습니다. 예: https://bots.kore.ai/hooks/skype/st-2724c525-484b-55ca-a844-8d7dfa6b6b23
  6. 다음 일러스트에 보이는대로 Create Microsoft App ID and password을 클릭합니다.
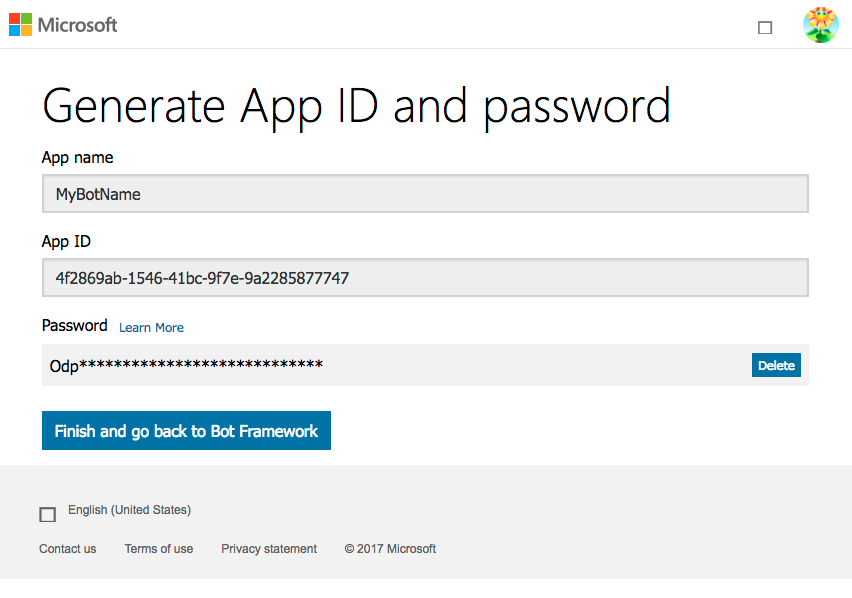
  7. Generate App ID and password 페이지에서, Generate an app password to continue을 클릭합니다.
  8. 생성된 PasswordApp ID를 나중에 Skype Channel 페이지에 대한 봇 빌더의 Register the Bot 탭에서 사용하기 위해 저장합니다.

    참고 사항: 암호가 생성된 경우에만 전체 암호가 Generate Password 대화창에 표시됩니다. 봇 빌더의 Skype Channel 페이지에 저장할 때까지 암호를 안전한 위치에 복사하고 저장합니다.

    Skype 채널 - AppID 대화창 생성

  9. Finish and go back to Bot Framework를 클릭합니다. Register a bot 탭이 표시됩니다.
  10. 설정을 저장하려면, Privacy statement, Terms of Use, Code of Conduct에 동의합니다.
  11. Register를 클릭합니다.
  12. Bot created 대화창에서, OK를 클릭합니다. My bots 탭이 표시됩니다.
  13. 선택적으로, Test를 클릭하여 봇과의 통신을 확인합니다. Endpoint authorization succeeded 메시지가 표시됩니다.
  14. 봇 빌더의 봇 등록 탭에서 Microsoft Bot Framework 개발자 포털에서 저장한 APP IDPASSWORD App IDAPP PASSWORD 필드에 붙여넣습니다.
  15. 다음 일러스트에 보이는 대로 Next을 클릭합니다. Skype 채널 - 봇 탭 등록
  16. Enable Channel 탭에서, 필요한 경우 Microsoft Bot Framework에서 Skype 채널 설정을 편집하는 방법을 검토한 후 Next을 클릭합니다. Publish Channel 탭이 표시됩니다.
  17.  Enable Channel 섹션 에서, Yes를 클릭하여 Kore.ai에 대한 Skype 채널을 사용할 수 있도록 설정합니다.
  18. Save를 클릭합니다.

채널 설정이 저장되고 Skype Channel 페이지가 닫힙니다.

Skype 채널 편집

Skype 채널을 편집하려면 다음 단계를 따르세요.

  1. 수정하려면 채널로 마우스를 이동한 후 Settings 아이콘을 클릭하여 다음 일러스트에 표시된 명령 메뉴를 표시합니다. 채널을 수정하려면 다음과 같은 명령 중 하나를 선택하세요.
  • Edit– 클릭하여 Skype Channel 페이지를 엽니다.
  • Disable/EnableDisable을 클릭하여 봇의 Skype 채널 사용을 일시적으로 비활성화하세요 채널이 사용 안 함으로 설정된 경우, Skype 채널 사용을 활성화하려면, Enable을 클릭하세요.
  • DeleteDelete를 클릭하세요. Delete Confirmation 대화 상자에서, OK를 클릭하여 봇 채널 설정을 영구적으로 삭제합니다.

    경고: 이 작업은 영구적이므로, 취소할 수 없습니다.
To add the Skype channel to your bot, you need a developer Microsoft Bot Framework account to configure the connection between Skype and Kore.ai. Adding the Skype channel to your Kore.ai bot is a three-step process to allow end-users to interact with your bot. To add the Skype channel to your bot, follow the below steps:

  1. Register the Bot – In your Microsoft Bot Framework developer account, you must register the bot by adding all the bot details and creating the App ID and Password. To register the bot, you must have created and registered for a free account in the Microsoft Bot Framework developer portal.
  2. Enable Channel – After registering the bot, you must enable the channel.
  3. Publish Channel – After the channel is enabled and all configurations are verified, you must publish the bot to make it available for developers.

Add Skype Channel

To complete this procedure, you must have or register for a new developer account in the Microsoft Bot Framework developer portal.

  1. In Bot Builder, under the Bots section, click the bot you want to add the Skype channel to.
  2. On the Channels tab, click the Expand  icon for the Skype section. The Skype Channel page is displayed.
  3. Log in to the Microsoft Bot Framework portal, and then click Register a bot.
  4. On the Register a bot tab, under the Bot profile section, enter your Bot Name, Bot handle, and Description.
  5. In the Configuration section, paste the Webhook URL from the Bot Builder into the Messaging endpoint field. For example, https://bots.kore.ai/hooks/skype/st-2724c525-484b-55ca-a844-8d7dfa6b6b23
  6. Click Create Microsoft App ID and password as shown in the following illustration.
  7. On the Generate App ID and password page, click Generate an app password to continue.
  8. Save the generated Password and the App ID to use later in the Register the Bot tab in Bot Builder for the Skype Channel page.

    Note: The only time the full password is displayed is when it is generated and displayed in the Generate Password dialog. Copy and save the password to a secure location until added to the Skype Channel page in Bot Builder.

    Skype Channel - Generate AppID Dialog

  9. Click Finish and go back to Bot Framework. The Register a bot tab is displayed.
  10. To save your settings, agree to Privacy statement, Terms of Use, and Code of Conduct.
  11. Click Register.
  12. On the Bot created dialog, click OK. The My bots tab is displayed.
  13. Optionally, click Test to check the connection to your bot. The Endpoint authorization succeeded message is displayed.
  14. In Bot Builder, on the Register the Bot tab, paste the App ID and Password you saved from the Microsoft Bot Framework developer portal into the APP ID and APP PASSWORD fields.
  15. Click Next as shown in the following illustration.
    Skype Channel - Register the Bot Tab
  16. On the Enable Channel tab, review how to edit the Skype channel settings in the Microsoft Bot Framework developer portal if needed, and then click Next. The Publish Channel tab is displayed.
  17.  In the Enable Channel section, click Yes to enable the Skype channel for Kore.ai.
  18. Click Save.

The channel configuration settings are saved and the Skype Channel page is closed.

Edit Skype Channel

To edit the Skype channel, follow the below steps:

  1. Hover over the channel to modify, and then click the Settings  icon displayed to show the command menu displayed in the following illustration.

    Select one of the following commands to modify the channel:
  • Edit – Click to open the Skype Channel page.
  • Disable/Enable – Click Disable to temporarily disable the use of the Skype channel for your bot. When the channel is disabled, click Enable to enable use of the Skype channel.
  • Delete – Click Delete. On the Delete Confirmation dialog box, click OK to permanently delete the bot channel configuration.

    Warning: This operation is permanent and cannot be undone.