LivePersonをチャネルとしてKore.aiボットに追加するには、LivePersonにボットユーザーを追加し、システム連携を設定する必要があります。Kore.aiボットにLivePersonチャネルを追加すると、ボットのエンドユーザーがLivePersonアカウントを使用してボットと対話できるようになります。LivePersonチャネルをボットに追加するには、次のことを行う必要があります:
- ボットスキルの作成―Kore.aiボットのチャネルとしてLivePersonを有効にするには、LivePersonポータルにサインインしてボットスキルを作成する必要があります。まず、LivePerson開発者アカウントを作成して登録しておく必要があります。
- ユーザーの追加―LivePersonチャネルにボットユーザーを追加するには、ボットユーザーの詳細とその他の権限を定義します。
- APIキーの生成―認証の詳細をコピーして、LivePersonチャネルページの構成タブに入力します。
- チャネルを有効化―システム連携を完了し、構成の詳細を入力した後、チャネルを有効にします。
LivePersonチャネルを追加するには、以下のステップに従います:
- ボットビルダーのボットセクションで、LivePersonチャネルを追加したいボットをクリックします。
- チャネルタブで、LivePersonアイコンをクリックします。LivePersonチャネルページが表示されます。
- 新しいブラウザタブで、管理者としてLivePersonアカウントにサインインしてから、Usersタブに移動します。
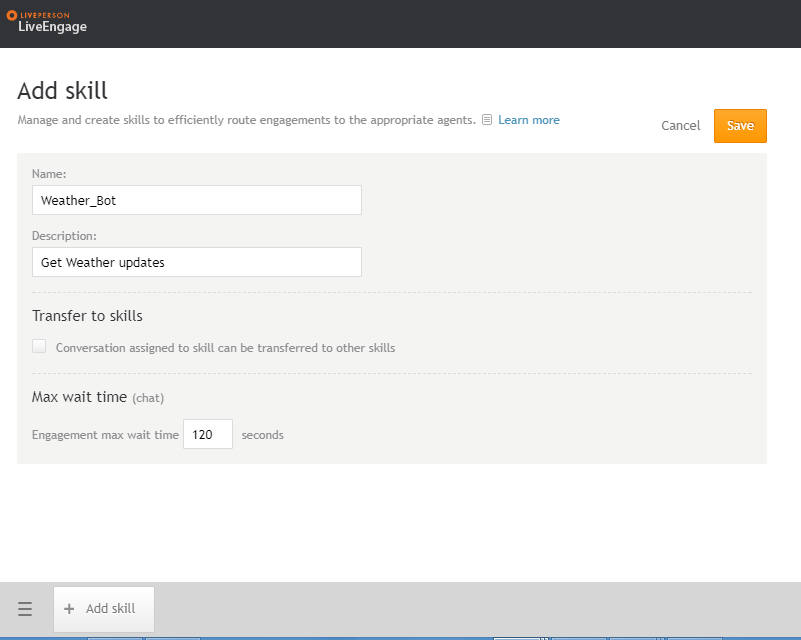
- ユーザーセクションで、Skillタブをクリックし、 Add Skillを選択して新しいスキルを作成します(下部のバーから)
- スキル名を<bot_name>のように追加します。たとえば、Kore.aiボット名がWeather Botの場合、スキル名はWeather Bot_botである必要があります。
- ボットのDescriptionを入力し、Conversation assigned to skill can be transferred to other skillsオプションの選択を解除します。
- Saveをクリックしてスキルを保存します。
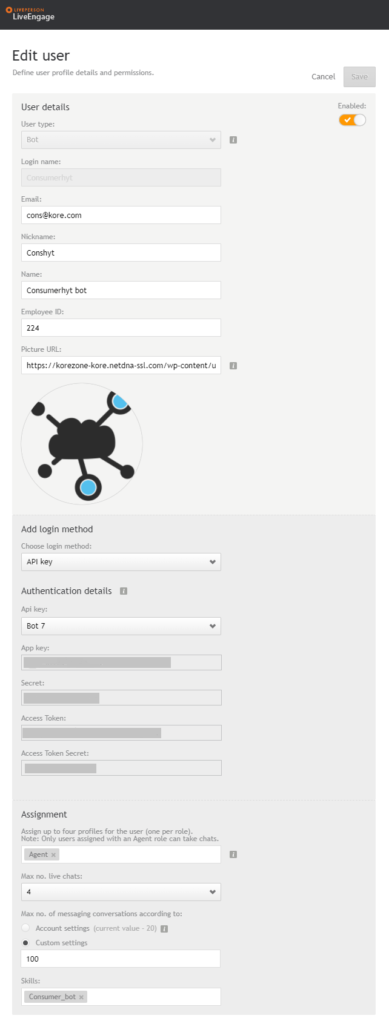
- ユーザーを追加するには、Add userページでボットとしてUser Typeを選択し、その他すべての必要な詳細を入力します。
- ログイン名、メール、ニックネーム、従業員ID、および名前を入力します。ニックネームと名前は、ユーザーチャットの画面に表示されます。
- ボットアバターのURLを提供します。
- ログイン方法を API Keyとして選択し、API keyプルダウンリストからGenerate API Keyオプションを選択して、新しいAPIキーを生成します。アプリキー、シークレット、アクセストークン、およびアクセストークンシークレットをメモし、LivePersonチャネルページのConfigurationsタブに入力します。
- AssignmentプルダウンリストからAgent を選択し、UnlimitedとしてMax no. live chatsを設定し、Skillsドロップダウンリストから前のステップで作成したスキルを選択します。
- Configurations タブに移動し、Account IdフィールドLivePersonアカウントIDを入力します。
- Login Nameフィールドに、LivePersonアカウントからのボットユーザーのログイン名を入力します。
- API Keyを入力するには、LivePersonユーザーアカウントに関連付けられているAPIキーの詳細を入力します。
- Enable Channelセクションで、Yesを選択してチャネルをアクティブにし、Saveをクリックしてユーザー作成プロセスを完了します。


LivePersonチャネルの編集
Live Personチャネルを編集するには、以下のステップに従います:
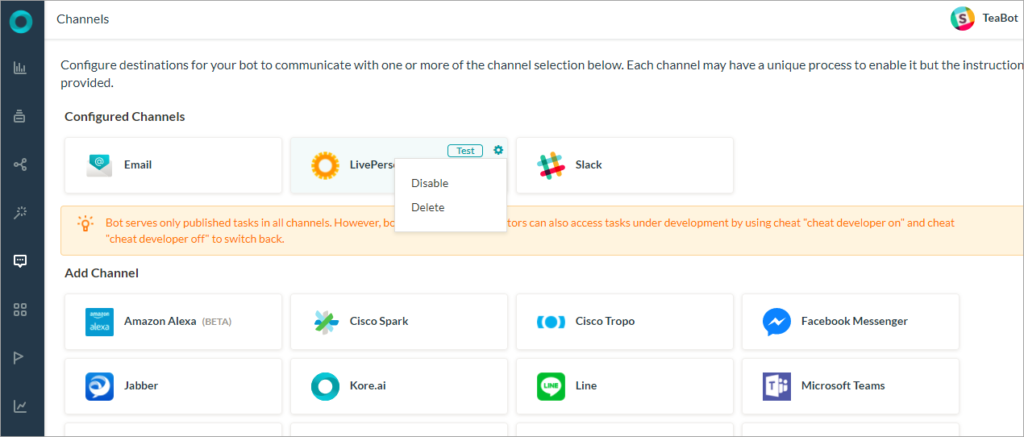
- 変更するチャネルにカーソルを合わせ、設定アイコンをクリックして、次の図に示すようなコマンドメニューを表示します。
 チャネルを変更するには、次のコマンドのいずれかを選択します:

-
- 無効化/有効化―無効化をクリックして、ボットのLivePersonチャネルの使用を一時的に無効にします。LivePersonチャネルの使用を有効にするには、有効化をクリックします。
- 削除―削除をクリックします。削除の確認ダイアログボックスで、OKをクリックして、ボットチャネル構成を完全に削除します。
Kore.ai 봇에 채널로 LivePerson을 추가하려면, LivePerson에서 봇 사용자를 추가하고 통합을 설정해야 합니다. Kore.ai 봇에 LivePerson 채널을 추가하면 봇의 최종 사용자가 사용자의 LivePerson 계정을 사용하여 봇과 상호작용할 수 있습니다. 봇에 Liveperson 채널을 추가하려면, 다음을 수행해야 합니다.
- Create a Bot Skill – Kore.ai 봇에서 채널로 LivePerson을 활성화하려면, LivePerson 포털에 로그인하고 봇 스킬을 생성해야 합니다. 우선, LivePerson 개발자 계정을 생성하고 등록해야 합니다.
- Add User – LivePerson 채널에 봇 사용자를 추가하려면, 봇 사용자 세부 정보와 기타 권한을 정의합니다.
- Generate API key – 권한 부여 세부 정보를 복사하여 LivePerson 채널 페이지의 Configurations 탭에 입력합니다.
- Enable channel – 통합을 완료하고 설정 세부 정보를 입력한 후에, 채널을 활성화합니다.
Liveperson 채널을 추가하려면 다음 단계를 따르세요.
- 봇 빌더의 Bots 섹션에서, Liveperson 채널을 추가하려는 봇을 클릭하세요.
- Channels 탭에서, LivePerson 아이콘을 클릭하세요. LivePerson Channel 페이지가 표시됩니다.
- 새 브라우저 탭에서, 관리자로 LivePerson 계정에 로그인한 후 Users 탭으로 이동합니다.
- 사용자 섹션에서, Skill 탭을 클릭하고 하단 바에서 Add Skill를 선택하여 새 스킬을 생성합니다.
- "스킬 이름을 <bot_name>으로 추가합니다. 예를 들어, Kore.ai 봇 이름이 Weather 봇인 경우 스킬 이름은 Weather Bot_bot이어야 합니다.
- 봇에 대한 Description을 입력한 후, Conversation assigned to skill can be transferred to other skills 옵션을 선택 취소합니다.
- Save를 클릭하여 스킬을 저장합니다.
- 사용자를 추가하려면, Add user 페이지에서 User Type을 Bot으로 선택하고 기타 필요한 세부 사항을 입력합니다.
- 로그인 이름과 이메일, 닉네임, 직원 ID, 이름을 입력합니다. 닉네임과 이름은 사용자 채팅 화면에 표시됩니다.
- 봇 아바타의 URL을 입력합니다.
- 로그인 방법을 API Key로 선택하고 API key 드롭다운에서 Generate API Key 옵션을 선택하여 새 API 키를 생성합니다. 앱 키와 시크릿, 액세스 토큰, 액세스 토큰 시크릿을 기록하고 LivePerson 채널 페이지의 Configurations 탭에 입력합니다.
- Assignment 드롭다운 목록에서 Agent를 선택하고, Unlimited으로 Max no. live chats를 설정한 다음 Skills 드롭다운 목록에서 이전 단계에서 생성한 스킬을 선택합니다.
- Configurations 탭으로 이동하여 Account ID 필드에 LivePerson 계정 ID를 입력합니다.
- Login Name 필드에 LivePerson 계정의 봇 사용자 로그인 이름을 입력합니다.
- API Key 세부 정보를 입력하려면, LivePerson 사용자 계정과 연결된 API 키 세부 정보를 입력합니다.
- Enable Channel 섹션에서, Yes를 선택하여 채널을 활성화한 후 Save를 클릭하여 사용자 생성 절차를 완료합니다.
Liveperson 채널 편집
Live Person 채널을 편집하려면 다음 단계를 따르세요.
- 수정하려면 채널로 마우스를 이동한 후 Settings 아이콘을 클릭하여 다음 이미지에 보이는 것과 같이 명령 메뉴를 표시합니다. 채널을 수정하려면 다음과 같은 명령 중 하나를 선택하세요.
-
- Disable/Enable을 클릭하여 봇의 LivePerson 채널 사용을 일시적으로 Disable하세요. LivePerson 채널 사용을 활성화하려면, Enable을 클릭하세요.
- Delete– Delete를 클릭하세요. Delete Confirmation 대화 상자에서, OK을 클릭하여 봇 채널 설정을 영구적으로 삭제합니다.
To add LivePerson as a channel to your Kore.ai bot, you must add a bot user in LivePerson and set up the integration. Adding the LivePerson channel to your Kore.ai bot allows end-users of your bot to interact with your bot using their LivePerson account. To add the LivePerson channel to your bot, you must:
- Create a Bot Skill – To enable LivePerson as a channel for your Kore.ai bot, you must sign in to the LivePerson portal and create a bot skill. Initially, you must have created and registered for a LivePerson developer account.
- Add User – To add a bot user in the LivePerson channel, define Bot User details and other permissions.
- Generate API key – Copy the authorization details to enter them in the Configurations tab of the LivePerson channel page.
- Enable channel – After completing the integration and entering the configuration details, enable the channel.
To add the LivePerson channel, follow the below steps:
- In the Bots section of the Bot Builder, click the bot you want to add the LivePerson channel to.
- On the Channels tab, click the LivePerson icon. The LivePerson Channel page is displayed.
- In a new browser tab, sign in to your LivePerson account as an administrator and then go to the Users tab.
- In the Users section, click the Skill tab and select Add Skill to create a new skill (From the bottom bar)
- Add the skill name as <bot_name>. For example, if your Kore.ai bot name is Weather Bot, then the skill name must be Weather Bot_bot.
- Enter a Description for your bot, and then un-select the option Conversation assigned to skill can be transferred to other skills.
- Click Save to save the skill.
- To Add User, in the Add user page, select User Type as Bot and provide all other required details.
- Enter a Login Name, Email, Nickname, Employee ID, and Name. The nickname and name will be displayed on the screen in the user chat.
- Provide a URL for the bot avatar.
- Choose the Login method as API Key, and select Generate API Key option from the API key drop-down list to generate a new API key. Make note of the App key, Secret, Access Token, and Access Token Secret and enter them in the Configurations tab of the LivePerson Channel page.
- Select Agent from the Assignment drop-down list, set Max no. live chats as Unlimited, and select the skill created in the previous step from the Skills drop-down list.
- Go to the Configurations tab, and in the Account ID field, enter your LivePerson account ID.
- In the Login Name field, enter your Login Name of the bot user from your LivePerson account.
- To enter the API Key Details, enter the details of the API Key associated with your LivePerson user account.
- In the Enable Channel section, select Yes to activate the channel, and then click Save to complete the user creation process.
Edit LivePerson Channel
To edit the Live Person channel, follow the below steps:
- Hover over the channel to modify, and then click the Settings icon to display the command menu as shown in the following image.
Select one of the following commands to modify the channel:
-
- Disable/Enable – Click Disable to temporarily disable the use of the LivePerson channel for your bot. To enable the use of the LivePerson channel, Click Enable.
- Delete – Click Delete. On the Delete Confirmation dialog box, click OK to permanently delete the bot channel configuration.