Twitter를 채널로 설정하려면, 봇을 Twitter 계정과 연결하고 통합을 활성화해야 합니다. Twitter를 채널로 추가하려면 다음 단계를 수행하세요.

  1. Create Twitter App – Twitter에 로그인합니다. Twitter App Management Console에서, Twitter와 Kore.ai 봇 간의 통신을 위해 권한을 부여합니다.
  2. Setup Keys and Tokens – Kore.ai 봇 플랫폼과 Twitter 앱 간의 통신을 위해 인증 키 및 토큰을 생성한 후 이러한 키와 토큰을 Kore.ai 봇 빌더에 복사합니다.
  3. Update Permissions – Kore.ai 봇에 Twitter를 채널로 사용하려면, Kore.ai 플랫폼과 상호작용하는 데 사용되는 Twitter 앱 권한을 정의해야 합니다.
  4. Enable Channel Twitter 앱에서 설정하고 봇 빌더에서 설정 데이터를 입력한 후, 채널을 활성화해야 합니다.

Twitter 채널 추가

이 절차를 완료하려면, Twitter 계정이 없는 경우 Twitter 계정을 생성해야 합니다. 참고: 채널 요구 사항에 대한 변경과 동시에 이 단계는 플랫폼의 v7.1에서 수정되었습니다.

Create App

  1. Twitter 앱을 생성하려면, 콜백 URL이 필요합니다. 콜백 URL을 검색하려면 다음 단계를 수행하세요.
    1. 봇 빌더의 Bots 섹션에서, Twitter 채널을 추가하려는 봇을 클릭하세요.
    2. Channels 탭에서, Twitter 아이콘을 클릭하세요. Twitter Channels 페이지가 표시됩니다.
    3. Twitter 채널 페이지의 Configurations 탭에서 Callback URL을 사용합니다.
  2. Twitter 앱 포털에 Log in하고 Create New App을 선택합니다.
  3. 모든 필수 정보를 입력하고, Create your Twitter application을 클릭하여 새 앱을 생성합니다.

키 및 토큰

애플리케이션을 생성한 후 다음을 수행합니다.

  1. Keys and tokens 탭으로 이동합니다.
  2. Access token & access token secret섹션에서, Create을 클릭합니다. 이 작업으로 액세스 토큰과 액세스 토큰 시크릿이 생성됩니다.
  3. API Key, API Secret Key, Access Token, 및 Access Token Secret 필드의 값을 복사합니다. 해당 봇에 대한 봇 빌더의 Twitter 채널을 설정하는 동안 값을 입력합니다.

권한

  1. Permissions 탭으로 이동하여 Edit을 클릭하고 Access Permission을 설정하여 다이렉트 메시지를 읽고, 씁니다.
  2. Save를 클릭합니다.
  3. Dev environments 페이지로 이동하여 앱의 환경을 설정합니다.
  4. Account Activity API 섹션에서 Set up dev environment 버튼을 클릭합니다. Dev environment label에 대한 값을 입력하고, ProductionEnvironment이라고 말하고 앱을 선택합니다.
  5. Complete setup를 클릭합니다.

채널 활성화

  1. 봇 빌더의 Bots 섹션에서, Twitter 채널을 추가하려는 봇을 클릭하세요.
  2. Channels 탭에서, Twitter 아이콘을 클릭하세요. Twitter Channels 페이지가 표시됩니다.
  3. Configurations 탭으로 이동합니다.
  4. Twitter 앱의 Keys and Tokens에서 부여 받은 API Key, API Secret Key, Access TokenAccess Token Secret을 입력합니다.
  5. Twitter 앱의 Permissions 섹션에서 설정된 대로 Environment Label을 입력합니다.
  6. Authorize를 클릭하여 Twitter 앱에 Webhook을 등록하고 실시간 활동을 구독합니다.
  7. Enable ChannelSave.
  8. Publishing your Bot을 위한 Twitter 채널이 설정 및 준비되었습니다.

Twitter 채널 편집

Twitter 채널을 편집하려면 다음 단계를 따르세요.

  1. 채널 위로 마우스를 이동하고 클릭하여 수정합니다.
  2. 채널 설정에서 필요한 업데이트와 저장을 할 수 있습니다.
  3. 또한 Settings 아이콘을 클릭하여 채널 정보를 사용하지 않거나 삭제할 수도 있습니다. 채널을 수정하려면 다음과 같은 명령 중 하나를 선택하세요.
  • Disable/EnableDisable함을 클릭하여 봇의 Twitter 사용을 일시적으로 비활성화하세요 Twitter 채널 사용을 활성화하려면, Enable을 클릭하세요.
  • DeleteDelete를 클릭하세요. Delete Confirmation 대화 상자에서, OK를 클릭하여 봇 채널 설정을 영구적으로 삭제합니다.
경고: 이 작업은 영구적이므로, 취소할 수 없습니다.

Twitterをチャネルとして設定するには、BotをTwitterアカウントに関連付け、Twitterアプリを定義し、連携を有効にする必要があります。Twitterをチャネルとして追加するには、以下を行う必要があります。

  1. Twitterアプリを作成する Twitterにログインし、Twitterアプリ管理コンソールで、Twitterとお客様のKore.ai Bot間の通信を許可するアプリを作成します。
  2. キーとトークンを設定する – TwitterアプリがKore.ai Botプラットフォームと通信するための認証キーとトークンを生成し、それらのキーとトークンをKore.ai Botビルダーにコピーします。
  3. 権限を更新する – Kore.ai BotのチャネルとしてTwitterを使用するには、Kore.ai Botプラットフォームと対話するために使用するTwitterアプリの権限を定義する必要があります。
  4. チャネルを有効にする – Twitterアプリを設定し、Bot Builderで設定データを入力したら、チャネルを有効にする必要があります。

Twitterチャネルを追加する:
この手順を完了するには、まだアカウントを持っていない場合、Twitterアカウントを作成する必要があります。

注:チャネル要件の変更に合わせて、プラットフォームのバージョン7.1で手順が変更されています。

アプリの作成

  1. Twitterアプリを作成するには、コールバックURLが必要です。
    1. BotビルダーのBotセクションで、Twitterチャネルを追加するBotをクリックします。
    2. チャネルタブでTwitterアイコンをクリックします。Twitterチャネルページが表示されます。
    3. Twitterのチャネルページにある設定タブからコールバックURLを使用します。
  2. Twitterアプリポータルにログインし、新しいアプリを作成を選択します。
  3. 必要な情報をすべて入力し、Twitterアプリを作成をクリックして、新しいアプリを作成します。

キーとトークン

アプリケーションの作成後、以下を行います。

  1. キーとトークンタブに進みます。
  2. アクセストークンとアクセストークンシークレットセクションで、作成ボタンをクリックします。この動作により、アクセストークンとアクセストークンシークレットが生成されます。
  3. APIキーAPIシークレットキーアクセストークンアクセストークンシークレットフィールドの値をコピーします。それぞれのBotのBotビルダーからTwitterチャネルを設定する際に、これらの値を入力する必要があります。

権限

  1. 権限タブに移動し、編集をクリックしてアクセス権限メッセージの読み取り、書き込み、直接送信に設定します。保存をクリックします。
  2. 開発環境ページに移動し、アプリの環境を設定します。アカウントアクティビティAPIセクションの開発環境の設定ボタンをクリックします。開発環境ラベルに値を入力し(「ProductionEnvironment」)、アプリを選択してセットアップの完了をクリックします。

チャネルの有効化

  1. BotビルダーのBotセクションで、Twitterチャネルを追加するBotをクリックします。
  2. チャネルタブでTwitterアイコンをクリックします。Twitterチャネルページが表示されます。
  3. 設定タブに移動します。
  4. Twitterアプリのキーとトークンタブから取得したAPIキーAPIシークレットキーアクセストークンアクセストークンシークレットを入力します。
  5. Twitterアプリの権限で設定した環境ラベルを入力します。
  6. 許可ボタンをクリックすると、WebhookをTwitterアプリに登録したり、リアルタイムのアクティビティを承認したりすることができます。
  7. チャネルを有効化し、保存します。
  8. お客様のTwitterチャネルが設定され、Botを公開する準備が整いました

Twitterチャネルの編集

Twitterチャネルを編集するには、チャネルにカーソルを合わせ、変更をクリックします。チャネルの設定に必要な更新を行い、保存することができます。また、設定アイコンをクリックして、チャネル情報を無効にしたり削除したりすることもできます。

チャネルを変更するには、以下のいずれかのコマンドを選択します。

  • 無効化/有効化無効化をクリックして、一時的にBotのTwitterチャネルの使用を無効にします。Twitterの使用を有効にする場合は、有効化をクリックします。
  • 削除削除をクリックして削除の確認ダイアログでOKをクリックし、Botチャネルの設定を永久に削除します。
警告:この操作は永久的なものであり、元に戻すことはできません。

To set up Twitter as a channel, you must associate the bot with a Twitter account, define a Twitter app, and enable the integration. To add Twitter as a channel, follow the below steps:

  1. Create Twitter App – Log in to Twitter. In Twitter App Management Console, create an app to provide authorization for communication between Twitter and your Kore.ai bot.
  2. Setup Keys and Tokens – Generate the authentication keys and tokens for the Twitter app to communicate with the Kore.ai Bots Platform, and then copy those keys and tokens to Kore.ai Bot Builder.
  3. Update Permissions -To use Twitter as a channel for your Kore.ai bot, you must define the Twitter app permissions used to interact with the Kore.ai Bots Platform.
  4. Enable Channel – After setting up the Twitter app and entering configuration data in Bot Builder, you must enable the channel.

Add Twitter Channel

To complete this procedure, you must create a Twitter account if you do not have one already.

Note: The steps are modified in v7.1 of the platform in sync with changes to the channel requirements.

Create App

  1. To create a Twitter app, you need a Callback URL. To find the Callback URL, follow the below steps:
    1. In the Bots section of the Bot Builder, click the bot you want to add the Twitter channel to.
    2. On the Channels tab, click the Twitter icon. The Twitter Channel page is displayed.
    3. Use the Callback URL from the Configurations tab of Twitter channel page.
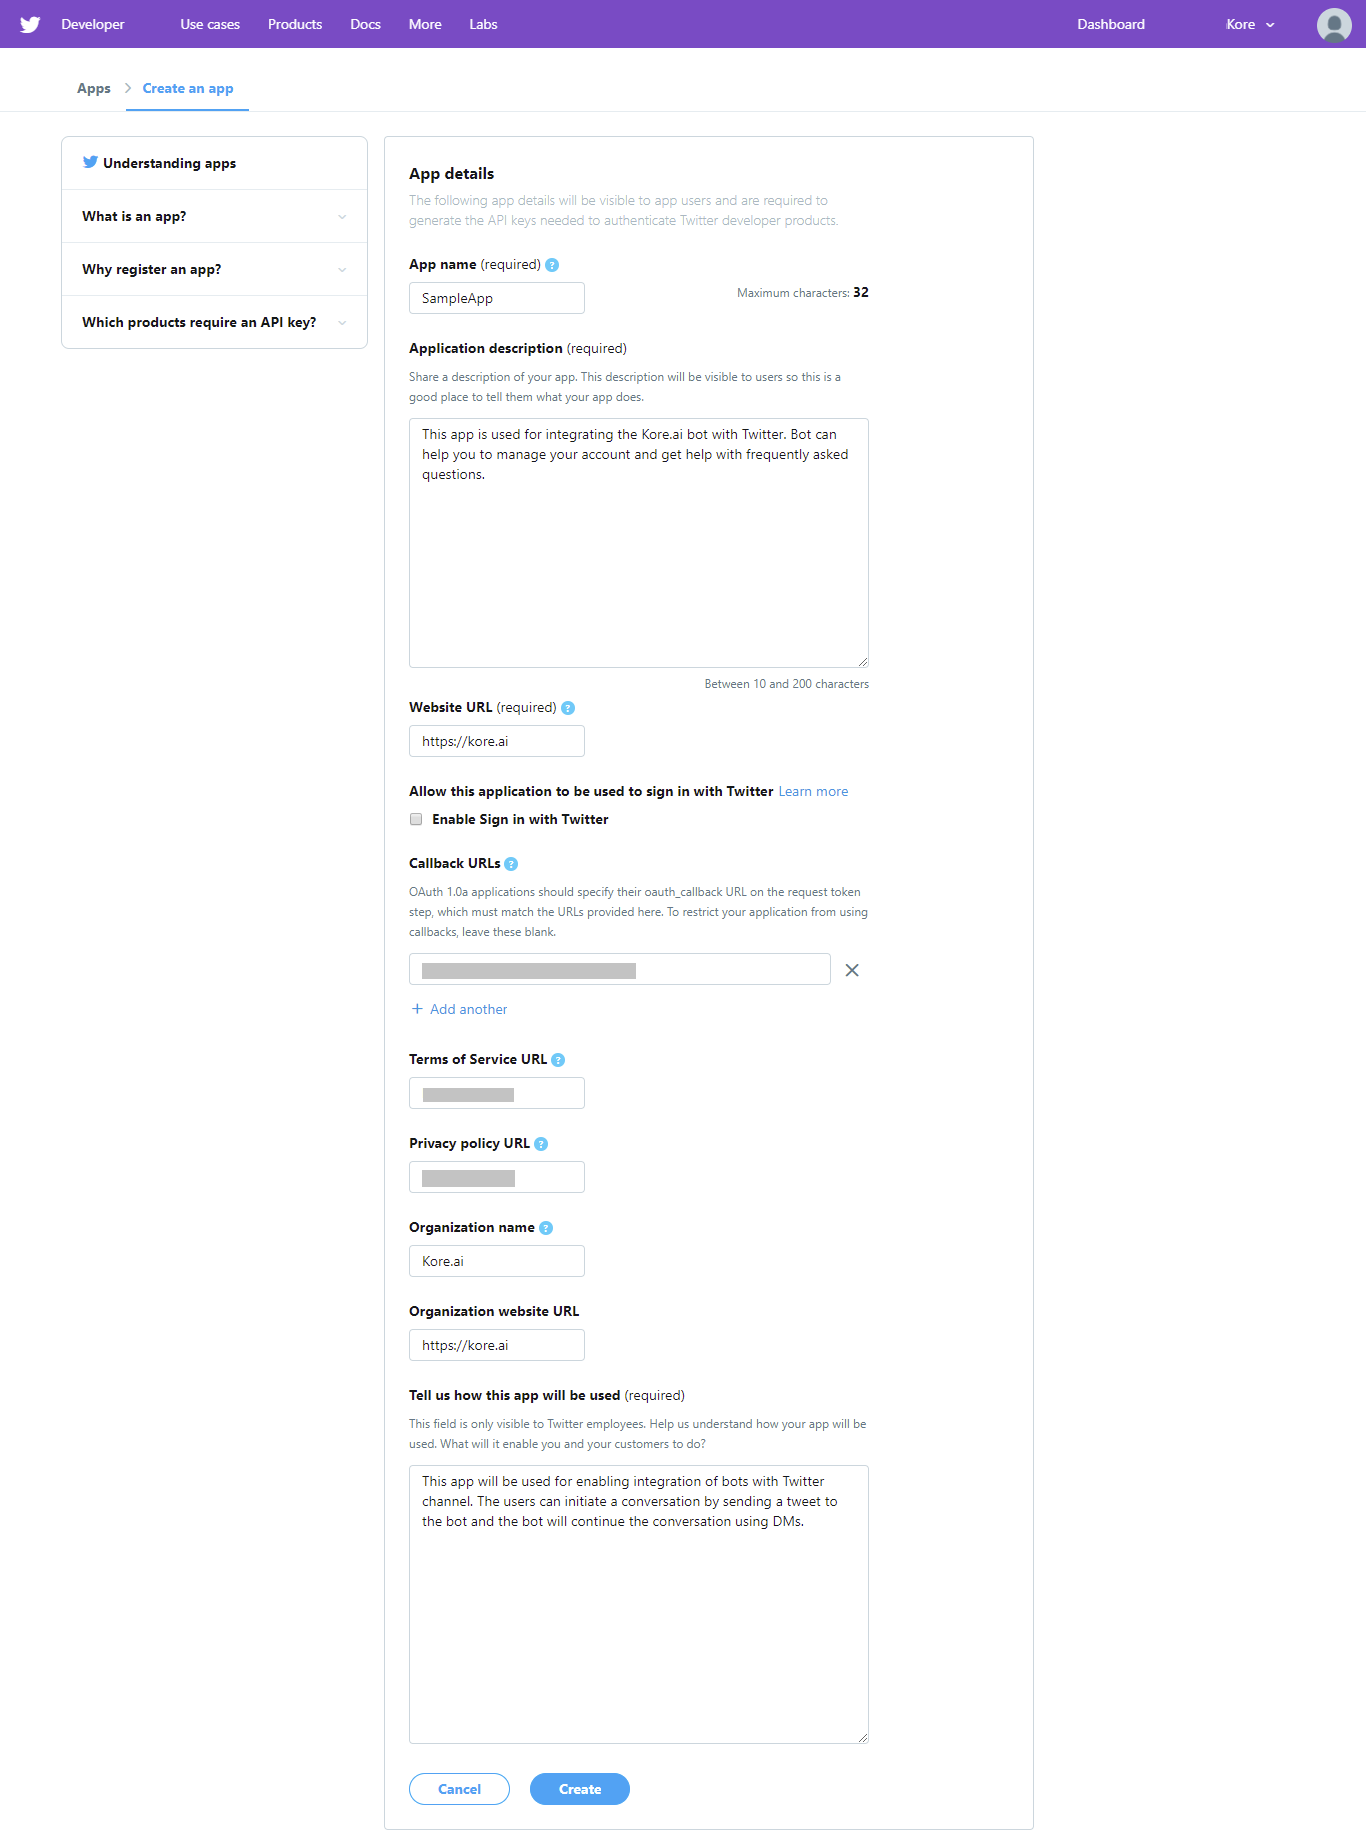
  2. Log in to Twitter apps portal and select Create New App.
  3. Provide all the required information, and click Create your Twitter application to create your new app.

Keys & Tokens

After the application is created:

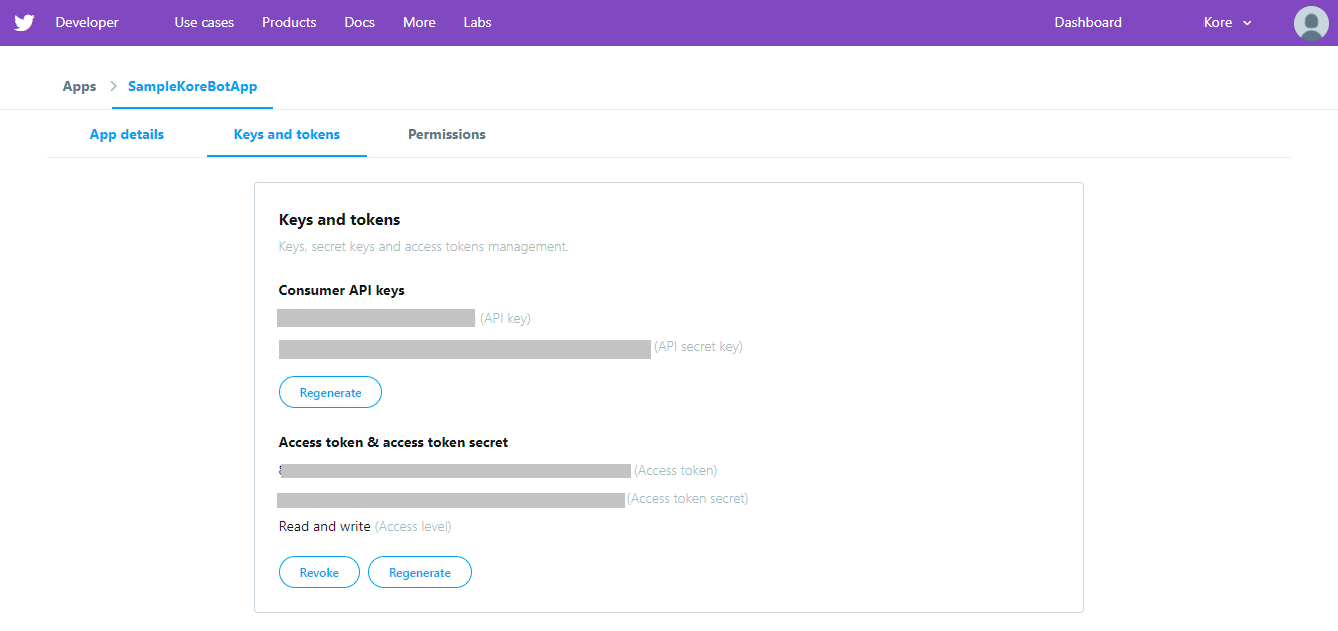
  1. Go to the Keys and tokens tab.
  2. Under the Access token & access token secret section, click Create. This action generates the Access Token and Access Token Secret.
  3. Copy the values of API Key, API Secret Key, Access Token, and Access Token Secret fields. You must provide them while configuring the Twitter channel  from the Bot Builder for the respective bot.

Permissions

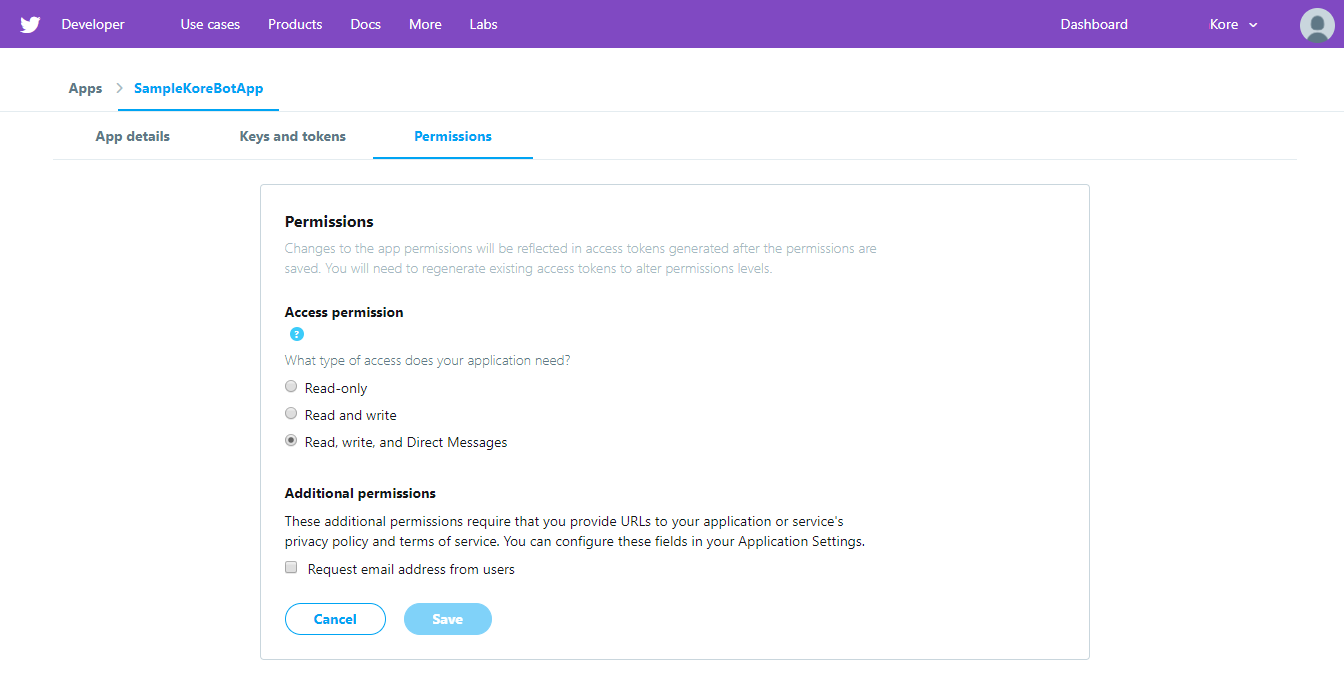
  1. Go to Permissions tab; click the Edit and set the Access Permission to Read, Write, and Direct Messages.
  2. Click Save.
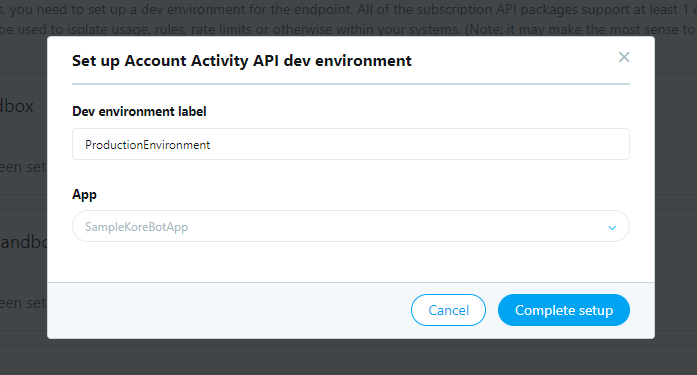
  3. Go to the Dev environments page and set up the environment for your app.
  4. Click Set up dev environment under the Account Activity API section. Provide a value for Dev environment label, say ProductionEnvironment, and choose your app.
  5. Click Complete setup.

Enable Channel

  1. In the Bots section of the Bot Builder, click the bot you want to add the Twitter channel to.
  2. On the Channels tab, click the Twitter icon. The Twitter Channel page is displayed.
  3. Go to Configurations tab.
  4. Enter the API key, API Secret Key, Access Token, and Access Token Secret obtained from the Keys and Tokens tab of your Twitter app.
  5. Enter the Environment Label as set up in the Permissions section of the Twitter app.
  6. Click Authorize to register a webhook with your Twitter app and to subscribe to realtime activities.
  7. Enable Channel and Save.
  8. Your Twitter channel is set up and ready for Publishing your Bot.

Edit Twitter Channel

To edit the Twitter channel, follow the below steps:

  1. Hover over the channel and click to modify.
  2. You can make necessary updates to your channel configurations and save them.
  3. You can also disable or delete the channel information by clicking the Settings icon.

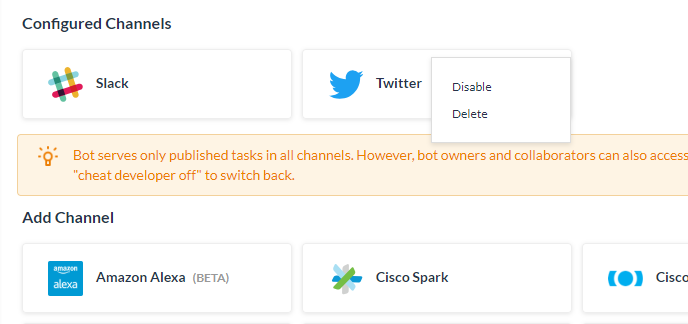
    Select one of the following commands to modify the channel:
  • Disable/Enable – Click Disable to temporarily disable the use of the Twitter channel for your bot. To enable use of the Twitter, click Enable.
  • Delete – Click Delete. On the Delete Confirmation dialog box, click OK to permanently delete the bot channel configuration.
Warning: This operation is permanent, and cannot be undone.