重要:Tropoはそのサービスを中止することを発表しました。ライブのTropoアカウントをお持ちの場合にのみ、チャネル設定を続行してください。ここをクリックして、Tropoのアカウントステータスを確認できます。
Kore.aiボットにCisco Tropoチャネルを追加して、ボットのエンドユーザーが“Tropo”アカウントを使用して対話できるようにするためには3段階のプロセスがありますです。ボットにCisco Tropoチャネルを追加するには、次のことを行う必要があります:
- Tropoアプリのを作成―“Tropo”で新しいアプリを作成して構成し、TropoアプリのデータをKore.aiボットビルダーにコピーします。
- APIキーを使用したアクセス―“Tropo”にWeb APIの詳細を追加し、生成されたAPIキーを“Tropo”からボットビルダーCisco TropoチャネルのAPIキーにアクセスタブにコピーします。
- Enable the Channel―ボットビルダーで、チャネル設定を保存します。
Cisco Tropoチャネルをボットに追加すると、ボットのエンドユーザーは“Tropo”クライアントを使用してボットと対話できます。この手順を完了するには、すでに“Tropo”アカウントを持っており、“Tropo”チームのメンバーである必要があります。Cisco Tropoチャネルをボットに追加するには、以下のステップに従います。
- ボットビルダーのボットセクションで、Cisco Tropoチャネルを追加したいボットをクリックします。
- チャネルタブで、Cisco Tropoセクションの展開
 アイコンをクリックします。Cisco Tropoチャネルページが表示されます。
 - 新しいブラウザタブで、“Tropo”アカウントにログインしてから、https://www.tropo.com/login/ にアクセスします。
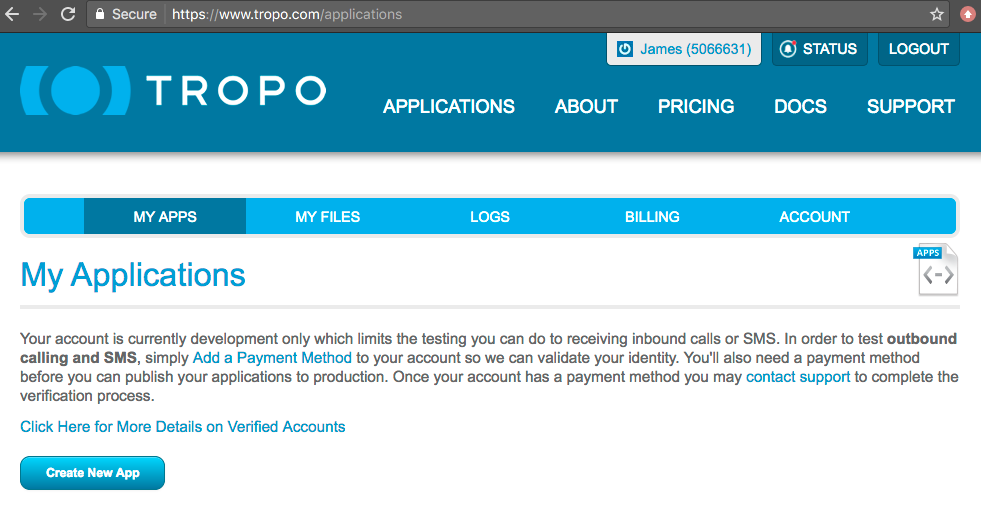
- 次の図に示すように、My Appsページで、Create New Appをクリックします。
- ボットビルダーの新しいアプリの作成ページの基本情報セクションで、アプリ名を入力します。たとえば、“My Kore.aiアプリ”。
- アプリケーションの種類セクションで、Web(HTTP)APIを選択し、Access APIキータブにあるボットビルダーCisco TropoチャネルページのCallback URLをTropoのWeb(HTTP)APIフィールドにコピーします。
- “Tropo”のPhone Numberセクションで、最初のフィールドで国を選択し、Standard: を選択します。次のフィールドでVoice and SMSに進み、オプションで3 番目のフィールドで電話番号の場所を変更します。
- Create Appをクリックします。< “Your App Name” >ページが表示されます。
- “Tropo”のNumbers セクションにあるNumberをコピーします。たとえば、Tropoアプリの作成タブのボットビルダーの電話番号フィールドに307-555-1212を入力し、国コードを選択します。
- “Tropo”のAPI Keysセクションから、messagingキーをボットビルダーのAPIキーフィールドにコピーし、次へをクリックします。チャネルの有効化タブが表示されます。
- 保存をクリックします。

“正常に追加されたCisco Tropoチャネル”メッセージは、ボットビルダーのホームページの上部に表示されます。“Tropo”では、アプリを“Tropo” App Directoryに送信することはオプションです。
Cisco Tropoチャネルの編集
Cisco Tropoチャネルを編集するには、以下のステップに従います:
- チャネルにカーソルを合わせて変更し、表示された設定
 アイコンをクリックして、次の画像に表示されているコマンドメニューを表示します。
![[チャネル]タブ―Cisco Tropo―編集](/wp-content/uploads/DIYChannelsTabTropaEdit.png)
チャネルを変更するには、次のコマンドのいずれかを選択します:
- 編集―クリックして、Cisco Tropoチャネルセットアップページを開きます。
- 無効化/有効化―無効化をクリックして、ボットのCisco Tropoチャネルの使用を一時的に無効にします。チャネルが無効になっている場合は、有効化をクリックしてCisco Tropoチャネルが使用できるようにします。
- 削除―削除をクリックします。削除の確認ダイアログボックスで、OKをクリックして、ボットチャネル構成を完全に削除します。
警告:この操作は永久的で、元に戻すことはできません。
중요: Tropo는 서비스 중단을 발표했습니다. 라이브 Tropo 계정이 있는 경우에만 채널 설정을 진행하세요. click here하여 Tropo 계정의 상태를 확인할 수 있습니다.
Kore.ai 봇에 Cisco Tropo 채널을 추가하는 것은 봇의 최종 사용자가 사용자의 Tropo 계정을 사용하여 상호 작용할 수 있도록 하는 3단계 과정입니다. 봇에 Cisco Tropo 채널을 추가하려면, 다음을 수행해야 합니다.
- Create a Tropo App – Tropo에서 새 앱을 생성 및 설정 후 Kore.ai 봇 빌더에 Tropo 앱 데이터를 복사합니다.
- Access using API Key – Tropo에 웹 API 상세 정보를 추가하고 Tropo에서 생성된 API 키를 봇 빌더 Cisco Tropo 채널 Access API Key 탭에 복사합니다.
- Enable the Channel – 봇 빌더에서 채널 설정을 저장합니다.
Cisco Tropo 채널을 봇에 추가하는 경우, 봇의 최종 사용자는 Tropo 클라이언트를 사용하여 봇과 상호작용할 수 있습니다. 이 절차를 완료하려면, Tropo 계정이 이미 있어야 하며 Tropo 팀의 회원이어야 합니다. Cisco Tropo 채널을 봇에 추가하려면 다음 단계를 따르세요.
- Bots 섹션 아래의 봇 빌더에서, Cisco Tropo 채널을 추가하려는 봇을 클릭하세요.
- Channels 탭에서, Cisco Tropo 섹션의 Expand 아이콘을 클릭합니다. Cisco Tropo 채널 페이지가 표시됩니다.
- 새 브라우저 탭에서, Tropo 계정에 로그인한 후 https://www.tropo.com/login/으로 이동합니다.
- My Apps 페이지에서, 다음 이미지에서 보이는 것과 같이 Create New App을 클릭합니다.
- 봇 빌더에서 Create your new app 페이지에서 Basic Information 섹션 아래에 앱 이름을 입력합니다. 예:,내 Kore.ai 앱.
- Type of Application 섹션에서, Web (HTTP) API를 선택하고 Tropo의 Web (HTTP) API 필드의 Access API Key 탭에 봇 빌더 Cisco Tropo Channel 페이지 Callback URL을 복사합니다.
- Tropo의 Phone Number 섹션에서, 첫 필드에서 국가를 선택하고 Standard를 선택합니다. 다음 필드의 Voice and SMS, 세 번째 필드의 phone number location을 선택적으로 변경합니다.
- Create App을 클릭합니다. <Your App Name> 페이지가 표시됩니다.
- Tropo의 Number 섹션의 Numbers를 복사합니다. 예를 들어, Create Tropo App 탭에서 봇 빌더의 Phone Number 필드에 307-555-1212를 입력하고 국가 코드를 선택합니다.
- Tropo의 API Keys 섹션에서 messaging키를 봇 빌더의 API 키 필드에 복사하고 Next을 클릭합니다. Enable Channel 탭이 표시됩니다.
- Save를 클릭합니다.
Successfully added Cisco Tropo channel 메시지는 봇 빌더 Home 페이지의 상단에 표시됩니다. Tropo에서, Tropo 앱 디렉토리에 앱을 제출하는 것은 선택 사항입니다.
Cisco Tropo 채널 편집
Cisco Tropo 채널을 편집하려면 다음 단계를 따르세요.
- 수정하려면 채널로 마우스를 이동한 후 Settings 아이콘을 클릭하여 다음 이미지에 보이는 것과 같이 명령 메뉴를 표시합니다. 채널을 수정하려면 다음과 같은 명령 중 하나를 선택하세요.
- Edit – 클릭하여 Cisco Tropo Channel 설정 페이지를 엽니다.
- Disable/Enable – Disable을 클릭하여 봇의 Cisco Tropo 채널 사용을 일시적으로 Enable하세요 채널이 사용 안 함으로 설정된 경우, Cisco Tropo 채널 사용을 활성화하려면, 사용함을 클릭하세요.
- Delete – Delete를 클릭하세요. Delete Confirmation 대화 상자에서, OK을 클릭하여 봇 채널 설정을 영구적으로 삭제합니다.
경고: 이 작업은 영구적이므로 취소할 수 없습니다.
IMPORTANT: Tropo has announced to discontinue its services. Proceed with the channel setup only if you have a live Tropo account. You can click here to verify the status of your Tropo account.
Adding the Cisco Tropo channel to your Kore.ai bot is a three-step process to allow end-users of your bot to interact using their Tropo accounts. To add the Cisco Tropo channel to your bot, you must:
- Create a Tropo App – Create and configure a new app in Tropo and then copy the Tropo app data into Kore.ai Bot Builder.
- Access using API Key – Add Web API details in Tropo and copy generated API keys from Tropo into the Bot Builder Cisco Tropo channel Access API Key tab.
- Enable the Channel – In Bot Builder, save the channel settings.
When you add the Cisco Tropo channel to your bot, end-users of your bot can interact with your bot using the Tropo client. To complete this procedure, you must already have a Tropo account and be a member of a Tropo team.
To add the Cisco Tropo channel to a bot, follow the below steps:
- In the Bot Builder, under the Bots section, click the bot you want to add the Cisco Tropo channel to.
- On the Channels tab, click the Expand icon of the Cisco Tropo section. The Cisco Tropo Channel page is displayed.
- In a new browser tab, sign in to your Tropo account and then go to https://www.tropo.com/login/.
- On the My Apps page, click Create New App as shown in the following image.
- In Bot Builder, on the Create your new app page, under the Basic Information section, enter a name for your app. For example, My Kore.ai App.
- In the Type of Application section, select Web (HTTP) API and copy the Bot Builder Cisco Tropo Channel page Callback URL on the Access API Key tab into the Web (HTTP) API field in Tropo.
- In the Phone Number section in Tropo, choose a country in the first field, select Standard: Voice and SMS in the next field, and then optionally change the phone number location in the third field.
- Click Create App. The < Your App Name > page is displayed.
- Copy the Number in the Numbers section in Tropo. For example, 307-555-1212 to the Phone Number field in Bot Builder on the Create Tropo App tab and select the country code.
- From the API Keys section in Tropo, copy the messaging key to the API Key field in Bot Builder and click Next. The Enable Channel tab is displayed.
- Click Save.
The Successfully added Cisco Tropo channel message is displayed at the top of the Bot Builder Home page. In Tropo, it is optional to submit your app to the Tropo App Directory.
Edit Cisco Tropo Channel
To edit the Cisco Tropo channel, follow the below steps:
- Hover over the channel to modify, and then click the Settings icon displayed to show the command menu displayed in the following image.
Select one of the following commands to modify the channel:
- Edit – Click to open the Cisco Tropo Channel setup page.
- Disable/Enable – Click Disable to temporarily disable the use of the Cisco Tropo channel for your bot. When the channel is disabled, click Enable to enable the use of the Cisco Tropo channel.
- Delete – Click Delete. On the Delete Confirmation dialog box, click OK to permanently delete the bot channel configuration.
Warning: This operation is permanent and cannot be undone.