비즈니스용 Skype를 채널로 설정하려면 Azure에 봇 채널 서비스를 등록하고 플랫폼이 메시지를 수신할 수 있도록 Webhook을 활성화해야 합니다. 비즈니스용 Skype 활성화하려면 다음 단계를 따르세요.

  1. Register a Bot Channel – Azure 포털에 로그인하고 봇 채널을 등록합니다.
  2. Create Microsoft ID and Password – 모든 봇 세부 정보를 추가하고 Microsoft ID 및 암호를 생성해야 합니다.
  3. Enable Skype for Business – 봇을 등록한 후, 채널을 활성화합니다.
  4. Publish Channel – 채널 활성화되고 모든 설정이 검증된 후, 봇을 게시하여 개발자가 사용할 수 있도록 합니다.

비즈니스용 Skype 채널을 추가하려면 다음 단계를 따르세요.

  1. 봇 빌더의 Bots 섹션에서, Skype for Business 채널을 추가하려는 봇을 클릭하세요.
  2. Channels 탭에서, Skype for Business 아이콘을 클릭하세요. Skype for Business 페이지가 표시됩니다.
  3. 새 브라우저 탭에서 Azure 포털에 로그인하고 봇 채널을 등록합니다.
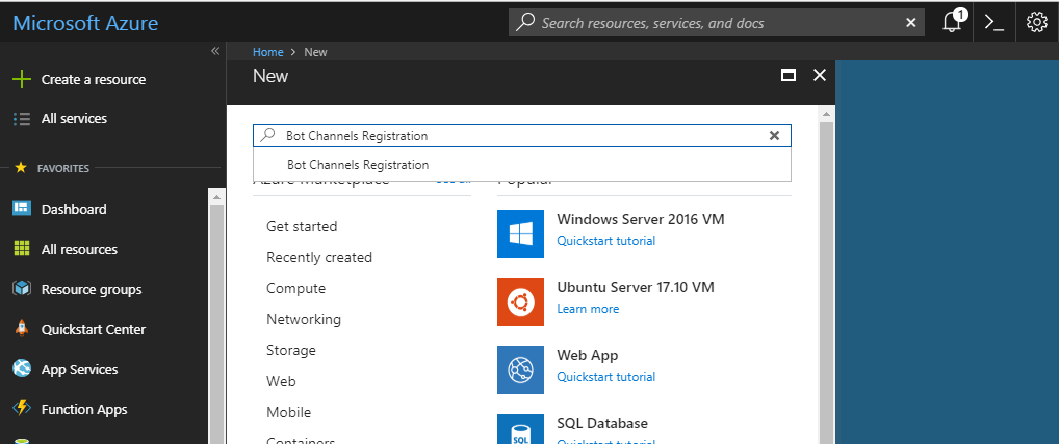
  4. 왼쪽 창에서 + Create a Resource를 클릭합니다. 검색 창에서, Bot Channels Registration를 검색하고 선택합니다.
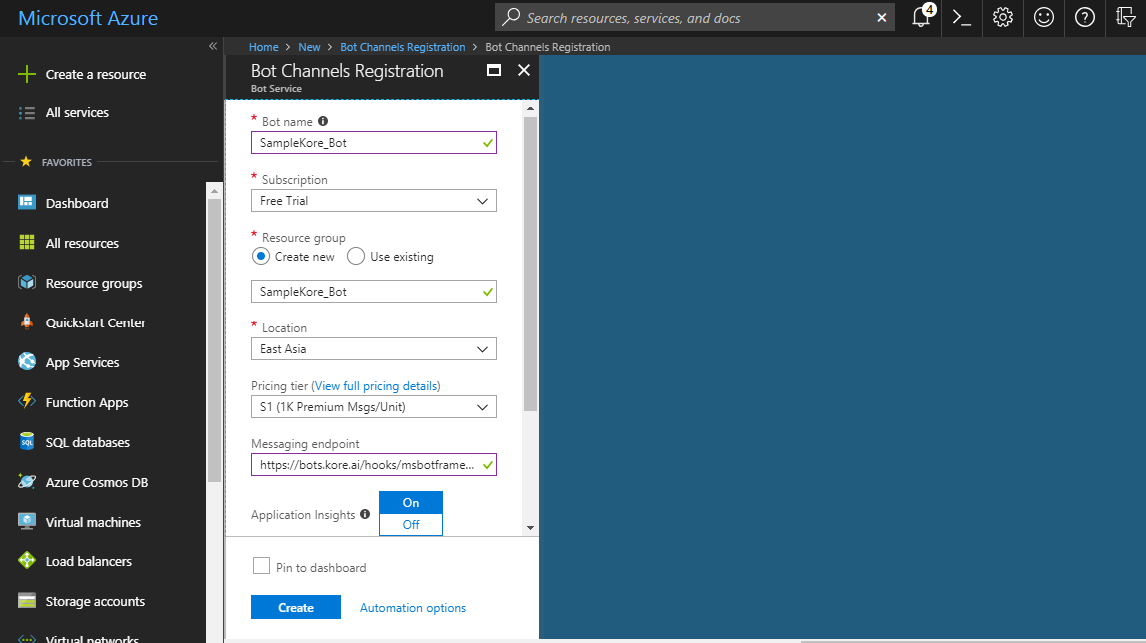
  5. Bot Channel Service 생성 페이지에서, Create을 클릭하고 다음 화면으로 진행하여 세부 정보를 입력합니다.
  6. 봇 채널 등록에 필요한 모든 세부 정보를 입력합니다. 빌더의 비즈니스용 Skype 채널 페이지의 Configurations 탭에서 Webhook URL을 복사하여 Messaging Endpoint 필드에 입력합니다.
  7. Create를 클릭하여 등록을 완료합니다. 생성에 성공하면 Azure 계정의 대시보드로 리디렉션됩니다.
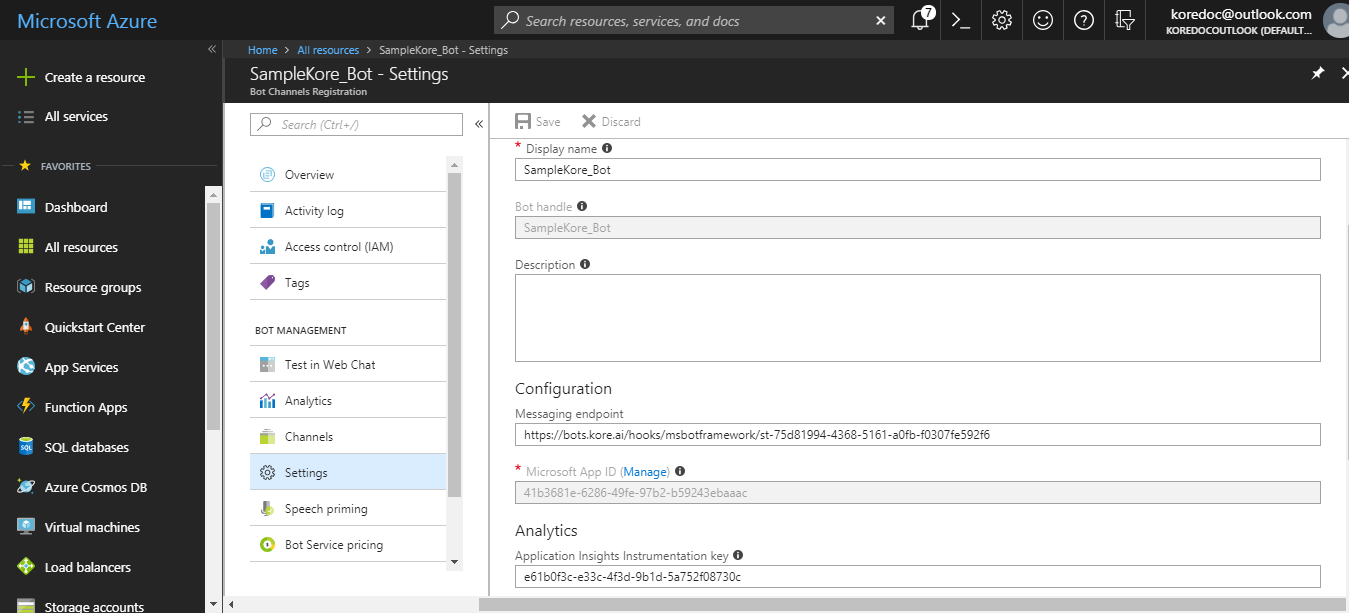
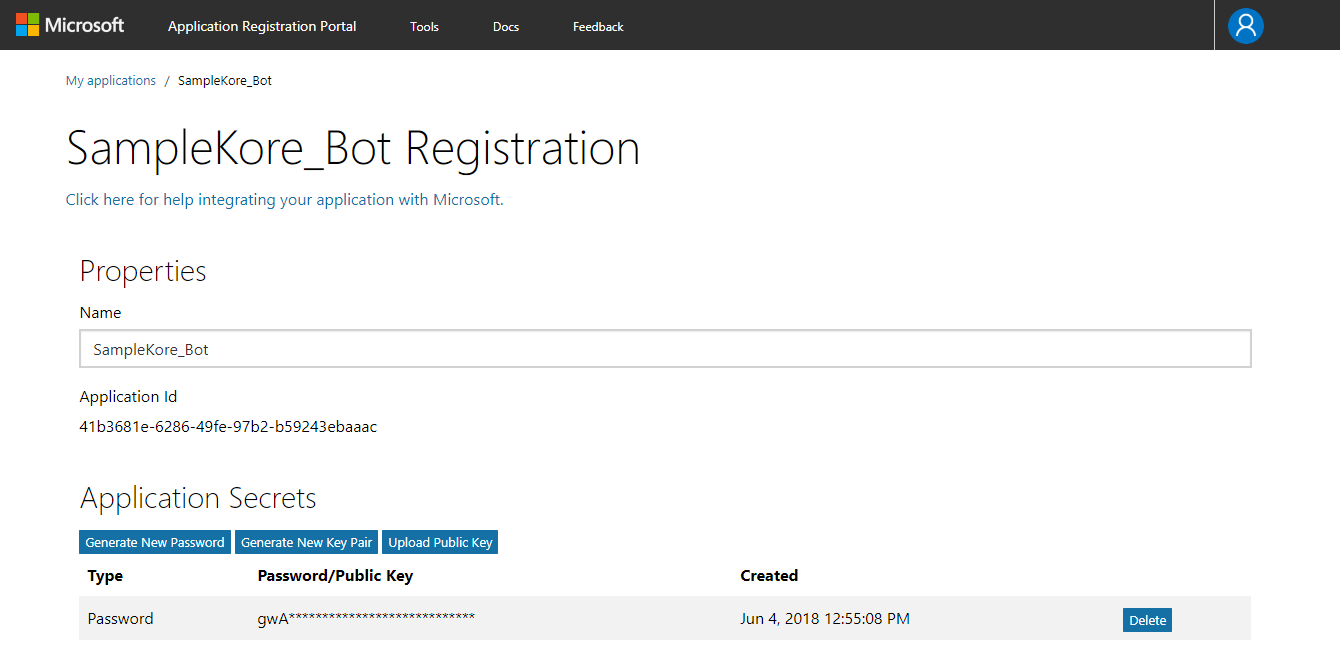
  8. Azure 대시보드에서 Microsoft App IDpassword를 생성하려면, 이전 단계에서 생성한 리소스를 선택합니다. 생성한 새 리소스의 세부 정보 페이지로 리디렉션됩니다.
  9. 왼쪽 창에서, Microsoft App ID 필드의 옆에 있는 Settings > Manage를 클릭합니다. 앱 인증 정보 관리를 위해 새 브라우저 탭으로 이동합니다.
  10. Generate New Password를 클릭하여 앱의 새 암호를 생성합니다. 창에서 표시된 암호를 기록하고 이 창의 Configurations 탭에 입력합니다.
  11. Ok를 클릭하여 이전 화면으로 돌아갑니다. App ID를 기록하고 이 채널 페이지의 Configuration 탭에 입력합니다.
  12. 페이지 끝에 있는 Save를 클릭하여 변경 내용을 저장합니다.
  13. 비즈니스용 Skype를 활성화하려면, Azure 포털로 이동하여 앱의 왼쪽 창에 있는 Channels를 클릭합니다. Skype for Business를 선택합니다.
  14. 채널 정보 페이지로 리디렉션되고 채널이 활성화됩니다. 봇을 비즈니스용 Skype 테넌트 계정에 추가하려면 다음 단계를 진행합니다.
  15. 비즈니스용 Skype 온라인의 테넌트 관리자는 봇을 비즈니스용 Skype 계정에 추가해야 합니다. 봇을 비즈니스용 Skype 기업용 계정에 추가하려면 Microsoft 봇 프레임워크의 instructions 사항을 참조하세요.
  16. 이러한 지시 사항을 수행한 후 최종 사용자는 비즈니스용 Skype 연락처 목록에서 봇을 찾고 대화를 시작할 수 있습니다.

To set up Skype for Business as a channel, you must register a Bot Channel service in Azure and enable a webhook for the platform to receive messages. To enable Skype for Business, follow the below steps:

  1. Register a Bot Channel – Log in to the Azure portal and register a bot channel.
  2. Create Microsoft ID and Password – You must add all the bot details and create the Microsoft ID and Password.
  3. Enable Skype for Business – After registering the bot, enable the channel.
  4. Publish Channel – After the channel is enabled and all configurations are verified, publish the bot to make it available for developers.

To add Skype for Business channel, follow the below steps:

  1. In the Bots section of the Bot Builder, click the bot you want to add the Skype for Business channel to.
  2. On the Channels tab, click the Skype for Business icon. The Skype for Business Channel page is displayed.
  3. In a new browser tab, log in to the Azure portal to register a bot channel.
  4. On the left pane, click + Create a Resource. On the search window, search and select Bot Channels Registration.
  5. On the new Bot Channel Service creation page, click Create and proceed to the next screen to enter the details.
  6. Enter all the required details to register the bot channel. Copy the Webhook URL from the Configurations tab of the Skype for Business channel page on the builder and provide it in the Messaging Endpoint field.
  7. Click Create to complete the registration. After successful creation, you are redirected to the Dashboard of your Azure account.
  8. To create Microsoft App ID and password from your Azure Dashboard, select the resource that you have created in the previous steps. You are redirected to the details page of the new resource that you have created.
  9. On the left pane, click SettingsManage next to the Microsoft App ID field. You are redirected to a new browser tab to manage your app credentials.
  10. Click Generate New Password to create a new password for your app. Make a note of the password displayed on the window and enter it in the Configurations tab of this window.
  11. Click Ok to go back to the previous screen. Make a note of the App ID and enter it in the Configuration tab of the channel page.
  12. Click Save at the end of the page to save your changes.
  13. To enable Skype for Business, go to your Azure portal and click Channels on the left pane of your app. Select Skype for Business.
  14. You are redirected to the channel information page and the channel is enabled. Proceed to the next step to add this bot to your Skype for Business Tenant account.
  15. The Tenant Administrator of your Skype for Business Online environment has to add this bot to your enterprise Skype for Business account. Refer to instructions from Microsoft Bot Framework to add this bot to your enterprise Skype for Business account.
  16. After these instructions are executed, end-users of your enterprise can find this bot in their Skype for Business contacts list and start chatting with the bot.