사용자 정의 봇을 정의한 후, 봇이 배포된 경우 최종 사용자가 봇에 접근하고 상호 작용하는 데 사용할 수 있도록 봇에 전달 채널을 추가할 수 있습니다. 예를 들어, Kore.ai 메시지 애플리케이션에서 봇을 사용할 수 있거나 이메일 주소 또는 Twilio SMS 계정을 통해 봇과 상호작용할 수 있도록 할 수 있습니다. Facebook 또는 Slack과 같은 타사 애플리케이션에서도 봇을 사용할 수 있습니다. 이 항목에서는 봇에 하나 또는 그 이상의 전달 채널을 추가하는 방법을 설명합니다. 기본값으로, 봇에 하나 또는 그 이상의 채널을 정의하지 않는 한 봇 및 정의된 알림 또는 조치 작업은 채널에서 사용자가 사용할 수 없습니다. 엔터프라이즈 봇의 경우, 봇이 정의된 채널이 있다 하여도, 엔터프라이즈에서 사용자가 사용할 수 있도록 하려면 봇 관리자가 봇을 승인하고 배포해야 합니다. Build -> Channels 탭에서 봇에 채널을 추가할 수 있습니다. Kore.ai 봇 플랫폼이 지원하는 채널은 기능과 사용에 따라 분류됩니다. 
채널 활성화
봇에 하나 또는 그 이상의 채널을 활성화하려면, 다음과 같은 단계를 따르세요.
- 채널을 추가하고 싶은 봇을 엽니다.
- 왼쪽 창으로 마우스를 이동하여 Channels 탭을 클릭합니다.
- 페이지에 추가하고자 하는 채널의 이름을 클릭합니다. 채널을 설치하기 위해 지침 페이지가 열립니다.

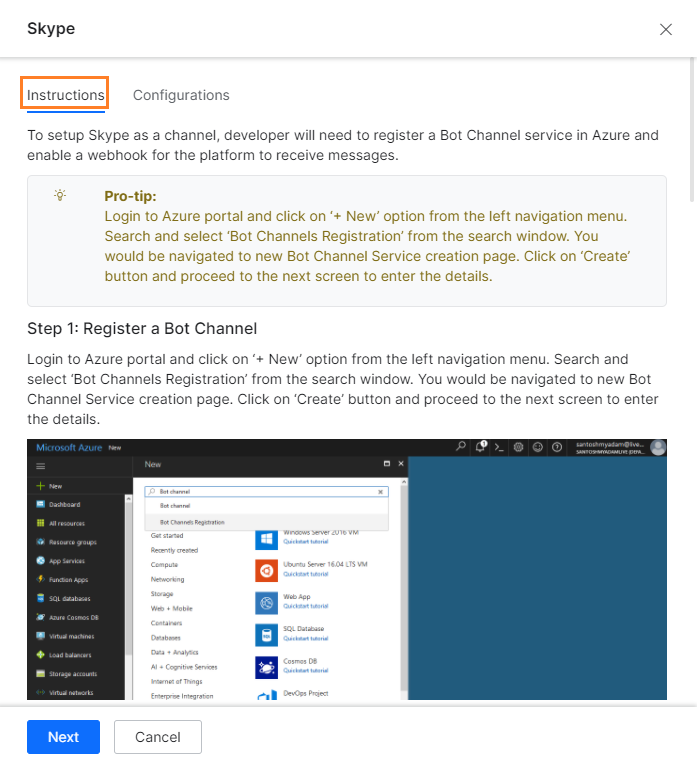
- Next 또는 Next 탭을 클릭하여 채널에 대한 설정 페이지를 엽니다. 이 이미지는 비즈니스용 Skype 채널의 설정 페이지를 보여줍니다.
Note – 봇에 채널을 추가한 후, 승인하려면 게시되어야 하며 봇 관리자가 봇을(새로운 채널로) 승인해야합니다. 봇 관리자가 봇에 대한 채널이라고 명시적으로 승인하기 전까지 사용자는 이 새로운 채널을 사용할 수 없습니다.
Available Channels
Click the icon of the channel you want to add, and then configure the channel to work with your Kore.ai bot. The page with Instructions and Configuration settings will slide out.
Following are the available channels:
カスタムボットを定義した後、ボットのデプロイ時にエンドユーザーがボットにアクセスして対話するために使用できる配信チャネルをボットに追加できます。たとえば、ボットをKore.aiメッセージングアプリケーションで使用できるようにしたり、メールアドレスまたはTwilio SMSアカウントを介してボットとのやり取りを許可したりできます。FacebookやSlackなどのサードパーティアプリケーションでボットを有効にすることもできます。このトピックでは、1つ以上の配信チャネルをボットに追加する方法について説明します。デフォルトでは、ボットに何かチャネルを定義しない限り、ボットおよび定義された通知またはアクションタスクはどのチャネルのユーザーも使用できません。エンタープライズボットの場合は、ボットにチャネルが定義されている場合でも、ボット管理者はボットを承認してデプロイし、エンタープライズ内のユーザーが利用できるようにする必要があります。ビルド->チャネルタブからボットにチャネルを追加できます。Kore.aiボットプラットフォームでサポートされているチャネルは、機能と使用法に基づいて分類されています。
チャネルの有効化
いくつかのチャネルをボットで有効化するには、以下のステップに従います:
- チャネルを追加したいボットを開きます。
- 左側のペインにカーソルを合わせて、チャネルタブをクリックします。
- ページに追加したいチャネルの名前をクリックします。チャネルをインストールするための手順ページが開きます。
- 次へまたは構成タブをクリックして、チャネルの構成ページを開きます。この画像は、Skype for Businessチャネルの構成ページを示しています。
注意―チャネルをボットに追加した後、ボットを公開して承認する必要があり、ボット管理者はボットを(新しいチャネルで)承認する必要があります。ボット管理者がボットのチャネルを承認するまで、ボットユーザーは新しいチャネルを利用できません。
利用可能なチャネル
追加したいチャネルのアイコンをクリックして、Kore.aiのBotで動作するようにチャネル設定を行います。説明と設定のページがスライドでアウトします。
利用可能なチャネルは以下の通りです。
After you define a custom bot, you can add delivery channels to your bot that end-users can use to access and interact with your bot when it is deployed. For example, you can enable your bot for use in the Kore.ai Messaging application, or allow interaction with your bot through an email address or a Twilio SMS account. You can also enable your bot in third-party applications such as Facebook or Slack. This topic describes how to add one or more delivery channels to your bot.
By default, a bot and any defined notification or action tasks are not available to users in any channel unless you define one or more channels for your bot. For enterprise bots, even if the bot has a channel defined, the Bots Admin must approve and deploy the bot to make it available to users in the enterprise.
You can add channels to your bot from the Build -> Channels tab. Channels supported by the Kore.ai bots platform are categorized based upon their functionality and usage.
Enable a Channel
To enable one or more channels for your bot, follow the below steps:
- Open the bot for which you want to add the channels.
- Hover over the left pane and click the Channels tab.
- Click the name of the channel you want to add to the page. It opens the instructions page to install the channel.
- Click Next or the Configuration tab to open the configuration page for the channel. This image shows the configuration page of the Skype for Business channel.
Note – After adding the channel to the bot, the bot needs to be published for approval and the Bot Admin needs to approve the bot (with new channels). The new channel is not available to users until the Bot Admin explicitly approves that channel for your bot.
Available Channels
Click the icon of the channel you want to add, and then configure the channel to work with your Kore.ai bot. The page with Instructions and Configuration settings will slide out.
Following are the available channels: