Kore.ai 봇 빌더에 로그인하면 랜딩 페이지로 이동합니다.

봇 빌더 랜딩 페이지

랜딩 페이지에서 나열된 아래 작업을 수행할 수 있습니다.

  • 계정에 있는 가상 비서 또는 봇에 접근합니다.
    • 최근에 방문한 봇을 확인합니다.
    • 내 봇(여러분이 개발한 봇) 및 공유된 봇(계정의 공동 개발자가 개발을 위해 여러분과 공유한 봇)을 포함한 모든 봇을 확인합니다. 다음을 수행할 수 있습니다.
      • 여러분이 생성한 봇 또는 여러분과 공유한 봇으로 제한한 목록을 필터,
      • 이름, 생성 날짜, 수정 날짜, 작업 수, 봇 소유자 이름별로 목록을 오름차순 또는 내림차순으로 정렬,
      • 타일 보기 또는 목록 보기 간 전환.
    • 새 봇 생성
  • 프로세스 앱 접근 (더 보기…)
  • 데이터 접근 (more…)
  • 여러분의 계정에 구성원 초대 (더 보기…).
  • 상황별 도움말 접근.
  • 프로필 섹션에서,

    • 계정이 여러 개인 경우 확인하고 계정 간 전환합니다.
    • 관리자 콘솔로 이동 – 관리자만 사용 가능합니다.
    • 프로필 보기 및 편집.
    • 앱 언어 설정 – 플랫폼 언어 전환.
    • 개발자 문서 페이지에 접근.
    • 개발자 커뮤니티 페이지에 접근.

봇 빌더 탐색

다음 섹션에서는 계정에서 가상 비서를 불러온 후 사용 가능한 메뉴 옵션을 설명합니다.

탐색 메뉴는 플랫폼 버전 9.0에서 개편되었습니다. 9.0과 이전 버전간의 비교 목록은 여기를 참조하세요.

상위 메뉴

봇 빌더 내에서 사용 가능한 모든 조치는 메뉴에서 접근할 수 있습니다. 쉽게 사용할 수 있도록 상위 메뉴에서 다음과 같이 분류됩니다.

  • 빌드
  • 배포
  • 분석
  • 관리

이 외에도 상위 메뉴에서 다음을 수행할 수 있습니다.

  • 현재 가상 비서의 다양한 버전 간 전환
  • 계정 내 모든 가상 비서 검색 및 전환
  • 기능 또는 메뉴 항목 검색
  • 상태 추적기 보기
  • 봇 언어 전환
  • 상황별 도움말 접근
  • 프로필 접근

왼쪽 탐색 메뉴

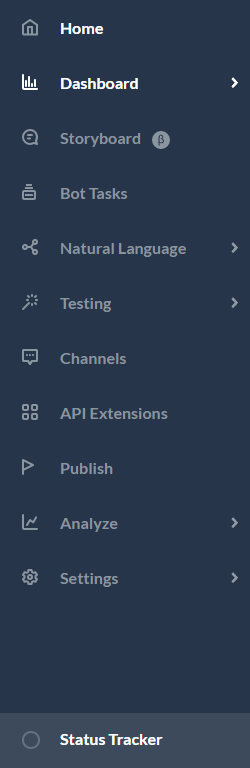
상단 메뉴에서 선택한 항목에 따라 왼쪽 메뉴 옵션이 다릅니다. 자주 사용한 메뉴 항목을 해당 메뉴 항목 옆에 있는 핀 아이콘을 사용하여 왼쪽 메뉴 상단에 고정할 수 있습니다.

  • 빌드 상위 메뉴 항목은 기본 봇 구축 모습을 지원합니다
    • 모든 봇 설정 및 기능의 전반적인 요약입니다.
    • 대화 스킬 – 봇의 대화형 스킬 구축을 위한 기본 도구입니다.
      • 스토리보드 – 직관적인 대화 디자이너 및 빌더
      • 대화 작업 – 사용자와 봇 간의 전체 대화형 흐름
      • 지식 그래프 – 정적 FAQ 텍스트를 지능적이고 개인화된 대화 경험으로 바꿉니다
      • 스몰 토크 – 최종 사용자와 봇이 나눌 수 있는 일상적인 대화를 말합니다.
      • 경고 작업 – 적시의 적절한 개인화된 정보를 엔터프라이즈 시스템으로부터 고객 및 직원에게 제공합니다.
    • 디지털 스킬
      • 디지털 뷰 – 대화형 구성 요소, 패널, 위젯을 설계하여 사전에 관련 정보를 고객에게 제공합니다
      • 디지털 양식 – 사용자의 모든 정보를 쉽게 효율적으로 캡처할 수 있는 이상적인 대화형 사용자 인터페이스입니다.
    • 봇 학습 및 설정과 관련된 모든 측면의 자연어입니다.
    • 중단, 명확화 등 인간 대화와 관련된 사실상 모든 뉘앙스를 처리하는 인텔리전스입니다.
    • 발화 테스트배치 테스트를 포함한 테스트
  • 다른 사용자가 봇을 사용할 수 있도록 배포
  • 분석
    • 봇 사용량 추적을 위한 사용량 지표
    • 나만의 분석 및 보고서를 구축하기 위한 맞춤형 대시보드
    • 고객이 봇과 효과적으로 대화에 참여하는지 상담사로 전환하거나 드랍오프되는지에 대한 통찰력을 제공하는 컨테인먼트 지표
    • 의도 감지를 추적하고 봇 학습에서 적절한 수정을 수행하기 위한 NLP 지표
    • 주어진 기간 동안 대화 세션에서 다양한 봇 사용자 상호 작용의 여정을 시각화하는 대화 흐름.
  • 관리 :

대화 작업 빌더 페이지

대화 작업 빌더 페이지에 접근하려면,

  1. 상단 메뉴에서 빌드를 선택합니다
  2. 왼쪽 탐색 창의 대화형 스킬에서 대화 작업을 선택합니다.
  3. 각 작업별로 다음과 같은 세부 정보가 표시됩니다.
    • 이름
    • 마지막 업데이트
    • 상태
  4. 작업 이름 위로 마우스를 이동하면 다음 옵션을 확인할 수 있습니다.
    • 작업 편집, 복제, 삭제
    • 뷰, 대화 설정, 중단 관리, 동작 수정 관리, 변수 네임스페이스 관리와 같은 추가 옵션

봇 대화 빌더 페이지

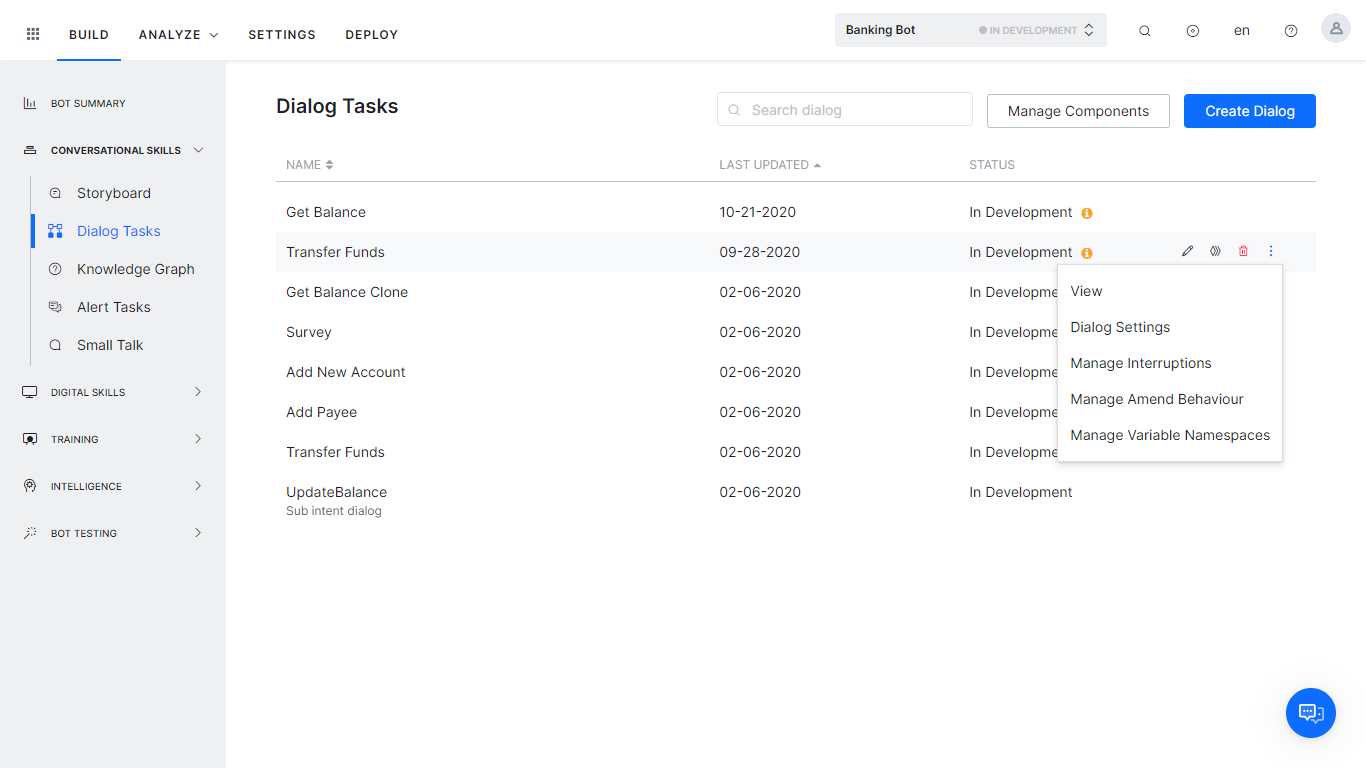
대화 빌더는 다양한 작업 구성 요소, 속성, 설정을 사용하여 대화 작업에서 사용자와 봇 간의 대화형 흐름을 생성하는 사용자 인터페이스입니다.

자세한

내용을 보려면 여기를 클릭하세요.

Kore.ai Botビルダーへのサインイン後、ランディングページに移動します。

Botビルダーのランディングページ


ランディングページでは、以下のアクションを実行することができます。

  • お客様の開発済みのBotをすべて表示する。
  • 共同開発者がお客様のアカウントから開発するための、共有済みのBotを表示する。
  • 新しいBotを作成する(詳細)。
  • サンプルスマートBot詳細)をインストールする(詳細)。
  • Botをインポートする(詳細)。
  • お客様のアカウントに開発者を招待する(詳細)。
  • コンテキストのヘルプにアクセスする。
  • プロフィールセクションから、

    • 複数のアカウントがある場合、アカウントを表示して切り替える。
    • 管理者コンソールに移動する(管理者ユーザーのみ利用可能)。
    • プロフィールを表示および編集する。
    • アプリ言語を設定する(バージョン8.0で導入されたこのオプションを使用して、プラットフォームの言語の切り替えが可能)。
    • 開発者のドキュメントページにアクセスする。
    • 開発者コミュニティのページにアクセスする。

Botビルダーの左のナビゲーション

Botを開いて左のナビゲーションペインにカーソルを置くと、複数のオプションが表示されます。

このナビゲーションペインでは、Botビルダーの様々な機能を利用することができます。機能は以下の通りです。

  • ホーム – Botビルダーのランディングページに戻る。
  • ダッシュボード – Bot Summaryと使用状況メトリックにアクセスして、Botの様々なコンポーネントやリアルタイムの状態を把握する(詳細)。
  • ストーリーボード – 会話デザイナーにアクセスして、エンドユーザーとBot間の実際の会話の代表的なあらゆるシーンを設計する(詳細)。
  • Botタスク – お客様のBotに様々なタスクを表示および追加する(詳細)。
  • 自然言語 – 応答性と効率を高めるためにBotをトレーニングする(詳細)。
  • テスト – ユーザーの発話用にBotをテストし、バッチテストスイートを実行する(詳細)。
  • チャネル – Botをホストするためにチャネルを有効にする(詳細)。
  • API拡張機能 – BotKit SDK、エージェント転送などを使用して、BotのAPIアクセスを有効にする(詳細)。
  • 公開 – 選択したチャネルでのBotへのユーザーアクセスを有効にする(詳細)。
  • 分析 – 公開後のBotのパフォーマンスを追跡および改善する(詳細)。
  • 設定 – Botの設定(詳細)と管理(詳細)。
  • ステータストラッカー – すべてのエクスポートおよびトレーニングに関するジョブを追跡する。

Botタスクビルダーのページ

Botタスクビルダーのページにアクセスするには、

  1. 左のナビゲーションペインにカーソルを合わせ、Botタスクを選択します。
  2. Botタスクページでは、プラットフォーム上で作成可能なそれぞれのタスクタイプのタブ(ダイアログタスク、ナレッジグラフなど)が表示されます。
  3. タブをクリックして、Bot内のタスクのリストを表示します。

それぞれのタスクについて、以下の詳細が表示されます。

  • 名前
  • 最終更新日
  • ステータス

タスク名にカーソルを合わせると、設定DIYSettingsIconアイコンが表示されます。

新しいタスクを作成するには、

  • タスクタイプのタブにカーソルを合わせて、アイコンをクリックします。例えば、ナレッジグラフを作成したい場合は、ナレッジグラフタブにカーソルを合わせて、表示されたアイコンをクリックします。
    詳細はこちらをクリックしてください。

ボットダイアログビルダーのページ

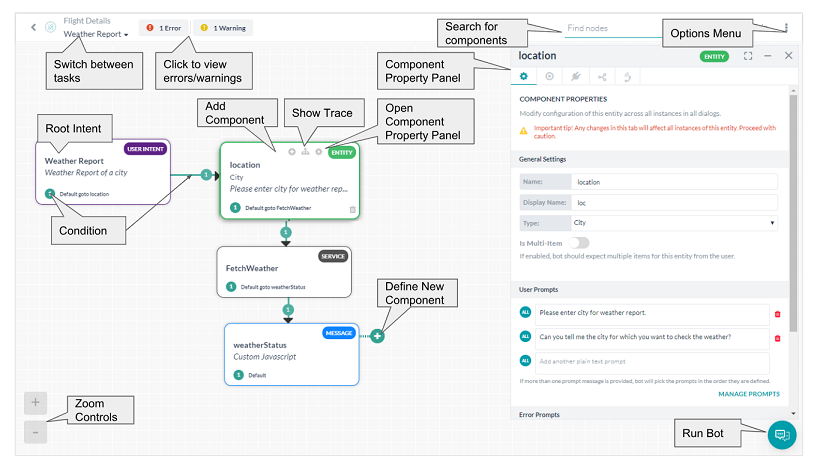
ダイアログビルダーとは、様々なタスクコンポーネント、プロパティ、設定を使用して、ダイアログタスク内でユーザーとBot間の会話の流れを作成するためのユーザーインターフェイスです。

詳細はこちらをクリックしてください。

After you sign in to Kore.ai Bot Builder, you are directed to the landing page.

Bot Builder Landing Page

On the landing page, you can perform the below-listed actions:

  • Access the Virtual Assistants or bots in your account:
    • View the Recently Visited bots.
    • View All Bots which includes My Bots i.e bots developed by you and Shared Bots i.e bots shared with you for development by the codevelopers from your account. You can:
      • Filter the list restricting it to bots created by you or shared with you;
      • Sort the list either ascending or descending by name, creation date, date modified, number of tasks, bot owner name;
      • toggle between Tile View or List View.
    • Create a New Bot
  • Access Process Apps (more…)
  • Access Data (more…)
  • Invite Members to your account (more…).
  • Access the Contextual Help.
  • From the Profile section,

    • View and switch between your accounts, in case of multiple accounts.
    • Go to Admin Console – available only for admin users.
    • View and edit your Profile.
    • Set the App Language – to switch the platform language.
    • Access developer Documentation pages.
    • Access Developer Community pages.

Bot Builder Navigation

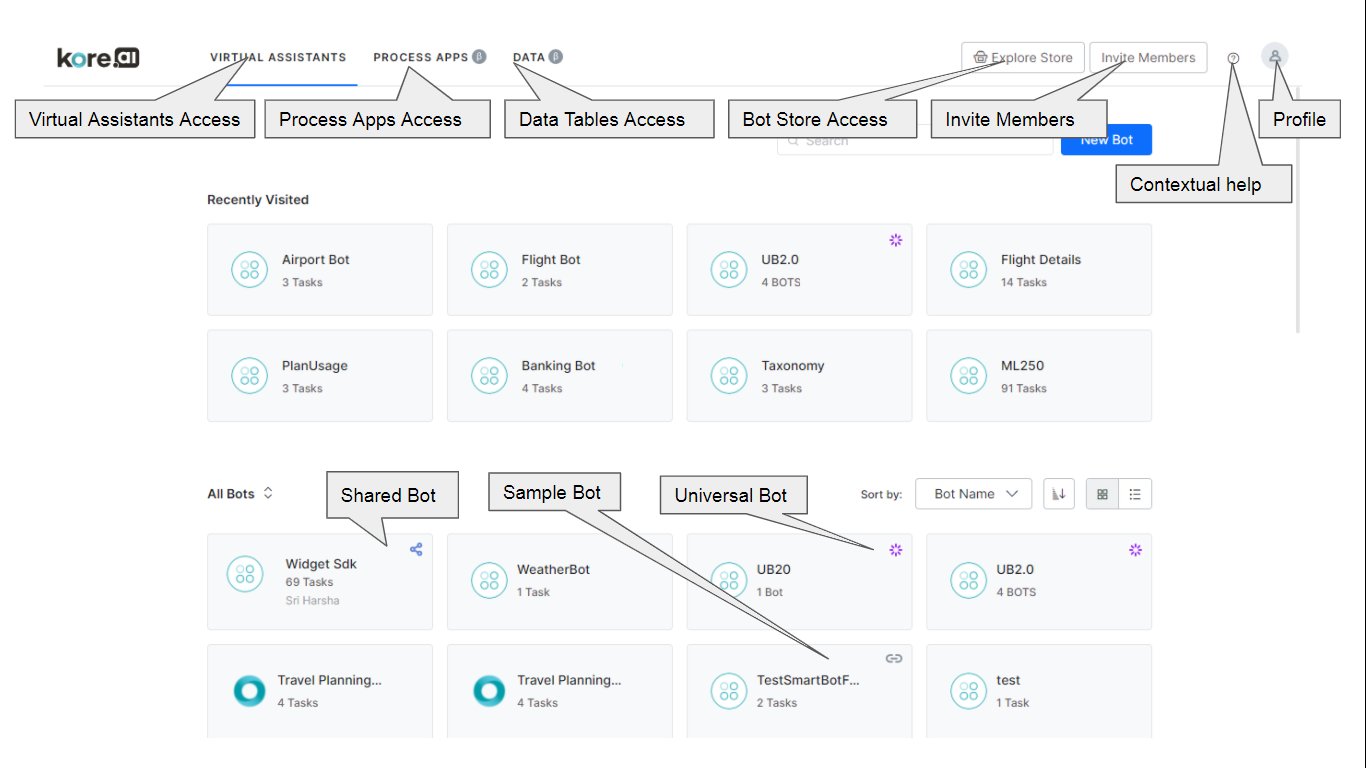
The following sections describe the menu options that are available once you open any virtual assistant from your account.

The navigation menu underwent an overhaul with the ver9.0 of the platform, for a comparative list between the 9.0 and earlier versions, refer here.

Top Menu

All the actions available within the bot builder can be accessed from its menu. For ease of usage, they are categorized as follows in the Top Menu:

  • Build
  • Deploy
  • Analyze
  • Manage

Apart from these, from Top Menu you can:

  • Switch between the various versions of the current virtual assistant
  • Search and switch to any virtual assistant within your account
  • Search for a feature or menu item
  • View the status tracker
  • Switch the bot language
  • Access contextual help
  • Access the profile.

Left Navigation Menu

Based on the selection from the top menu, left menu options differ. You can pin a frequently used menu item to the top of the left menu using the pin icon, next to the corresponding menu item.

  • Build top menu items assist in the basic bot building aspects
    • Summary for a bird’s eye view of all the bot configuration and capabilities.
    • Conversation Skills – basic tools for building bot’s conversational skills:
      • Storyboard – an intuitive conversation designer and builder
      • Dialog Tasks – a full conversational flow between a user and a bot
      • Knowledge Graph – to turn your static FAQ text into an intelligent, personalized conversational experience
      • Small Talk – for the casual conversations that a bot can have with the end-users.
      • Alert Tasks – to deliver timely, relevant, and personalized information from enterprise systems to customers and employees
    • Digital Skills
      • Digital Views – to design interactive components, panels, and widgets, to proactively present relevant information to your customers
      • Digital Forms – for an interactive User Interface for easy and efficient capture of all the information from the user will be ideal.
    • Natural Language for all aspects related to bot training, and settings.
    • Intelligence to handle virtually all nuances related to human conversations, including interruptions, clarifications, and more.
    • Testing to include Utterance Testing and Batch Testing
  • Deploy to make the bot available to others
  • Analyze
    • Usage Metrics to track the bot usage
    • Custom Dashboard to build your own analytics and reports
    • Containment Metrics for insights into how effectively customers are engaging with the bot vs transferring to agents or dropping offs
    • NLP Metrics to track the intent detection and make appropriate corrections in bot training
    • Conversation Flows to visualize the journey of various bot user interactions across conversation sessions in a given time period.
  • Manage for

Dialog Task Builder Page

To access the Dialog Task Builder page,

  1. Select Build from the Top Menu;
  2. From the left navigation pane, under Conversational Skills select Dialog Tasks.
  3. For each task, the following details are displayed:
    • Name
    • Last Updated
    • Status
  4. When you hover over a task name, for the following options:
    • Edit, Clone, Delete the task
    • More options like View, Dialog Settings, Manage Interruptions, Manage Amend Behavior, Manage Variable Namespace

Bot Dialog Builder Page

Dialog Builder is a user interface to create a conversational flow between a user and a Bot in a dialog task using various task components, properties, and settings.

For more details, click here.

Submit a Request

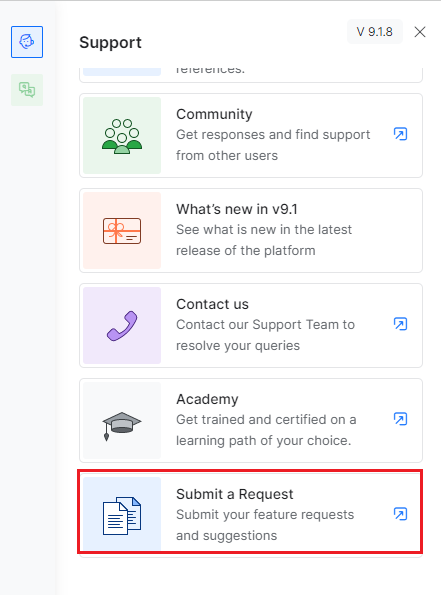
You can suggest new features or provide your feedback by accessing the Submit a Request option from the Help section. You can also collaborate with other users who are talking about that particular request, and view the roadmap for your request under Planned, In Progress or Completed statuses.

Note: If a board is marked public, it is visible to anyone having the URL. However, a public user can only read the posts on the board. The user needs to sign in to have write access for a post.

The Submit a Request option lets you submit a feedback request on one of the following public boards:

  • Process Apps
  • Virtual Assistants
  • Bugs

Customization is available to mark boards Private and make them available only for a group of people/or can add custom domains to make the boards available only for a few customers.

You can also track the status of the request under Roadmap.
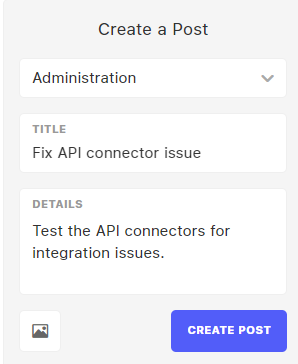
Create a Post

To submit a request, follow these steps:

1. On the Kore.ai Bot Builder home screen, click the Help icon.


2. Click the Submit a Request option on the dialog.

3. On the landing page, follow these steps:

a. To submit a request for Virtual Assistants, click the Virtual Assistants tab.

b. When the following page appears, create a post with these steps:

  • In the Create a Post window, select a category from the list.

  • Provide the title and detailed description.

  • (optional) Click the image icon and upload an image relevant to the post.

  • Click Create Post.

  • The created request appears on the screen with the provided title, description, and other details as shown below.

You can leave a comment, edit, or delete this post and also change its status.

Note: The Virtual Assistants feedback request created by you appears on the requests list.

To create a post for Process Apps and Bugs, select the respective option from the dropdown and follow the same steps as you did for Virtual Assistants.

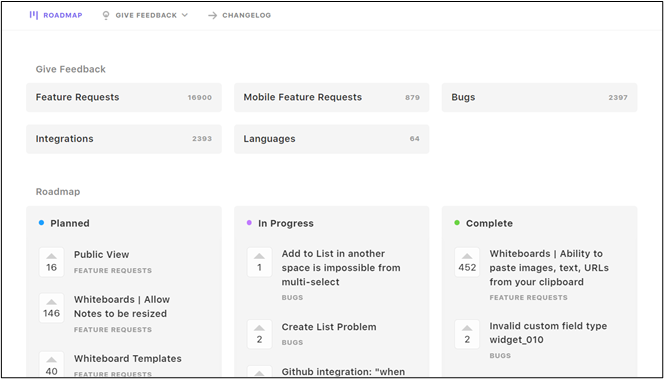
Viewing the Progress Roadmap

You can track the status of the feedback request that you’ve created under Roadmap.

A request can be marked with the following status values:

  • Planned: The activity or action has been planned for the request.
  • In Progress: The activity or action is in progress.
  • Complete: The activity or action has been completed.

Based on the status marked for a request, it gets moved to the respective status category.

Custom Statuses 

  1. The admin can create a custom status which helps track a post.
  2. The status of a request can be viewed for each post thread.

Roadmap

  1. You can mark a post as a roadmap item via the admin console.

2 The Roadmap is fully-customizable and can be made public or private.