Overview
Support for the Smart Bots functionality is deprecated from Release 8.1.0. You may continue to use the Smart Bots that you have already created, but you will no longer be able to create new Smart Bots. This feature will be discontinued in the upcoming releases.
We recommend exploring the Universal Bot functionality that gives you a more modular and scalable approach. Universal Bots provide a single interface for your customers to interact with multiple Standard bots designed for different use cases. Know more.
Kore.ai’s Smart Bots allow enterprises to build virtual assistants centrally and allow various teams within the enterprise to reuse and extend the Bot configurations to suit their requirements. Smart Bots expedite the bot building process by allowing new bots to inherit the configuration and tasks of pre-defined bots.
For example, a bank with operations in various countries and jurisdictions can use Smart Bots to define global standards and allow regional units to supplement with any local regulatory or customer needs.
You can also build a utility bot that could fulfill common enterprise needs like IT Help Desk, Leave Management, etc. and individual departments can inherit this utility Smart bot and supplement department specific tasks. Like, the Marketing & Sales team could subscribe to the utility Smart bot and add tasks related to prospecting by integrating with Salesforce, Hubspot, etc.
Use Case
Banking Bot – Multi-jurisdiction Operations
Banks with operations in various countries or jurisdictions can use Smart Bots to define global standards and allow regional units to supplement with any local needs of the regulators and/or customers. 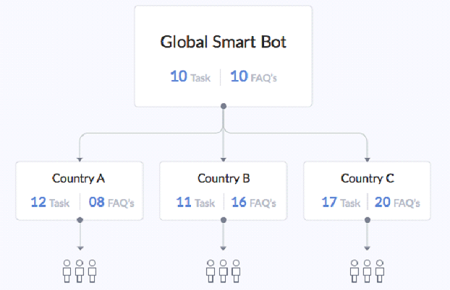
- A global team can define the minimum essentials or the mandatory tasks as a Smart bot;
- Regional units or groups can install the Smart bot to inherit the configurations and include additional tasks to meet specific local requirements;
- Upgrades to the Smart bots are automatically inherited by all regional bots;
- Regional units/groups can also selectively unlock the components to stop receiving upgrades from Smart bot.
Define a Smart Bot
Smart Bots expedite the bot building process by allowing new bots to inherit the configuration and tasks of pre-defined bots.
This section explains how you can create Smart Bots and use them within your enterprise account. Creating a Smart Bot is similar to Creating a Standard bot and involves the following steps:
- Creating bot
- Defining bot tasks
- Testing the bot
- Configuring channels
- Defining bot settings
- Publishing
Few of the above steps need special mention in the context of Smart Bots and are discussed in this section.
Configuring Bot Settings
Some Bot Settings that need to be configured specially for a Smart Bot are mentioned in this section.
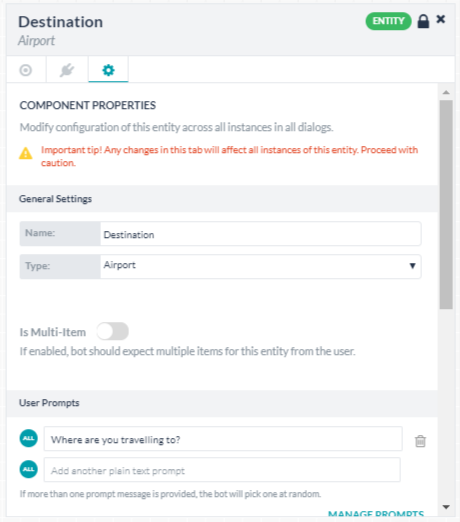
Defining Bot Variables
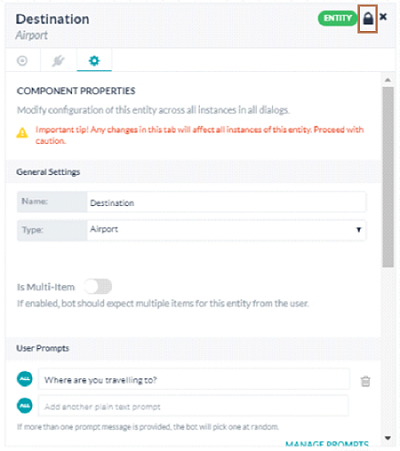
Bot Variables allow you to define variables centrally and reuse them across bot definitions. For example, during bot building, developers typically use staging endpoints for testing. You can set those endpoints as variables. When you export or publish the bot, you can replace such variable values with the production endpoints. Defining Bot Variables remains the same as Standard Bots. Refer here to learn how to configure the Bot Variables.
Global Variables of Smart Bots will have an additional option to define the visibility or usage of variables during inheritance:
- Pre-Populated: Use this option to allow the child bot developers to view and edit the variable value in the Setup Variables tab while inheriting the bot.
- Hidden: Use this option when you do not want to allow the child bot developers to view or edit the variable value while inheriting the bot. They can, however, view the name and value of the variable on the Bot Variables page after inheriting.
- Ask on Install: Use this option to get the value of the bot variable from the child bot developer while inheriting the bot. Developers of the inherited bot cannot see the variable’s value set up in the smart bot and they cannot complete inheriting the bot without entering a value.
Configuring Smart Bot Settings
Configuration settings required to inherit the smart bot can be set from the Smart Bot Settings tab in the Bot Settings. These settings serve as an aid in the discovery, preview, and installation of the Smart Bot.
To configure the Smart Bot settings, follow these steps::
- Hover over the side navigation panel of the bot and click Settings > Smart Bot Settings.
- Configure the following settings:
- Allow users to try using developer authorization: This option allows the user to try the smart bot from the developer authorization before installing it.
- Yes, allow users to try using developer authorization: Use this option to allow the Try option for this bot, so your developers can chat with this bot by logging into your account’s marketplace.
- No, do not enable try capability: Use this option to disallow the Try options for this bot in your account’s marketplace.
- Smart Bot Description: Enter a description for the Smart Bot to show it in your account’s marketplace.
- Configuration Instructions: Instructions can be given to the developers using the Smart Bot for installing the same. This should include details like the list of tasks available and their purpose, bot variables that need to be populated, and so forth. The purpose of these instructions is to ensure that the developers inheriting this bot can put it to maximum use. Developers can see these instructions while inheriting the smart bot. You can either upload a PDF file containing the instructions or enter it in a plain text format.
- Configuration Instructions URL: Additionally, you can provide a URL, if any, for the configuration instructions details.
- Save the settings.
Inheriting a Smart Bot
Bot developers can view and install a Smart Bot published within their account.
NOTE: In order for the developers to view and inherit your smart bot, you need to publish it. Refer here for details on Publishing the Bot.
Steps to Inherit a Smart Bot
- Open the Bot Builder.
- On the top-right side of the Bot Builder homepage, click New Bot.
- On the New Bot window, click Inherit a Bot. The Select Smart Bot window opens.

- On the Select Smart Bot window, search or scroll to the bot you want to inherit. Hover over the Smart Bot’s name and click Install. The Configure Smart Bot window opens.
- The Bot Name field is auto-filled with a suffix added to the Smart Bot name. Replace it with a name of your choice.
- If you want to add a custom icon for the bot, select Custom Icon in the icon field and upload the file.
- Update Preference can be set, which decides how the updates to the parent bot are to be handled by the child bot. When there are changes to the parent bot, the updates to the child bot can be made to the published version or the in-development version of the child bot.
- Add bot definition updates directly to published version when available is the default setting whereby all the updates get inherited by the published version of the child bot. In case the published version is not available, then the updates are applied to the in-development version.
Note: This setting overrides the bot setting of ‘hold all deployment requests and publishing only on explicit approval from admin’ from the Admin Console.
- Always add bot definition updates to the in-development version will apply the changes to the in-development version of the child bot. If the in-development version is not available it is created in the locked inheritance state.
Note:If any tasks or nodes are unlocked in the in-development version, the same will be applied to the published version. This setting can be modified later from the Advanced Settings of the child bot.
- Click the Setup Variables tab. It shows the list of variables that are configured with Pre-Populated or Ask on Install settings. Enter the values for Ask on Install variables. Optionally, make edits to Pre-Populated variables if any.
- The Configuration Installation file opens. Read the instructions carefully and then click Next.
- The child bot gets created, and the Bot Tasks page of the bot opens.
The child bots can use the Smart Bot as is or extend the inherited functionality by adding tasks and knowledge queries, as well as localize relevant parameters using variables. The Inheritance Scenarios section below provides the list of elements that get inherited by the child bot and the conditions under which the inheritance continues or gets overridden.
Inheritance Scenarios
In a child bot, the inheritance applies in the following ways:
- No inheritance where some elements do not get inherited by the child bot;
- One-time inheritance wherein inheritance is a one-time process and any further changes to some bot elements in the parent smart bot will not be inherited by the child bot.
- Continued inheritance where changes to some bot elements in the parent smart bot will be inherited by the child bot. Update Preference settings configured at the time of bot installation or later from the Advanced Settings tab will decide which version of the child bot – published or in-development – will get the updates.
Disable Inheritance: Inheritance can be disabled at the bot level, from the Advanced Settings of the child bot using the Smart Bot Inheritance option. This option will permanently delink the child bot from the parent smart bot and should be used with caution..
The following sections show the list of bot elements with no, one-time and continuous inheritance and the actions that unlock the inheritance.
Bot Elements that are not Inherited
- Any Configured Channels
- Any apps created in the Smart Bot for connecting to BotKit or Web SDK
Bot Elements with One-Time Inheritance
- Entity Synonyms
- Bot Settings
- Auth Profiles
- Default Dialog
Note: While the Entity Synonyms of existing bot tasks have a one-time inheritance, the NLP entries of any new task created in the parent bot will get inherited by the child bots.
Bot Elements with Continued Inheritance
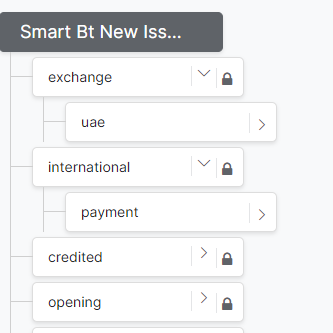
Bot Tasks inherited by the child bot have a continued inheritance which means that any published changes to the bot tasks in the parent automatically reflect in the child bot. You can override or “unlock” the continued inheritance of bot elements by editing a certain portion of them.
The following table shows the list of bot elements that acquire a continued inheritance and provides the steps to unlock the inheritance.
| Feature Name |
Unlocking of Inheritance |
| Dialog Tasks |
On the Dialog tasks page, click the lock icon against the task name, and then click Unlock.
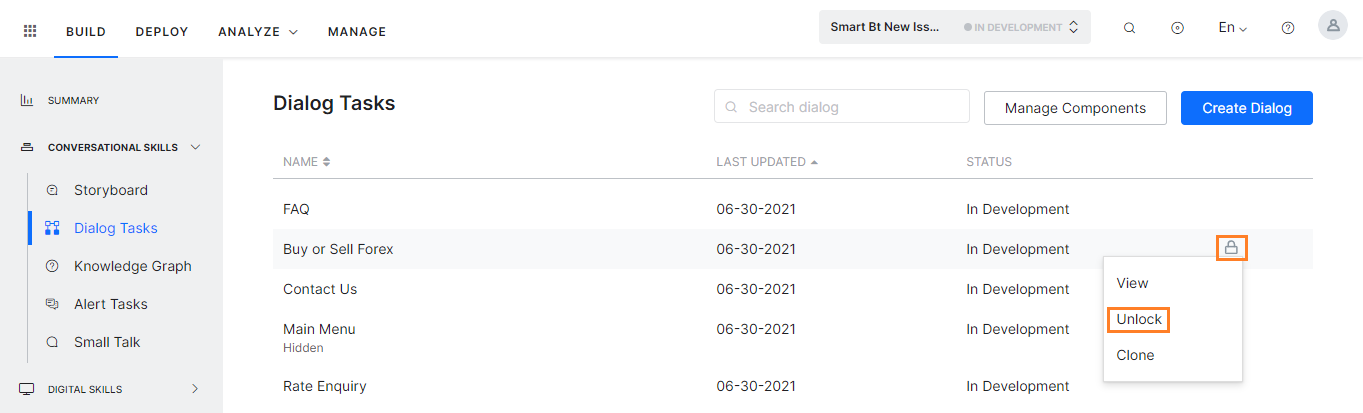
Once unlocked, the following dialog components will stop receiving updates and should be managed by the child bot developer:
- Dialog Settings and Interruption Settings
- Order of node connections
- Deletion of Nodes
- Addition of New nodes
Note: When you unlock a Dialog Task, all the Dialog Nodes are still locked until you unlock them individually. The locked nodes continue to receive updates from the parent bot. |
| Dialog Nodes |
All Dialog node definitions except Synonyms and Patterns remain in the continued inheritance with the parent bot. To unlock the inheritance of the node:
- Unlock the inheritance of all the Dialog tasks using the node.
- Open the node and click the lock icon on the top-right corner of the node window.
- Click Confirm on the Confirmation Message window to unlock the node.
Note: For a node that is used by multiple tasks, you might want to unlock the inheritance for a specific task and not all tasks..
|
| Knowledge Graph |
Child bots get continued inheritance of all terms, FAQs, path synonyms, term usage property, child terms, and their synonyms. You can unlock the inheritance of a Knowledge Graph at any of the first-level nodes. When you click the lock icon of a first-level node and confirm unlocking it, the inheritance of the term and all its child terms becomes unlocked.
When unlocked, the following components will stop receiving updates:
- Synonyms, class association, and other term specific settings of the unlocked term and all its child terms
- All questions and answers added either to the term or its child terms
- Additional child terms, additional questions can be added and managed
- Inherited classes are always in a non-editable state
Answers can be unlocked when the associated first-level term is in a locked state by editing and training the same. When an answer is unlocked:
- Path and the question will continue to get the inheritance
- Answers, alone, will not get updates
Note: You cannot modify inherited classes even after unlocking. However, you can duplicate the class definition by re-creating it and applying it to appropriate classes.
|
| Language Management |
Any Languages Enabled by the parent bot are inherited by the child bot. Following scenarios unlock the inheritance in the child bot:
- Manage Language from the child bot will unlock the inheritance for the selected language.
- Enable Language from the child bot will unlock any future inheritance for that language i.e if the parent bot enables the same language it will not be inherited by the child bot.
|