Kore.aiストアは、Kore.aiプラットフォームで実行するボットのオンライン市場です。ストアのパーパスは、ボット開発者であるあなたが、ボットの機能を探索し、それをアカウントにインポートできるようにすることです。ストア内には“テンプレートボット”のみが用意されており、ストアを訪れると、これらのボットをすべて探索することができます。テンプレートボットをインストールするためには、Kore.aiプラットフォームのアカウントが必要です。
アクセスストア
ストアへのアクセスには、さまざまな方法があります。以下からストアにアクセスできます。
- ストア
- Kore.aiプラットフォーム
ストア
- https://bots.kore.ai/botstore/から、ストアにアクセスできます。
- ストアで利用できるすべてのテンプレートボットを閲覧、探索、インストールすることができます。
- テンプレートは、Kore.aiプラットフォームのように、適用される製品をベースに分類されています。
Kore.aiプラットフォーム Kore.aiプラットフォームのユーザーであれば、プラットフォーム内からストアにアクセスすることができます。
- 有効な資格情報によって、Kore.aiプラットフォームにログインします。
- ランディングページでは、右上にストアの探索ボタンが表示されています。

- ストアの探索をクリックします。
- Kore.aiプラットフォームに関連するボットを閲覧、探索、インストールすることができます。
ボットの探索
テンプレートボットは、インストールする前に探索することができます。探索オプションでは、技術仕様、サポートされているチャネル、システム連携、言語など、ボットの概要を手に入れることができます。ボットストアにアクセスした後は、以下の手順で、提供されたさまざまなテンプレートをご探索ください。
- 以下の基準をベースにして、ボットをフィルタリングすることができます:
- カスタマーサービス、HR、ヘルスケア、小売、通信などの業種。
- NLUのコンセプトであるデジタルビュー、IVRシステム連携、オムニチャネル体験などの機能。複数の機能を選択できます。
- Salesforceなどのシステム連携。複数のシステム連携を選択することができます。
- メール、Facebook、Messenger、Twilioなどのデプロイメント用チャネル。複数のチャネルを選択できます。
- テンプレート ボットを、以下に基づいて 並べ替える ことができます。
- 導入数
- 最新
- アルファベット順
- テンプレートボットをポイントすると、以下のような機能が表示されます:
- ボットの名前、アイコン、概要など。
- 関連する機能、複雑さ、デプロイメントのチャネル、ダウンロード数など。
- プレビュー画面で探索をクリックすると、以下のような詳細が表示されます。
- ボットの機能について説明する 動画。
- 以下の2つのセクションが出てきます。
- 概要 — このセクションでは、テンプレートボットの概要と、このボットで利用可能な機能について説明しています。
- 技術仕様 — このセクションでは、データソースなど、ボットの技術的な側面の詳細について説明しています。
- 右の列では、以下を確認できます。
- ボットの“カテゴリ”と“複雑さ”。
- ボットがダウンロードされた回数。
- サポートされている“チャネル”“言語”“システム連携”(ある場合)のリスト。
- 選択された“テンプレート”ボットに類似するボットが表示される関連ボットセクション。
- ボットを探索した後、必要であれば、インストールをクリックして、ボットをインストールします。

ボットのインストール
インストールとは、テンプレートボットを自身のアカウントにインポートすることです。テンプレートボットは、ストアおよびKore.aiプラットフォームからインストールできます。テンプレートボットを選択したら、以下の手順でボットのアカウントにそれをインストールします。
- ボットストアからのインストール:
- ボットストアにアクセスして、テンプレートボットを探索し、選択したテンプレートボットでインストールをクリックします。
- まだログインしていない場合、Kore.aiのアカウントにログインするように指示されます。
- 有効なKore.aiアカウントをお持ちでない方は、今すぐ作成できます。
- Kore.aiプラットフォームからのインストール、
- 有効な資格情報によって、Kore.aiプラットフォームにログインします。
- 「ランディング」ページからは、以下の方法で「テンプレート」ページにアクセスできます。
- ボットの探索のバナーをクリックします。
- + 新しいボットのストアから開始を選択します。
- テンプレートボットを探索し、選択したテンプレートボットに対してインストールをクリックします。
- ボットの概要ページに、サンプルボットの設定ウィンドウが表示されます。
- 設定を続けることも、後でボットをセットアップすることもできます。すぐにセットアップしたくない場合は、「設定」ウィンドウを閉じてください。セットアップするためのオプションは、後でボット名の横に用意されています。

- サンプルボットの「設定」ウィンドウで、デフォルトでは手順タブが選択されており、インストール手順を見ることができます。
- 次へをクリックします。
- ボットの設定ページで:
- ボット名を入力します。
- アイコンを選択します。
- 汎用ボットアイコン
- カスタムアイコン – カスタムアイコンのファイルをアップロードします
- 次へ/完了をクリックします。
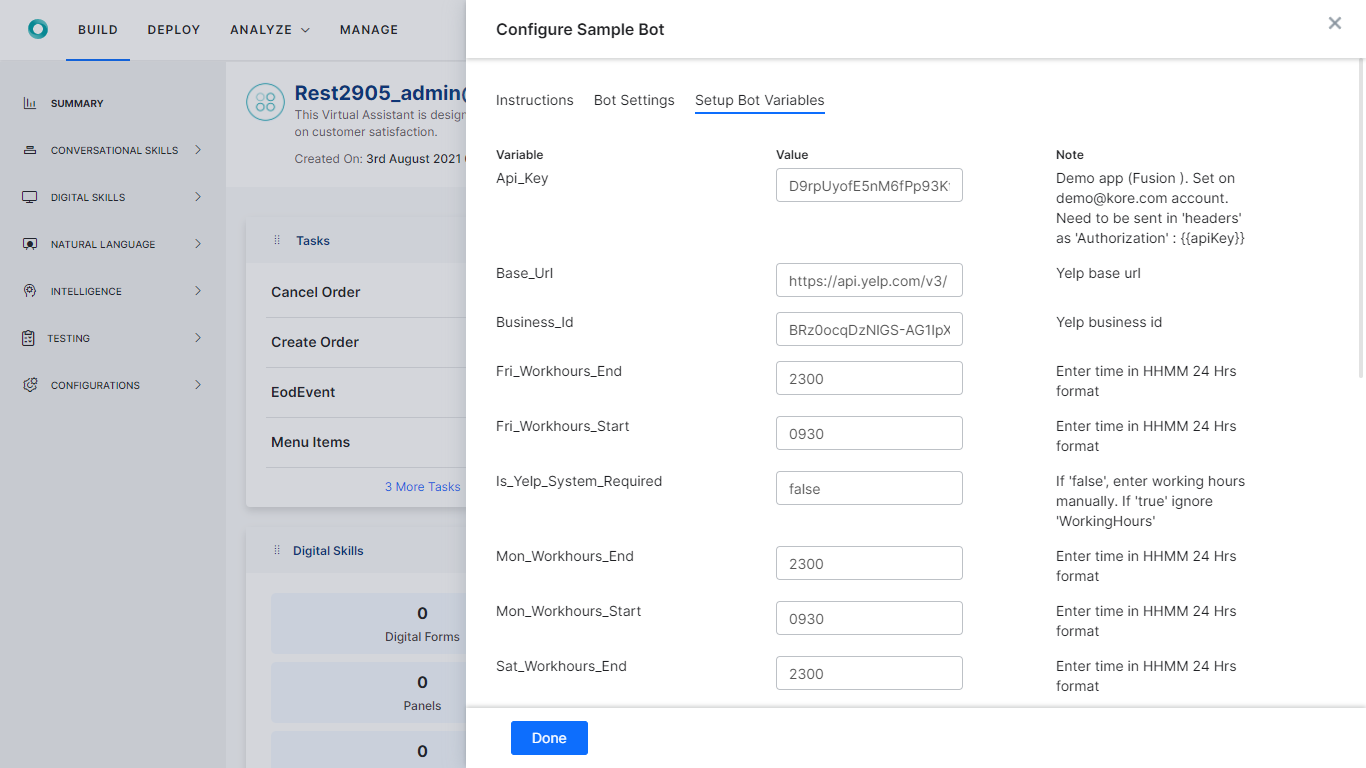
- ボット変数のセットアップページで、変数名に対応する値を入力します。これらは、認証トークンやAPIキーなど、ボットの実行に必要とされる値です。このステップは、インストールしようとするボットによってはオプションとなります。
- 完了をクリックします。
- これで、テンプレートボットはいつでも使用できます。
Kore.ai 스토어는 Kore.ai 플랫폼에서 실행되는 봇의 온라인 마켓플레이스입니다. 이 스토어의 목적은 봇 개발자가 봇의 기능을 탐구하고 봇을 해당 계정으로 가져올 수 있도록 하는 것입니다. 템플릿 봇만 스토어를 이용할 수 있으며, 스토어를 방문하여 모든 봇을 탐색할 수 있습니다. 템플릿 봇을 설치하려면 Kore.ai 플랫폼 계정이 있어야 합니다.
스토어 액세스
다양한 방법으로 스토어에 액세스할 수 있습니다. 다음 위치에서 스토어에 액세스할 수 있습니다.
- 스토어
- Kore.ai 플랫폼
스토어
- 스토어에 액세스하려면 https://bots.kore.ai/botstore/를 방문하세요.
- 스토어에서 이용할 수 있는 모든 템플릿 봇을 보고, 탐색하고, 설치할 수 있습니다.
- 템플릿은 Kore.ai 플랫폼과 같이 적용 가능한 제품을 기준으로 분류됩니다.
Kore.ai 플랫폼 Kore.ai 플랫폼 사용자는 플랫폼에서 스토어에 액세스할 수 있습니다.
- 유효한 자격 증명으로 Kore.ai 플랫폼에 로그인합니다.
- 랜딩 페이지의 오른쪽 상단에 스토어 탐색 버튼이 있습니다.
- 스토어 탐색을 클릭합니다.
- Kore.ai 플랫폼과 관련된 봇을 보고, 탐색하고, 설치할 수 있습니다.
봇 탐색
템플릿 봇을 설치하기 전에 먼저 탐색할 수 있습니다. 탐색 옵션을 사용하면 기술 세부 사양, 지원되는 채널, 통합, 언어 등 봇에 대한 개요를 파악할 수 있습니다. 봇 스토어에 액세스한 다음 아래 단계에 따라 제공되는 다양한 템플릿을 살펴보세요.
- 다음 기준에 따라 봇을 필터링할 수 있습니다.
- 고객 서비스, HR, 의료, 소매, 통신 등과 같은 영역.
- NLU 개념 디지털 뷰, IVR 통합, 옴니채널 경험 등과 같은 기능. 여러 기능을 선택할 수 있습니다.
- Salesforce와 같은 통합 등 여러 통합을 선택할 수 있습니다.
- 이메일, Facebook Messenger, Twilio 등과 같은 배포용 채널을 여러 개 선택할 수 있습니다.
- 다음을 기준으로 템플릿 봇을 정렬할 수 있습니다.
- 설치 수
- 최신
- 알파벳순
- 템플릿 봇 위에 마우스를 올려놓으면 다음과 같은 기능을 미리 볼 수 있습니다.
- 봇 이름, 봇 아이콘, 봇 요약.
- 관련 기능, 복잡성, 배포 채널, 다운로드 수.
- 미리 보기 디스플레이에서 다음과 같은 자세한 내용을 보려면 탐색을 클릭합니다.
- 봇의 기능을 설명하는 동영상.
- 다음을 제공하는 두 섹션을 찾을 수 있습니다.
- 개요 – 이 섹션에서는 템플릿 봇과 이 봇에서 사용 가능한 기능 요약을 제공합니다.
- 기술 세부 사양 – 이 섹션에서는 데이터 소스와 같은 봇의 기술적인 측면에 대한 자세한 개요를 제공합니다.
- 오른쪽 열에서 다음을 확인할 수 있습니다.
- 봇의 카테고리 및 복잡성.
- 봇을 다운로드한 횟수.
- 채널, 언어, (있는 경우) 지원되는 통합 목록.
- 선택한 템플릿 봇과 유사한 봇의 관련된 봇 섹션.
- 봇을 탐색한 후 필요한 경우 설치를 클릭하여 봇을 설치합니다.
봇 설치
설치란 사용자 계정으로 템플릿 봇을 가져오는 것을 의미합니다. 스토어와 Kore.ai 플랫폼에서 템플릿 봇을 설치할 수 있습니다. 템플릿 봇을 탐색하고 선택한 다음 아래 단계에 따라 봇의 계정에 해당 봇을 설치합니다.
- 봇 스토어에서 설치하는 경우:
- 봇 스토어를 방문하여 템플릿 봇을 탐색하고 선택한 템플릿 봇에 대해 설치를 클릭합니다.
- 아직 로그인하지 않았다면 Kore.ai 계정에 로그인하라는 메시지가 표시됩니다.
- 유효한 Kore.ai 계정이 없는 경우 바로 만들 수 있습니다.
- Kore.ai 플랫폼에서 설치하는 경우:
- 유효한 자격 증명으로 Kore.ai 플랫폼에 로그인합니다.
- 랜딩 페이지에서 다음 방법을 통해 템플릿 페이지를 방문할 수 있습니다.
- 봇 탐색 배너를 클릭합니다.
- + 새 봇에서 스토어에서 시작을 선택합니다.
- 템플릿 봇을 탐색하고 선택한 템플릿 봇에 대해 설치를 클릭합니다.
- 봇 요약 페이지에 샘플 봇 구성 창이 나타납니다.
- 구성을 계속하거나 나중에 봇을 설정할 수도 있습니다. 나중에 구성하려면 구성 창을 닫습니다. 이 설정 옵션은 나중에 봇 이름 옆 버튼으로 선택할 수 있습니다.
- 샘플 봇 구성 창에는 기본적으로 지시 사항 탭이 선택되어 있으므로 설치 지시 사항을 확인할 수 있습니다.
- 다음을 클릭합니다.
- 봇 설정 페이지:
- 봇 이름을 입력합니다.
- 아이콘을 선택합니다.
- 일반 봇 아이콘
- 사용자 정의 아이콘 – 사용자 정의 아이콘이 있는 파일을 업로드합니다
- 다음/완료를 클릭합니다.
- 봇 변수 설정 페이지에서 변수 이름에 해당하는 값을 입력합니다. 봇이 권한 부여 토큰 또는 API 키 등을 실행하는 데 필요한 값입니다. 설치하는 봇에 따라 달라지는 선택적 단계입니다.
- 완료를 클릭합니다.
- 템플릿 봇을 사용할 준비가 되었습니다.
Leave a Reply
Kore.ai Store is an online marketplace for bots that run on the Kore.ai platform. The purpose of the store is to enable you as a bot developer to explore the bot’s capabilities and import them into their accounts. Only Template Bots are available in the store and by visiting the store you can explore all these bots. You must have a Kore.ai platform account to install the template bots.
Access Store
There are different ways you can access the store. You can access the store from:
- Store
- Kore.ai Platform
Store
- Visit https://bots.kore.ai/botstore/ to access the store.
- You can view, explore, and install all the template bots available in the store.
- The templates are categorized based on the product they are applicable to like the Kore.ai Platform.
Kore.ai Platform
As a Kore.ai platform user, you can access the store from within the platform.
- Log in to the Kore.ai platform with valid credentials.
- On the landing page, you can find the Explore Store button at the top right.
- Click Explore Store.
- You can view, explore, and install the bots related to the Kore.ai platform.
Explore Bots
You can explore the template bots before installing them. The explore option allows you to get an overview of the bots including the technical specifications, supported channels, integrations, and languages.
Once you have accessed the bot store, follow the below steps to explore the various templates offered:
- You can filter the bots based on the following criteria:
- Domains like customer service, HR, Healthcare, Retail, Telecom, and more.
- Features like NLU concepts Digital Views, IVR integration, Omnichannel experience, and more. You can select multiple features.
- Integrations like Salesforce, etc. You can select multiple integrations.
- Channels for deployment like Email, Facebook Messenger, Twilio, etc. You can select multiple channels.
- You can sort the template bots based on:
- Number of installations
- Recency
- Alphabetically
- Hover over a template bot to preview its features like:
- Name, icon, and summary of the bot.
- Associated features, complexity, the channels of deployment, and the number of downloads.
- On the preview display, click Explore for more details like:
- A video that explains the bot’s features.
- You can find two sections that give:
- Overview – This section gives a summary of the template bot and the features available in this bot.
- Technical Specifications – This section gives a detailed overview of the technical aspects of the bot like data source, etc.
- On the right column, you can find:
- Category and complexity of the bot.
- The number of times the bot was downloaded.
- The list of channels, languages, and integrations (if any) supported.
- The Related Bots section for bots similar to the selected template bot.
- After exploring the bot, if required, you can click Install to install the bot.
Install Bots
Install refers to importing the template bots into your account. You can install template bots from the store and Kore.ai platform.
Once you have explored and selected a template bot, follow the below steps to install the same into your bot’s account:
- Installing from Bot store:
- Visit the bot store, explore the template bots and click Install on the selected templated bot.
- You are prompted to log in to your Kore.ai account, if not logged in already.
- If you do not have a valid Kore.ai account, you can create it now.
- Installing from Kore.ai platform,
- Login to the Kore.ai platform with valid credentials.
- From the landing page, you can visit the Templates page by:
- Clicking the Explore Bots banner.
- Selecting the Start from the Store option under + New Bot.
- Explore the template bots and click Install against the selected templated bot.
- A Configure Sample Bot window appears on the Bot Summary page.
- You can continue with the configuration or choose to set up the bot later. If you don’t want to set it up immediately, just close the configure window. The option to set it up is available next to the bot name later.
- On the Configure Sample Bot window, by default, the Instructions tab is selected and you can find the installation instructions.
- Click Next.
- On the Bot Settings page:
- Enter the Bot Name.
- Select an icon:
- Generic bot icon
- Custom icon – Upload a file with the custom icon
- Click Next/Done.
- On the Setup Bot Variables page, enter the corresponding values for the variable names. These are the values that the bot needs for its execution like authorization tokens or API keys. This is an optional step depending upon the bot you are installing.
- Click Done.
- Your template bot is ready for use.