이 섹션에서 다루는 주제로는 봇 가져오기/내보내기, 봇 삭제, 봇 변경 로그 보기가 있습니다.

봇 변수 및 봇 변수의 관리 방법을 참조해 보세요. 자세한 내용은 여기를 참조하세요.

봇 가져오기 및 내보내기

Kore.ai를 사용하면 봇의 작업과 관련 설정을 다른 봇으로 내보내고 가져올 수 있습니다. 이 기능은 봇 정의 마이그레이션, 봇 복제, 봇 정의의 정기적인 백업 유지 관리에 도움이 됩니다. 봇이 최종 사용자용으로 출시되기 전에 개발 프로세스의 여러 단계에서 다양한 버전의 봇을 테스트하는 것이 특히 도움이 됩니다. 이 섹션의 문서는 내보내기 가져오기 기능이 작동하는 방식과 해당 기능을 수행하는 방법을 이해하는 데 도움을 줍니다. 참고: v8.0의 출시 이후 enableNegativePatterns 플래그는 내보내고 가져온 봇 정의의 'NLP 데이터'에 있는 'NLP 설정'에 포함됩니다. 이 플래그는 봇에서 네거티브 패턴이 활성화/비활성화되었는지 확인하는 데 사용됩니다. 이 패치 이전에 이 플래그는 가져온 봇 정의의 'NLP 데이터'에 있는 'NLP 설정'과 내보낸 봇 정의의 '설정'에 있는 '봇 설정'의 일부였습니다. 이 변경 사항은 기능을 간소화하기 위한 것으로, v8.0 이전에 생성된 내보내기 파일에서 봇의 증분 가져오기가 실패할 수 있습니다.

봇 내보내기

내보내기 옵션을 사용하여 봇의 정의 및 구성을 내보낼 수 있습니다. 봇을 내보내면 다음 압축 파일이 다운로드됩니다.

  • botDefinition.json: 봇 메타데이터, 작업, 봇 및 작업 수준 동의어, 발화, 패턴, 지식 그래프, 표준 응답, 흐름, IDP를 포함합니다. 봇을 내보내는 동안 봇 작업, NLP 데이터(NLP 설정, 발화, 표준 응답) 및 설정(봇 설정, 변수, IVR 설정)에서 내보낼 특정 항목을 선택할 수 있습니다.
  • config.json: 봇 설정, 봇 변수 및 IVR 설정을 포함합니다.
  • Icon.png: 봇 아이콘을 포함합니다.
  • Custom ScriptFile Name.js> (사용 가능한 경우): JavaScript 함수가 있는 스크립트 파일을 포함합니다. 이 파일을 봇에 업로드하면 봇의 어디에서나 파일에서 함수에 액세스할 수 있습니다.
참고: 봇과 봇의 구성 요소에는 내보내는 동안 고유한 참조 ID가 제공됩니다. 이러한 ID는 플랫폼이 대상 봇에서 일치하는 작업을 식별하고 업데이트하는 데 도움이 됩니다.

내보내기 모드

두 가지 모드로 봇을 내보낼 수 있습니다. 게시됨최신 버전. 선택한 모드에 따라 해당 봇 작업 버전을 내보냅니다. 두 가지 모드에서 봇 작업, NLP 데이터 및 봇 설정에서 내보낼 특정 봇 구성 요소를 선택할 수 있습니다. 추가 개별 봇 작업도 선택할 수 있습니다.

게시된 모드

게시된 모드에서 봇을 내보낼 경우 다른 기존 버전에 관계없이 게시된 버전의 봇 작업만 내보냅니다. 예를 들어, 봇이 게시된 버전의 작업으로 구성되어 있고 업그레이드 진행 중 버전이면 게시된 버전만 내보냅니다. 게시된 모드에서 내보내는 작업 버전을 확인하려면 아래 표를 참조하세요.

작업 상태
진행 중 내보내지 않음 개발 진행 중인 작업인 경우 게시된 모드에서 내보내지 않습니다.
설정됨 내보내지 않음 작업 설정이 완료되었지만 사용하도록 게시되지 않은 경우 게시된 모드에서 내보내지 않습니다.
게시됨 내보냄 모든 게시된 봇 작업을 내보냅니다.
업그레이드 진행 중 내보내지 않음 진행 중인 작업 업그레이드 설정을 내보내지 않습니다. 게시된 설정만 내보낼 수 있습니다.
거부됨 내보내지 않음 관리자가 거부한 내보내지 않은 작업 설정은 내보내지 않습니다
일시 중단됨 내보내지 않음 일시 중단된 작업은 내보내지 않습니다.
참고: 대화 작업에서 '게시됨' 상태의 노드만 내보냅니다.
최신 버전

최신 모드에서 봇을 내보내면 봇의 게시 상태에 관계없이 최신 버전의 봇 작업을 내보낼 수 있습니다. 예를 들어, 봇이 게시된 버전의 작업과 업그레이드 진행 중인 버전으로 구성된 경우 업그레이드 진행 중인 버전을 내보내고, 구성된 버전만 있는 경우에는 설정된 버전을 내보냅니다. 최신 모드에서 내보내는 작업 버전을 확인하려면 아래 표를 참조하세요.

작업 상태
진행 중 사용 가능한 유일한 버전인 경우 내보내며 최신 버전이 있는 경우 내보내지 않습니다
설정됨 사용 가능한 유일한 버전인 경우 내보내며 최신 버전이 있는 경우 내보내지 않습니다
게시됨 사용 가능한 유일한 버전인 경우 내보내며 최신 버전이 있는 경우 내보내지 않습니다
업그레이드 진행 중 봇의 다른 작업 버전에 관계없이 내보냅니다
거부됨 내보내지 않음 관리자가 거부한 내보내지 않은 작업 설정은 내보내지 않습니다
일시 중단됨 내보내지 않음 일시 중단된 작업은 내보내지 않습니다

봇 내보내기 단계

  1. 내보낼 봇을 엽니다.
  2. 상단 메뉴에서 배포 탭을 선택합니다.
  3. 왼쪽 메뉴에서 봇 관리 -> 가져오기 및 내보내기를 선택합니다.
  4. 가져오기 및 내보내기 페이지에서 내보내기 탭을 선택합니다.
  5. 내보내기 탭에서 게시됨 또는 최신 버전 내보내기 모드를 선택합니다.
  6. 기본적으로 모든 봇 항목은 내보내기로 선택됩니다. 내보내지 않을 항목을 선택 취소합니다.
  7. 작업의 경우 선택한 작업만 내보내도록 추가로 선택할 수 있습니다. 기본적으로 모든 작업이 선택됩니다. 모든 작업 링크를 클릭하여 작업 선택 대화 상자를 열고 내보낼 작업을 선택합니다.
  8. 또한 내보내기에 종속 작업 포함 여부를 선택할 수도 있습니다. 가져오기 전에 이러한 작업이 있는지 확인하고 종속 작업이 없으면 가져오기가 실패합니다. 이러한 종속 작업에는 다음이 포함됩니다.
    • 연결된 대화(예: 다른 대화의 정의에 있는 대화 노드)
    • 대화의 모든 노드에서 IVR 속성에 대해 '재시도 초과 시 동작'을 정의할 때 연결된 대화.
    • 하위 의도/중단 설정의 일부로 연결된 대화.
    • 종속 작업이 포함되지 않은 경우 대화 실행이 실패할 수 있는 다른 시나리오

  9. 내보내기를 클릭합니다. 내보내기가 백그라운드에서 실행되며 완료된 후에 다운로드 버튼이 활성화됩니다. 다운로드를 클릭하여 파일을 로컬 컴퓨터에 다운로드합니다.

내보낸 봇 구성 요소

봇을 내보낼 때 최신 모드 또는 게시된 모드의 선택에 따라 다음 봇 구성 요소를 내보냅니다.

봇 작업
작업 전용
  • 작업 정의(작업, 알림, 정보 및 대화)
  • 동의어(작업, 필드 및 엔티티)
  • 패턴(작업, 필드 및 엔티티)
지식 그래프 지식 그래프 정의와 관련 동의어 및 클래스
NLP 데이터
NLP 설정 고급 NLP 설정, 무시 단어, 필드 메모리 고급 NLP 설정(자연어 > 고급 설정)에는 다음이 포함됩니다.

  • ML 발화의 자동 학습 설정
  • 다중 의도 탐지 설정
  • 임계값 및 구성 설정
  • 기초 의미
  • 지식 그래프
  • 기계 학습
발화 활성화된 모든 언어의 모든 봇 발화
표준 응답 활성화된 모든 언어로된 봇의 모든 표준 응답
설정
봇 설정 봇 설정 페이지에서 다음 정보를 확인할 수 있습니다.

  • 일반 설정
  • 각 활성화된 언어에 대한 봇 이름, 설명, 봇 동의어
  • 언어 선택 시간 프레임(봇 설정 > 언어 관리)
  • 환영 메시지
  • 보류 및 재개 설정(봇 수준)
  • 사용자 정의 스크립트 파일
  • 테넌시 URL
  • 오류 메시지
  • 작업 설정 및 실행 설정(UI 양식을 사용하여 작업 실행).
봇 변수 해당 값과 함께 봇의 모든 전역 및 콘텐츠 변수입니다.
IVR 설정 봇에 대한 모든 IVR 설정(봇 설정 > IVR 설정).

봇 가져오기

다음 가져오기 유형 중 하나를 사용하여 봇의 작업 및 구성을 새 봇이나 기존 봇으로 가져올 수 있습니다.

  • 전체 가져오기: 기존 봇을 가져온 봇 구성으로 대체합니다. 가져오기 정의에 없는 대상 봇의 추가 구성은 모두 삭제됩니다. 이 규칙의 예외는 가져오기 봇 정의에 없는 경우에도 유지되는 Webhook 채널입니다.
    참고: 이 옵션을 사용하여 봇을 가져오기 전에 대상 봇을 백업하고 주의를 기울이는 것이 좋습니다.
  • 증분 가져오기: 가져오기 파일에서 사용 가능한 설정으로 현재 봇을 업그레이드합니다. 대상 또는 가져온 봇에서 사용할 수 있는 추가 구성은 그대로 유지됩니다. 봇 작업, NLP 데이터 및 봇 설정에서 가져올 특정 봇 구성 요소를 선택할 수 있습니다. 가져온 봇 항목이 증분 가져오기에서 대상 봇의 항목을 어떻게 대체하는지 알아보려면 문서 끝에 있는 증분 가져오기 표의 봇 항목을 참조하세요.

시작하기 전에 config.json 파일은 대상 봇의 값이 필요한 봇 변수로 구성됩니다. 봇 정의를 새 봇으로 가져오기 전에 관련 개발자와 파일을 공유하거나 변수에 적합한 값을 직접 입력합니다.

기존 봇으로 가져오기 단계

봇을 가져오려면 다음 단계를 따르세요.

  1. 내보낼 봇을 엽니다.
  2. 상단 메뉴에서 배포 탭을 선택합니다.
  3. 왼쪽 메뉴에서 봇 관리 -> 가져오기 및 내보내기를 선택합니다.
  4. 가져오기 및 내보내기 페이지에서 가져오기 탭을 선택합니다.
  5. 봇 정의 파일 필드 및 봇 설정 파일 필드 옆에 있는 파일 선택 버튼을 클릭하고 각각 botDefinition.jsonconfig.json 파일을 업로드합니다.
  6. 선택적으로 필요한 경우 가져온 봇에서 사용자 정의 스크립트 파일을 업로드합니다.
  7. 다음 가져오기 옵션 중 하나를 선택합니다. 전체 가져오기 또는 증분 가져오기.
  8. 전체 가져오기를 선택하면 개발 중인 복사본의 봇 정의를 가져오기 파일에 있는 정의로 덮어씁니다.
    • 봇에 하나 이상의 추가 작업이나 언어가 있고 이러한 작업이 가져오기 정의에 없는 경우 해당 작업은 삭제됨으로 표시되며 봇이 게시될 때 삭제됩니다.
    • 봇을 가져온 후 자동으로 게시하도록 선택할 수 있습니다.

  9. 증분 가져오기를 선택하는 경우 가져올 봇 항목을 선택할 수도 있습니다.

    • ML 발화는 추가 또는 대체할 수 있습니다
      • 첨부 옵션은 파일에 있는 발화를 봇으로 가져와야 하고 봇의 추가 발화를 유지해야 하는 경우(기본 동작임) 사용할 수 있습니다.
      • 대체 옵션은 파일에 있는 발화를 봇으로 가져와야 할 때 사용할 수 있으며 봇의 추가 발화가 제거됩니다.
        • 작업을 가져오는 경우에도 가져오는 작업과 관련된 추가 발화가 제거됩니다.

    • 확인 대화가 열리면 백업을 클릭하여 기존 봇 구성을 다운로드합니다.
      참고: 백업은 선택 사항이지만 가져온 봇이 봇 설정을 대체한 후에는 봇 설정을 복구할 수 없으므로 특히 전체 가져오기를 선택할 때는 백업하는 것이 좋습니다.
    • 가져오기를 시작하려면 진행을 클릭합니다.
    • 가져오기가 완료되면 다음과 같은 성공 메시지가 표시됩니다. 완료를 클릭합니다.

참고: 봇 가져오기는 봇이 복원되었지만 복원 후 게시되지 않는 경우 실패합니다.

가져오기 옵션을 사용하여 새 봇 생성하기

봇을 생성하는 동안 봇을 가져오려면 다음 단계를 따르세요.

  1. 봇 빌더 홈페이지 오른쪽 상단에서 새 봇 > 봇 가져오기를 클릭합니다.
  2. 봇의 이름, 봇의 이용 대상, 봇의 색상을 입력합니다. 자세한 내용은 새 봇 생성하기를 참조하세요.
  3. 봇 정의 파일 필드 및 봇 설정 파일 필드 옆에 있는 파일 선택 버튼을 클릭하고 각각 botDefinition.json 및 config.json 파일을 업로드합니다.
  4. 선택적으로 필요한 경우 소스 봇에서 사용자 정의 스크립트 파일을 업로드하고 가져오기를 클릭합니다.
  5. 가져오기가 끝난 후 성공 메시지에서 완료를 클릭하여 봇 작업 페이지로 이동합니다.

증분 가져오기의 봇 항목

구성 요소 설명
참조 ID가 같은 작업 가져온 작업은 현재 상태(일시 중단된 작업 및 거부된 작업 포함)에 관계없이 대상 봇의 작업을 대체하고 상태를 설정됨으로 변경합니다.
참조 ID가 다른 소스 봇의 작업 이러한 작업은 참조 ID가 같은 대상 봇에서 생성됩니다.
참조 ID가 다른 대상 봇의 작업 이러한 작업은 그대로 유지됩니다.
발화, 패턴, 작업 수준 동의어 가져온 발화, 패턴 및 작업 수준 동의어는 대상 봇의 발화, 패턴 및 작업 수준 동의어를 대체하고 가져온 작업에 적용합니다. 대상 봇에 게시된 모델은 그대로 유지됩니다.
지식 그래프, 봇 동의어 및 표준 응답 대상 봇의 기존 지식 그래프, 봇 동의어 및 표준 응답은 가져온 것으로 대체됩니다.

봇 삭제하기

봇 작업이 게시되면 봇을 삭제할 수 없습니다. 작업을 게시한 후에는 봇 관리자가 작업을 승인하고 사용자에게 할당해야 합니다. 개발자는 할당된 작업을 삭제할 수 없습니다. 게시된 작업을 삭제하려면 봇 관리자가 작업을 일시 중지해야 합니다. 또한 봇이 게시된 흐름의 일부인 경우 봇을 삭제할 수 없습니다. 봇을 삭제하기 전에 흐름을 삭제하거나 흐름에서 봇을 제거해야 합니다.

봇 삭제 단계

  • 삭제할 봇을 엽니다.
  • 상단 메뉴에서 배포 탭을 선택합니다
  • 봇 관리 메뉴의 왼쪽 탐색 메뉴에서 봇 삭제를 클릭합니다.

봇 변경 로그 보기

봇을 생성한 후에는 설정 변경, 작업 추가, 채널 활성화, 흐름 추가 등 다양한 이유로 봇을 편집해야 할 수 있습니다. 봇에 대한 모든 변경 사항을 추적하려면 변경 로그를 볼 수 있습니다. 변경 로그는 봇에 대한 수정 목록을 시간순으로 보여주며 봇의 초기 저장에서 마지막 업데이트까지의 모든 변경 사항으로 구성됩니다. 봇의 변경 로그를 보려면 다음 단계를 따르세요.

  1. 상단 메뉴에서 배포 탭을 선택합니다.
  2. 왼쪽 메뉴에서 봇 관리 ->로그 변경을 클릭합니다.

    • 시간 역순의 변경 목록으로 구성됩니다.
    • 각 페이지에는 가장 최근의 10가지 변경 사항과 변경을 수행한 사용자 이름, 변경 시놉시스, 적용된 변경 사항의 타임스탬프가 표시됩니다.
    • 게시 이벤트의 로그는 선택한 모든 작업에 대해 통합되며, 모든 작업이 게시 의견과 함께 게시되도록 선택되지 않은 경우 작업이 나열됩니다.

로그에서 다음 작업을 수행할 수 있습니다.

  • 검색 텍스트 상자를 사용하여 텍스트를 입력할 수 있으며 플랫폼이 변경 설명에서 해당 텍스트를 검색하고 검색 기준을 충족하는 로그가 표시됩니다.
  • 필터 옵션은 다음을 기준으로 필터링하는 데 사용할 수 있습니다.
    • 봇에서 협업하는 개발자 이름
    • 날짜 범위는 지난 24시간, 지난 7일 또는 시작 날짜와 종료 날짜를 지정한 사용자 정의 날짜입니다. 기본적으로 지난 24시간 동안 모든 개발자의 변경 사항이 표시됩니다.
  • 내보내기 아이콘을 사용하여 변경 로그를 CSV 형식으로 내보낼 수 있습니다. 검색 및 필터 기준을 적용한 후 표시되는 로그가 다운로드됩니다.

このセクションでは、ボットのインポートとエクスポート、ボットの削除、ボットの変更履歴の確認などについて説明します。

ボット変数とその管理方法を参照するのが良いと思われます。詳細はこちらを参照してください

ボットのインポートとエクスポート

Kore.aiでは、ボットのタスクおよび関連する設定を別のボットにエクスポートおよびインポートすることができます。この機能は、ボット定義の移行、ボットの複製、またはボット定義の定期的なバックアップを維持するのに役立ちます。特に、エンドユーザー向けにボットをリリースする前に、開発プロセスのさまざまな段階で、多様なバージョンのボットをテストすることに役立ちます。このセクションの記事は、“エクスポート”と“インポート”機能の仕組みと実行方法を理解するために役立ちます。メモ:v8.0リリース以降は、“enableNegativePatterns”フラグは、エクスポートとインポートされるボット定義における「NLPデータ」の下にある「NLP設定」に含まれるようになります。このフラグは、ボットにおいてネガティブパターンが有効/無効になっているかどうかをチェックするために使用されます。このパッチを適用する前は、このフラグは、インポートされたボット定義における「NLPデータ」の下の「NLP設定」の一部であり、また、エクスポートされたボット定義における「設定」の下の「ボット設定」の一部でありました。この変更は、機能の効率化を目的としたもので、v8.0以前に作成されたエクスポートファイルからのボットの増分インポートに失敗することもあります。

ボットのエクスポート

エクスポートオプションを用いて、ボットの定義および設定をエクスポートすることができます。ボットをエクスポートすると、以下のようなZIPファイルがダウンロードされます。

  • botDefinition.json:ボットメタデータ、タスク、ボットとタスクレベルの同義語、発話、パターン、ナレッジグラフ、標準応答、フローおよびIDPを含みます。ボットエクスポート時に、ボットタスク、NLPデータ(NLP設定、発話、標準応答)、設定(ボット設定、変数、IVR設定)の中より、エクスポート対象の特定アイテムを選択することができます。
  • config.json:ボット設定、ボット変数、およびIVR設定が含まれます。
  • icon.png:ボットアイコンが含まれます。
  • <カスタムスクリプトファイル名.js>(利用可能な場合):JavaScript機能を持つスクリプトファイルが含まれます。このファイルをボットにアップロードした場合、ボット内のいずれからでもファイル内の機能にアクセスできるようになります。
メモ:ボットとそのコンポーネントには、エクスポート時に固有のレファレンスIDが付与されます。これらのIDは、プラットフォームが対象となるボットの中で一致するタスクを特定し、更新するのに役立ちます。

エクスポートのモード

ボットのエクスポートには、以下の2つのモードがあります。公開済みおよび最新バージョン。選択されたモードに応じて、対応するバージョンのボットタスクがエクスポートされます。どちらのモードでも、ボットのタスク、NLPデータ、ボットの設定から、エクスポートする特定のボットコンポーネントを選択することができます。さらに、個々のボットタスクを選択することもできます。

公開済みモード

公開済みモードでボットをエクスポートすると、既存のバージョンにかかわらず、ボットタスクの公開済みバージョンのみがエクスポートされます。例として、ボットがタスクの公開済みバージョンと進行中のアップグレードバージョンで構成されている場合、公開済みバージョンのみがエクスポートされます。以下の表を参照して、どのバージョンのタスクが公開モードでエクスポートされるかをご確認ください。

タスク ステータス
進行中 タスクが開発進行中で、公開済みモードでエクスポートされない場合、エクスポートされません。
設定済み タスクの設定は完了しているが使用のために未公開で、公開済みモードでエクスポートされない場合、エクスポートされません。
公開済み エクスポートされた公開済みボットタスクは、すべてエクスポートされます。
アップグレード中 エクスポートされていない進行中のタスクアップグレード設定は、エクスポートされません。公開済み設定のみがエクスポートされます。
却下 管理者によって却下されたエクスポートされていないタスク設定は、エクスポートされません。
一時停止 一時停止中のエクスポートされていないタスクは、エクスポートされません。
メモ:ダイアログタスクでは、公開済みステータスのノードのみがエクスポートされます。
最新バージョン

最新モードでボットをエクスポートすると、公開ステータスにかかわらず、ボットタスクの最新バージョンがエクスポートされます。例として、ボットがタスクの公開済みバージョンとアップグレード中のバージョンで構成されている場合、アップグレード中のバージョンがエクスポートされますが、設定済みバージョンだけしかない場合は、設定済みバージョンがエクスポートされます。以下のテーブルを参照して、どのバージョンのタスクが最新モードでエクスポートされるかを理解します。

タスク ステータス
進行中 利用可能な唯一のバージョンである場合は、エクスポートされます 以降のバージョンが存在する場合はエクスポートされません
設定済み 利用可能な唯一のバージョンである場合はエクスポートされます 以降のバージョンが存在する場合はエクスポートされません
公開済み 利用可能な唯一のバージョンである場合はエクスポートされます 以降のバージョンが存在する場合はエクスポートされません
アップグレード中 ボット内の他のタスクのバージョンにかかわらず、エクスポートされます。
却下 管理者によって却下されたエクスポートされていないタスク設定は、エクスポートされません
一時停止 一時停止中のエクスポートされていないタスクは、エクスポートされません

ボットをエクスポートする手順

  1. エクスポートしたいボットを開きます。
  2. トップメニューから デプロイタブを選択します
  3. 左側メニューから、ボット管理->インポート&エクスポートを選択します
  4. インポート&エクスポートページで、エクスポート タブを選択します。
  5. エクスポートタブにおいて、公開済みまたは最新バージョンのいずれかのエクスポートモードを選択します。
  6. デフォルトでは、すべてのボットアイテムがエクスポート向けに選択されています。エクスポートしたくないアイテムの選択を解除します。
  7. タスクについては、さらに選択したタスクのみをエクスポートすることもできます。デフォルトでは、「すべてのタスク」が選択されています。すべてのタスクのリンクをクリックすると、タスクの選択ダイアログが開きますので、エクスポートしたいタスクを選択します。
  8. また、依存タスクを含めるを選択するか、またはエクスポート向けを含めないも、選択できます。これらの存在はインポート前にチェックされ、依存するタスクがない場合はインポートが失敗します。これらの依存タスクには、以下のようなものが含まれます。
    • リンクされたダイアログ(例:別のダイアログの定義に存在するダイアログノード)。
    • ダイアログのいずれかのノードのIVRプロパティの「再試行回数超過時の動作」を定義するときにリンクされたダイアログです。
    • サブインテント/一時停止設定の一部としてリンクされたダイアログ。
    • 依存タスクが含まれていない場合にダイアログの実行が失敗する可能性があるその他のシナリオ。

  9. エクスポートをクリックします。エクスポートはバックグラウンドで行われ、完了後にダウンロードボタンが有効になります。ダウンロードをクリックすると、ファイルがローカルコンピュータにダウンロードされます。

エクスポートされたボットコンポーネント

ボットエクスポート時に、最新モードあるいは公開モードの選択に合わせて、以下のボットコンポーネントがエクスポートされます。

ボットタスク
タスクのみ
  • タスクの定義(アクション、通知、情報、ダイアログ)
  • 同義語(タスク、フィールド、エンティティ)
  • パターン(タスク、フィールド、エンティティ)
ナレッジグラフ ナレッジグラフの定義と、それに関連する同義語およびクラス。
NLPデータ
NLP設定

NLPの詳細設定と除外ワードとフィールドメモリ。NLPの詳細設定(自然言語>詳細設定)には、以下のアイテムがあります。

  • ML発話の自動学習設定
  • 複数のインテント検出設定
  • ~のしきい値と環境設定
  • ファンダメンタルミーニング
  • ナレッジグラフ
  • 機械学習
発話 すべての有効な言語のボットによるすべての発話
標準レスポンス すべての有効な言語でのボットによるすべての標準応答
設定
ボットの設定

ボットの設定画面から以下の情報を確認することができます。

  • 一般設定
  • 有効な言語ごとのボット名、説明、ボットの同義語
  • 言語選択期限(ボットの設定 > 言語管理)
  • ウェルカムメッセージ
  • 一時停止と再開の設定(ボットレベル)
  • カスタムスクリプトファイル
  • テナントURL
  • エラーメッセージ
  • タスクの設定と実行の設定(UIフォームを使用してタスクを実行する場合)。
ボット変数 ボットに存在するすべてのグローバル変数とコンテンツ変数、およびその値。
IVR設定 ボットのすべてのIVR設定(ボットの設定 > IVR設定)。

ボットのインポート

以下のインポートタイプのいずれかを使用して、ボットのタスクや設定を新規または既存のボットにインポートすることができます。

  • 全体インポート:既存のボットを、インポートされたボット構成に置き換えます。インポート定義に存在しない対象ボットの追加構成はすべて削除されます。ただし、Webhookチャネルは例外で、インポートボットの定義に存在しなくても保持されます。
    メモ:このオプションを使用してボットをインポートする前に、対象ボットのバックアップを取ることに十分に留意することを強くお勧めします。
  • 増分インポート:現在のボットを、インポートファイルで利用できる構成でアップグレードします。対象ボットもしくはインポートボットで利用できる追加構成はすべて保持されます。ボットタスク、NLPデータ、およびボット設定からインポートする特定のボットコンポーネントを、選択することができます。増分インポートにおいて、インポートされたボットアイテムが対象ボットアイテムをどのように置き換えるかについては、記事の最後にある増分インポートテーブルのボットアイテムをご参照ください。

開始する前に “config.json”ファイルは、対象ボットに必要な値を持つボット変数で構成されています。ボット定義を新しいボットにインポートする前に、ファイルを関連する開発者と共有するか、あるいは自分で変数に適切な値を入力します。

既存のボットへのインポートの手順

ボットをインポートするには、以下の手順に従います。

  1. エクスポートしたいボットを開きます。
  2. トップメニューから デプロイタブを選択します
  3. 左側メニューから、ボット管理->インポート&エクスポートを選択します
  4. インポート&エクスポートページでインポートタブを選択します。
  5. ボット定義ファイルボット設定ファイルの横にあるファイルの選択ボタンをクリックし、それぞれ“botDefinition.json”と“config.json”のファイルをアップロードします。
  6. インポートされたボットのカスタムスクリプトファイルがあれば、任意でそれをアップロードします。
  7. 次のいずれかのインポートオプションを選択します。全体インポート または増分インポート
  8. 完全インポートを選択した場合、開発中のコピーにあるボットの定義は、インポートファイルにある定義で上書きされます。
    • ボットに1つ以上の追加のタスクや言語がある場合、かつそれらがインポート定義に存在していない場合、これらのタスクは削除済みとしてマークされ、かつボットの公開時に除去されます。
    • インポート後にボットを自動公開するかどうかを選択することができます。

  9. 増分インポートを選択した場合、インポートするボットアイテムを選択することもできます。

    • MLの発話は、追加したり置き換えたりすることができます。
      • “追加”オプションは、ファイルに含まれる発話をボットにインポートする際に使用され、ボット内に存在する追加の発話は保持されます(これはデフォルトの動作です)。
      • “置換”オプションは、ファイルに含まれる発話をボットにインポートする際に使用します。ボット内に存在する追加の発話は削除されます。
        • タスクをインポート中の場合でも、インポート中のタスク関連の追加発話は削除されます。

    • 表示された確認ダイアログで、バックアップをクリックして既存のボットの設定をダウンロードします。
      メモ:バックアップはオプションですが、特に全体インポートを選択した場合は、インポートされたボットがボットの構成を置き換えた後では、ボットの構成を回復することができないため、バックアップを行うことを強くお勧めします。
    • 続行をクリックしてインポートを開始します。
    • インポートが完了すると、次のような成功メッセージが表示されます。完了をクリックします。

メモ:ボットが復元されているにもかかわらず、復元後に公開されていない場合、ボットのインポートに失敗してしまいます。

インポートオプションによる新規ボットの作成

ボットの作成中にボットをインポートするには、以下の手順に従います。

  1. ボットビルダーのホームページの右上にある新規ボット > ボットをインポートをクリックします。
  2. ボットの名前、対象ユーザー、色を入力します。詳細は「新しいボットの作成」をご参照ください。
  3. ボット定義ファイルボット設定ファイルの横にあるファイルの選択ボタンをクリックし、それぞれ botDefinition.json と config.json のファイルをアップロードします。
  4. ソースボットのカスタムスクリプトファイルがあれば、任意でそれをアップロードし、インポートをクリックします。
  5. インポート終了後の完了メッセージで、完了をクリックしてボットタスクのページに進みます。

増分インポートのボットアイテム

コンポーネント 説明
同じ参照IDを持つタスク インポートされたタスクは、ターゲットボットのタスクを置き換え、現在のステータス(一時停止および拒否されたタスクなど)に関わらず、ステータスが「設定済み」に変更されます。
異なる参照IDを持つソースボットのタスク これらのタスクは、同じ参照IDを持つターゲットボットで作成されます。
異なる参照IDを持つターゲットボットのタスク これらのタスクはそのままです。
発話、パターン、タスクレベルの同義語 インポートされた発話、パターン、タスクレベルの同義語は、対象ボットの同義語を置き換え、インポートされたタスクに適用されます。対象ボットの公開済みモデルはそのまま維持されます。
ナレッジグラフ、ボットの同義語、標準応答 対象ボットの既存のナレッジグラフ、ボットの同義語、標準応答は、インポート済みのものに置き換えられます。

ボットの削除

ボットのタスクがいずれも公開済みの場合、ボットの削除はできません。タスクの公開後、ボット管理者はそれを承認してユーザーに割り当てる必要があります。開発者は割り当てられたタスクを削除することはできません。公開されたタスクを削除するには、ボット管理者がタスクを一時停止する必要があります。また、ボットが公開されているフローの一部である場合、ボットを削除することはできません。フローを削除するか、もしくはフローからボットを削除してから削除する必要があります。

ボットを削除する手順

  • 削除したいボットを開きます
  • トップメニューから デプロイタブを選択します
  • 左側のナビゲーションからボット管理メニューの下で、ボットの削除をクリックします。

ボットの変更履歴の確認

ボットの作成後、設定の変更、タスクの追加、チャネルの有効化、フローの追加など、様々な理由で編集が必要になることがあります。ボットに加えられたすべての変更を追跡するために、変更ログを見ることができます。変更ログは、Myボットに対する変更の時系列的なリストを表示します。これは、Myボットを最初に保存してから最後の更新にいたるまでのあらゆる変更内容から構成されています。ボットの変更履歴を表示するには、以下の手順に従います。

  1. トップメニューから、デプロイタブを選択します
  2. 左側メニューから、ボット管理-> 変更ログをクリックします。
    • 逆の時系列順で並べられた変更内容リストで構成されています。
    • 各ページには、直近10件の変更内容と、変更を行ったユーザー名が表示され、続いて変更の概要、および適用された変更のタイムスタンプが表示されます。
    • 公開イベントのログは、選択したすべてのタスク用に統合され、すべてのタスクが公開コメントとともに公開するように選択されていない場合に備えて、タスクがリストアップされます。

ログに対して、以下のアクションを実行することができます。

  • 検索テキストボックスを使用して、任意のテキストを入力することができます。プラットフォームは変更内容の説明でそのテキストを検索し、検索条件を満たすログが表示されます。
  • フィルターオプションを使用して、以下の項目に基づいてフィルタリングすることができます。
    • ボットを共同開発している開発者名。
    • 日付の範囲は、過去24時間、過去7日間、または開始日と終了日を指定したカスタム日付のいずれかです。デフォルトでは、過去24時間のすべての開発者の変更内容が表示されます。
  • エクスポートアイコンでは、変更履歴をCSV形式でエクスポートすることができます。検索条件やフィルター条件を適用して表示されたログがダウンロードされます。

The topics dealt with in this section include Importing and Exporting Bots, Deleting Bots, and viewing Bot change logs.

You might want to refer to Bot Variables and how these can be managed. Refer here for more.

Importing and Exporting Bots

Kore.ai allows you to export and import a bot’s tasks and associated configurations into another bot. This feature helps you in the migration of bot definition, cloning of bots, or for maintaining a periodic backup of bot definitions. It is particularly helpful to test various versions of your bot at different stages of the development process before it is released for end users. The articles in this section help you understand how the Export and Import features work and how to perform them.

NOTE: Post v8.0 release, the enableNegativePatterns flag will be included in ‘NLP Settings’ under ‘NLP Data’ in the exported and imported bot definitions. This flag is used to check if the Negative Patterns are enabled/disabled in the Bot. Prior to this patch, this flag was part of ‘NLP Settings’ under ‘NLP Data’ in the imported bot definitions and ‘Bot Setting’ under ‘Setting’ in the exported bot definitions. This change is aimed at streamlining the functionality and might result in the failure to the incremental import of a bot from an export file generated before v8.0.

Exporting a Bot

You can export a bot’s definition and configuration using the Export option. When you export a bot, it downloads a zipped file with the following:

  • botDefinition.json: Includes bot metadata, tasks, bot and task-level synonyms, utterances, patterns, knowledge graph, standard responses, flows, and IDPs. You can select specific items to export from bot tasks, NLP data – NLP settings, utterances, standard responses – and Settings – bot settings, variables, IVR settings- while exporting the bot.
  • config.json: Includes bot settings, bot variables, and IVR settings.
  • Icon.png: Includes the bot icon.
  • <Custom ScriptFile Name.js> (if available): Includes a script file with JavaScript functions. When you upload this file to a bot, you can access the functions in the file from anywhere in the bot.
Note: The bot and its components are given unique Reference IDs during export. These IDs help the platform to identify matching tasks in the target bot and update them.

Export Modes

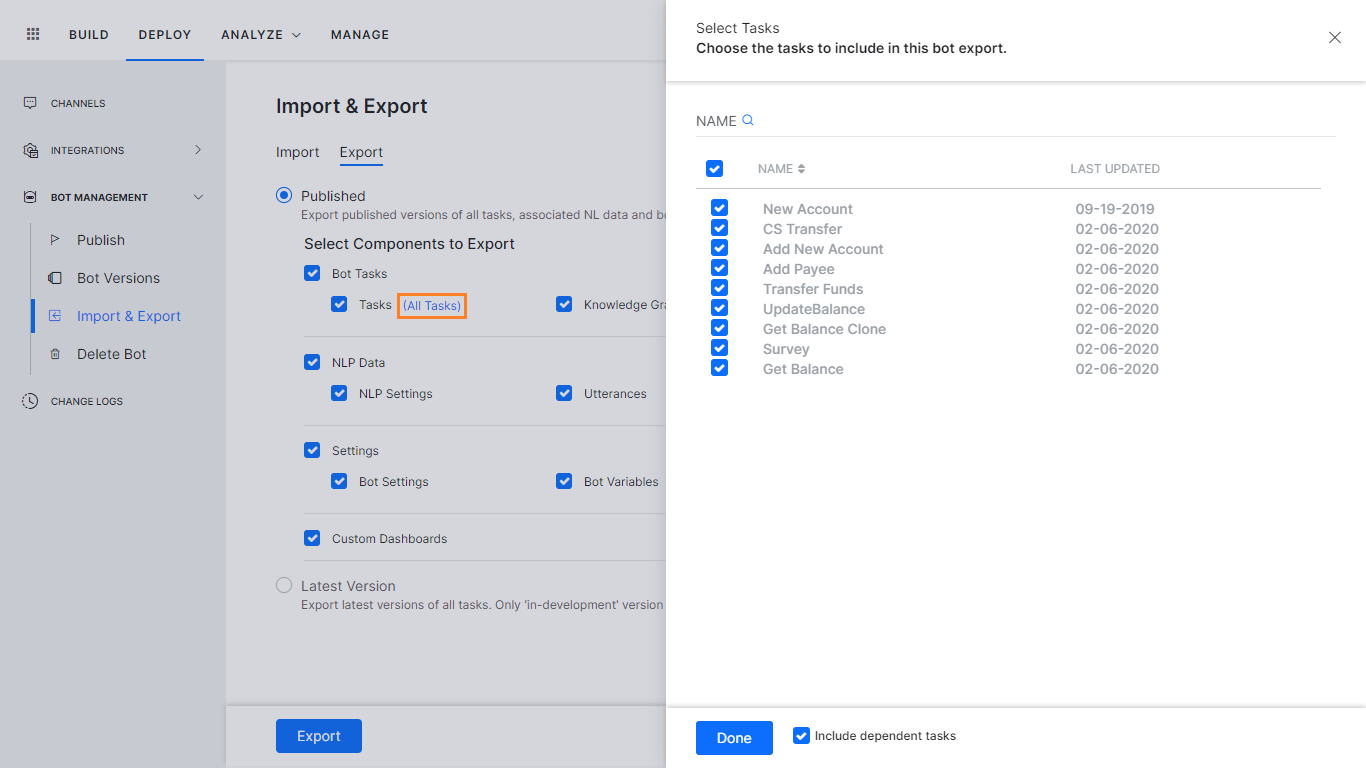
You can export bots in two modes: Published and Latest Version. Depending on the mode that is selected, the corresponding versions of the bot tasks are exported. You can select specific bot components to export from the bot tasks, NLP data, and bot settings in both the modes. Further individual Bot Tasks can also be selected.

Published Mode

When you export a bot in the Published mode, only the published versions of the bot tasks are exported, regardless of any other existing versions. For example, if a bot consists of a published version of a task and also version in Upgrade in Progress, only the published version gets exported.

Refer to the table below to understand which versions of the tasks are exported in the Published mode:

Task Status
In Progress Not exported
If a task is in progress for development, it isn’t exported in the Published mode.
Configured Not exported
If the task configuration is complete but not published for use, it doesn’t get exported in the Published mode.
Published Exported
All published bot tasks get exported
Upgrade in Progress Not exported
Task upgrade configurations that are in progress do not get exported. Only the published configurations get exported.
Rejected Not exported
Task configurations rejected by admins do not get exported.
Suspended Not exported
Suspended tasks do not get exported.
Note: In Dialog tasks, only the nodes in the Published status get exported.
Latest Version

When you export a bot in the Latest mode, the latest versions of the bot tasks get exported, regardless of their publishing status. For example, if a bot consists of a published version of a task and also the version in Upgrade in Progress, the Upgrade in Progress version gets exported, whereas if it just has a Configured version, the configured version is exported.

Refer to the table below to understand which versions of the tasks are exported in the Latest mode:

Task Status
In Progress Exported if it is the only available version
Not Exported if a later version exists
Configured Exported if it is the only available version
Not Exported if a later version exists
Published Exported if it is the only available version
Not Exported if a later version exists
Upgrade in Progress Exported regardless of any other task version in the bot
Rejected Not exported
Task configurations rejected by admins do not get exported
Suspended Not exported
Suspended tasks do not get exported

Steps in Exporting the Bot

  1. Open the bot you want to export
  2. Select Deploy tab from the top menu
  3. From the left menu select Bot Management -> Import & Export
  4. On the Import & Export page, select the Export tab
  5. In the Export tab, select either Published or Latest Version exporting mode.
  6. By default, all the bot items are selected for export. Deselect the items that you do not want to export.
  7. For Tasks, you can further choose to export only select tasks. By default All Tasks are selected. Click the All Tasks link to open Select Tasks dialog to choose the tasks you want to export
  8. You can also choose to Include dependent tasks or not for export. The existence of these will be checked before import and the import will fail if the dependent tasks are missing. These dependent tasks include the following:
    • Linked Dialogs i.e. dialog nodes present in the definition of another dialog;
    • Dialogs linked in defining ‘Behavior on Exceeding Retries’ for IVR Properties of any node of the dialog;
    • Dialog linked as part of sub-intent / interruption settings;
    • Any other scenario where a dialog execution could fail if a dependent task is not included;

  9. Click Export. The export happens in the background and the Download button gets activated after it is complete. Click Download to download the file to your local computer.

Exported Bot Components

When you export a bot, the following bot components get exported, depending on your Latest or Published Mode selection:

Bot Tasks
Tasks Only
  • Task Definition (Action, Alert, Information, and Dialog)
  • Synonyms (Task, Field, and Entity)
  • Patterns (Task, Field, and Entity)
Knowledge Graph Knowledge Graph definition along with the associated synonyms and classes.
NLP Data
NLP Settings The Advanced NLP Settings and Ignore words and Field memory.
The Advanced NLP Settings ( Natural Language > Advanced Settings) include the following:

  • Auto-train settings for ML Utterances
  • Multiple intent detection settings
  • Threshold and Configurations settings for
  • Fundamental meaning
  • Knowledge Graph
  • Machine Learning
Utterances All the bot utterances of all the enabled languages
Standard Responses All the standard responses of the bot in all enabled languages
Settings
Bot Settings The following information from Bot Settings page:

  • General Settings
  • Bot name, description, and bot synonyms for each enabled language
  • Language selection time frame (Bot Settings > Language Management)
  • Welcome message
  • Hold and Resume settings (Bot level)
  • Custom Script file
  • Tenancy URLs
  • Error messages
  • Task setup and execution settings (for executing tasks using UI forms).
Bot Variables All the global and content variables present in the bot along with their values.
IVR settings All the IVR settings for the bot (Bot Settings > IVR settings).

Importing a Bot

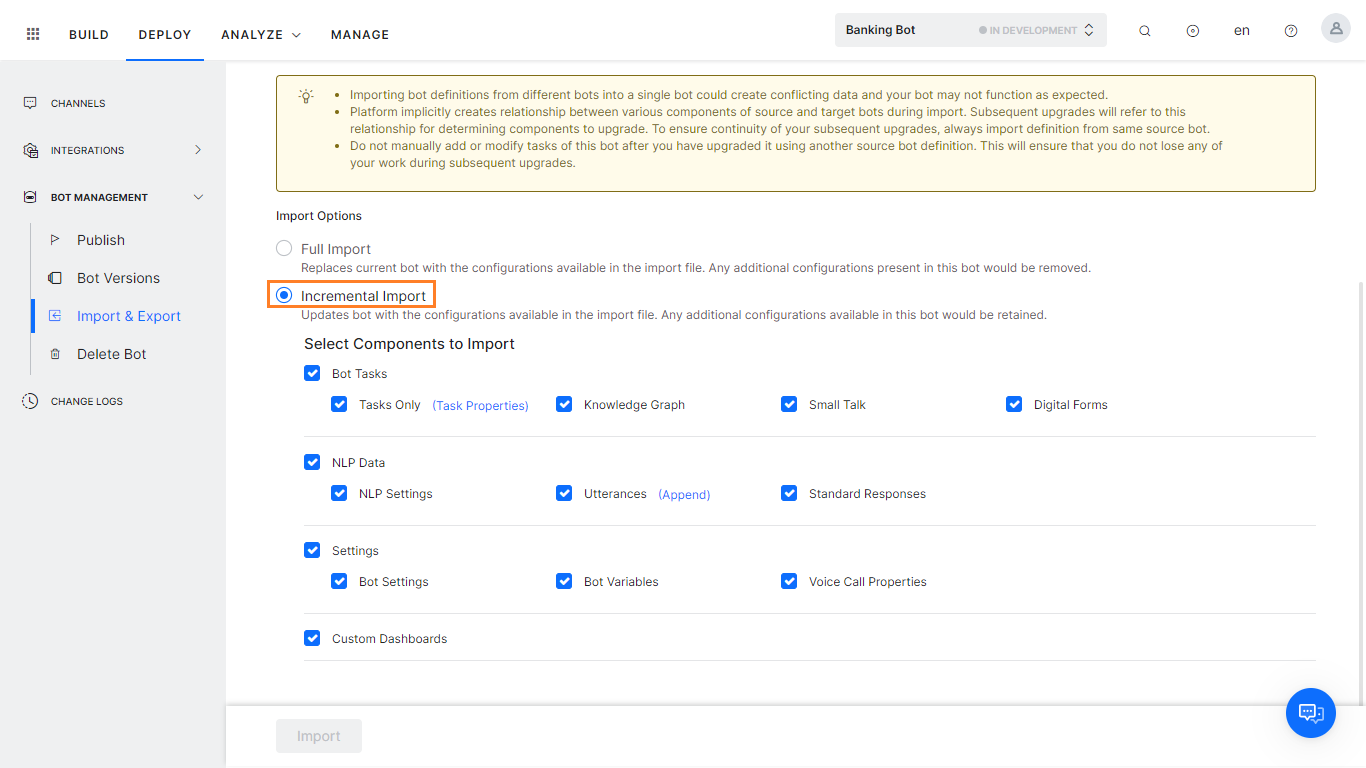
You can import tasks and configurations of a bot into a new or existing bot using one of these import types:

  • Full import: Replaces the existing bot with the imported bot configurations. Any additional configurations in the target bot that are not present in the import definition will be deleted. An exception to this rule is the webhook channel, which will be retained even if not present in the import bot definition.
    Note: We strongly recommend you exercise caution and take a backup of the target bot before importing a bot using this option.
  • Incremental import: Upgrades the current bot with the configurations available in the import file. Any additional configurations available in the target or imported bot are retained. You can select specific bot components to import from the bot tasks, NLP data, and bot settings. Refer to the Bot Items in the Incremental Import table at the end of the article to learn how the imported bot items replace the target bot’s items in incremental import.

Before you Begin
The config.json file consists of bot variables that need values for the target bot. Share the file with the relevant developers or enter suitable values yourself for the variables before importing the bot definition into a new bot.

Steps in Importing to an Existing Bot

To import a bot, follow these steps:

  1. Open the bot you want to export
  2. Select the Deploy tab from the top menu
  3. From the left menu select Bot Management -> Import & Export
  4. On the Import & Export page select the Import tab
  5. Click the CHOOSE FILE buttons next to the BOT DEFINITION FILE field and BOT CONFIG FILE field, and upload the botDefinition.json and config.json files respectively.
  6. Optionally, upload the custom script file from the imported bot if any.
  7. Select one of these import options: Full Import or Incremental Import.
  8. If you select Full import, the bot definition in the in-development copy will be overwritten with the definition present in the import file.
    • If there are one or more additional tasks or languages in the bot, and if these are not present in the import definition, then these tasks will be marked as deleted and will be removed when the bot is published.
    • You can choose to auto-publish the bot post-import.

  9. If you select Incremental import, you can also choose which bot items to import.

    • ML Utterances can either be Appended or Replaced
      • Append option can be used when the utterances present in the file should be imported into the bot and any additional utterances in the bot should be retained (this is the default behavior)
      • Replace option can be used when the utterances present in the file should be imported into the bot. Any additional utterances in the bot will be removed.
        • In case you are importing Tasks too, the additional utterances related to tasks being imported will be removed.

    • On the confirmation dialog that opens, click Backup to download the existing bot configuration.
      Note: While backing up is an optional choice, we strongly recommend you do so, especially when choosing Full Import, as you cannot recover the bot configurations after the imported bot replaces them.
    • Click Proceed to start the import.
    • After the import is completed, the following success message appears. Click Done.

Note: Bot import would fail if the bot has been restored but not published after the restore.

Creating a New Bot Using the Import Option

To import a bot while creating it, follow these steps:

  1. On the top-right side of the Bot Builder homepage, click New Bot > Import a Bot.
  2. Enter a Name, Target Audience, and Color for the Bot. Refer to Create a New Bot to learn more.
  3. Click the CHOOSE FILE buttons next to the BOT DEFINITION FILE field and BOT CONFIG FILE field and upload the botDefinition.json and config.json files respectively.
  4. Optionally, upload a Custom Script file from the source bot if any, and click Import.
  5. On the success message after the end of importing, click Done to proceed to the Bot Tasks page.

Bot Items in Incremental Import

COMPONENT DESCRIPTION
Tasks with the same Reference ID Imported tasks replace the tasks in the target bot and their status changes to Configured, regardless of their current status (including Suspended and Rejected tasks).
Tasks in the source bot with a different Reference ID These tasks are created in the target bot with the same Reference ID.
Tasks in the target bot with a different Reference ID These tasks stay intact.
Utterances, Patterns, and Task-level Synonyms Imported utterances, patterns, and task-level synonyms replace the ones in the target bot and apply them to the imported tasks. Published models in the target bot stay intact.
Knowledge Graph, Bot Synonyms and Standard Responses Existing knowledge graph, bot synonyms, and standard responses in the target bot are replaced with the imported ones.

Deleting a Bot

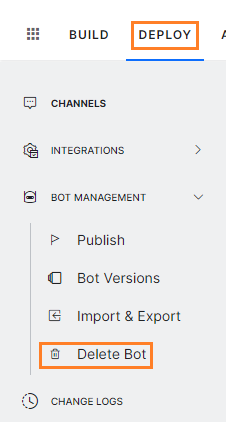
You cannot delete a bot if any of the bot tasks are Published. Once you publish a task, the Bots Admin must approve and assign it to users. The developer cannot delete assigned tasks. To delete a published task, the Bots Admin needs to suspend the task.
Also, you cannot delete a bot if it is part of a published flow. You must delete the flow or remove the bot from the flow before attempting to delete it.

Steps to Delete a Bot

  • Open the bot you want to delete
  • Select the Deploy tab from the top menu
  • From the left navigation under the Bot Management menu, click Delete Bot.

Viewing the Bot Change Log

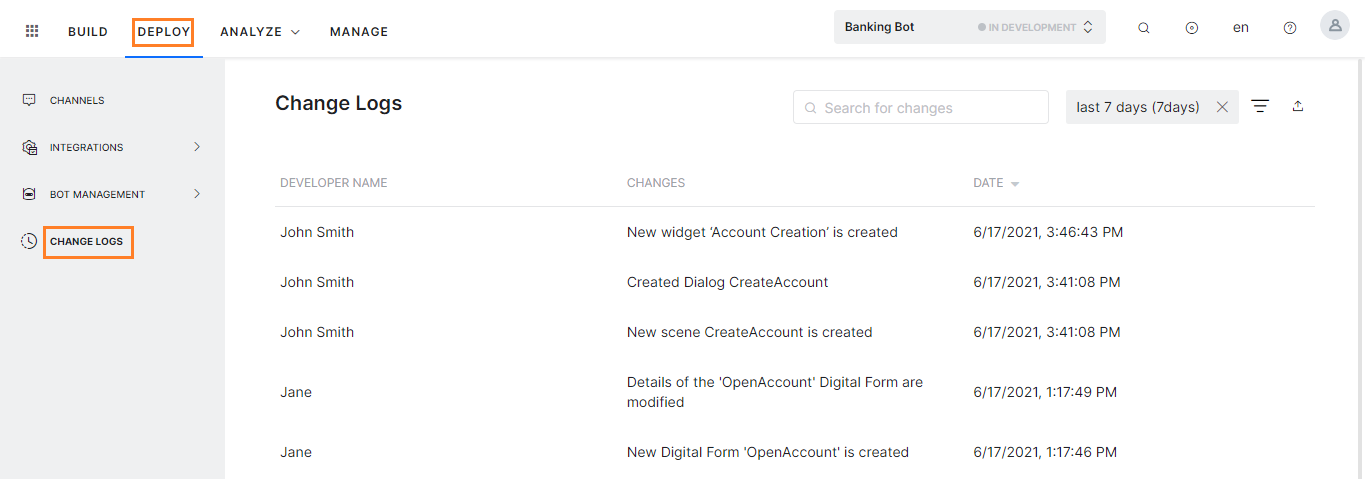
After creating a bot, you may need to edit it for various reasons such as changing its settings, adding tasks, enabling channels, and add flows.

To track all the changes made to a bot, you can view the Change Logs, which show a chronological list of modifications to your bot. It consists of all the changes from the initial save of your bot to the last update.

To view the changelog for a bot, follow these steps:

  1. Select Deploy tab from the top menu
  2. From the left menu click Bot Management -> Change Logs.

    • It consists of the list of changes in reverse chronological order.
    • Each page displays the ten most recent changes and the name of the user that made the change, followed by the change synopsis, and the timestamp of the applied change.
    • Logs of the Publish Event are consolidated for all selected tasks, with the tasks listed in case all tasks are not selected for publishing along with the Publish Comments.

Following actions can be performed on the logs:

  • Using the search text box, you can enter any text and the platform will search for that text in the change description and the logs fulfilling the search criteria would be displayed.
  • The filter option can be used to filter based on:
    • Developer Name collaborating on the bot;
    • Date Range either past 24 hrs, past 7 days, or custom date by specifying the start and end date.
      By default,  changes from all developers in the past 24 hours would be displayed.
  • The export icon can be used to Export the changelog in CSV format. The logs displayed after applying the search and filter criteria would be downloaded.