이 튜토리얼은 Kore.ai 봇을 웹 애플리케이션과 통합하는 데 사용할 수 있는 라이브러리의 모음인 Kore.ai 봇 웹 SDK의 인스턴스를 설정하고 실행하기 위한 엔드투엔드 워크스루입니다.
웹 SDK 튜토리얼 개요
이 튜토리얼에서는, Kore.ai 샘플 봇 설치, 봇 호스팅을 위한 테스트 애플리케이션 설치, 로컬 서버의 봇과 Kore.ai 봇 플랫폼 간에 통신을 위해 로컬 호스트 서버를 사용하여 JSON 웹 토큰(JWT) 생성 웹 서비스를 설치합니다. 다음 목록에서는 웹 SDK 설치 및 설정을 위해 수행하는 일반적인 단계를 설명합니다.
- 통합할 봇 구축 – 이 튜토리얼에서는, 날씨 보고서와 함께 항공편 및 위치 정보를 얻기 위해 개방형 API를 사용하는 여행 계획 샘플 봇을 설치합니다.
- 웹/모바일 클라이언트 채널 설정 – 웹 SDK를 이용하여 여행 계획 샘플 봇을 사용하려면, 웹/모바일 클라이언트 채널을 위한 봇을 설정해야 합니다.
- 새 클라이언트 앱 생성 – 여행 계획 샘플 봇을 위한 웹/모바일 클라이언트 채널을 설정할 때, 클라이언트 앱을 생성하고 인증 토큰을 생성하는 데 사용되는 JWT 서명 알고리즘을 선택해야 합니다.
- 봇 게시 – 여행 계획 샘플 봇을 설정한 후, 봇을 게시하고 관리자에게 보내서 승인을 받아야 합니다.
- 봇 승인 및 배포 – 봇 관리자 콘솔에서, 배포하려면 게시된 봇과 작업을 승인해야 합니다.
- Node.js 다운로드 및 설치 – 테스트 애플리케이션의 봇과 Kore.ai 봇 플랫폼 간에 통신하기 위해 웹 SDK를 위한 JWT 토큰 생성 웹 서비스를 호스팅하는 데 사용되는 Node.js를 설치해야 합니다.
- 테스트 애플리케이션 다운로드 및 압축 해제 – 테스트 애플리케이션, SDKApp은 컴퓨터 로컬 호스트 서버를 사용하여 웹 페이지에서 채널로 Kore.ai 봇을 호스팅할 애플리케이션을 시뮬레이션하는 데 사용됩니다.
- Kore.ai 웹 SDK 다운로드 및 압축 해제 – 웹 SDK에는 웹/모바일 클라이언트 채널을 사용하여 테스트 애플리케이션에서 통신하고 봇을 실행하는 데 사용되는 라이브러리가 포함되어 있습니다. 컴퓨터의 index.html 파일에서 설정값을 설정해야 합니다.
- 애플리케이션 시작 및 웹 브라우저에서 봇 보기 – 터미널 창에서, JWT 서비스를 시작한 다음, 웹 브라우저에서 봇을 봅니다.
이제 단계별 구현에 대해 자세히 알아보겠습니다.
Kore.ai 웹 SDK 설치 및 실행하기
이 섹션에서는 웹 SDK와 로컬 호스트 서버 컴퓨터에서 실행 중인 테스트 애플리케이션을 사용한 Kore.ai 샘플 봇을 실행하는 방법을 자세히 설명합니다. 시작하려면, 테스트 애플리케이션에서 실행할 봇을 빌드한 다음 웹/모바일 클라이언트 채널에서 실행할 봇을 설정해야 합니다. 이 튜토리얼에서는, 샘플 봇을 설치하겠습니다(자세한 단계는 여기를 참조하세요)
- 봇 빌더에 로그인하고, +새 봇 옆에 있는 아래쪽 화살표를 클릭하고 샘플 봇 설치를 선택합니다.
- 여행 계획 샘플위로 마우스를 가져간 다음, 설치를 클릭합니다.
- 여행 계획 샘플이 성공적으로 설치됨 메시지가 표시되고 샘플 봇이 왼쪽 탐색 메뉴에 있는 봇에 추가됩니다.
이 다음 섹션에서는, 새 클라이언트 앱을 생성하고 채널 설정을 정의하여 여행 계획 샘플 봇을 위한 웹/모바일 클라이언트 채널을 정의합니다. 단계에 대한 자세한 설명은 여기를 참조하세요.
- 봇 빌더 상단 메뉴에서, 배포 탭을 선택합니다
- 왼쪽 메뉴에서, 연동 > 웹/모바일 SDK를 클릭합니다.
- 앱 선택 드롭다운 목록에서, 앱 생성을 클릭합니다. 클라이언트 앱 생성 대화 상자가 표시됩니다.
- 이름 필드에서, 앱의 이름을 입력합니다. 예: 내 SDK 클라이언트 앱.
- JWT 서명 알고리즘 섹션에서, HS256을 선택하여 인증 토큰을 생성합니다.
- 다음 -> 완료를 클릭합니다.
- 웹/모바일 클라이언트 채널 페이지는 다음 JWT 자격 증명과 함께 표시되며, 이러한 모든 세부 정보를 기록합니다. 나중에 웹 SDK 설정에서 사용할 것입니다.
- 봇 이름
- 봇 ID
- 클라이언트 ID
- 클라이언트 시크릿
- 저장을 클릭합니다.
이제 봇을 생성하고 웹/모바일 클라이언트 채널에 정의했으므로, 봇을 게시하고 배포할 준비가 되었습니다.
참고: 기본적으로, 여행 샘플 계획 봇은 설정 -> 일반 설정의 빌드 탭에서 이용 대상을 엔터프라이즈 사용자로 설정하여 구성됩니다. 선택적으로, 이 봇을 일반 대중이 사용하도록 정의할 수 있습니다. 봇이 게시되면, 이용 대상을 변경할 수 없습니다.
- 배포 탭에서, 봇 관리 -> 게시를 클릭합니다.
- 게시 페이지에서, 모든 작업을 선택한 다음, 계속을 클릭합니다.
- 의견을 입력하고 확인을 클릭하고 게시합니다.
엔터프라이즈 개발자가 봇을 게시한 후, 해당 봇을 승인하고 사용할 사용자에게 할당해야 합니다.
- 봇의 엔터프라이즈 관리자는 봇의 이용 대상이 엔터프라이즈 사용자 또는 일반 대중 중에 어느 것으로 설정되어 있는지에 따라 봇 관리자 콘솔에서 다음 봇 배포 중 하나를 완료해야 합니다. 다음 중 하나를 완료합니다.
- 봇 관리자 콘솔에서, 봇 관리 모듈의 엔터프라이즈 봇 페이지에서, 배포하려는 여행 계획 샘플 봇의 줄임표 아이콘을 클릭한 다음 봇 작업 관리를 클릭합니다. 봇 작업 관리 대화 상자가 표시됩니다.
- 봇 작업 필드에서, 확장
 아이콘을 클릭하여 사용 가능한 작업과 배포 가능한 작업을 표시하고, 이 봇의 모든 작업을 선택한 다음 확인을 클릭합니다.
 - 봇 작업 관리 대화 상자에서, 확인을 클릭합니다. 봇 상태가 성공적으로 변경됨 메시지가 표시됩니다.
- 엔터프라이즈 봇 페이지에서, 사용자를 할당하려는 여행 계획 샘플 봇의 줄임표 아이콘을 클릭한 다음 봇 및 작업 할당을 클릭합니다.
- 봇 및 작업 할당 대화 상자가 표시됩니다. 모든 작업에 대해 본인을 포함한 모든 사용자에게 봇을 할당합니다.
이제 웹 SDK와 로컬 호스트 서버에서 봇을 로컬로 실행하는 테스트 애플리케이션에 필요한 소프트웨어 패키지를 다운로드, 압축 해제, 설치 및 설정해야 합니다.
- 컴퓨터에 node.js를 다운로드하여 설치하려면, https://nodejs.org/en/download/로 이동한 다음, Mac의 경우 .pkg를, Windows의 경우 .msi를 선택합니다.
- 터미널 창에서,
node -v명령어를 실행하여 설치 및 버전(예:v6.10.2)을 확인합니다. - Kore 봇을 연동하려는 앱을 호스팅하는 웹 서버의 SDKApp/sdk 폴더를 찾습니다. 이 튜토리얼에서는, 테스트 애플리케이션과 JWT 웹 서비스를 다운로드하려면, SDKApp을 클릭하고 압축을 해제합니다.
- Kore.ai 웹 SDK를 다운로드하려면, https://github.com/Koredotcom/web-kore-sdk로 이동한 다음, 다운로드를 클릭합니다. 위의 단계에서 언급한 …/SDKApp/sdk 폴더로 모든 파일을 압축 해제합니다. 릴리스 정보에서 릴리스 호환성을 확인합니다.
- 배포 -> 채널 메뉴의 봇 빌더 웹/모바일 클라이언트 채널 페이지에서, 다음을 복사합니다(위의 8단계에서 언급한 대로):
- clientSecret
- clientId
- 봇 이름
- 플랫폼의 버전 7.2에서는, 웹 SDK repo 구조가 크게 변경되었습니다. 어떤 repo를 사용하느냐에 따라 단계가 다릅니다.
- 플랫폼 버전 7.2 이후(즉, 2020년 2월 이후) 다운로드한 최신 웹 SDK 파일의 경우 이 단계를 따르세요.
- 텍스트 편집기를 사용하여 …/SDKApp/sdk/UI 폴더에서 index.html 파일을 엽니다. UI 폴더에 대한 경로를 추가하여 다음 줄을 업데이트합니다:
- kore-config.js를 열고 botOptions 매개변수인 botInfo, clientId, clientSecret, 이메일 ID를 userIdentity로 업데이트합니다.
“clientSecret”: “{client secret}”
$.ajax({
   url: “http://localhost:3000/api/users/getJWT”,
     //this is sample url of a localhost.
     //This should include the url where you are hosting the bot.
   botOptions.userIdentity = ‘ ‘;
     // Provide users email id here
   botOptions.clientId= "{client id} ";
     // secure client-id
   _botOptions.botInfo= {name:"{bot name}","id":"{bot id"};
     // Kore bot name is case sensitive
 })
JWTUrl은 앱이 호스팅 되는 위치(Kore.ai 봇을 연동하려는 위치)를 나타냅니다. 이 튜토리얼에서는, JWT 서버(19단계의 설정대로)를 사용하고 여기서도 동일하게 사용합니다.
- kore-config.js에서 봇의 이용 대상을 설정했는지 확인합니다. 다음 중 하나를 선택합니다.
"isAnonymous": < false >;봇이 엔터프라이즈 사용자용으로 배포되고 다음과 같이 설정된 경우botOptions.userIdentity = '< Your email ID>';– 또는 –"isAnonymous": < true >;봇이 소비자 용으로 배포된 경우
- 이 단계는 플랫폼 버전 7.2 이전(즉, 2020년 2월 이전)에 다운로드한 이전 Web SDK 파일에 유효합니다.
- 텍스트 편집기를 사용하여 …/SDKApp/sdk/UI 폴더에서 index.html 파일을 엽니다.
- UI 폴더에 대한 경로를 추가하여 다음 줄을 업데이트합니다:
<script src="libs/jquery.js" type="text/javascript"></script>
<script src="libs/jquery.tmpl.min.js" type="text/javascript"></script>
<script src="libs/jquery-ui.min.js" type="text/javascript"></script>
<link href="libs/jquery-ui.min.css" rel="stylesheet"></link>
<script src="chatWindow.js" type="text/javascript"></script>
<link href="chatWindow.css" rel="stylesheet"></link> - 로컬 호스트로 실행하려면 다음 매개변수를 업데이트합니다
“clientSecret”: “{client secret}” $.ajax({ url: “http://localhost:3000/api/users/getJWT”, //this is sample url of a local host. //This should include the url where you are hosting the bot. botOptions.userIdentity = ‘ ‘; // Provide users email id here botOptions.clientId= "{client id} "; // secure client-id _botOptions.botInfo= {name:"{bot name}","id":"{bot id"}; // Kore bot name is case sensitive })참고: 위의 코드 조각에 언급된 URL은 앱이 호스팅되는 위치(Kore.ai 봇을 연동하려는 위치)를 나타냅니다. 이 튜토리얼에서는, JWT 서버(18단계의 설정대로)를 사용하고 여기서도 동일하게 사용합니다.
- 다음 중 하나를 선택합니다.
"isAnonymous": < false >;봇이 엔터프라이즈 사용자용으로 배포되고 다음과 같이 설정된 경우botOptions.userIdentity = '< Your email ID>';– 또는 –"isAnonymous": < true >;봇이 소비자 용으로 배포된 경우
- UI 폴더에 대한 경로를 추가하여 다음 줄을 업데이트합니다:
- 텍스트 편집기를 사용하여 …/SDKApp/sdk/UI 폴더에서 index.html 파일을 엽니다.
- 플랫폼 버전 7.2 이후(즉, 2020년 2월 이후) 다운로드한 최신 웹 SDK 파일의 경우 이 단계를 따르세요.
- 변경 사항을 저장합니다. JWT 토큰 생성 서비스를 시작하고 로컬 웹 브라우저에서 설정된 웹 SDK를 사용하여 테스트 애플리케이션을 액세스할 준비가 되었습니다.
- 홈 디렉토리로 이동합니다
cd SDKApp - 다음 명령어를 사용하여 종속성을 설치합니다
npm install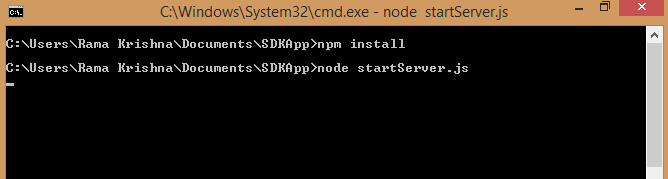
- SDKApp을 시작합니다
node startServer.js - localhost:3000을 사용하여 모든 브라우저에서 애플리케이션에 액세스합니다

webSDK를 통해 데이터 전달하기
index.html 파일 내의 botInfo에서 사용자 정의 데이터를 추가하여 채널에 액세스하는 사용자의 추가 정보를 전달할 수 있습니다.
botOptions.botInfo = {name: "Banking Bot",
                              "_id": "<bot_id>",
                              customData: "value"
              };
전화번호, 주소 또는 위치 등과 같은 세부 정보는 customData 내부에서 전달할 수 있는 데이터의 예시입니다. customData 컨텍스트 개체의 BotUserSession 아래 lastMessage에서 액세할 수 있습니다. 이 데이터는 webSDK를 사용하는 사용자에게만 해당되며 사용자 세션 동안 지속됩니다. 여러 값을 키-값 쌍으로 index.html 파일의 customData에 추가할 수도 있습니다.
botOptions.botInfo = {name:"<bot_name>",
                      "_id":"<bot_id",
                      customData:{"name":"John",
                                  "age":30,
                                   "cars": {"car1":"Ford",
                                            "car2":"BMW",
                                            "car3":"Fiat"
                                             }
                                   }
                           };

매핑된 ID 전달하기
웹/모바일 SDK는 사용자가 봇과 인터렉션 하는 동안 한 ID에서 다른 ID로 전환할 때 사용자의 매핑된 ID 전달을 지원합니다. 이 과정을 통해 사용자는 이전 ID를 사용하여 시작된 진행 중인 대화를 계속할 수 있습니다. 예를 들어, 사용자가 익명 또는 무작위로 생성된 ID를 사용하여 봇과 대화를 시작했을 수 있습니다. 메시지를 몇 개 교환한 후, 사용자는 웹 사이트 또는 애플리케이션에 로그인하여 인증된 사용자 또는 알려진 사용자가 될 수 있습니다. 이 시점에서, 사용자의 알려진 ID는 매개변수 identityToMerge를 사용하여 ‘JWT Grant API’ 호출의 일부로 SDK에서 봇으로 전달될 수 있습니다. 플랫폼은 이 정보를 사용하여 사용자 ID를 병합하고 사용자가 새로운 알려진 ID를 사용하여 진행 중인 대화를 재개할 수 있도록 합니다.
{
 "iat": 1611810186883,
 "exp": 1611813786.883,
 "aud": "https://idproxy.kore.com/authorize",
 "iss": "cs-d3042d3e-7da4-55da-a94d-783349270cc0",
 "sub": "knowuser1@test.com",
 "isAnonymous": "false",
 "identityToMerge": "anonymoususer1@test.com"
}
다음 시나리오는 새 ID 및 병합된 ID를 처리할 때 봇 행동을 설명합니다.
- 새 ID 및 병합된 ID가 시스템에 없는 경우, 새 ID가 생성되고 새 ID를 사용하여 새 대화가 시작됩니다.
- 시스템에 새 ID가 있지만 병합된 ID는 없는 경우, 새 ID를 사용하여 대화를 시작하거나 (활성 세션의 경우)계속합니다
- 시스템에 병합된 ID는 있지만 새 ID는 없는 경우, 새 ID가 생성되고 새 ID를 사용하여 대화가 계속됩니다. 병합된 ID에 대한 모든 참조는 새 ID로 대체되고 병합된 ID는 제거됩니다.
- 병합된 ID 및 새 ID가 모두 시스템에 있고 새 ID는 활성 세션이 없는 경우, 대화는 새 ID를 사용하여 계속됩니다. 병합된 ID에 대한 모든 참조는 새 ID로 대체되고 병합된 ID는 제거됩니다.
- 병합된 ID 및 새 ID가 모두 시스템에 있으면서 활성 세션이 있는 경우, 병합된 ID의 대화는 새 ID를 사용하여 계속됩니다. 병합된 ID에 대한 모든 참조는 새 ID로 대체되고 병합된 ID는 제거됩니다. 새 ID의 활성 세션이 "드롭오프"로 표시되고 종료됩니다
위에서 언급한 사용자 ID의 동작으로 인해 다음의 변경 사항이 확인될 수 있습니다.
- 병합된 ID와 관련된 모든 세션을 새 ID와 연결하여 분석 및 채팅 기록이 업데이트됩니다
- 병합된 ID를 새 ID로 대체하여 세션 데이터가 업데이트됩니다
- 병합된 ID의 대화를 추적하는 청구 세션은 새 ID로 표시됩니다
webSDK를 통한 메타 태그 사용자 정의
플랫폼 버전 8.0 릴리스로, 지원되는 모든 내부 채널(웹 SDK/IVR / IVRVoice / Webhook 채널)에서 직접 사용자 정의 메타 태그를 추가할 수 있습니다. 세션, 사용자, 메시지 수준 메타 태그를 정의할 수 있습니다. 이러한 태그는 생성되는 즉시 대화 세션에 추가됩니다.
botOptions.botInfo = {name:"<bot_name>", "_id":"<bot_id",
                           customData :{"name":"John"},
                           "metaTags": {
                                 "messageLevelTags": [{ "name": "tag1", value: "message"}],
                                 "sessionLevelTags": [{ "name": "tag2", value: "session"}],
                                 "userLevelTags": [{ "name": "tag3", value: "user"}]
                                 }
                          };
일반적으로 발생하는 몇 가지 오류들
- index.html에 잘못된 URL이 있으면, 사용자에게 404 오류가 표시됩니다. URL을 다시 확인합니다. 봇을 자체 웹 SDK 또는 Kore의 웹 SDK 중 어느 곳에서 호스팅하는지에 따라 URL이 변경됩니다. Kore 웹 SDK인 경우, URL은
http://demo.kore.net:3000/users/sts 7입니다. 사내 웹 SDK에서 호스팅하는 경우, 해당 URL을 제공하세요. - 누락된/유효하지 않은 jwt.sub(): 이 오류는 사용자의 이메일 id가 index.html 파일에 지정되지 않은 경우, 엔터프라이즈 봇에서 발생합니다. index.html에서 아래와 같이 사용자 ID를 제공합니다
botOptions.userIdentity = ‘x@gmail.com’;// Provide users email id here. - 찾을 수 없음: 잘못된 클라이언트 ID 또는 클라이언트 ID가 제공되지 않은 경우, 사용자에게 이 오류가 표시됩니다. 봇 – API 확장 옵션에서 클라이언트 ID가 올바른지 확인합니다
botOptions.clientId = “{clientID}”; // secure client-id - jwt 확인 오류: 잘못된 클라이언트 시크릿이 index.html 파일에 제공되었습니다: 봇 – API 확장 옵션에서 얻은 클라이언트 시크릿이 올바른지 확인합니다
“clientSecret”: "{clientSecret}” //provide clientSecret here
테스트 애플리케이션과 로컬 호스트 서버를 사용하여 웹 SDK를 설치하고 테스트한 후, 동일한 개념으로 자신의 엔터프라이즈 애플리케이션에서 웹 SDK를 설치하고 설정할 수 있습니다. 귀하의 웹 사이트와 서버를 가리키도록 웹 SDK의 index.html 파일에 있는 파일 경로와 URL을 재설정하고, 엔터프라이즈를 위한 JWT 자격 증명을 사용한 웹/모바일 클라이언트 채널용 Kore.ai 봇을 설정해야 합니다.
これは、Kore.ai ボットと独自の Web アプリケーションとの連携に使用するライブラリのコレクションである Kore.ai ボット Web SDK の インスタンスをセットアップして実行するための、エンド ツー エンドのチュートリアルです。これは、 Kore.ai ボットを独自の Web アプリケーションに統合するために使用できるライブラリのコレクションです。
Web SDK チュートリアルの概要
このチュートリアルでは、Kore.ai のサンプル ボット、ボットをホストするためのテスト アプリケーション、および JSON Web トークン (JWT) 生成 Web サービスをインストールします。その際、ローカル サーバー上のボットと Kore.ai ボット プラットフォームとの通信に、ローカル ホスト サーバーを使用します。以下のリストでは、Web SDK のインストールと設定に必要な一般的な手順を説明しています。
- 統合するボットの構築 ー このチュートリアルでは、フライト情報や位置情報、天気予報を取得するために、オープン API を使用する旅行計画サンプル ボットをインストールします。
- Web/モバイル クライアント チャネルの設定 ー Web SDKで、旅行計画サンプルボットを使用するには、Web/モバイル クライアント チャネル用にボットを設定する必要があります。
- 新規クライアント アプリの作成 ー 旅行プ計画サンプル ボットに Web/モバイル クライアント チャネルを設定する場合、クライアント アプリを作成し、認証トークンの生成に使用する JWT 署名アルゴリズムを選択する必要があります。
- ボットの公開 ー 旅行計画サンプルボットの設定が完了したら、ボットをボット管理者に送信して承認を得るためのボットを公開する必要があります。
- ボットの承認とデプロイ ー ボット管理コンソールで、公開されたボットとタスクを承認してデプロイする必要があります。
- Node.js のダウンロードとインストール ー テスト アプリケーションのボットと Kore.ai ボット プラットフォームとの通信には、Web SDK の JWT トークン生成 Web サービスのホストに使用される Node.js をインストールする必要があります。
- テスト アプリケーションのダウンロードと解凍 ー テスト アプリケーションのSDKApp は、コンピュータのローカル ホスト サーバーを使用して、Kore.ai ボットを Web ページ上のチャネルとしてホストするアプリケーションをシミュレートするために使用されます。
- Kore.ai Web SDK のダウンロードと解凍 ー Web SDK には、Web/モバイル クライアント チャネルを使用して、テストアプリケーションでボットと通信したり実行するために使用されるライブラリが含まれています。お使いのコンピュータに合わせて、index.html ファイルの設定を行う必要があります。
- アプリケーションの起動と Web ブラウザでのボットの表示 ー ターミナル ウィンドウで、JWT サービスを起動し、Web ブラウザでボットを表示します。
それでは、実装についての詳細をひとつひとつ見ていきましょう。
Kore.ai Web SDK のインストールと実行
このセクションでは、Web SDK を使用した Kore.ai サンプル ボットと、コンピュータのローカル ホスト上で動作するテスト アプリケーションを実行する方法について、詳細な手順を説明します。まず、テスト アプリケーションで実行するボットを構築し、そのボットを Web/モバイルクライアント チャネルで実行できるように設定する必要があります。このチュートリアルでは、サンプル ボットをインストールします(詳しい手順についてはこちらをご参照ください)。
- ボットビルダーにログオンし、[+ 新規ボット] の隣にある下向き矢印をクリックし、[サンプルボットのインストール] を選択します。
- [旅行計画サンプル] にカーソルを合わせて、[インストール] をクリックします。
- 「旅行計画サンプルが正常にインストールされました」のメッセージが表示され、ボットの左のナビゲーションメニューにサンプルボットが追加されます。
次のセクションでは、新しいクライアント アプリを作成し、チャネル設定を定義することで、旅行計画サンプル ボットの Web/モバイル クライアント チャネルを定義します。詳しい手順についてはこちらをご覧ください 。
- ボットビルダーのトップメニューで、[デプロイ] タブを選択します。
- 左側のメニューで、[システム連携 > Web/モバイル SDK] をクリックします。
- アプリの選択ドロップダウンリストで、[アプリの作成] をクリックします。"クライアント アプリの作成" ダイアログが表示されます。
- “名前” フィールドに、アプリの名前を入力します。例: マイ SDK クライアント アプリ.
- [JWT 署名アルゴリズム] セクションでは、[HS256] を選択して認証トークンを生成します。
- [次へ > 完了] をクリックします。
- 「Web/モバイルクライアント チャネル」ページが以下の JWT 資格情報とともに表示されますので、これらの詳細をすべてメモしてください。これらは後ほど Web SDK のセットアップで使用します。
- ボット名
- ボット ID
- クライアント ID
- クライアント シークレット
- [保存] をクリックします。
ボットが作成され、Web/モバイル チャネル用に定義されたので、ボットを公開してデプロイする準備が整いました。
メモ: デフォルトでは、[旅行計画サンプル] ボットは、[一般的設定] のビルド タブで、対象ユーザーが エンタープライズ ユーザーに設定されています。オプションとして、このボットを一般公開用として定義することもできます。このボットが公開されると、対象ユーザーを変更することはできません。
- [デプロイ] タブで [ボット管理 > 公開] をクリックします。
- [公開」ページで、すべてのタスクを選択し、[続行] をクリックします。
- コメントを入力し、公開を [確認] します。
エンタープライズの開発者がボットを公開した後、そのボットを承認し、使用するユーザーに割り当てる必要があります。
- ボットの対象ユーザーがエンタープライズ ユーザーと一般ユーザーのどちらに設定されているかに応じて、ボット管理者コンソールで以下のいずれか 1 つのボット デプロイメントを行います。以下のいずれか 1 つを完了させます:
- ボット管理者コンソールのボット管理vモジュールの「エンタープライズ ボット」ページでデプロイする旅行計画サンプル ボットの[省略記号] アイコンをクリックし、[ボット タスクの管理] をクリックします。「ボットタスクの管理" ダイアログが表示されます。
- 「ボットのタスク" フィールドで、展開アイコンをクリックして、利用可能でデプロイされたタスクを表示し、このボットのすべてのタスクを選択して、 [確認]をクリックします。
- 「ボット タスクの管理" ダイアログで [確認]をクリックします。「ボットのステータスが正常に変更されました」というメッセージが表示されます。
- 「エンタープライズ ボット」ページで、ユーザーを割り当てたい旅行計画サンプル ボットの [省略記号] アイコンをクリックし、[ボットとタスクの割り当て] をクリックします。
- "ボットとタスクの割り当て" ダイアログが表示されます。自分自身を含むすべてのタスクについて、ボットをユーザーに割り当てます。
次に、Web SDK とテスト アプリケーションに必要なソフトウェア パッケージのダウンロード、解凍、インストール、設定を行い、ローカル ホスト サーバー上でボットを実行します。
- node.js をコンピュータにダウンロードしてインストールするには、https://nodejs.org/g/en/download/ へ進み、Mac の場合は .pkg、Windows の場合は .msiを選びます。
- ターミナル ウィンドウで
node -vコマンドを実行して、インストールとバージョンを確認します。例:v6.10.2。 - Kore ボットを統合する アプリをホストする Web サーバーの SDKApp/sdk フォルダを探します。このチュートリアルでは、テスト アプリケーションと JWT Web サービスをダウンロードするために SDKAppをクリックして、解凍します。
- Kore.ai Web SDK をダウンロードするには、https://github.com/Koredotcom/web-kore-sdkへ進み、[ダウンロード] をクリックします。上述のステップで、すべてのファイルを抽出して、上記の …/SDKApp/sdk フォルダに入れます。リリースの互換性は、リリース ノートで確認します。
- [デプロイ > チャネル] メニューの「ボットビルダー Web/モバイル クライアント チャネル」ページから、(上記のステップ 8 で述べたように)以下をコピーします。
- clientSecret
- clientId
- ボット名
- プラットフォームの Ver 7.2 では、Web SDK のリポジトリ構造が大きく変更されました。手順は、どのリポジトリを使用しているかによって異なります。
- プラットフォームの Ver 7.2 以降、つまり 2020 年 2 月以降にダウンロードした最新の Web SDK ファイルの場合は、この手順に従ってください。
- テキスト エディターを使用して、…/SDKApp/sdk/UI フォルダー内の index.html ファイルを開きます。以下の行を更新して、UI フォルダへのパスを追加します:
<script src="libs/jquery.js" type="text/javascript"></script><script src="libs/jquery.tmpl.min.js" type="text/javascript"></script><script src="libs/jquery-ui.min.js" type="text/javascript"></script><link href="libs/jquery-ui.min.css" rel="stylesheet"></link><script src="chatWindow.js" type="text/javascript"></script><link href="chatWindow.css" rel="stylesheet"></link> - kore-config.js を開き、botOptions パラメータの botInfo、clientId、 clientSecret を変更し、さらにメールアドレス ID を userIdentity に書き換えられます。
“clientSecret”: “{client secret}” $.ajax({ url: “http://localhost:3000/api/users/getJWT”, //this is sample url of a localhost.//This should include the url where you are hosting the bot. botOptions.userIdentity = ‘ ‘; // Provide users email id here botOptions.clientId= "{client id} "; // secure client-id _botOptions.botInfo= {name:"{bot name}","id":"{bot id"}; // Kore bot name is case sensitive })JWTUrl は、アプリ (Kore.ai ボットを連携させたい場所)がホストされている場所を指します。このチュートリアルでは、(ステップ 19 でセットアップした)JWT サーバーを使用しているため、ここでも同じものを使用しています。
- kore-config.js で、ボットの配信対象が設定されていることを確認します。以下のいずれか 1 つを選択します:
"isAnonymous": < false >;エンタープライズ ユーザー向けにボットをデプロイしている場合は、次のように設定しますbotOptions.userIdentity = '< Your email ID>';ー または ー"isAnonymous": < true >;ボットが コンシューマー向けにデプロイされている場合
- テキスト エディターを使用して、…/SDKApp/sdk/UI フォルダー内の index.html ファイルを開きます。以下の行を更新して、UI フォルダへのパスを追加します:
- この手順は、プラットフォームの Ver 7.2 以前、つまり 2020 年 2 月以前にダウンロードされた古い Web SDK ファイルに対して有効です。
- テキスト エディターを使用して、…/SDKApp/sdk/UI フォルダー内の index.html ファイルを開きます:
- 以下の行を更新して、UI フォルダへのパスを追加します:
<script src="libs/jquery.js" type="text/javascript"></script><script src="libs/jquery.tmpl.min.js" type="text/javascript"></script><script src="libs/jquery-ui.min.js" type="text/javascript"></script><link href="libs/jquery-ui.min.css" rel="stylesheet"></link><script src="chatWindow.js" type="text/javascript"></script><link href="chatWindow.css" rel="stylesheet"></link> - ローカル ホストとして実行するには、以下のパラメータを更新します
“clientSecret”: “{client secret}” $.ajax({ url: “http://localhost:3000/api/users/getJWT”, //this is sample url of a local host.//This should include the url where you are hosting the bot. botOptions.userIdentity = ‘ ‘; // Provide users email id here botOptions.clientId= "{client id} "; // secure client-id _botOptions.botInfo= {name:"{bot name}","id":"{bot id"}; // Kore bot name is case sensitive })メモ: 上記のコードスニペットに記載されている URL は、アプリ(Kore.ai のボットを統合させたい場所)がホストされている場所を指しています。このチュートリアルでは、(ステップ 18 で i セットアップした)JWT サーバーを使用しているため、ここでも同じものを使用しています。
- 以下のいずれか 1 つを選択してください:
"isAnonymous": < false >;エンタープライズ ユーザー向けにボットをデプロイしている場合は、次のように設定しますbotOptions.userIdentity = '< Your email ID>';ー または ー"isAnonymous": < true >;ボットがコンシューマー向けにデプロイされている場合
- 以下の行を更新して、UI フォルダへのパスを追加します:
- テキスト エディターを使用して、…/SDKApp/sdk/UI フォルダー内の index.html ファイルを開きます:
- プラットフォームの Ver 7.2 以降、つまり 2020 年 2 月以降にダウンロードした最新の Web SDK ファイルの場合は、この手順に従ってください。
- 変更を保存します: これで、JWT トークン生成サービスを開始し、設定した Web SDKを 使用して、ローカルの Web ブラウザからテスト アプリケーションにアクセスする準備ができました。
- ホーム ディレクトリに移動します
cd SDKApp - 以下のコマンドで依存関係をインストールします
npm install - SDKApp の起動
node startServer.js - localhost:3000 を使用して、任意のブラウザでアプリケーションにアクセスします
webSDK 経由でのデータの受け渡し
index.html ファイル内の botInfo にカスタム データを追加することで、チャネルにアクセスするユーザーの追加情報を渡すことができます。
botOptions.botInfo = {name: "Banking Bot", "_id": "<bot_id>", customData: "value" };
電話番号、住所、所在地などの詳細は、 カスタムデータ内で渡せるデータのサンプルです。customData コンテキスト オブジェクトの BotUserSession の下の lastMessage からアクセスできます。このデータは、webSDK を使用しているユーザーに固有のもので、ユーザー セッションの間は有効です。複数の値はキーと値のペアとして、 index.html ファイルの customData に追加することもできます:
botOptions.botInfo = {name:"<bot_name>", "_id":"<bot_id", customData:{"name":"John", "age":30, "cars": {"car1":"Ford", "car2":"BMW", "car3":"Fiat" } } };
Passing Mapped Identities
The Web/Mobile SDKs support the passing of mapped identities of the users when they switch from one identity to another while interacting with the bot. This process allows the users to continue any ongoing conversation initiated using a previous identity.
For example, a user may have started the conversation with the bot using an anonymous or randomly generated identity. After exchanging a few messages, the user may become an authenticated or known user by logging into your website or any application. At this point, the user’s known identity can be passed to the bot from the SDK as part of the ‘JWT Grant API’ call using the parameter identityToMerge. The Platform uses this information to merge the user identities and allows the user to resume an ongoing conversation using the new known identity.
{
 "iat": 1611810186883,
 "exp": 1611813786.883,
 "aud": "https://idproxy.kore.com/authorize",
 "iss": "cs-d3042d3e-7da4-55da-a94d-783349270cc0",
 "sub": "knowuser1@test.com",
 "isAnonymous": "false",
 "identityToMerge": "anonymoususer1@test.com"
}
The following scenarios describe the bot behavior when dealing with the new identity and merged identity:
- When both the new and merged identities are not present in the system, then the new identity is created and a new conversation is started using new identity
- When the new identity is present but the merged identity is not present in the system, then the conversation is started or continued (in case of an active session) using new identity
- When the merged identity is present but the new identity is not present in the system, then the new identity is created and the conversation is continued using the new identity. All references to the merged identity are replaced with the new identity and the merged identity is removed.
- When both the merged identity and the new identity are present in the system and the new identity does not have an active session, then the conversation is continued using the new identity. All references to the merged identity are replaced with the new identity and the merged identity is removed.
- When both the merged identity and the new identity are present in the system and both have an active session, then the merged identity’s conversation is continued using the new identity. All references to the merged identity are replaced with the new identity and the merged identity is removed. The active session of the new identity is marked as “Drop-off” and closed
Due to the above-mentioned behavior in the user identity following changes can be seen:
- Analytics and Chat History will be updated associating all the sessions related to the merged identity with the new identity
- The sessions data is updated replacing the merged identity with the new identity
- The Billing Session tracking merged identity’s conversation will be marked as new identity
webSDK 経由のカスタム メタタグ
Ver 8.0 のプラットフォームのリリースにより、サポートされているすべての内部チャネル(Web SDK/IVR/IVRVoice/Webhook チャネル)からカスタム メタタグを直接追加できます。セッション、ユーザー、およびメッセージ レベルのメタタグを定義できます。これらのタグは、会話セッションが作成されるとすぐに追加されます。
botOptions.botInfo = {name:"<bot_name>", "_id":"<bot_id", customData :{"name":"John"}, "metaTags": { "messageLevelTags": [{ "name": "tag1", value: "message"}], "sessionLevelTags": [{ "name": "tag2", value: "session"}], "userLevelTags": [{ "name": "tag3", value: "user"}] } };
一般的に発生するエラー
- 誤った URL が記載されていると、ユーザーに対して 404 エラーが表示されます。URL を再確認します。URL は、自分の Web SDK でボットをホストしているか、Kore Web SDK でホストしているかによって異なります。Kore Web SDK であれば、URL は
http://demo.kore.net:3000/users/sts 7です。自社の Web SDK でホストしている場合は、それぞれの URL を入力します。 - missing/Invalid jwt.sub(): このエラーは、index.html ファイルにユーザーのメールアドレスが指定されていない場合に、エンタープライズ ボットで発生します。index.html 内で、以下に示すようにユーザーの識別情報を記述します
botOptions.userIdentity = ‘x@gmail.com’;// Provide users email id here. - 見つかりませんでした: clientID が間違っているか、clientID が指定されていない場合に、このエラーが表示されます。Bot – API Extensions オプションから正しい ClientID を確認します。
botOptions.clientId = “{clientID}”; // secure client-id - jwt の検証エラー: index.html 内の clientSecret に誤りがあります: ボット – API 拡張機能 オプションで、正しい ClientID を確認します。
“clientSecret”: "{clientSecret}” //provide clientSecret here
テスト アプリケーションとローカル ホスト サーバーを使用して Web SDK をインストールしてテストした後、同じコンセプトで自分のエンタープライズ アプリケーションに Web SDK をインストールして設定できます。Web SDK の index.html ファイル内のファイル パスと URL を、自身の Web サイトとサーバーを指すように再設定し、エンタープライズの JWT 資格情報を持つ Kore.ai ボットを Web/モバイル クライアント チャネルに設定するだけです。
This tutorial is an end-to-end walkthrough for setting up and running an instance of the Kore.ai Bots Web SDK which is a collection of libraries that you can use to integrate Kore.ai bots with your own web applications.
Web SDK Tutorial Overview
In this tutorial, you will install a Kore.ai sample bot, a test application to host the bot, and then a JSON Web Token (JWT) generation web service using your local host server to communicate between the bot on your local server and the Kore.ai Bots Platform.
The following list describes the general steps you will take to install and configure the Web SDK.
- Build the Bot to be integrated – For this tutorial, you will install the Travel Planning Sample bot that uses open APIs to get flight and location information, along with weather reports.
- Configure Web/Mobile Client channel – To use the Travel Planning Sample bot with the Web SDK, you must configure the bot for the Web/Mobile Client channel.
- Create a new Client App – When you configure the Web/Mobile Client channel for the Travel Planning Sample bot, you must create a client app and select the JWT signing algorithm used to generate the authentication tokens.
- Publish the bot – After you have configured the Travel Planning Sample bot, you must publish the bot which sends the bot to the Bots Admin for approval.
- Approve and Deploy the bot – In the Bots Admin Console, the published bot and tasks must be approved to deploy.
- Download and install Node.js – You will need to install Node.js used to host the JWT token generation web service for the Web SDK to communicate between the bot in the test application and the Kore.ai Bots Platform.
- Download and uncompress the test application – The test application, SDKApp is used to simulate your application that will host the Kore.ai bot as a channel on a web page using your computer local host server.
- Download and uncompress the Kore.ai Web SDK – The Web SDK contains the libraries used to communicate and run the bot in the test application using the Web/Mobile Client channel. You will need to configure settings in the index.html file for your computer.
- Start your application and view the bot in a web browser – In a Terminal window, you will start the JWT service, and then view the bot in a web browser.
Now let us see detailed step by step implementation.
Installing and Running the Kore.ai Web SDK
This section provides detailed steps on how to run a Kore.ai sample bot using the Web SDK and a test application running on your computer local host server.
To get started, you will need to build a bot to run in the test application, and then configure the bot to run in the Web/Mobile Client channel. For this tutorial, we will be installing a sample bot (see here for detailed steps)
- Log on to Bot Builder, and click the down-arrow next to the +New Bot and select Install Sample Bots.
- Hover over Travel Planning Sample, and then click Install.
- The Travel Planning Sample installed successfully message is displayed and the sample bot is added to your Bots left-hand navigation menu.
In this next section, you will define the Web/Mobile Client channel for the Travel Planning Sample bot by creating a new client app and defining channel settings. See here for a detailed explanation of the steps.
- On the bot builder top menu, select the Deploy tab
- From the left menu, click Integrations > Web/Mobile SDK.
- In the Select App drop-down list, click Create App. The Create Client App dialog is displayed.
- In the Name field, enter a name for your app, for example, My SDK Client App.
- In the JWT Signing Algorithms section, select HS256 to generate the authentication tokens.
- Click Next -> Done.
- The Web/Mobile Client Channel page is displayed with the following JWT credentials, make a note of all these details. We will be using them later in the Web SDK setup:
- Bot Name
- Bot ID
- Client ID
- Client Secret
- Click Save.
Now that the bot is created and defined for the Web/Mobile Client channel, you are ready to publish and deploy your bot.
Note: By default, the Travel Sample Planning bot is configured with Target Audience set to Enterprise Users on the Build tab in the Configurations -> General Settings. Optionally, you can define this bot for General Public use. Once this bot is published, the Target Audience cannot be changed.
- On the Deploy tab, click Bot Management -> Publish.
- On Publish page, select all tasks, and then click Proceed.
- Enter a comment and Confirm publish.
After an enterprise developer publishes a bot, it must be approved and assigned to the users for use.
- Complete one of the following bot deployments in the Bots Admin Console depending if your bot Target Audience is set to Enterprise Users or General Public. Complete one of the following:
- In the Bots Admin Console, in the Bots Management module, on the Enterprise Bots page, click the Ellipses icon for the Travel Planning Sample bot that you want to deploy, and then click Manage bot tasks. The Manage Bot Tasks dialog is displayed.
- In the Bot tasks field, click the Expand icon to display the available and deployed tasks, select all tasks for this bot, and then click Confirm.
- In the Manage bots tasks dialog, click Confirm. The Bot status changed successfully message is displayed.
- On the Enterprise Bots page, click the Ellipses icon for theTravel Planning Sample bot that you want to assign the users to, and then click Bot & task assignments.
- The Bot & task assignments dialog is displayed. Assign the bot to your users, for all tasks, including yourself.
Now it is time to download, uncompress, install and configure the software packages required for the Web SDK and a test application to run the bot locally on your local host server.
- To download and install node.js on your computer, go to https://nodejs.org/en/download/, and then select your OS as .pkg for Mac, and .msi for Windows.
- In a Terminal window, run the
node -vcommand to verify installation and version, for example,v6.10.2. - Locate the SDKApp/sdk folder of your web server hosting the app where you want to integrate the Kore bot. For this tutorial, to download the test application and JWT web service, click SDKApp, and unzip it.
- To download the Kore.ai Web SDK, go to https://github.com/Koredotcom/web-kore-sdk, and then click Download. Extract all files to the …/SDKApp/sdk folder mentioned in step above. Check for the release compatibility from the release notes.
- From the Bot Builder Web/Mobile Client Channel page on the Deploy -> Channels menu, copy the following (as mentioned in step 8 above):
- clientSecret
- clientId
- Bot Name
- For ver7.2 of the platform, the Web SDK repo structure has undergone a major change. The steps would vary based on which repo you are using.
- Follow this step for the latest Web SDK file downloaded after ver7.2 of the platform i.e. after Feb 2020.
- Open the index.html file from the …/SDKApp/sdk/UI folder using a text editor. Update the following lines to add the path to the UI folder:
<script src="libs/jquery.js" type="text/javascript"></script>

<script src="libs/jquery.tmpl.min.js" type="text/javascript"></script>

<script src="libs/jquery-ui.min.js" type="text/javascript"></script>

<link href="libs/jquery-ui.min.css" rel="stylesheet"></link>

<script src="chatWindow.js" type="text/javascript"></script>

<link href="chatWindow.css" rel="stylesheet"></link> - Open the kore-config.js and update the botOptions parameters botInfo, clientId and clientSecret, and your email id as userIdentity.
“clientSecret”: “{client secret}”
$.ajax({
   url: “http://localhost:3000/api/users/getJWT”,
     //this is sample url of a localhost.
     //This should include the url where you are hosting the bot.
   botOptions.userIdentity = ‘ ‘;
     // Provide users email id here
   botOptions.clientId= "{client id} ";
     // secure client-id
   _botOptions.botInfo= {name:"{bot name}","id":"{bot id"};
     // Kore bot name is case sensitive
 })
The JWTUrl refers to the location where your app (where you want the Kore.ai Bot to be integrated) is hosted. For this tutorial, we are using the JWT server (as setup in step 19) and hence using the same here.
- Ensure that in kore-config.js you set the audience for your bot. Choose one of the following:
"isAnonymous": < false >;if bot is deployed for the enterprise users, and then setbotOptions.userIdentity = '< Your email ID >';
– or –"isAnonymous": < true >;if bot is deployed for Consumer Use
- Open the index.html file from the …/SDKApp/sdk/UI folder using a text editor. Update the following lines to add the path to the UI folder:
- This step is valid for older Web SDK file downloaded before ver7.2 of the platform i.e. before Feb 2020
- Open the index.html file from the …/SDKApp/sdk/UI folder using a text editor:
- Update the following lines to add the path to the UI folder:
<script src="libs/jquery.js" type="text/javascript"></script>

<script src="libs/jquery.tmpl.min.js" type="text/javascript"></script>

<script src="libs/jquery-ui.min.js" type="text/javascript"></script>

<link href="libs/jquery-ui.min.css" rel="stylesheet"></link>

<script src="chatWindow.js" type="text/javascript"></script>

<link href="chatWindow.css" rel="stylesheet"></link> - Update the following parameters to run as local host
“clientSecret”: “{client secret}” $.ajax({ url: “http://localhost:3000/api/users/getJWT”, //this is sample url of a local host. //This should include the url where you are hosting the bot. botOptions.userIdentity = ‘ ‘; // Provide users email id here botOptions.clientId= "{client id} "; // secure client-id _botOptions.botInfo= {name:"{bot name}","id":"{bot id"}; // Kore bot name is case sensitive })Note: The URL mentioned in the above code snippet, refers to the location where your app (where you want the Kore.ai Bot to be integrated) is hosted. For this tutorial, we are using the JWT server (as setup i step 18) and hence using the same here.
- Choose one of the following:
"isAnonymous": < false >;if bot is deployed for the enterprise users, and then setbotOptions.userIdentity = '< Your email ID >';
– or –"isAnonymous": < true >;if bot is deployed for Consumer Use
- Update the following lines to add the path to the UI folder:
- Open the index.html file from the …/SDKApp/sdk/UI folder using a text editor:
- Follow this step for the latest Web SDK file downloaded after ver7.2 of the platform i.e. after Feb 2020.
- Save your changes.
You are ready to start the JWT token generation service and access the test application with the configured Web SDK in your local web browser. - Go to home directory
cd SDKApp - Install dependencies using the following command
npm install
- Start SDKApp
node startServer.js - Access the application in any browser using localhost:3000
Passing data via webSDK
You can pass additional information of the user accessing the channel by adding the custom data at botInfo inside the index.html file.
botOptions.botInfo = {name: "Banking Bot",
                              "_id": "<bot_id>",
                              customData: "value"
              };
Details like phone number, address, or location, etc., are examples of data that can be passed inside the customData.
customData can be accessed from lastMessage under the BotUserSession of the context object. This data will be specific to the user using webSDK and will last for the user session.
Multiple values can also be added to the customData in the index.html file as key-value pairs:
botOptions.botInfo = {name:"<bot_name>",
                      "_id":"<bot_id",
                      customData:{"name":"John",
                                  "age":30,
                                   "cars": {"car1":"Ford",
                                            "car2":"BMW",
                                            "car3":"Fiat"
                                             }
                                   }
                           };
Passing Mapped Identities
The Web/Mobile SDKs support the passing of mapped identities of the users when they switch from one identity to another while interacting with the bot. This process allows the users to continue any ongoing conversation initiated using a previous identity.
For example, a user may have started the conversation with the bot using an anonymous or randomly generated identity. After exchanging a few messages, the user may become an authenticated or known user by logging into your website or any application. At this point, the user’s known identity can be passed to the bot from the SDK as part of the ‘JWT Grant API’ call using the parameter identityToMerge. The Platform uses this information to merge the user identities and allows the user to resume an ongoing conversation using the new known identity.
{
 "iat": 1611810186883,
 "exp": 1611813786.883,
 "aud": "https://idproxy.kore.com/authorize",
 "iss": "cs-d3042d3e-7da4-55da-a94d-783349270cc0",
 "sub": "knowuser1@test.com",
 "isAnonymous": "false",
 "identityToMerge": "anonymoususer1@test.com"
}
The following scenarios describe the bot behavior when dealing with the new identity and merged identity:
- When both the new and merged identities are not present in the system, then the new identity is created and a new conversation is started using new identity
- When the new identity is present but the merged identity is not present in the system, then the conversation is started or continued (in case of an active session) using new identity
- When the merged identity is present but the new identity is not present in the system, then the new identity is created and the conversation is continued using the new identity. All references to the merged identity are replaced with the new identity and the merged identity is removed.
- When both the merged identity and the new identity are present in the system and the new identity does not have an active session, then the conversation is continued using the new identity. All references to the merged identity are replaced with the new identity and the merged identity is removed.
- When both the merged identity and the new identity are present in the system and both have an active session, then the merged identity’s conversation is continued using the new identity. All references to the merged identity are replaced with the new identity and the merged identity is removed. The active session of the new identity is marked as “Drop-off” and closed
Due to the above-mentioned behavior in the user identity following changes can be seen:
- Analytics and Chat History will be updated associating all the sessions related to the merged identity with the new identity
- The sessions data is updated replacing the merged identity with the new identity
- The Billing Session tracking merged identity’s conversation will be marked as new identity
Custom Meta Tags via webSDK
With the release of ver8.0 of the platform, you can directly add Custom Meta Tags from all supported internal channels (Web SDK/IVR / IVRVoice / Webhook channels). You can define Session, User, and Message level meta-tags. These tags will be added to the Conversation Session as soon as it is created.
botOptions.botInfo = {name:"<bot_name>", "_id":"<bot_id",
                           customData :{"name":"John"},
                           "metaTags": {
                                 "messageLevelTags": [{ "name": "tag1", value: "message"}],
                                 "sessionLevelTags": [{ "name": "tag2", value: "session"}],
                                 "userLevelTags": [{ "name": "tag3", value: "user"}]
                                 }
                          };
Some commonly encountered errors
- A wrong URL is given in index.html, users see a 404 error. Double check the URL. URL changes depending on whether you are hosting the bot on your own web SDK or on Kore’s web SDK. If its Kore web SDK, then the URL is
http://demo.kore.net:3000/users/sts 7.
If you are hosting on your in-house web SDK, then provide the respective URL. - missing/Invalid jwt.sub(): This error occurs for enterprise Bots, when the user’s email id is not given in the index.html file. Provide users identity as shown below in index.html
botOptions.userIdentity = ‘x@gmail.com’;// Provide users email id here. - Not found: User sees this error when either wrong clientID or no clientID is given. Check the correct ClientID from Bot – API Extensions option
botOptions.clientId = “{clientID}”; // secure client-id - error verifying the jwt: the Wrong clientSecret is given in index.html: Check the correct clientSecret you get from Bot – API Extensions option
“clientSecret”: "{clientSecret}” //provide clientSecret here
After you install and test the Web SDK using the test application and your local host server, you can use the same concept to install and configure the Web SDK in your own enterprise application. You will just need to reconfigure the file paths and URLs in the index.html file of the Web SDK to point to your website and servers, and configure a Kore.ai bot for the Web/Mobile Client channel with JWT credentials for your enterprise.