This topic describes the user interface for creating a conversational flow between a user and a Bot in a dialog task using the Dialog Builder tool in Kore.ai Bot Builder.
The following sections detail the properties for this node in the new dialog builder, introduced in v9.0 of the platform. For the details related to the older legacy builder,
refer here.
Dialog Builder

In the Search field, you can search component titles for any letters or words using find-as-you-type. Search matches are highlighted in the component titles.
Adding Nodes
In ver9.0 of the platform, Conversation Driven Dialog Builder was introduced. This dialog builder allows you to build the dialog tasks in one of the following three ways:
Drag and drop
You can add nodes within the dialog task, by dragging the node from the panel to the designated place in the dialog task. Use the drop-down to reuse existing nodes and drag and drop the same.

Dialog Canvas
Use the + button next to the node where you want to add another node. You can either add a new node or use an existing node.
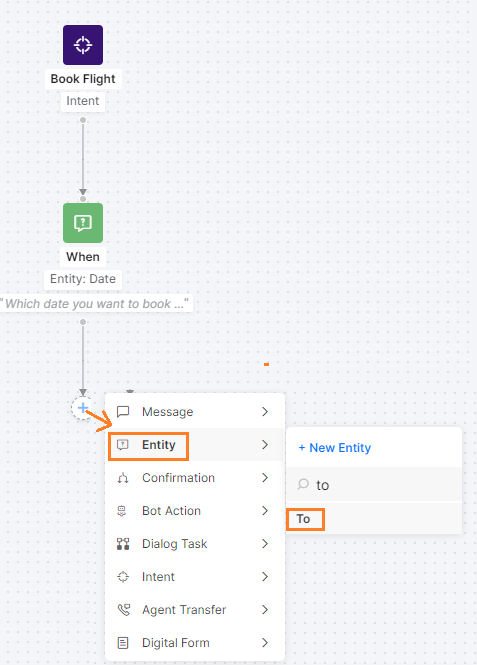
You can use the Add Node button visible on hover over the connector line, to add nodes between two existing nodes. You can create a new node or pick from the existing node list.

Node Properties

From the Properties panel you can access:
- Component Properties like name, type, and component-specific properties.
- Instance Properties can be customized for the selected node for the current dialog.
- Connection Properties can be used for setting the transition conditions.
- NLP Properties for intent and entity recognition.
- Voice Call Properties for IVR channels (available for certain nodes only after IVR integration).
Depending on the type of component added, you can define various settings in the Properties panel. For more information, see the corresponding component types of documentation.
Bot Action Nodes
Note: This node was introduced in v9.0 of the platform as a container for Service, Script, etc nodes.
Bot Action nodes include the following nodes which need processing by the bot without user interaction:
- Service Node
- Script Node
- Logic Node
- Webhook Node
- Process
To access these above-mentioned nodes follow the below steps:
- Add Bot Action node in the respective position
- Click the expand (+) button next to the bot action node

- The nodes panel will be replaced with the Bot Action Nodes panel

- Add any node from here, using either the + or drag and drop

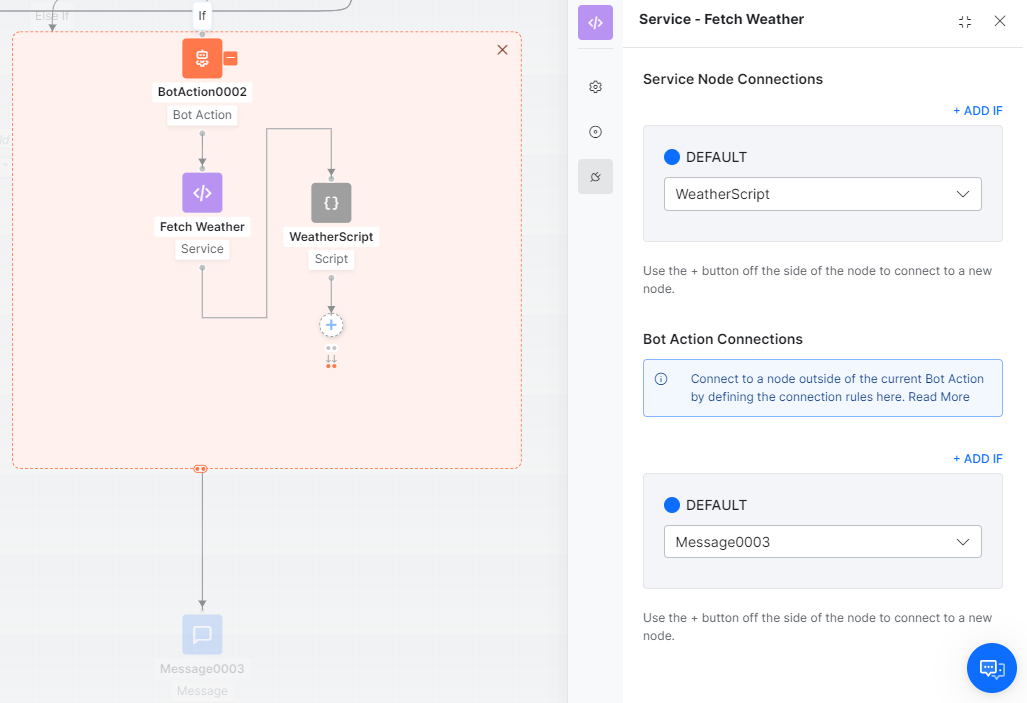
- Nodes inside the bot action node cannot be connected directly to any node outside the bot action.
- For the nodes inside the bot action node, the following connections can be configured:
- Node Connections – this option can be used to define the connection rules connecting to nodes within the bot action node. It can be configured to:
- any node within the corresponding bot action node;
- Not Connected;
- End of Bot Action – this would take the bot flow to the node connected to the bot action node;
- Bot Action Connections – this option can be used to define the connection rules connecting to a node outside of the current Bot Action. These rules would be applied to the bot action node as a whole.
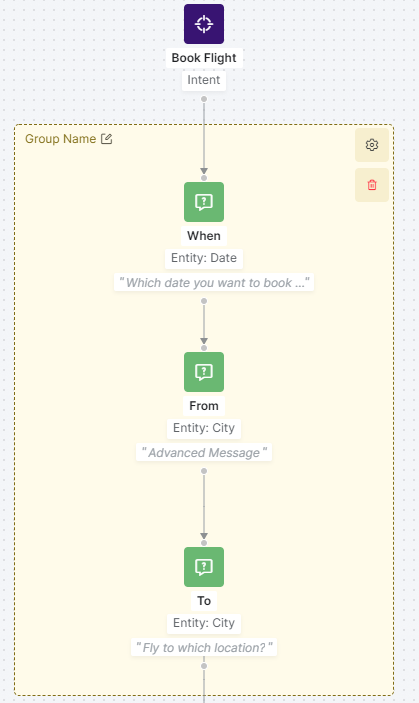
Grouping Nodes
You can group nodes to improve the user experience with follow-ups, digressions, and amending entity values.
To add a group node to the dialog task, follow the below steps:
- Open the Dialog Task where you want to add the Group node.
- Create a group using the ctrl key and the mouse action of selection covering one or more nodes in the dialog definition. (for pre-v9.0 use the mouse action of selection covering one or more nodes in the dialog definition.)

- You can rename, configure, or delete a group.
Options Menu
The Options menu is your access to Dialog Builder tool settings and commands such as view settings, dialog task settings, and dialog import and export. To access commands,
- For the Options menu, click
 icon on the top-right of the Dialog Builder as shown in the following illustration. If Variable Namespace is enabled for the bot, you can see an additional Manage Variable Namespaces option.

Display Options
You can use Display Options to reduce unnecessary node information and better utilize screen real estate.
You can show or hide some or all node types, node details, or connection details displayed in the Dialog Builder.
- Show All to show all the node information.
- Hide Node Type to remove the node name.
- Hide Node Details to remove node descriptions.
- Hide All to show only basic node information.
Zoom Controls
Zoom Options are used to:
- Fit to Page – Resizes Dialog Builder components and connections to fit within the display screen resolution for a single, non-scrolling page.
- Reset Zoom – Resets zoom settings to actual size.
Additional Zoom Option controls are available at the bottom-left of the Dialog Task builder shown in the following illustration.

Dialog Settings
The Dialog Settings dialog allows you to modify the dialog task basic settings, and if desired, set the visibility of a dialog to create a hidden dialog task that is available for use, but not shown as a bot task.
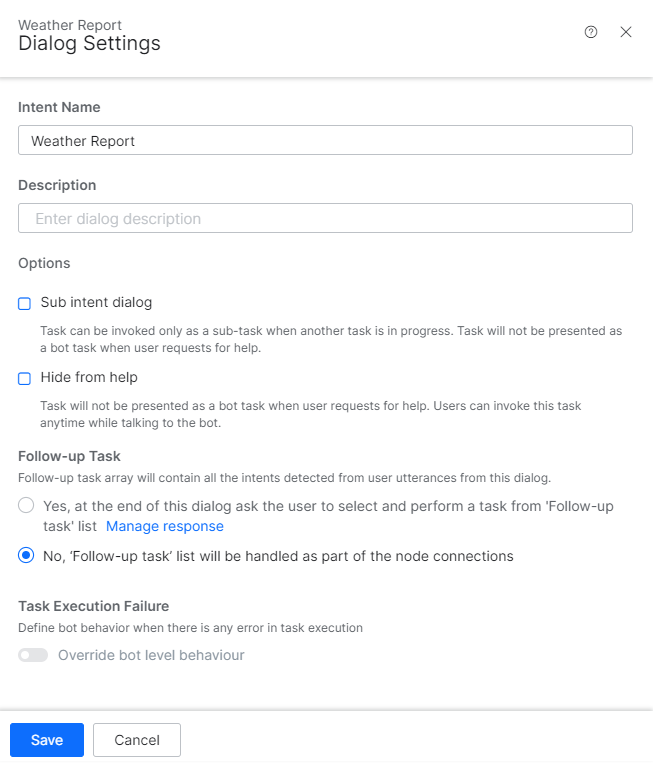
Add or modify the following settings for each dialog:
- Name – The name of your dialog task, usually the main user intent. For example, Pay Bills.
- Description – An optional description of your dialog task displayed in Bot Builder.
- Options – Specify the behavior of this dialog task to the end-user:
- Sub intent only dialog – Task is invoked only as a sub-task when another task is in progress. The task is not presented as a bot task when the user requests help.
- Hide from help – Task is not presented as a bot task when the user requests for help. Users can invoke this task anytime while talking to the bot. Note this option is selected automatically when the previous option is selected.
- Follow-up Task – Follow-up task array contains all the intents detected from user utterances from this dialog. You can either:
- Handle the follow-up tasks as part of node connections (default setting), or
- Let the user select the follow-up task.
- Task Execution Failure – Define bot behavior when there is an error in task execution. It can be set as either:
- Same as the Bot Level behavior
- Specific to this task – initiate a task, run script, or show a message.
Troubleshooting
A real-time set of errors and warnings are available as you define your dialog task located on the top-right of the Dialog Builder. Click the information icon to display any errors or warnings as shown in the following illustration.

