トリガーとは、定義された条件に基づいて、特定のプロセスアプリケーションを駆動する特定のイベントです。要件に応じてプロセスフローをトリガーするために使用できるさまざまなトリガーがあります。
会話形式トリガー
会話形式トリガーとは、会話ボットを通じて発生するトリガーのことを指します。Kore.ai会話ボットを関連付けて、プロセスアプリをトリガーするためにボットを使用する必要があります。会話型ボットがプロセスアプリをトリガーできるようにするために、ボットにはトリガーアクションを実行するための権限が与えられています。
会話形式トリガーを設定するには、以下の手順に従います。
- プロセスアプリにログインした後、そのアプリにはフロータブが表示されます。
- 右側のペインで、トリガーの下の会話形式をクリックします。
- 「会話形式トリガー」ウィンドウでは、デフォルトで設定タブが選択されています。
- 構成ページで、+変数をクリックしてプロセス変数を追加します。変数によって、プロセスアプリのフロー全体でボットのデータを使用できます。変数の追加はオプションです。会話中にプロセスをトリガーしたい場合は、それを追加できます。
- データ型 (文字列、ブール値、数字、日付) をドロップダウンリストから選択します。
- 同様に、データ型が異なる複数の変数を追加できます。
- 手順タブをクリックすると、設定するための手順が表示されます。
- ペイロードを定義 – プロセスアプリのトリガーとして機能するボットから想定されるペイロードを追加します。
- 会話ボットがプロセスアプリをトリガーできるように、ボットにはトリガーアクションを実行するためのアクセス許可が付与されています。設定>ボットのアクセス許可からアクセス許可を追加できます。また、プロセスアプリの設定後に、ボットのアクセス許可を有効にすることもできます。
- 開発者は、アクセス許可を付与した後、ボットビルダーのダイアログ定義画面に移動して、プロセスノードを追加し、トリガーするプロセスアプリを選択し、ボットからプロセスアプリにコンテキストデータを渡すために、コンテキストマッピングを実行する必要があります。トリガーを作成して設定した後、個別にこれを実行することもできます。
- 完了をクリックします。

デジタルフォームトリガー
デジタルフォームは、必要なデータを収集するのに役立ちます。これによってユーザーは、あるリクエストを処理するために必要なデータを入力することができます。デジタルフォームトリガーとは、デジタルフォームを送信することで発生するトリガーのことです。例として、従業員の経費報告書について検討しましょう。ある従業員が1000ドルの経費報告書を送信しました。投稿後、システムはAPIリクエストによりユーザー関連情報を取得し、承認プロセスを踏みます。このシナリオでは、システムはAPIリクエストを使用します。以下に、デジタルフォームトリガーのプロセスフローを説明します。
デジタルフォームを設定するには、以下の手順に従います。
- プロセスアプリにログインした後、そのアプリにはフロータブが表示されます。
- 右側のペインで、トリガーの下のデジタルフォームをクリックします。
- デジタルフォームトリガーウィンドウで、フォームを選択するか、フォームドロップダウンリストから新しいフォームを作成を選択します。
- [新しいフォーム] ダイアログボックスで、以下の詳細を入力します。
- 名前 – デジタルフォームの名前を入力。例:経費報告書
- 表示名 – 名前を識別しやすいように表示名を入力。
- 説明 – デジタルフォームの簡単な説明を入力
- 作成をクリックします。
- デジタルフォームトリガーウィンドウで、アクセス制御を追加をクリック。それはフォームページに表示され、マスターフォームにコンポーネントを追加できます。更新できるのは 読み取り専用、可視化および 可視性の設定であり、アクセス制御で行うことができます。
- フォームを埋め込むHTMLセクションでは、HTMLコードが表示されています。コピーをクリックして、HTMLコードをコピーします。このHTML iframeコードを使用して、トリガーフォームをウェブサイトに埋め込むことができます。これはあなたがポータル を使用しない場合のみ必要となります。プロセスアプリは公開アクセス用です。
- 完了をクリックします。作成されたトリガーは、プロセスビルダーで確認できます。
- イニシエーター(従業員)に通知することで、フローの構築を開始します。
- 左側のペインには、イベントセクションがあります。通知ステンシルを、このセクションからビルダーにドラッグアンドドロップします。
- 通知ステンシルをクリックして、「通知」ウィンドウを開きます。
- 「通知」ウィンドウで、以下の詳細を入力。
- 名前 – 通知メッセージの名前を入力。
- 配信モード – 従業員に通知する際の通信モードを選択。
- 受信者 – 通知を受信する従業員のメールアドレスを入力。コンテキスト や変数 をトリガーから使用することもできます。
- 件名 – 通知メールの件名を入力。
- メッセージを作成 – 通知に関連するテキストを入力。さらに、コンテキストや変数の追加もサポートしているので、メッセージを作成する際にそれらを含めることができます。
- 「通知」ウィンドウを閉じます。
- APIリクエストを行い、イニシエーター(従業員)の管理者の詳細を取得します。
- 左側のペインには、システム連携セクションが表示されます。このセクションからビルダーにAPIに接続ステンシルをドラッグアンドドロップします。
- APIに接続ステンシルをクリックして、「APIに接続」ウィンドウを 開きます。
- 「APIに接続」 ウィンドウで、以下の詳細を入力します。
- 名前 – APIリクエストの名前を入力。
- タイプ – APIリクエストタイプを選択。RESTまたはSOAP
- システム連携モード – システム連携モードを選択。同期または非同期。
- URL:URLフィールドの下のリクエストを定義をクリックします。
- リクエストの定義ページで、以下の詳細を入力します。
- リクエストタイプ – 取得
- リクエストURL – https://608fd39c38473400170203a8.mockapi.io/api/v1/leaverequests(これは一例を示すURLであり、業務を目的とするものではありません。)
- このAPIは、ヘッダーパラメータを必要としません。
- リクエストをテストタブをクリック。
- ページ右上のテストをクリック。テストが完了するまで待つと、以下の ステータスコードを取得できます 200。
- APIコールによって返された記録の配列を見ることができます。次のステップでは、JavaScriptを使用して値を説明します。
- ページ右上の保存をクリック。
- リクエストの定義ページで、以下の詳細を入力します。
- 「APIに接続」 ウィンドウを閉じます。
- APIリクエストが正常に完了すると、システムは管理者の詳細を取得し、タスク(経費報告の承認)を割り当てます。
- 左側のペインに、タスクセクションが表示されます。通知ステンシルを、このセクションからビルダーにドラッグアンドドロップします。
- ヒューマンタスクステンシルをクリックして、 ヒューマンタスクウィンドウを開きます。
- 「ヒューマンタスク」ウィンドウで、以下の詳細を入力:
- 名前 – ヒューマンタスクの名前を入力。
- タスクの結果 – 承認と却下のオプションが表示されます。タスクを承認するか却下するかを選択します。また、これらのオプションの名前を変更したり、成果を追加 をクリックすると、保留などのオプションを追加できます。
- 通知タブをクリックして、通知設定を構成します。
- ドロップダウンリストから配信モードを選択します。ボットまたはAPIまたはメール。
- 応答セクションにおいて、応答を取得 オプションを選択し、管理者の応答を送信します。これらのオプションは、選択した配信モードによって異なります。配信モードが メールの場合は、フォームやメールで応答を取得できます。配信モードが ボットの場合は、フォームや会話体験によって応答を取得できます。配信モードが APIの場合は、APIを介して応答を取得できます。この例では、選択された配信モードはメールです。
- フォームによる応答の取得 – 選択すると、 フォームのURLは、メッセージを作成セクションで作成されたメッセージにインサートされます。
- メールで応答を取得 – 選択すると、結果のボタン が、メッセージを作成セクションで作成されたメッセージに付加されます。
- メッセージを作成セクションで、以下の詳細を入力します。
- 件名 – 通知メールの件名を入力。
- メッセージを作成 – 応答メッセージの詳細を入力。
- {..}をクリックして、メッセージに変数を追加します。メッセージにおいて、コンテキスト を使用することもできます。
- 割り当てタブをクリックして、受信者設定を構成します。下のオプションから何れかを選択できます:
- 単一の受信者 – 選択すると、このセクションで設定した受信者に応答を送信できます。
- 受信者IDフィールドには、受信者のメールアドレスを入力します。
- 複数の受信者 – 選択すると、このセクションで設定した複数の受信者に応答を送信できます。
- 受信者IDフィールドに受信者のメールアドレスをコンマで区切って入力します。
- 割り当てロジックセクションで、オプションを選択します。
- 全員への割り当て – 選択すると、システムはタスクをすべての受信者に割り当てます。
- 最も占有率が低い – 選択すると、システムは、開いているタスクの数が最も少ない受信者にタスクを割り当てます。
- グループ– 選択すると、応答をグループ宛に送信できます。グループの受信者のうち 1 人だけがタスクを完了する必要があります。
- グループIDフィールドには、グループのメールアドレスをカンマで区切って入力します。
- 単一の受信者 – 選択すると、このセクションで設定した受信者に応答を送信できます。
- 「ヒューマンタスク」 ウィンドウを閉じます。
- タスクを割り当てた後、管理者はそのタスクを承認または却下することができます。このアクションを実行するには、ロジックステンシルが必要です。このタスクを実行するのに、常にロジックが必要であるわけではなく、ユースケースによって異なります。しかし、この例では、ロジックステンシルを使用しています。
- 左側のペインに、ロジックセクションが表示されます。スプリットステンシルを、このセクションからビルダーにドラッグアンドドロップします。
- スプリットステンシルは、2つのブランチ(ブランチ1とブランチ2)を持つビルダーに追加されます。
- スプリットステンシルをクリックして、「スプリット」ウィンドウを開きます。
- 「スプリット」ウィンドウで、以下の詳細を入力。
- 名前 – スプリットアクションの名前を入力。例:管理者決定。
- ブランチ – ブランチ(ブランチ1とブランチ2)を承認済みと却下済みとして編集します。
- スプリットロジック – 以下のオプションのいずれかを選択します。
- すべてのブランチを実行 – 選択すると、すべてのブランチが同時に実行されます。
- 条件で実行 – 選択すると、下記の条件を定義セクションで条件を定義できます。プロセスフィールド、コンテキストおよびプロセスコンテクストに基づいて条件を定義することができます。例として、プロセスフィールドを選択しましょう。
- Ifという条件でフィールド値を選択 を選択し、より小さいをそれぞれのドロップダウンリストから選択します。その値フィールドに $2000を入力します。
- ブランチへ移動ドロップダウンリストから、承認済みを選択します。
- Else-Ifを追加セクションにおいて、ブランチへ移動ドロップダウンリストから却下済みを選択します。
- 「スプリット」ウィンドウを閉じます。
- 次のステップは、経費報告書のステータスを従業員に通知することです。通知ステンシルを、ビルダーに関する承認済みと却下済みの下にをドラッグアンドドロップします。
- 承認済みと却下済みブランチの通知ステンシルを開き、通知の詳細を設定します。
- 最後にプロセスフローを終了します。
- 左側のペインに、ロジックセクションが表示されます。終了ステンシルを、このセクションからビルダーにドラッグアンドドロップします。
- 終了ステンシルをクリックして、「終了」ウィンドウを開きます。
- 「終了」ウィンドウで、以下のいずれかのオプションを選択します。
- このパスを終了 – 選択すると、システムにおいて現在のパスが終了し、他のすべてのパスはアクティブなまま残ります。
- すべてのパスを終了 – 選択すると、システムにおいてすべてのアクティブなパスが終了し、プロセスフローが終了します。

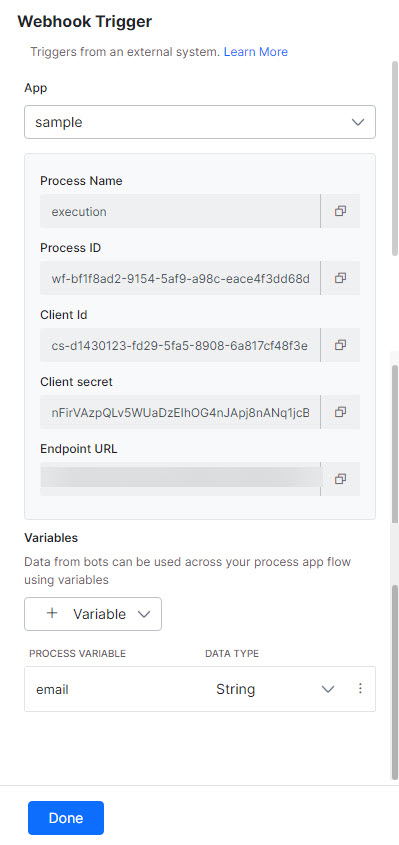
Webhookトリガー
Webhookトリガーでは、サードパーティのアプリケーションからプロセスアプリをトリガーすることができます。これにより、認証のために、クライアントIDとクライアントシークレットを使用して、APIコールを行うことができます。
Webhookトリガーを設定するには、以下の手順に従います。
- プロセスアプリにログインした後、そのアプリにはフロータブが表示されます。
- 右側のペインで、トリガーの下のWebhookをクリックします。
- 「Webhookトリガー」ウィンドウで、以下の詳細を設定します。
- アプリ– ドロップダウンリストからアプリを選択するか、新しいアプリを作成します。新規アプリを作成するには、以下の手順に従います。
- ドロップダウンリストから、新規作成を選択。
- 「新規アプリを作成」ダイアログボックスで、アプリ名を入力し、ドロップダウンリストから認証アルゴリズム (HS256/RS256)を選択します。
- 確認をクリック。
- 変数– +変数をクリックして、プロセス変数を追加します。変数によって、プロセスアプリのフロー全体でボットのデータを使用できます。
- アプリ– ドロップダウンリストからアプリを選択するか、新しいアプリを作成します。新規アプリを作成するには、以下の手順に従います。
- 完了をクリックします。
呼び出し可能なトリガー
呼び出し可能なトリガーとは、他のプロセスアプリから呼び出されるトリガーを指します。たとえば、すでに設計されているプロセスアプリ Aと、呼び出し可能なトリガーを使用するプロセスアプリ Bについて考えてみましょう。上記の例では、どのフローが プロセスアプリBのトリガーとなるかは定義されていません。代わりに、 サブフローの呼び出し タスクがプロセスアプリAに追加されて、プロセスアプリBをトリガーします。呼び出し可能なタスクが追加された後、システムは自動的にこの2つのフローをリンクして プロセスアプリAをプロセスアプリBへのトリガーとして追加されます。「呼び出し可能なトリガー」ウィンドウでは、プロセスアプリAの名前が (トリガーとして)確認され、他のトリガー/プロセスアプリケーションがプロセスアプリBをトリガーします。
呼び出し可能型トリガーを設定するには、以下のステップに従います:
- プロセスアプリにログインした後、そのアプリにはフロータブが表示されます。
- 右側のペインで、トリガーの下の呼び出し可能をクリックします。
- 「呼び出し可能トリガー」ウィンドウでは、デフォルトで変数 タブが選択されています。
- 「変数」ページで+変数をクリックして、プロセス変数を追加します。変数は親プロセスから子プロセスアプリに渡されます。
- データ型 (文字列、ブール値、数字、日付) をドロップダウンリストから選択します。
- 保存をクリックします。
- 同様に、データ型が異なる複数の変数を追加できます。
- プロセスアプリタブをクリック。
- プロセスアプリを見つけることができます。このワークフローのトリガーとなるプロセスアプリを選択します。
- 完了をクリックします。

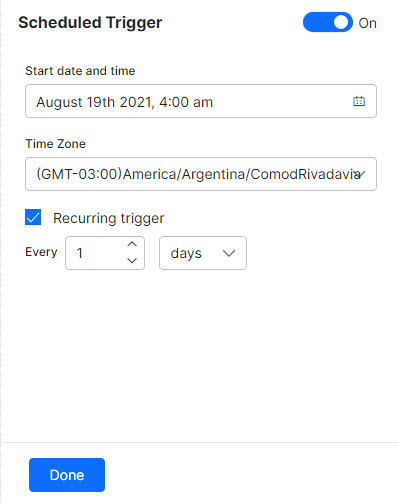
スケジュールされたトリガー
スケジュールされたトリガーでは、人手を介さずに、スケジュールされた時間に自動的にプロセスアプリをトリガーできます。例として、監査プロセスを考えてみましょう。ここでは、手動でトリガーする代わりに、システムが自動的に監査プロセスをトリガーすることができます。
呼び出し可能トリガーを設定するには、以下の手順に従います。
- プロセスアプリにログインした後、そのアプリにはフロータブが表示されます。
- 右側のペインで、トリガーの下のスケジュール済みをクリックします。
- 「スケジュール済みトリガー」ウィンドウで、以下の詳細を設定します。
- 開始日時 – カレンダーから開始日時を選択。
- タイムゾーン – ドロップダウンリストからタイムゾーンを選択。
- 繰り返しトリガー ウィンドウの右上にあるトグルをオンに切り換えます。トリガーを繰り返したい場合は、繰り返しトリガーチェックボックスを選択することができます。次に、それぞれのフィールドに詳細を入力して、繰り返しを設定します。
- 完了をクリックします。
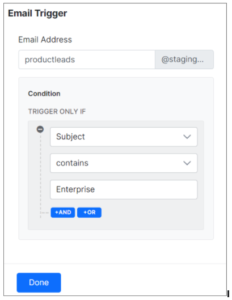
メールトリガー
メールトリガーとは、メールの送受信時に発生するトリガーのことです。これは、メールを送信するだけでプロセスアプリを開始するのに役立ちます。例として、購入したい製品の価格を尋ねるメールを送信すると、リードが開始され、適切な人/グループにタスクを作成することができます。
メールトリガーを設定するには、以下の手順に従います。
- プロセスアプリにログインした後、そのアプリにはフロータブが表示されます。
- 右側のペインで、トリガーの下のメールをクリックします。
- 「メールトリガー」ウィンドウで、以下の詳細を設定します。
- トリガーのメールアドレス – デフォルトでは、プロセスアプリ名がトリガーとなるメールアドレスとみなされますが、トリガーとなるメール名は任意に編集することができます。
- メールトリガーのドメインは静的なままであり、変更できません
- 条件付き/条件なしでメールトリガーを追加できます。
- メールに特定のキーワードが含まれている場合にのみプロセスアプリをトリガーすることもできます。
- 例:件名に「エンタープライズ」が含まれている場合のみトリガー
- この場合、ステップ4aにおいて上記で選択したメールアドレスにメールが受信されるたびに、プロセスアプリはメールの件名に「エンタープライズ」があるかどうかをチェックし、「はい」であればプロセスアプリをトリガーします。
- ビジネスニーズに応じて複数の条件を追加できます
- メールに特定のキーワードが含まれている場合にのみプロセスアプリをトリガーすることもできます。
- トリガーのメールアドレス – デフォルトでは、プロセスアプリ名がトリガーとなるメールアドレスとみなされますが、トリガーとなるメール名は任意に編集することができます。