봇 관리자 콘솔의 보안 및 제어 모듈에 있는 Kore.ai 커넥터 페이지에서, 클라우드 및 네트워크에서 Kore.ai 봇 플랫폼 간에 안전한 통신을 제공하기 위해 안전한 회사 인트라넷 내의 봇용 Kore.ai 커넥터 에이전트를 다운로드하고 설정할 수 있습니다.
Kore.ai 커넥터를 사용하는 이유?
Kore.ai 봇은 업데이트를 수행하고, 사용자에게 알림을 제공하고 작업을 수행하도록 설계되었습니다. 수행할 작업은 웹 기반 애플리케이션 또는 온프레미스 봇 애플리케이션으로서 인터넷을 통해 사용할 수 있는 타사 애플리케이션에서 수신되거나 수행됩니다. Kore.ai 봇 온프레미스 시스템에서, 회사 인트라넷 내의 사용자와 시스템을 제한하거나 특정 데이터 교환을 위한 특정 채널을 설정하여 통신 보안을 유지합니다. 반대로, Kore.ai 봇은 클라우드 환경에 상주하여 데이터를 처리하며 봇 프레미스 애플리케이션에 직접 연결할 수 없습니다. Kore.ai 커넥터 에이전트를 사용하여 인트라넷 내에서 Kore.ai와 온프레미스 애플리케이션 간에 안전한 데이터 연결을 설정하고 유지할 수 있습니다. Kore.ai 커넥터는 지정된 봇 애플리케이션으로 제한된 안전한 연결을 사용하여 설정된 회사 인트라넷 내에 설치되어 설정된 독립 실행형 애플리케이션입니다. Kore.ai 커넥터 에이전트는 온프레미스 애플리케이션과 Kore.ai 간에 데이터 액세스 요청을 전달하여 이러한 애플리케이션의 권한과 특권을 가진 최종 사용자가 설정한 특정 봇 작업을 처리하도록 설계되었습니다. 다음 그림은 봇 관리자 콘솔 보안 및 제어 모듈의 Kore.ai 커넥터 페이지를 보여줍니다. 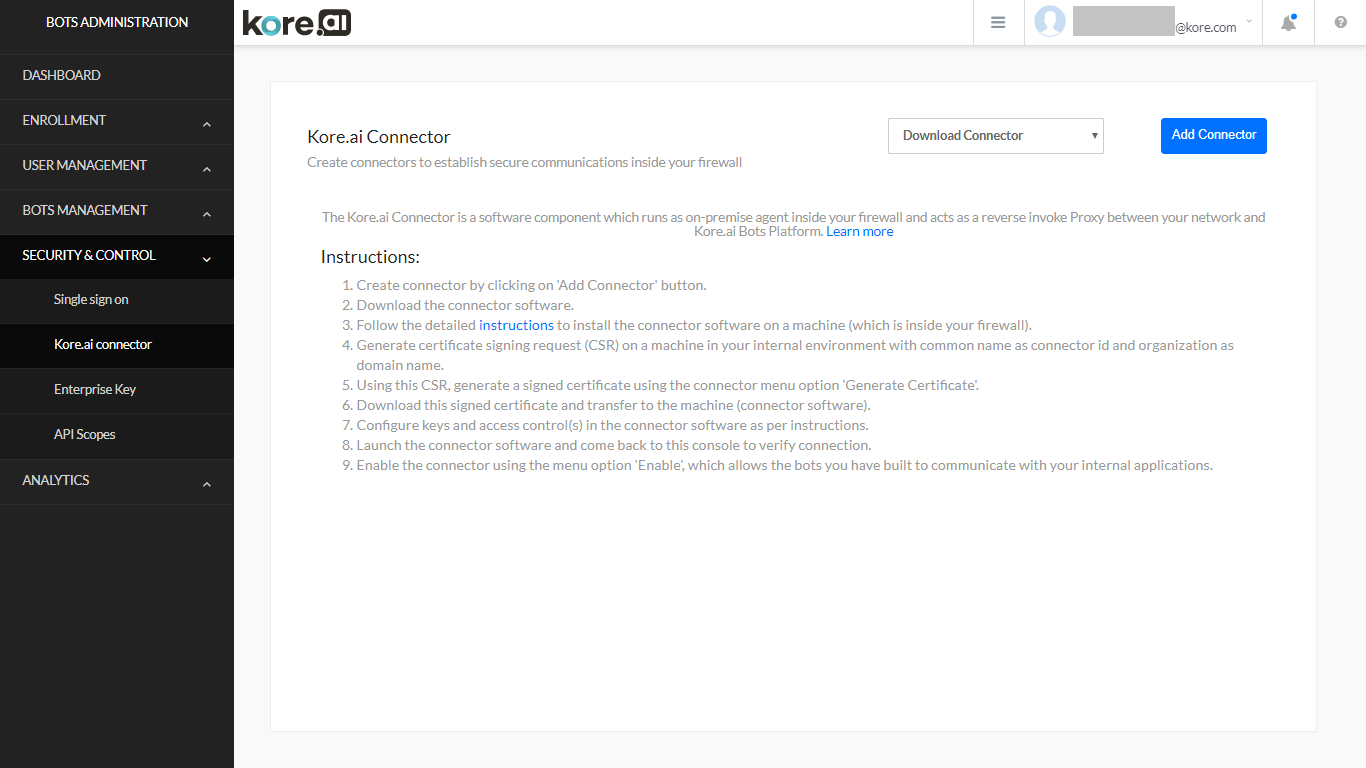
Kore.ai 커넥터 페이지 제어 다음 제어는 봇 관리자 콘솔의 Kore.ai 커넥터 페이지에서 사용할 수 있습니다. 커넥터 다운로드 – 커넥터 다운로드 드롭다운 화살표를 클릭한 다음 운영 체제 중 하나를 선택합니다.
- Windows 기반
- Unix/Linux 기반
Kore.ai 커넥터 에이전트를 기본 브라우저 다운로드 디렉토리에 다운로드합니다. DMZ 또는 인트라넷에 에이전트를 설치합니다. 자세한 내용은, Kore.ai 커넥터 에이전트를 참조하세요. 커넥터 추가 – 최대 2개의 커넥터를 추가하려면 클릭합니다. 커넥터를 추가한 후에는, Kore.ai 커넥터 에이전트를 설치하고 설정해야 합니다. 조치 메뉴 – Kore.ai 커넥터 페이지에서, 추가된 각 커넥터에 대하여, 줄임표 아이콘을 클릭하고 조치 메뉴를 표시하여 다음 명령을 실행합니다.
- 지침 – Kore.ai 커넥터 에이전트를 설치 및 설정하는 전반적인 단계를 설명하는 커넥터 지침 대화 상자를 표시합니다.
- 편집 – Kore.ai 커넥터 이름, 설명, ID, 연결됨 또는 연결 끊김과 같은 상태 및 마지막으로 연결된 날짜를 표시하는 커넥터 세부 정보 대화 상자를 표시합니다.
- 인증서 생성 – 인증서 파일 생성 방법에 대한 지침과 함께 보안을 위한 .pem 파일을 생성하는 데 사용되는 서명된 인증서 생성 대화 상자를 표시합니다. 자세한 내용은, Kore.ai 커넥터 에이전트를 참조하세요.
- 활성화/비활성화 – 이 커넥터를 정말로 활성화하시겠습니까? 대화 상자를 표시하려면 클릭합니다. 계속을 클릭하여 커넥터를 활성화합니다. 커넥터를 활성화하면, Kore.ai 커넥터 에이전트의 다른 활성화된 인스턴스가 비활성화됩니다.
- 삭제 – 커넥터 삭제 대화 상자를 표시하려면 클릭합니다. 커넥터를 영구적으로 삭제하려면, 확인을 클릭합니다.
정보
Kore.ai 커넥터는 클라우드에서 운영되는 Kore.ai와 온프레미스 애플리케이션 간에 안전한 데이터 교환을 제공하기 위해 회사 인트라넷 또는 주변 네트워크(DMZ) 내의 봇 방화벽 뒤에서 실행되는 에이전트입니다. 다음 다이어그램에서, 최종 사용자는 클라우드에서 Kore.ai에 연결하는 Kore.ai 봇을 설정합니다. Kore.ai 봇 서버(5)는 봇 요청을 통해 Kore.ai 커넥터 게이트웨이(2)에 연결합니다. Kore.ai 커넥터 게이트웨이는 봇 애플리케이션과 인터렉션을 위해 온프레미스 인트라넷 또는 DMZ에 설치되어 안전하게 설정된 Kore.ai 커넥터(3)에 요청을 릴레이 합니다. 애플리케이션의 응답은 Kore.ai 커넥터를 통해 다시 Kore.ai 클라우드로 전송되어 처리됩니다. 선택적으로, 온프레미스 애플리케이션이 webhook을 사용하여 데이터(예: 알림 메시지)를 Kore.ai 클라우드에 푸시하도록 할 수 있습니다. 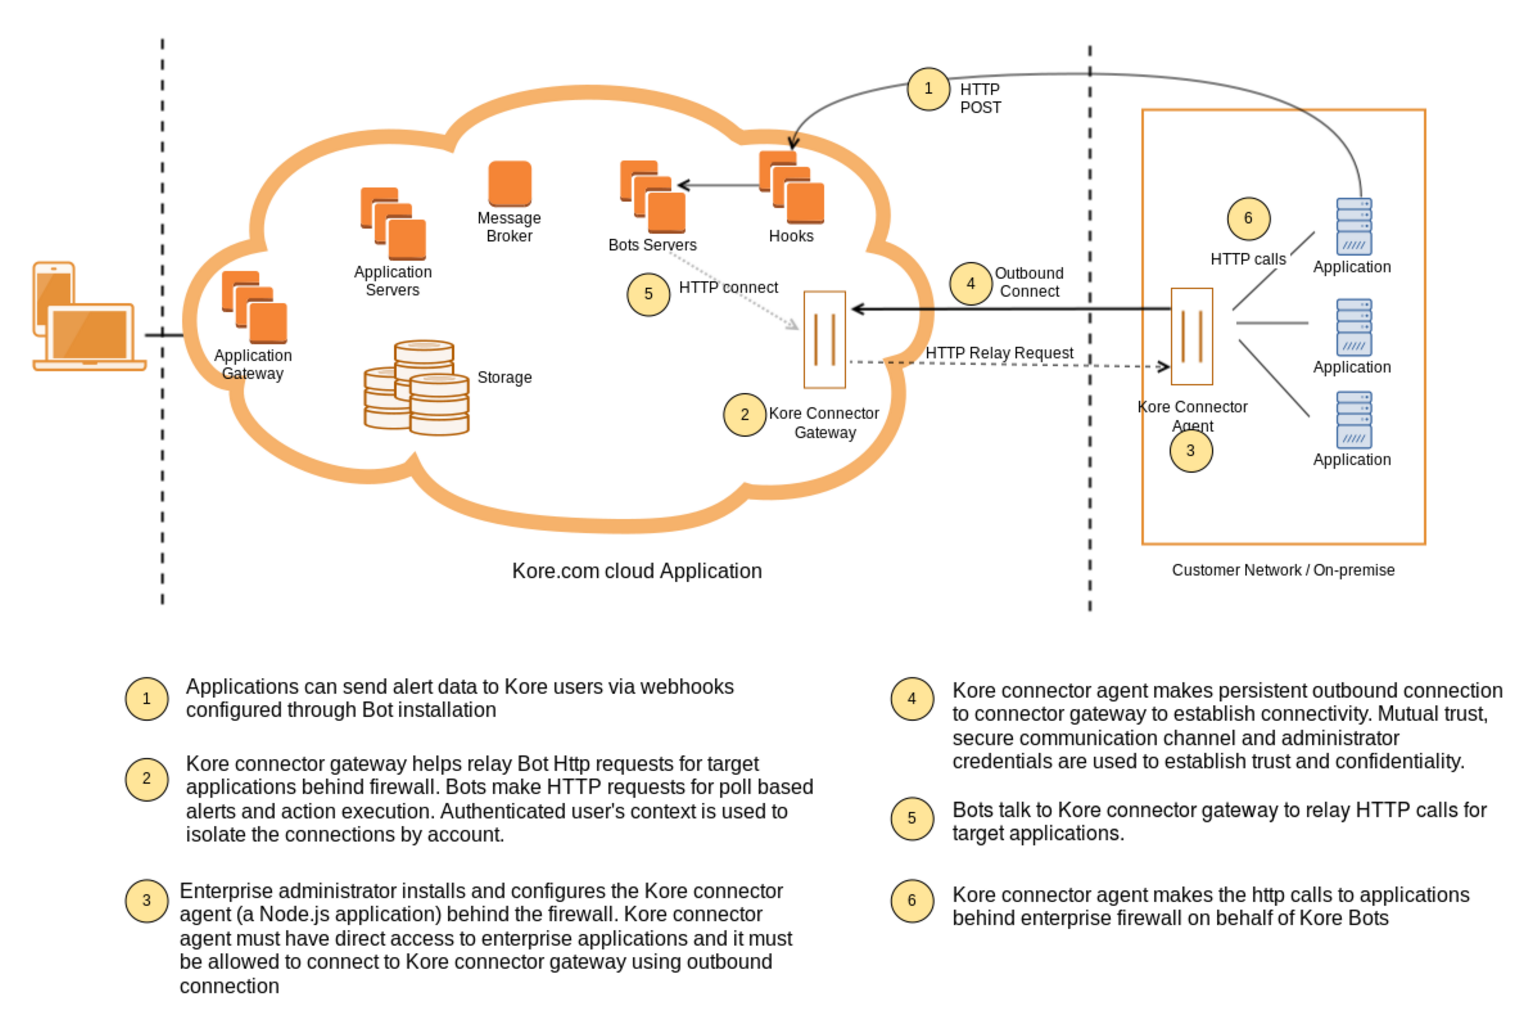 작동 방식 네트워크에 Kore.ai 커넥터를 설치한 후, 구체적인 접근, 통신, 데이터 요청 또는 정의한 봇 애플리케이션에 데이터 게시를 위한 세부 정보로 에이전트를 설정합니다. Kore.ai 커넥터 에이전트가 시작되면, Kore.ai와 지속적인 SSL 연결을 시작하고 봇 애플리케이션과 Kore.ai의 양방향 데이터 전송 요청을 모니터링합니다. 지속적인 연결이 끊어지면, Kore.ai 커넥터가 자동으로 통신 재설정을 시도합니다. 봇 관리 콘솔에서 연결을 직접 모니터링할 수 있습니다.
Installing
This topic describes how to install and configure the Kore.ai Connector Agent for Kore.ai Bots that you can use to securely connect the cloud-based Kore.ai Bots platform to your on-premises applications in your company Intranet.
Prerequisites
To install the Kore.ai Connector, you should review the following hardware and software requirements.
Hardware Requirements
The server hosting the Kore.ai Connector Agent should have:
RAM: 4 GB
CPU Core: 8
Hard disk space: 10 GB – To support the following:
- Kore.ai Connector download – 10MB
- Installation Files – 20MB
- Logging and Configuration Files – < 5GB
Software Requirements
The Kore.ai Connector supports both Windows and Linux operating systems as follows:
Linux/Unix
The following Red Hat® Enterprise Linux® versions are supported:
- RHEL 5 (32-bit and 64-bit)
- RHEL 6 (32-bit and 64-bit)
- RHEL 7 (64-bit)
The following CentOS versions are supported:
- CentOS 5 (32-bit and 64-bit)
- CentOS 6 (32-bit and 64-bit)
- CentOS 7 (64-bit)
Node.js – Required to run the Kore.ai Connector Agent. Download and install from https://nodejs.org/en/download/ on the server where the Kore.ai Connector Agent is installed.
Windows
The following Microsoft Windows 64-bit operating systems are supported:
- Windows 7 (64-bit)
- Windows 8.1 (64-bit)
- Windows 10 (64-bit)
- Windows Server 2008 R2 (64-bit)
- Windows Server 2012 (64-bit)
- Windows Server 2012 R2 (64-bit)
Node.js – Required to run the Kore.ai Connector Agent. Download and install from https://nodejs.org/en/download/ on the server where the Kore.ai Connector Agent is installed. In addition, you must also install the forever module. After node.js is installed, run the following command to install the forever module.
npm install forever -g
Installation Process
This section describes the installation and configuration of your application server where the Kore.ai Connector Agent is installed, the configuration required in the Bots Admin Console, and finally, enabling enterprise Bots for the Kore.ai Connector Agent and deploying the upgraded Bots for enterprise users.
추가
봇 관리자 콘솔에서, 커넥터를 추가하여 시작합니다. 연결을 추가하면, 회사 및 고유한 Kore.ai 커넥터를 위한 고유한 ID가 생성됩니다.
- 봇 관리자 콘솔에서, 보안 및 제어 모듈의 Kore.ai 커넥터 페이지에서, 커넥터 추가를 클릭합니다. 커넥터 추가 대화 상자가 표시됩니다.
- 선택적으로, 첫 번째 필드에서 커넥터 이름을 편집한 다음, 두 번째 필드에 커넥터의 설명을 입력합니다.
- 추가를 클릭합니다. 커넥터 지침 대화 상자가 다음 그림과 같이 표시됩니다.
- 커넥터 지침 대화 상자에서, 확인을 클릭합니다. Kore.ai 커넥터 페이지가 표시됩니다.
- 커넥터 다운로드 드롭다운 목록에서, 운영 체제를 선택하고, 다음 중 Kore.ai 커넥터 에이전트 압축 파일을 다운로드 합니다.
- Linux/Unix – kore-connector-1.0.0.tar.gz
- Windows – kore-connector-1.0.0.zip
- 파일을 애플리케이션 서버에 복사한 다음 압축을 해제합니다.
- Linux의 경우, 다음 명령을 사용합니다. tar -xvf kore-connector-X.X.X.tar.gz
- Windows의 경우, 파일 탐색기에서 파일을 마우스 오른쪽 버튼으로 클릭하고 명령 메뉴에서 추출을 선택합니다.
Kore.ai 커넥터 에이전트 파일은 다음 디렉토리 구조로 압축 해제됩니다.
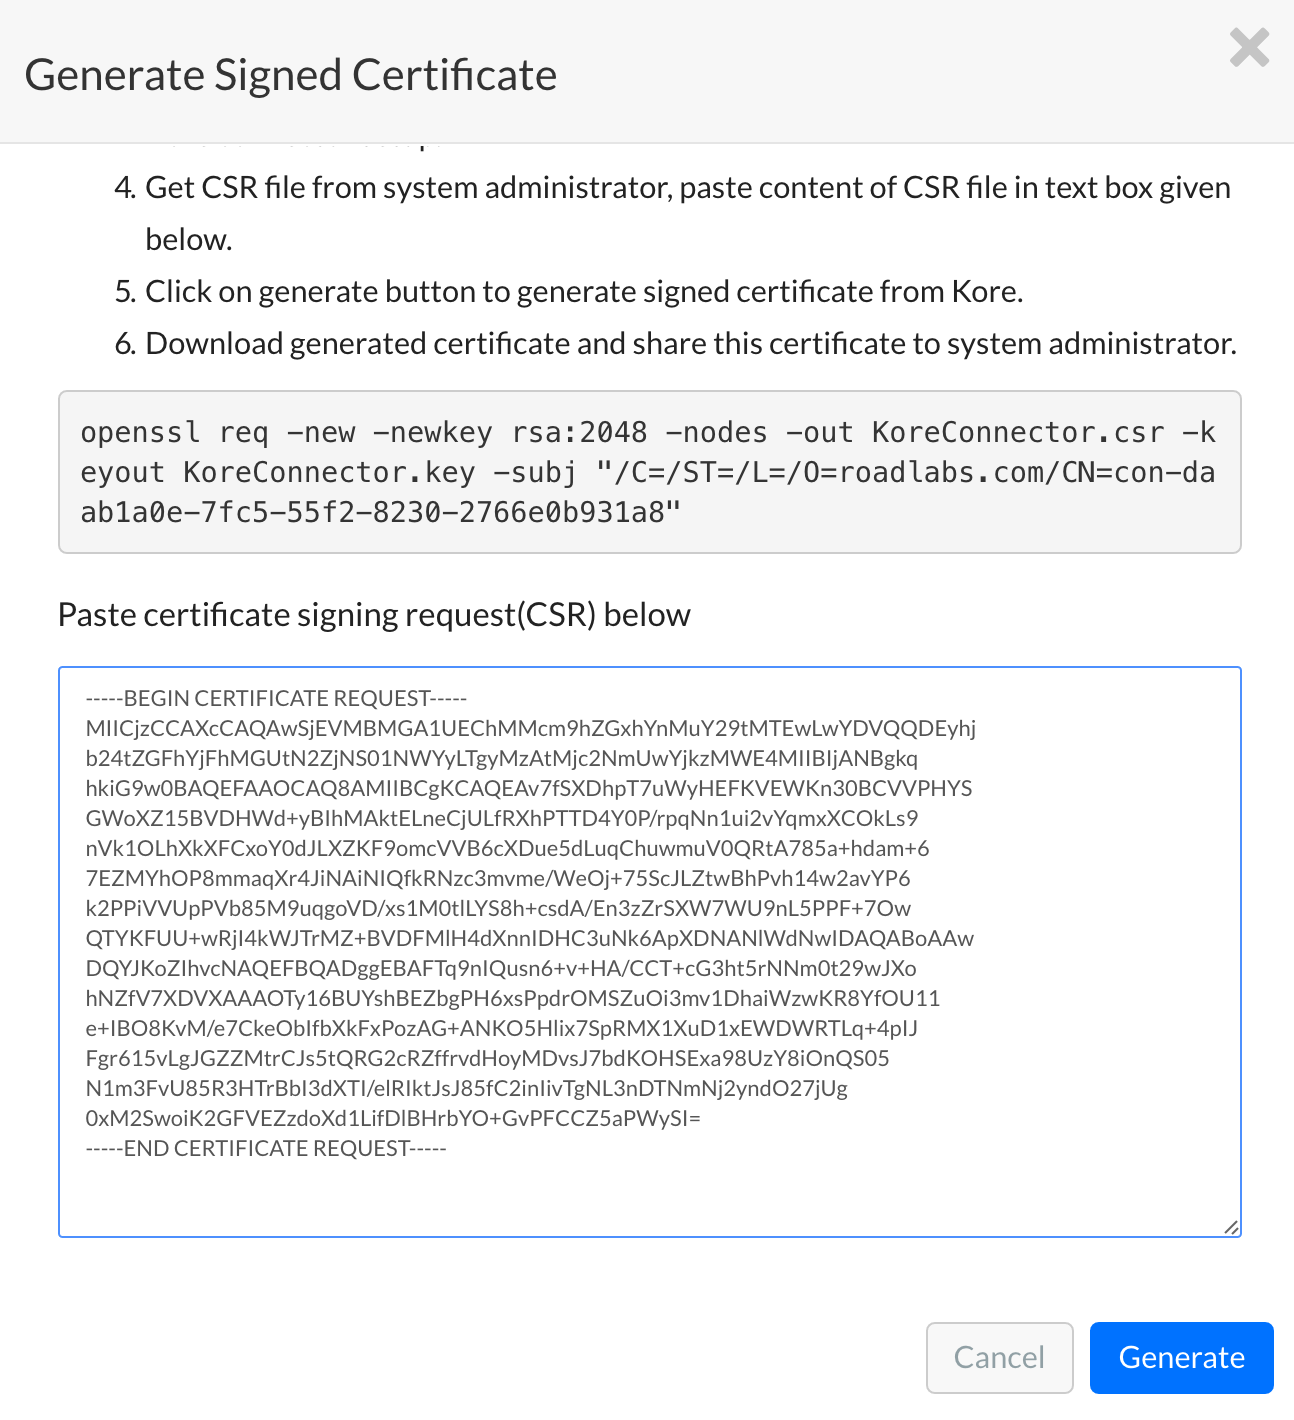
서명된 보안 인증서 생성 클라우드의 Kore.ai 서버와 인트라넷 간에 안전한 데이터 교환을 위해서, 서명된 보안 인증서를 생성해야 합니다. 먼저, 봇 관리자 콘솔에 표시된 명령을 사용하여 애플리케이션 서버에 .csr 파일을 생성한 다음, .csr 파일의 내용을 서명된 인증서 생성 대화 상자에 붙여넣습니다. .csr 내용은 .pem 파일을 생성하고 다운로드하는 데 사용됩니다. 그런 다음, .pem 파일을 애플리케이션 서버에 설치된 Kore.ai 커넥터 에이전트에 다시 복사합니다.
- 봇 관리자 콘솔에서, 보안 및 제어 모듈의 Kore.ai 커넥터 페이지에서, 줄임표 아이콘을 클릭합니다.
- 조치 메뉴에서, 인증서 생성을 클릭합니다. 서명된 인증서 생성 대화 상자가 다음 그림과 같이 표시됩니다.
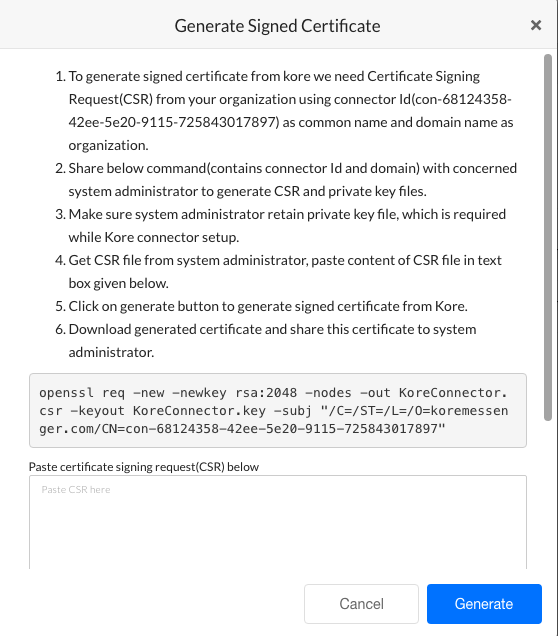
- 지침을 검토한 다음, 다음 그림과 같이 지침의 6단계 이후 표시된 사용자 정의 명령을 복사합니다.

- Kore.ai 커넥터 에이전트를 설치할 때 생성된 /Credentials 디렉토리에 명령을 붙여넣고 회사 인트라넷 내의 애플리케이션 서버에서 실행합니다.
- /Credentials 디렉토리에, Kore.aiConnector.key 파일과 함께 Kore.aiConnector.csr 파일이 생성됩니다. 텍스트 편집기를 사용하여, Kore.aiConnector.csr 파일을 열고, 파일의 전체 내용을 복사한 다음, 다음 그림과 같이 서명된 인증서 생성 대화 상자의 인증서 서명 요청 필드에 붙여넣습니다.
- 생성을 클릭합니다. 인증서 다운로드 및 인증서 보기 버튼이 생성됩니다.
- 인증서 다운로드를 클릭합니다. Kore.aiConnectorCert.pem 파일이 로컬 컴퓨터 브라우저의 기본 다운로드 폴더로 다운로드됩니다.
- 애플리케이션 서버에서 Kore.ai 커넥터를 설치할 때 생성된 /Credentials 폴더에 Kore.aiConnectorCert.pem 파일을 복사합니다.
보안 파일이 애플리케이션 서버에 준비되었습니다.
설정
Kore.ai 커넥터 에이전트 소프트웨어를 설치한 후, 다음 속성을 확인하거나 설정해야 합니다.
- 인증서 정보 – connectorconfig.json 파일의
credentials를 참조합니다. - 로그 디렉토리 – connectorconfig.json 파일의
logger를 참조합니다. - 클러스터 환경 – connectorconfig.json 파일의
cluster를 참조합니다. - 아웃바운드 연결에 대한 프록시 제어 – connectorconfig.json 파일의
tunnel을 참조합니다. - 엔터프라이즈 애플리케이션에 대한 접근 제어 – accesscontrol.json 파일을 참조합니다.
기본 구성 설정 – connectorconfig.json 이 섹션에서는 <Kore.ai 커넥터 에이전트 설치 경로>/config/connectorconfig.json 파일에서 인증서 정보, 로깅 및 클러스터 모드 설정에 대한 기본 구성 설정을 표시합니다.
{
   "credentials":{
      "key":"./credentials/Kore.aiConnector.key",
      "cert":"./credentials/Kore.aiConnectorCert.pem",
      "ca":"./credentials/ca.crt"
   },
   "logger":{
      "applogs":{
         "path":"./logs",
         "level":"info"
      },
      "auditlogs":{
         "path":"./audits",
         "level":"info"
      }
   },
   "cluster":{
      "enabled":true,
      "workers":2
   }
}
인증서 정보 Kore.ai 커넥터 에이전트를 위한 보안 키를 Kore.ai 커넥터 에이전트용 설치 디렉토리가 아닌 다른 위치에 저장할 수 있습니다. 자격 증명 파일을 애플리케이션 서버 또는 네트워크의 다른 서버의 다른 디렉토리로 이동하거나 다음 매개변수를 포함하는 connectorconfig.json 파일의 credentials 섹션에서 상대 경로 또는 절대 경로를 지정할 수 있습니다.
key– 클라이언트 인증서입니다. 기본 설정은 다음과 같습니다../credentials/Kore.aiConnector.key
cert– 봇 관리자 콘솔에서 생성된 .pem 파일입니다. 기본 설정은 다음과 같습니다../credentials/Kore.aiConnectorCert.pem
ca– Kore.ai 커넥터 에이전트의 일부로 설치됩니다. 기본 설정은 다음과 같습니다../credentials/ca.crt
로깅 설정 Kore.ai 커넥터 에이전트는 실행 시 두 개의 로깅 파일을 생성합니다.
- kore-connector.log.<dd-MM-yyyy> – 다음을 포함하는 애플리케이션 로깅 이벤트입니다.
- 커넥터 상태 – 에이전트 시작 또는 중지와 같은 상태의 모든 변경 사항이 로그 항목으로 추가됩니다.
- 오류 – 에이전트에 대한 모든 오류 메시지는 app.log 파일에 캡처됩니다.
- kore-connector-audit.log.<dd-MM-yyyy> – 감사 로깅 이벤트입니다.
- 설정 변경 – connectorconfig.json 파일 및 accesscontrol.json 파일의 모든 변경 사항입니다. 원본 파일은 자동으로 백업되고 로그 항목이 생성됩니다.
- 요청된 URL – Kore.ai 커넥터로 들어오는 모든 요청된 URL은 로그 항목으로 캡처됩니다.
기본적으로, 애플리케이션의 로깅 파일과 감사 로그는 <Kore.ai 커넥터 에이전트 설치 경로>/logs 및 <Kore.ai 커넥터 에이전트 설치 경로>/audits에서 기본 설정 경로에 생성되고 저장됩니다. 애플리케이션 서버 또는 네트워크의 다른 서버의 다른 디렉토리를 지정하고 전체 경로를 지정할 수 있습니다. 또한, 필요에 따라 다음과 같이 로깅 파일 수준을 높이거나 낮출 수 있습니다.
- fatal – 데이터 손실 또는 추가 데이터 손실을 예방하기 위해 서비스 또는 애플리케이션을 강제로 종료하는 오류입니다. 프로세스에서 한 번만 발생하며 일반적으로 로그의 마지막 항목입니다.
- critical – 서비스 또는 애플리케이션을 아직 종료하지 않았지만 그럴 가능성이 있는 즉각적인 조사가 필요한 오류입니다.
- error – 현재 작업에 치명적이지만 서비스 또는 애플리케이션에는 치명적이지 않은 오류입니다(예: 파일을 열 수 없음, 파일 누락 또는 데이터 누락). 이러한 유형의 오류는 일반적으로 관리자 개입이 필요합니다.
- warn – 기본 서버에서 백업 서버로 전환, 재시도 또는 보조 데이터 누락 등 복구 기능과 관련하여 잠재적으로 애플리케이션 이상 현상을 유발할 수 있는 모든 것입니다.
- info – 서비스 시작 및 계획 중지, 설정 가정 등과 같은 일반 애플리케이션 작업에 대한 일반 정보입니다. 이것은 Kore.ai 커넥터 에이전트의 기본 설정입니다.
- debug – 진단 정보, 일반적으로 시스템 관리자와 IT 인력을 위한 정보입니다.
- trace – 모든 작동 정보(예: 함수의 일부).
fatal 아래의 각 로그 수준에는 상위 로깅 수준의 정보를 포함합니다. 예를 들어, info의 기본 수준은 로그 파일에 있는 fatal, critical, error, warn 및 info에 대한 모든 정보를 포함합니다. 확장성 및 클러스터 설정 Kore.ai 커넥터 에이전트는 필요에 따라 요청 부하를 처리할 수 있도록 확장이 가능합니다. Kore.ai 커넥터 에이전트를 설치하면, 기본적으로 2개의 작업자 즉, CPU가 사용되도록 활성화됩니다. Kore.ai 커넥터 에이전트의 요청에 대한 부하 처리를 늘리려면, 더 많은 작업자를 활성화해야 합니다. 클러스터 모드를 사용하지 않으려면, “enabled” 속성을 false로 설정합니다. 또한, 하나 이상의 서버에서 클라우드 커넥터를 실행하여 장애 조치와 규모 확장성 요건을 충족할 수 있습니다. 인증서 및 기타 설정은 동일하게 유지됩니다. 클라우드 커넥터는 Kore.ai 클라우드 게이트웨이에 아웃바운드 연결을 만드는 클라이언트입니다. 하나 이상의 커넥터가 연결되면, 클라우드 게이트웨이는 커넥터에 부하를 분배합니다. 아웃바운드 연결을 위한 프록시 제어 <Kore.ai 커넥터 에이전트 설치 경로>/config/connectorconfig.json 파일에서 Kore.ai 커넥터 에이전트용 아웃바운드 프록시 설정을 구성할 수 있습니다. 모든 아웃바운드 데이터가 프록시 서버를 통해 라우팅되지 않는 경우 이 설정은 선택 사항입니다. 아웃바운드 프록시 설정을 구성하려면, 다음 설정 샘플에 항목 레이블이 tunnel 로 표시된 다음 설정을 추가합니다.
{
   "credentials":{
      "key":"./credentials/Kore.aiConnector.key",
      "cert":"./credentials/Kore.aiConnectorCert.pem",
      "ca":"./credentials/ca.crt"
   },
   "logger":{
      "applogs":{
         "path":"./logs",
         "level":"info"
      },
      "auditlogs":{
         "path":"./audits",
         "level":"info"
      }
   },
   "cluster":{
      "enabled":true,
      "workers":2
   },
   "tunnel":{
      "proxyHost":"hostname",
      "proxyPort":"portnumber"
   }
}
애플리케이션에 대한 접근 제어 Kore.ai 커넥터 에이전트는 회사 인트라넷의 특정 애플리케이션에 접근하려면 화이트리스트에 등록된 URL의 명시적인 집합이 필요합니다. 다른 모든 HTTP 요청은 Kore.ai 커넥터에 의해 거부됩니다. 다음 매개변수를 사용하여 …/config/configs 디렉토리의 Kore.ai 커넥터 설치 디렉토리에 있는 accesscontrol.json 파일에서 Kore.ai 커넥터 에이전트를 사용하는 각 봇 애플리케이션에 대한 접근 제어를 설정해야 합니다.
- virtualhost – 봇 빌더 도구에서 온프레미스 봇을 설정하고 요청 체인 설정 대화 상자의 Request URL 속성에 지정된 대로 정확히 가상 호스트 이름을 지정합니다. 자세한 내용은, 봇 빌더 문서의 요청 체인 개체 정의를 참조하세요.
- virtualport – 봇 빌더 도구에서 온프레미스 봇을 설정하고 요청 체인 설정 대화 상자의 Request URL 속성에 지정된 대로 정확히 가상 포트를 지정합니다. 자세한 내용은, 봇 빌더 문서의 요청 체인 개체 정의를 참조하세요.
- internalhost – 봇과 데이터 교환에 사용되는 온프레미스 엔터프라이즈 애플리케이션의 실제 호스트 이름을 지정합니다.
- internalport – 봇과의 데이터 교환에 사용되는 온프레미스 엔터프라이즈 애플리케이션의 실제 포트를 지정합니다.
- protocol – 온프레미스 엔터프라이즈 애플리케이션에 대한 연결을 위한 HTTP 또는 HTTPS를 지정합니다.
- allowedPaths – 모든 경로를 “/*” 또는 호스트에 대한 특정 경로 배열로 지정하고, 매개변수를 포함하지 않습니다. Kore.ai 커넥터는 경로를 최대로 검사하지만, 다음으로 시작하는 매개변수는 포함하지 않습니다: ” ? “
다음 이미지는 네 개의 봇 설정을 사용하여 구성된 accesscontrol.json 파일의 예입니다.
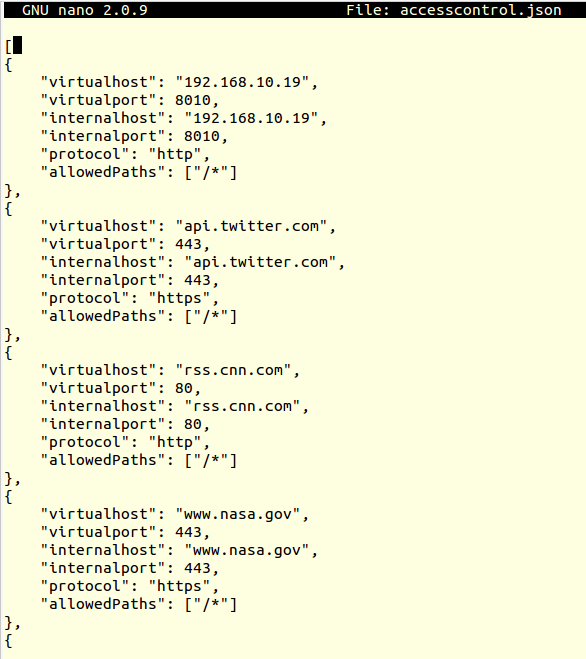
참고 사항: 의견은 설정 파일에서 사용할 수 없습니다.
시작
이 섹션에서는 Windows 또는 Linux 운영 체제에서 Kore.ai 커넥터 에이전트를 시작하거나 중지하는 방법을 설명합니다. Linux/Unix 운영 체제 Linux 운영 체제에서는, Kore.ai 커넥터 에이전트를 수동으로 시작하거나, 부팅 시 자동으로 시작되도록 Kore.ai 커넥터 에이전트를 설정할 수 있습니다. Linux에서 Kore.ai 커넥터 수동 시작/중지 Kore.ai 커넥터 설치 디렉토리에서 다음 명령을 실행하여 Linux/Unix 애플리케이션 서버에서 Kore.ai 커넥터 에이전트를 수동으로 시작하거나 중지하고 다음과 같이 상태를 확인합니다.
./koreconnector.sh start
./koreconnector.sh stop
./koreconnector.sh status
다음 이미지는 Kore.ai 커넥터의 성공적인 시작과 상태 확인에 대한 응답을 보여줍니다.  Linux에서 Kore.ai 커넥터 자동 시작 설정 이 섹션에서는 Linux 서버를 시작하거나 재부팅할 때 Kore.ai 커넥터 에이전트를 자동으로 시작하도록 설정하는 방법을 설명합니다.
- Kore.ai 커넥터 에이전트를 자동으로 시작하도록 설정하려면, 애플리케이션 서버의 …/etc/rc.local 파일에서, 다음 명령을 추가합니다.
cd <Kore.ai 커넥터 설치 루트> ; ./koreconnector.sh start
예:
cd /home/CompanyAdmin/kore-connector ; ./koreconnector.sh start
Windows 운영 체제 Windows 운영 체제에서는, Kore.ai 커넥터 에이전트를 수동으로 시작하거나 중지하고, Kore.ai 커넥터 에이전트의 상태를 확인할 수 있습니다. Windows에서 Kore.ai 커넥터 수동 시작/중지 Kore.ai 커넥터 설치 디렉토리에서 다음 명령을 실행하여 Windows 애플리케이션 서버에서 Kore.ai 커넥터 에이전트를 수동으로 시작하거나 중지하고 다음과 같이 상태를 확인합니다.
.\koreconnector.cmd start
.\koreconnector.cmd stop
.\koreconnector.cmd status
봇 활성화
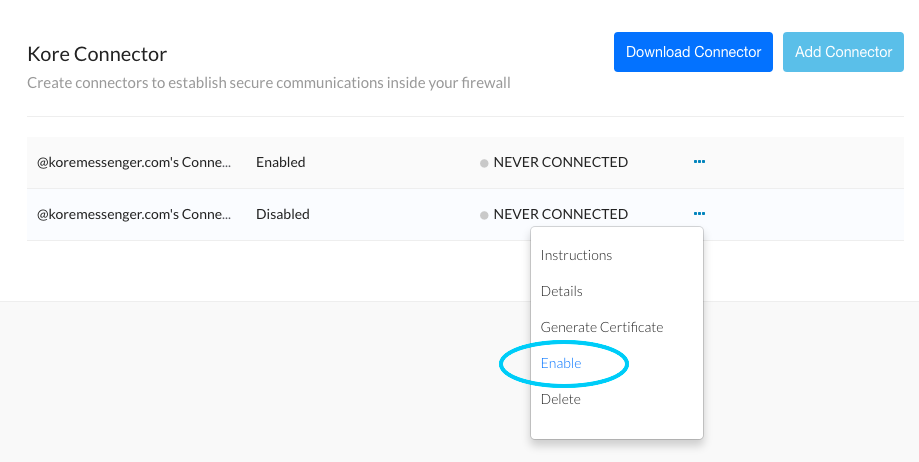
이 섹션에서는, 봇 관리 콘솔에서 Kore.ai 커넥터 에이전트에 대한 연결을 확인한 다음, 연결을 활성화할 수 있습니다. 연결이 활성화되면, 봇 빌더 도구에서 사용자 정의 봇을 수정하여 Kore.ai 커넥터를 사용하고 봇을 게시한 다음, 봇 관리자 콘솔에서, 게시된 봇을 배포하고 회사의 사용자에게 봇을 할당할 수 있습니다.
- 봇 관리자 콘솔의 보안 및 제어 모듈에 있는 Kore.ai 커넥터 페이지에서, Kore.ai 커넥터 상태가 연결됨인지 확인하고, 줄임표 아이콘을 클릭한 다음, 조치 메뉴에서, 다음 그림과 같이 활성화를 클릭합니다.
- 봇 빌더에서, Kore.ai 커넥터를 사용하여 실행하려는 각 봇 작업에 대해, 각 봇을 복제하거나 업그레이드합니다.
- 요청 체인 개체 설정 대화 상자에서, 커넥터를 사용한 접근을 선택하고, 변경 사항을 저장한 다음, 봇을 게시합니다. 요청 개체 설정에 대한 자세한 내용은, 봇 빌더 도구 문서에서 경고 작업 요청 개체 설정 또는 조치 작업 요청 개체 설정을 참조하세요.
참고 사항: 커넥터를 사용한 접근을 위한 요청 체인 개체 설정 대화 상자의 옵션은 Kore.ai 커넥터가 봇 관리자 콘솔에서 활성화된 경우에만 사용할 수 있습니다.
- 요청 체인 개체 설정 대화 상자에서, 커넥터를 사용한 접근을 선택하고, 변경 사항을 저장한 다음, 봇을 게시합니다. 요청 개체 설정에 대한 자세한 내용은, 봇 빌더 도구 문서에서 경고 작업 요청 개체 설정 또는 조치 작업 요청 개체 설정을 참조하세요.
- 봇 관리자 콘솔에서, 게시된 봇을 배포하고 엔터프라이즈에서 봇을 사용하는 사용자에게 작업을 할당합니다. 자세한 내용은, 봇 관리를 참조하세요.
Kore.ai 커넥터가 애플리케이션 서버에 설치되고 봇 관리자 콘솔에서 활성화되고, 봇이 커넥터를 사용하도록 사용자 정의된 후에는, 봇 관리 콘솔에서 커넥터의 상태를 모니터링하면 됩니다. Kore.ai 커넥터를 시작할 수 없거나, 고객이 오류를 보고하는 경우, Kore.ai 커넥터 설정을 재구성해야 할 수도 있습니다.
문제 해결
Kore.ai 커넥터 에이전트를 설치하고 설정하려면 여러 단계가 수반됩니다. 또한, 설치 후에도, Kore.ai 봇과 온프레미스 애플리케이션 간에 연결 유지를 위해 추가 설정이 필요할 수 있습니다. 이 항목에서는 일반적으로 발생할 수 있는 몇 가지 문제와 이러한 문제를 처리하는 방법을 설명합니다. Kore.ai 커넥터 에이전트 서버 문제 Kore.ai 커넥터 시작 실패 로그 오류 메시지: 유형 오류: 개체 #<Object>에 'parse' 메소드가 없습니다 해결책: 서버에는 여러 버전의 node.js가 설치되어 있을 수 있습니다. 실행할 node.js 버전을 지정해야 할 수도 있습니다. 버전을 확인하려면, 다음 명령을 실행합니다. nvm list 이 명령은 다음을 반환할 수 있습니다.
v0.10.29

v0.10.30

v0.10.31

v0.10.35

v0.10.36

v0.11.13

v0.12.2

v0.12.4

v4.0.0
사용할 버전을 설정하려면, 다음 명령을 실행합니다.
nvm use v4.0.0
이 명령은 다음을 반환해야 합니다.
Now using node v4.0.0
클라이언트 문제
조직의 사용자는 Kore.ai 커넥터와 관련된 연결 문제를 경험하고 있을 수 있습니다.
- 오류 메시지: “< 엔터프라이즈 애플리케이션 >”에 연결할 수 없습니다. 커넥터와 통신할 수 없습니다. 다시 시도하세요.
- 해결책: < Kore.ai 커넥터 설치 디렉토리>/config/configs/accesscontrol.json 파일에 "virtualhost" 항목이 정의되지 않았거나 잘못 설정되어 있습니다. 항목을 확인합니다.
- 오류 메시지: 서버가 오류를 반환했습니다. 이후 다시 시도하세요. (404 – 시스템에 연결할 수 없음).
- 해결책: 애플리케이션 서버의 Kore.ai 커넥터와 Kore.ai 게이트웨이 간에 연결이 끊어졌습니다. Kore.ai 커넥터 에이전트 실행이 중지되었을 수 있습니다. 애플리케이션 서버에서 Kore.ai 커넥터를 다시 시작해야 할 수도 있습니다.
문제를 해결할 수 없는 경우, Kore.ai 지원팀에 문의하세요.
Kore.aiコネクタページのボット管理コンソールのセキュリティと制御モジュールで、安全な企業イントラネット内のボット用Kore.aiコネクタエージェントをダウンロードして構成し、クラウドのKore.aiボットプラットフォームと自身のネットワーク間の安全な通信を提供できます。
なぜKore.aiコネクタなのか?
Kore.aiボットは、更新を行い、ユーザーに通知を提供し、タスクを実行するように設計されています。実行するタスクは、Webベースまたはオンプレミスのボットアプリケーションとして、インターネット経由で利用可能なサードパーティアプリケーションで実行されるか、そこから実行結果を受信します。Kore.aiボットのオンプレミスシステムでは、イントラネット内のユーザーやシステムを制限したり、特定のデータ交換のために特定のチャネルを設定したりすることで、通信のセキュリティを確保しています。反対に、Kore.aiボットはクラウド環境に常駐してデータを処理し、ボットの社内アプリケーションに直接接続することはできません。Kore.aiコネクタエージェントを使用して、Kore.aiとイントラネット内のオンプレミスアプリケーション間の安全なデータ接続を確立および維持できます。Kore.aiコネクタは、企業のイントラネット内にインストールおよび構成されたスタンドアロンアプリケーションで、指定されたボットアプリケーションへの制限された安全な接続で構成されています。Kore.aiコネクタエージェントは、オンプレミスアプリケーションとKore.aiの間でデータアクセスの要求を渡すように設計されており、それらのアプリケーションの権限と特権を持つエンドユーザーによって構成された特定のボットタスクを処理します。次のイラストはボット管理コンソールのセキュリティと制御モジュールのKore.aiコネクタページを示しています。 Kore.aiコネクタページコントロール―次のコントロールは、ボット管理コンソールのKore.aiコネクタページで使用できます。コネクタのダウンロード―コネクタのダウンロードドロップダウン矢印をクリックして、次のオペレーティングシステムのいずれかを選択します。
- ウィンドウズベース
- Unix / Linuxベース
Kore.aiコネクタエージェントをデフォルトのブラウザダウンロードディレクトリにダウンロードします。DMZまたはイントラネットにエージェントをインストールします。詳細については、Kore.aiコネクタエージェントのインストールをご覧ください。コネクタの追加―クリックして最大2つのコネクタを追加します。コネクタを追加したら、Kore.aiコネクタエージェントをインストールして構成する必要があります。アクションメニュー―Kore.aiコネクタページで、追加された各コネクタに対して、省略記号アイコンをクリックしてアクションメニューを表示し、次のコマンドを実行します:
- 手順―Kore.aiコネクタエージェントをインストールおよび設定するための全体的な手順を説明するコネクタの手順ダイアログを表示します。
- 編集―Kore.aiコネクタの名前、説明、ID、ステータスがCONNECTEDまたはDISCONNECTED、最終接続日を示すコネクターの詳細ダイアログを表示します。
- 証明書の生成―セキュリティのために.pemファイルを作成するために使用される署名付き証明書の生成ダイアログと、ファイルの作成方法の説明を表示します。詳細については、Kore.aiコネクタエージェントのインストールをご覧ください。
- 有効化/無効化―クリックして、このコネクタを有効にしますか?ダイアログを表示します。「継続する」 をクリックして、チャネルを有効にします。コネクタを有効にすると、Kore.aiコネクタエージェントの他の有効なインスタンスは無効になります。
- 削除―クリックして、コネクタの削除ダイアログを表示します。コネクタを完全に削除するには、確認をクリックします。
について
Kore.aiコネクタは社内のイントラネット、またはペリメータネットワーク(DMZ)内のボットファイアウォールの背後で実行されるエージェントであり、クラウドで動作するKore.aiとオンプレミスアプリケーション間の安全なデータ交換を提供します。次の図では、エンドユーザーがクラウド内のKore.aiに接続するKore.aiボットを構成しています。Kore.aiボットサーバー(5)は、ボットリクエストによりKore.aiコネクタゲートウェイ(2)に接続します。Kore.aiコネクタゲートウェイはオンプレミスのイントラネットまたはDMZにインストールされ、安全に構成されたKore.aiコネクタ(3)にリクエストを中継して、ボットアプリケーションとインタラクトします。アプリケーションからのレスポンスは、Kore.aiコネクタを介してKore.aiクラウドに返送され処理されます。オプションで、オンプレミスアプリケーションがWebhookを使用して、アラートメッセージなどのデータをKore.aiクラウドにプッシュできるようにすることができます。 使い方―ネットワークにKore.aiコネクタをインストールした後、自分が定義するボットアプリケーションにアクセス、通信、要求またはデータを投稿するための詳細を使用してエージェントを構成します。開始すると、Kore.aiコネクタエージェントはKore.aiとの持続的なSSL接続を開始し、ボットアプリケーションとKore.aiとの間のデータ転送のリクエストを監視します。持続的接続が切断されると、Kore.aiコネクタは自動的に通信の再確立を試みます。ボット管理コンソールで直接接続を監視できます。
Installing
This topic describes how to install and configure the Kore.ai Connector Agent for Kore.ai Bots that you can use to securely connect the cloud-based Kore.ai Bots platform to your on-premises applications in your company Intranet.
Prerequisites
To install the Kore.ai Connector, you should review the following hardware and software requirements.
Hardware Requirements
The server hosting the Kore.ai Connector Agent should have:
RAM: 4 GB
CPU Core: 8
Hard disk space: 10 GB – To support the following:
- Kore.ai Connector download – 10MB
- Installation Files – 20MB
- Logging and Configuration Files – < 5GB
Software Requirements
The Kore.ai Connector supports both Windows and Linux operating systems as follows:
Linux/Unix
The following Red Hat® Enterprise Linux® versions are supported:
- RHEL 5 (32-bit and 64-bit)
- RHEL 6 (32-bit and 64-bit)
- RHEL 7 (64-bit)
The following CentOS versions are supported:
- CentOS 5 (32-bit and 64-bit)
- CentOS 6 (32-bit and 64-bit)
- CentOS 7 (64-bit)
Node.js – Required to run the Kore.ai Connector Agent. Download and install from https://nodejs.org/en/download/ on the server where the Kore.ai Connector Agent is installed.
Windows
The following Microsoft Windows 64-bit operating systems are supported:
- Windows 7 (64-bit)
- Windows 8.1 (64-bit)
- Windows 10 (64-bit)
- Windows Server 2008 R2 (64-bit)
- Windows Server 2012 (64-bit)
- Windows Server 2012 R2 (64-bit)
Node.js – Required to run the Kore.ai Connector Agent. Download and install from https://nodejs.org/en/download/ on the server where the Kore.ai Connector Agent is installed. In addition, you must also install the forever module. After node.js is installed, run the following command to install the forever module.
npm install forever -g
Installation Process
This section describes the installation and configuration of your application server where the Kore.ai Connector Agent is installed, the configuration required in the Bots Admin Console, and finally, enabling enterprise Bots for the Kore.ai Connector Agent and deploying the upgraded Bots for enterprise users.
追加中
ボット管理コンソールでは、まずコネクタを追加します。接続を追加すると、会社のための一意のKore.aiコネクタと一意のIDが作成されます。
- ボット管理コンソールのセキュリティと制御モジュールのKore.aiコネクタページで、コネクタの追加をクリックします。コネクターを追加ダイアログが表示されます。
- 必要に応じて、最初のフィールドでコネクタの名前を編集し、2番目のフィールドにコネクタの説明を入力します。
- 追加をクリックします。次のイラストのようにコネクターの手順ダイアログが表示されます。
- コネクターの手順ダイアログで、OKをクリックします。Kore.aiコネクタページが表示されます。
- コネクタのダウンロードドロップダウンリストで、自分のオペレーティングシステムを選択し、次のいずれかのKore.aiコネクタエージェント圧縮ファイルをダウンロードします。
- Linux/Unix―kore-connector-1.0.0.tar.gz
- Windows―kore-connector-1.0.0.zip
- ファイルをコピーして、アプリケーションサーバーに解凍します。
- Linuxの場合は、次のコマンドを使用します:tar -xvf kore-connector-X.X.X.tar.gz
- Windowsの場合、ファイルエクスプローラーでファイルを右クリックし、コマンドメニューで抽出先を選択します。
Kore.aiコネクタエージェントファイルは、次のディレクトリ構築に解凍されます。 署名付きセキュリティ証明書の生成クラウド内のKore.aiサーバーとイントラネット間の安全なデータ交換のために、署名されたセキュリティ証明書を生成する必要があります。まず、ボット管理コンソールに表示されるコマンドを使用してアプリケーションサーバー上に.csrファイルを作成し、次に.csrファイルの内容を署名付き証明書の生成ダイアログに貼り付けます。.csrコンテンツは、.pemファイルを生成してダウンロードするために使用されます。次に、.pemファイルを自身のアプリケーションサーバーにインストールされているKore.aiコネクタエージェントにコピーして戻します。
- ボット管理コンソールのセキュリティと制御モジュールのKore.aiコネクタページで、省略記号をクリックします。
- アクションメニューで、証明書の生成をクリックします。次のイラストのように署名付き証明書を生成ダイアログが表示されます。
- 手順をレビューしてから、次のイラストに示すように、ステップ6の後に表示されたカスタムコマンドを手順にコピーします。
- Kore.aiコネクタエージェントのインストール時に作成した、会社のイントラネット内のアプリケーションサーバーの/Credentialsディレクトリにコマンドを貼り付けて実行します。
- /Credentialsディレクトリに、Kore.aiConnector.csrファイルがKore.aiConnector.keyファイルとともに作成されます。テキストエディタを使用してKore.aiConnector.csrファイルを開き、ファイルの内容全体をコピーしてから、次のイラストに示すように、署名付き証明書の生成ダイアログの証明書署名要求フィールドに内容を貼り付けます。
- 生成をクリックします。証明書のダウンロードボタンと証明書の表示ボタンが表示されます。
- 証明書のダウンロードをクリックします。Kore.aiConnectorCert.pemファイルは、自身のローカルコンピューターのブラウザーのデフォルトのダウンロードフォルダーにダウンロードされます。
- Kore.aiConnectorCert.pemファイルを、Kore.aiコネクタをインストールしたときに作成したアプリケーションサーバーの/Credentialsフォルダにコピーします。
セキュリティファイルは、アプリケーションサーバーに配置されています。
設定
Kore.aiコネクタエージェントソフトウェアをインストールした後、次のプロパティを確認または設定する必要があります。
- 証明書情報―connectorconfig.jsonファイルの
credentialsを参照してください。 - ログディレクトリ―connectorconfig.jsonファイルの
loggerを参照してください。 - クラスター環境―connectorconfig.jsonファイルの
clusterを参照してください。 - アウトバウンド接続のプロキシ制御―connectorconfig.jsonファイルの
tunnelを参照してください。 - エンタープライズアプリケーションのアクセス制御―accesscontrol.jsonファイルを参照してください。
デフォルトの構成設定―connectorconfig.jsonこのセクションでは、< Kore.aiコネクタエージェントのインストールパス >/config/connectorconfig.jsonファイルの証明書情報、ロギング、クラスターモード設定のデフォルトの構成設定を示します。
{
   "credentials":{
      "key":"./credentials/Kore.aiConnector.key",
      "cert":"./credentials/Kore.aiConnectorCert.pem",
      "ca":"./credentials/ca.crt"
   },
   "logger":{
      "applogs":{
         "path":"./logs",
         "level":"info"
      },
      "auditlogs":{
         "path":"./audits",
         "level":"info"
      }
   },
   "cluster":{
      "enabled":true,
      "workers":2
   }
}
証明書情報 Kore.aiコネクタエージェントのセキュリティキーは、Kore.aiコネクタエージェントのインストールディレクトリ以外の場所に保存することをお勧めします。資格情報ファイルをアプリケーションサーバー上の別のディレクトリまたはネットワーク内の別のサーバーに移動し、次のパラメータを含むconnectorconfig.jsonファイルのcredentialsセクションで相対パスまたは絶対パスを指定できます。
key―クライアント証明書。デフォルト設定は次のとおりです:./credentials/Kore.aiConnector.key
cert―ボット管理コンソールで生成された.pemファイル。デフォルト設定は次のとおりです:./credentials/Kore.aiConnectorCert.pem
ca―Kore.aiコネクタエージェントの一部としてインストールされます。デフォルト設定は次のとおりです:./credentials/ca.crt
ロギング設定 Kore.aiコネクタエージェントは、実行時に2つのロギングファイルを生成します。
- kore-connector.log.< dd-MM-yyyy >―次のアプリケーションログイベントを含めます:
- コネクタのステータス―エージェントの開始や停止などのステータスの変更は、ログエントリとして追加されます。
- エラー―エージェントのエラーメッセージはすべてapp.logファイルにキャプチャされます。
- kore-connector-audit.log.< dd-MM-yyyy >―ログイベントを監査します。
- 構成の変更―connectorconfig.jsonファイルとaccesscontrol.jsonファイルの変更。オリジナルファイルは自動的にバックアップされ、ログエントリが作成されます。
- リクエストされたURL―Kore.aiコネクタに着信するすべてのリクエストされたURLは、ログエントリとしてキャプチャされます。
デフォルトでは、アプリケーションと監査ログのログファイルが作成され、< Kore.aiコネクタエージェントのインストールパス >/ログと< Kore.aiコネクタエージェントのインストールパス >/監査のデフォルトのインストールパスに保存されます。アプリケーションサーバー上の別のディレクトリまたはネットワーク内の別のサーバーを指定して、フルパスを指定できます。次のように、必要に応じてログファイルのログレベルを増減することもできます。
- 致命的―データの損失またはさらなるデータの損失を防ぐためにサービスまたはアプリケーションのシャットダウンを強制するエラー。プロセスで1回だけ発生し、通常はログの最後のエントリです。
- 重大―サービスまたはアプリケーションをまだシャットダウンしていないが、シャットダウンする可能性が高い、即時の調査が必要なエラー。
- エラー―現在のオペレーションには致命的であるが、サービスやアプリケーションには致命的ではないエラー。たとえば、ファイルを開くことができない、ファイルが見つからない、データが欠落しているなど。このタイプのエラーは通常、管理者の介入が必要です。
- 警告―プライマリサーバーからバックアップサーバーへの切り替え、再試行、セカンダリデータの欠落など、回復機能を備えたアプリケーションの異常を引き起こす可能性のあるもの。
- 情報―サービスの開始と停止の計画、構成の前提条件など、通常のアプリケーションオペレーションに関する一般的な情報。これは、Kore.aiコネクタエージェントのデフォルト設定です。
- デバッグ―診断情報。通常、システム管理者とIT担当者向けです。
- トレース―関数の一部など、すべてのオペレーション情報。
致命的より下の各ログレベルには、上のログレベルからの情報が含まれます。たとえば、情報としてのデフォルトレベルには、ログファイル内の致命的、重大、エラー、警告、および情報のすべての内容が含まれます。拡張性とクラスター構成 Kore.aiConnector Agentは、必要に応じて要求の負荷を処理するために拡張可能です。Kore.ai Connector Agentをインストールすると、クラスターモード設定がデフォルトで有効になり、2つのワーカーまたはCPUが使用できるように設定されます。Kore.aiコネクタエージェントによるリクエストの負荷処理を強化するには、より多くのワーカーを有効にすることをお勧めします。クラスターモードを使用しない場合は、 [有効化]プロパティをフェイルスに設定します。複数のサーバーでクラウドコネクタを実行して、フェイルオーバーと拡張性の要件を満たすこともできます。証明書とその他の構成は同じままです。クラウドコネクタは、Kore.aiクラウドゲートウェイへのアウトバウンド接続を行うクライアントです。複数のコネクタが接続されている場合、クラウドゲートウェイは負荷をコネクタに分散します。アウトバウンド接続のプロキシ制御 Kore.aiコネクタエージェントのアウトバウンドプロキシ設定は、<Kore.aiコネクタエージェントのインストールパス> /config/connectorconfig.jsonファイルで構成できます。すべてのアウトバウンドデータがプロキシサーバーを介してルーティングされない限り、この構成はオプションのままです。アウトバウンドプロキシ設定を構成するには、次の構成サンプルでトンネル というラベルの付いたエントリとして示されている次の構成を追加します。
{
   "credentials":{
      "key":"./credentials/Kore.aiConnector.key",
      "cert":"./credentials/Kore.aiConnectorCert.pem",
      "ca":"./credentials/ca.crt"
   },
   "logger":{
      "applogs":{
         "path":"./logs",
         "level":"info"
      },
      "auditlogs":{
         "path":"./audits",
         "level":"info"
      }
   },
   "cluster":{
      "enabled":true,
      "workers":2
   },
   "tunnel":{
      "proxyHost":"hostname",
      "proxyPort":"portnumber"
   }
}
アプリケーションのアクセス制御 Kore.aiコネクタエージェントでは、自社のイントラネット上の特定のアプリケーションにアクセスするために、ホワイトリストに登録されたURLの明示的なセットが必要です。その他のHTTPリクエストは、Kore.aiコネクタによって拒否されます。… /config/configs ディレクトリのKore.aiコネクタインストールディレクトリにあるaccesscontrol.jsonファイルでKore.aiコネクタエージェントを使用するボットアプリケーションごとに、次のパラメータを使用してアクセス制御を構成する必要があります。
- virtualhost―ボットビルダーツールでオンプレミスボットを構成するときに、リクエストチェーンの設定ダイアログのリクエストURLプロパティで指定されているとおりにバーチャルホスト名を指定します。詳細については、ボットビルダのドキュメントのリクエストチェーンオブジェクトの定義を参照してください。
- virtualport―ボットビルダーツールでオンプレミスボットを構成するときに、リクエストチェーンの設定ダイアログのリクエストURLプロパティで指定されているとおりにバーチャルポートを指定します。詳細については、ボットビルダのドキュメントのリクエストチェーンオブジェクトの定義を参照してください。
- internalhost―ボットとのデータ交換に使用されるオンプレミスエンタープライズアプリケーションの実際のホスト名を指定します。
- internalport―ボットとのデータ交換に使用されるオンプレミスエンタープライズアプリケーションの実際のポートを指定します。
- protocol―オンプレミスのエンタープライズアプリケーションへの接続のためにHTTPまたはHTTPSを指定します。
- allowedPaths―すべてのパスを「/ *」またはホストのパスの特定の配列として指定します。パラメータは含まれません。Kore.aiコネクタはパスをチェックしますが、?で始まるパラメータは含まれません。
次の画像は、4つのボット構成で構成された accesscontrol.jsonファイルの例です。
メモ:コメントは構成ファイルでは使用できません。
開始中
このセクションでは、WindowsまたはLinuxオペレーティングシステムでKore.aiコネクタエージェントを起動または停止する方法について説明します。Linux / Unixオペレーティングシステム Linuxオペレーティングシステムでは、Kore.aiコネクタエージェントを手動で起動するか、起動時に自動起動するようにKore.aiコネクタエージェントを設定できます。LinuxでのKore.aiコネクタの手動起動/停止 Kore.aiコネクタのインストールディレクトリで次のコマンドを実行して、Linux/UnitアプリケーションサーバーでKore.aiコネクタエージェントを手動で起動または停止し、次のようにステータスをチェックします。
./koreconnector.sh start
./koreconnector.sh stop
./koreconnector.sh status
次の画像は、Kore.aiコネクタの正常な起動とステータスチェックに対するレスポンスを示しています。 LinuxでKore.aiコネクタを自動起動に構成 このセクションでは、Linuxサーバーの起動時または再起動時にKore.aiコネクタエージェントが自動的に起動するように設定する方法について説明します。
- アプリケーションサーバーの…/etc/rc.localファイルで、Kore.aiコネクタエージェントの自動起動を設定するには、次のコマンドを追加します。
cd <Kore.ai Connector Installation Root> ; ./koreconnector.sh start
例えば:
cd /home/CompanyAdmin/kore-connector ; ./koreconnector.sh start
Windowsオペレーティングシステム Windowsオペレーティングシステムでは、Kore.aiコネクタエージェントを手動で開始または停止し、Kore.aiコネクタエージェントのステータスをチェックできます。WindowsでのKore.aiコネクタの手動起動/停止 Kore.aiコネクタのインストールディレクトリで次のコマンドを実行して、WindowsアプリケーションサーバーでKore.aiコネクタエージェントを手動で起動または停止し、次のようにステータスをチェックします。
.\koreconnector.cmd start
.\koreconnector.cmd stop
.\koreconnector.cmd status
ボットを有効化
このセクションでは、ボット管理コンソールでKore.aiコネクタエージェントへの接続を確認してから、接続を有効にすることができます。接続が有効になっている場合、ボットビルダーツールでKore.aiコネクタを使用するためにカスタムボットを変更し、それらのボットを公開してから、ボット管理コンソールで、公開されたボットをデプロイし、社内のユーザーにボットを割り当てることができます。
- ボット管理コンソールのセキュリティと制御モジュールのKore.aiコネクタページで、Kore.aiコネクタのステータスが「接続済み」であることを確認し、次の図に示すように、省略記号アイコンをクリックし、アクションメニューで有効にするをクリックします。
- ボットビルダーで、Kore.aiコネクタを使用して実行するボットタスクごとに、各ボットのクローンを作成するかアップグレードします。
- リクエストチェーンオブジェクトの設定ダイアログで、コネクタを使用してアクセスを選択し、変更を保存してから、ボットを公開します。リクエストオブジェクトの設定の詳細については、ボットビルダツールドキュメントのアラートタスクリクエストオブジェクトの設定またはアクションタスクリクエストオブジェクトの設定を参照してください。
メモ:コネクタを使用したアクセスのリクエストチェーンオブジェクトの設定ダイアログのオプションは、ボット管理コンソールでKore.aiコネクタが有効になっている場合にのみ使用できます。
- リクエストチェーンオブジェクトの設定ダイアログで、コネクタを使用してアクセスを選択し、変更を保存してから、ボットを公開します。リクエストオブジェクトの設定の詳細については、ボットビルダツールドキュメントのアラートタスクリクエストオブジェクトの設定またはアクションタスクリクエストオブジェクトの設定を参照してください。
- ボット管理コンソールで、公開されたボットをデプロイし、エンタープライズでボットタスクを使用できるユーザーを割り当てます。詳細はボットの管理をご覧ください。
Kore.aiコネクタがアプリケーションサーバーにインストールされ、ボット管理コンソールで有効にされ、ボットがコネクタを使用するようにカスタマイズされた後は、ボット管理コンソールでコネクタのステータスを監視するだけで済みます。Kore.aiコネクタを起動できない場合、またはお客様からエラーが報告されている場合は、Kore.aiコネクタの設定を再構成する必要があります。
トラブルシューティング
Kore.aiコネクタエージェントのインストールと構成には、多くのステップが含まれます。また、インストール後でも、Kore.aiボットとオンプレミスアプリケーション間の接続を維持するために追加の構成が必要になる場合があります。このトピックでは、発生する可能性のある一般的な問題のいくつかと、それらの問題の処理方法について説明します。Kore.aiコネクトエージェントサーバーの問題 Kore.aiコネクタが開始に失敗するログエラーメッセージ:TypeError:Object #<Object> has no method 'parse' Solution: サーバーには、バージョンが異なる複数のnode.jsがインストールされている場合があります。実行するnode.js のバージョンを指定する必要がある場合があります。バージョンを確認するには、次のコマンドを実行します:nvm list このコマンドは次を返す場合があります:v0.10.29 v0.10.30 v0.10.31 v0.10.35 v0.10.36 v0.11.13 v0.12.2 v0.12.4 v4.0.0 使用するバージョンを設定するには、次のコマンドを実行します:nvm use v4.0.0 コマンドは次を返す必要があります: Now using node v4.0.0 クライアントの問題 組織内のユーザーは、Kore.aiコネクタで接続の問題が発生する可能性があります。
- エラーメッセージ:「<エンタープライズアプリケーション>に到達できません。コネクタと通信できません。もう一度やり直してください。
- ソリューション:< Kore.ai Connector Install Dir >/config/configs/accesscontrol.jsonファイルの「virtualhost」エントリが定義されていないか、正しく構成されていません。エントリを確認します:
- エラーメッセージ:サーバーがエラーを返しました。あとでもう一度お試しください。(404―システムに到達できません)。
- ソリューション:アプリケーションサーバー上のKore.aiコネクタとKore.aiゲートウェイ間の接続性が切断されています。Kore.aiコネクタエージェントの実行が停止した可能性があります。アプリケーションサーバーでKore.aiコネクタを再起動する必要がある場合があります。
問題を解決できない場合は、Kore.aiサポートに連絡してください。
Leave a Reply
On the Kore.ai Connector page, in the Security & Control module of the Bots Admin Console, you can download and configure the Kore.ai Connector Agent for Bots within your secure company intranet to provide secure communications between the Kore.ai Bots platform in the cloud and your network.
Why Kore.ai Connector?
Kore.ai Bots are designed to make updates, provide notifications to users, and perform tasks. The tasks to perform are received from or performed on third-party applications available over the Internet as web-based applications or on-premises bots applications.
In a Kore.ai bots on-premises system, communications security is maintained by restricting users and systems within the company intranet or by configuring specific channels for specific data exchange. On the contrary, Kore.ai Bots reside and process data in the cloud environment and cannot directly connect to your bots premises applications.
You can use the Kore.ai Connector Agent to establish and maintain secure data connectivity between Kore.ai and your on-premises applications within your intranet.
The Kore.ai Connector is a stand-alone application that is installed and configured within your company intranet configured with restricted and secure connectivity to specified bots applications. The Kore.ai Connector Agent is designed to pass requests for data access between your on-premises applications and Kore.ai to process the specific Bot tasks configured by an end-user with rights and privileges for those applications.
The following illustration shows the Kore.ai Connector page in the Bots Admin Console Security & Control module.
Kore.ai Connector Page Controls
The following controls are available on the Kore.ai Connector page in the Bots Admin Console.
Download Connector – Click the Download Connector drop-down arrow in and then select one of the following operating systems:
- Windows Based
- Unix/Linux Based
Download the Kore.ai Connector Agent to your default browser downloads directory. Install the agent in your DMZ or Intranet. For more information, see Installing the Kore.ai Connector Agent.
Add Connector – Click to add up to two connectors. After a connector is added, you should install and configure the Kore.ai Connector Agent.
Actions Menu – On the Kore.ai Connector page, against each added connector, click the Ellipsis icon to display the Actions menu to run the following commands:
- Instructions – Displays the Connector Instructions dialog that describes the overall steps to install and configure the Kore.ai Connector Agent.
- Edit – Displays the Connector Details dialog that shows the Kore.ai Connector name, description, ID, status as CONNECTED or DISCONNECTED, and Last Connected date.
- Generate Certificate – Displays the Generate Signed Certificate dialog used to create a .pem file for security along with instructions on how to create the file. For more information, see Installing the Kore.ai Connector Agent.
- Enable/Disable – Click to show the Are you sure you want to enable this connector? dialog. Click Continue to enable the connector. When enabling a connector, any other enabled instances of the Kore.ai Connector Agent are disabled.
- Delete – Click to display the Delete Connector dialog. To permanently delete the connector, click Confirm.
About
The Kore.ai Connector is an agent that runs behind your bots firewall within your company Intranet or perimeter network (DMZ) to provide secure data exchange between Kore.ai which operates in the cloud and your on-premises applications.
In the following diagram, end-users configure a Kore.ai Bot that connects to Kore.ai in the cloud. The Kore.ai Bot servers (5) contact the Kore.ai Connector Gateway (2) with the Bot request. The Kore.ai Connector Gateway relays the request to the Kore.ai Connector (3) installed and securely configured in your on-premises Intranet or DMZ to interact with your bots applications. The response from your applications is sent through the Kore.ai Connector back out to the Kore.ai cloud and processed. Optionally, you can enable your on-premises applications to push data, for example, alert messages, to the Kore.ai cloud using webhooks.
How it Works
After you install the Kore.ai Connector in your network, you configure the agent with details to specifically access, communicate, and request or post data to the bots application you define.
When started, the Kore.ai Connector Agent initiates a persistent SSL connection with Kore.ai and monitors requests for data transfer to or from your bots applications and Kore.ai. If the persistent connection is broken, the Kore.ai Connector automatically attempts to reestablish communication. You can monitor connectivity directly in the Bots Admin console.
Installing
This topic describes how to install and configure the Kore.ai Connector Agent for Kore.ai Bots that you can use to securely connect the cloud-based Kore.ai Bots platform to your on-premises applications in your company Intranet.
Prerequisites
To install the Kore.ai Connector, you should review the following hardware and software requirements.
Hardware Requirements
The server hosting the Kore.ai Connector Agent should have:
RAM: 4 GB
CPU Core: 8
Hard disk space: 10 GB – To support the following:
- Kore.ai Connector download – 10MB
- Installation Files – 20MB
- Logging and Configuration Files – < 5GB
Software Requirements
The Kore.ai Connector supports both Windows and Linux operating systems as follows:
Linux/Unix
The following Red Hat® Enterprise Linux® versions are supported:
- RHEL 5 (32-bit and 64-bit)
- RHEL 6 (32-bit and 64-bit)
- RHEL 7 (64-bit)
The following CentOS versions are supported:
- CentOS 5 (32-bit and 64-bit)
- CentOS 6 (32-bit and 64-bit)
- CentOS 7 (64-bit)
Node.js – Required to run the Kore.ai Connector Agent. Download and install from https://nodejs.org/en/download/ on the server where the Kore.ai Connector Agent is installed.
Windows
The following Microsoft Windows 64-bit operating systems are supported:
- Windows 7 (64-bit)
- Windows 8.1 (64-bit)
- Windows 10 (64-bit)
- Windows Server 2008 R2 (64-bit)
- Windows Server 2012 (64-bit)
- Windows Server 2012 R2 (64-bit)
Node.js – Required to run the Kore.ai Connector Agent. Download and install from https://nodejs.org/en/download/ on the server where the Kore.ai Connector Agent is installed. In addition, you must also install the forever module. After node.js is installed, run the following command to install the forever module.
npm install forever -g
Installation Process
This section describes the installation and configuration of your application server where the Kore.ai Connector Agent is installed, the configuration required in the Bots Admin Console, and finally, enabling enterprise Bots for the Kore.ai Connector Agent and deploying the upgraded Bots for enterprise users.
Adding
In the Bots Admin Console, you begin by adding a connector. When you add a connection, a unique ID is created for your company and your unique Kore.ai Connector.
- In the Bots Admin Console, in the Security & Control module, on the Kore.ai Connector page, click Add Connector. The Add Connector dialog is displayed.
- Optionally, in the first field, edit the name of the connector, and then enter a Description for the connector in the second field.
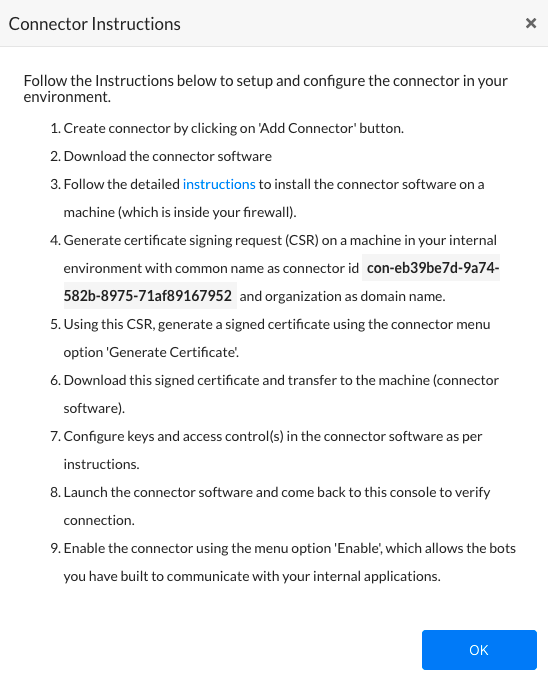
- Click Add. The Connector Instructions dialog is displayed as shown in the following illustration.
- In the Connector Instructions dialog, click OK. The Kore.ai Connector page is displayed.
- In the Download Connector drop-down list, select you operating system and download the Kore.ai Connector Agent compressed file, one of:
- Linux/Unix – kore-connector-1.0.0.tar.gz
- Windows – kore-connector-1.0.0.zip
- Copy, and then uncompress the file to your application server.
- For Linux, use the following command:
tar -xvf kore-connector-X.X.X.tar.gz - For Windows, in File Explorer, right-click the file and select Extract to on the command menu.
- For Linux, use the following command:
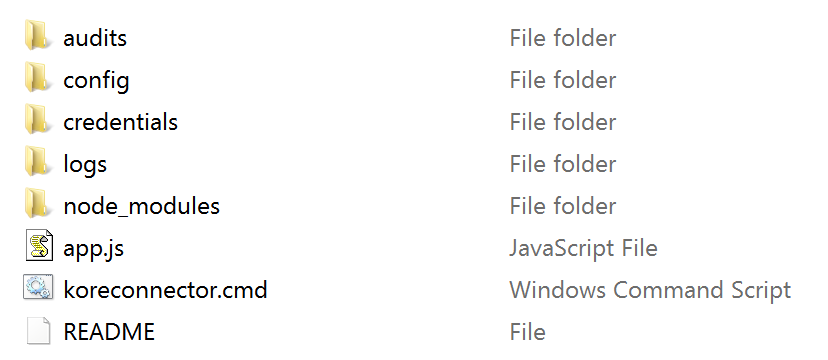
The Kore.ai Connector Agent file is uncompressed into the following directory structure.
Generating a Signed Security Certificate
For secure data exchange between the Kore.ai servers in the cloud and your intranet, you need to generate a signed security certificate. First, create a .csr file on your application server using the command displayed in the Bots Admin Console, and then paste the content of the .csr file into the Generate Signed Certificate dialog. The .csr content is used to generate and download the .pem file. You will then copy the .pem file back to the Kore.ai Connector Agent installed on your application server.
- In the Bots Admin Console, in the Security & Control module, on the Kore.ai Connector page, click the Ellipsis icon.
- On the Actions menu, click Generate Certificate. The Generate Signed Certificate dialog is displayed as shown in the following illustration.
- Review the instructions, and then copy your custom command displayed after step 6 in the instructions as shown in the following illustration.
- Paste and run the command on your application server within your company intranet in the /Credentials directory created when you installed the Kore.ai Connector Agent.
- In the /Credentials directory, the Kore.aiConnector.csr file is created, along with the Kore.aiConnector.key file. Open the Kore.aiConnector.csr file using a text editor, and copy the entire contents of the file, and then paste the contents into the Certificate signing request field in the Generate Signed Certificate dialog as shown in the following illustration.
- Click Generate. The Download Certificate and View Certificate buttons are displayed.
- Click Download Certificate. The Kore.aiConnectorCert.pem file is downloaded to your local computer browser default downloads folder.
- Copy the Kore.aiConnectorCert.pem file to the /Credentials folder created when you installed the Kore.ai Connector on your application server.
Your security files are in-place on the application server.
Configuring
After you install the Kore.ai Connector Agent software, you must verify or set the properties for:
- Certificate Information – See
credentialsin the connectorconfig.json file. - Log Directories – See
loggerin the connectorconfig.json file. - Cluster Environment – See
clusterin the connectorconfig.json file. - Proxy Control for Outbound Connections – See
tunnelin the connectorconfig.json file. - Access Control for Enterprise Applications – See the accesscontrol.json file.
Default Configuration Settings – connectorconfig.json
This section shows the default configuration settings for certificate information, logging, and cluster mode settings in the < Kore.ai Connector agent Installation Path >/config/connectorconfig.json file:
{
"credentials":{
"key":"./credentials/Kore.aiConnector.key",
"cert":"./credentials/Kore.aiConnectorCert.pem",
"ca":"./credentials/ca.crt"
},
"logger":{
"applogs":{
"path":"./logs",
"level":"info"
},
"auditlogs":{
"path":"./audits",
"level":"info"
}
},
"cluster":{
"enabled":true,
"workers":2
}
}
Certificate Information
You may want to store the security keys for the Kore.ai Connector Agent in another location other than the installation directory for the Kore.ai Connector Agent. You can move the credential files to another directory on the application server or another server in the network and specify the relative or absolute path in the credentials section in the connectorconfig.json file that contains the following parameters:
key– The client certificate. Default setting is:./credentials/Kore.aiConnector.key
cert– The .pem file generated in the Bots Admin Console. Default setting is:./credentials/Kore.aiConnectorCert.pem
ca– Installed as part of the Kore.ai Connector Agent. Default setting is:./credentials/ca.crt
Logging Configuration
The Kore.ai Connector Agent generates two logging files at runtime:
- kore-connector.log.< dd-MM-yyyy > – Application logging events to include:
- Connector status – Any change in status such as agent start or stop is added as a log entry.
- Errors – Any error message for the agent is captured in the app.log file.
- kore-connector-audit.log.< dd-MM-yyyy > – Audit logging events.
- Configuration changes – Any changes in connectorconfig.json file and accesscontrol.json file. The original file is backed up automatically and a log entry is made.
- Requested URLs – All requested URLs coming into the Kore.ai Connector are captured as a log entry.
By default, logging files for the application and auditing logs are created and stored in the default installation pat in the < Kore.ai Connector Agent Installation Path >/logs and < Kore.ai Connector Agent Installation Path >/audits. You can specify another directory on the application server or another server in the network and specify the full path.
You can also increase or decrease the logging levels as needed for either logging file as:
- fatal – Any error that is forcing a shutdown of the service or application to prevent data loss or further data loss. Occurs only once in a process and is usually the last entry in a log.
- critical – An error which requires immediate investigation that has not yet shut down a service or application, but is likely to do so.
- error – Any error which is fatal to the current operation but not fatal to the service or application, for example, cannot open a file, missing file, or missing data. This type of errors usually requires administrator intervention.
- warn – Anything that can potentially cause application abnormalities with the ability to recover, for example, switching from a primary to backup server, retrying, or missing secondary data.
- info – General information about normal application operations such as start and planning stopping of service, configuration assumptions, and so forth. This is the default setting for the Kore.ai Connector Agent.
- debug – Diagnostic information, usually for system administrators and IT personnel.
- trace – All operational information, for example, parts of a function.
Each log level below fatal includes the information from any logging level above. For example, the default level as info includes all the information for fatal, critical, error, warn, and info in the log file.
Scalability and Cluster Configuration
The Kore.ai Connector Agent is scalable to handle the request load as required. When you install the Kore.ai Connector Agent, cluster mode settings are enabled by default, with 2 workers, or CPUs, set for use.
For increased load handling for requests by the Kore.ai Connector Agent, you may want to enable more workers. If you do not want to use cluster mode, set the “enabled” property to false.
You can also run cloud connectors in more than one server to meet failover as well as scalability requirements. Certificate and other configurations will remain same. Cloud Connector is a client which makes outboud connection to Kore.ai Cloud Gateway. When more than one connectors are connected, Cloud Gateway will distribute the load to the connectors.
Proxy Control for Outbound Connections
You can configure outbound proxy settings for the Kore.ai Connector Agent in the < Kore.ai Connector agent Installation Path >/config/connectorconfig.json file. This configuration is optional unless all of your outbound data is routed through a proxy server.
To configure outbound proxy settings, add the following configuration shown as the entry labeled tunnel in the following configuration sample:
{
"credentials":{
"key":"./credentials/Kore.aiConnector.key",
"cert":"./credentials/Kore.aiConnectorCert.pem",
"ca":"./credentials/ca.crt"
},
"logger":{
"applogs":{
"path":"./logs",
"level":"info"
},
"auditlogs":{
"path":"./audits",
"level":"info"
}
},
"cluster":{
"enabled":true,
"workers":2
},
"tunnel":{
"proxyHost":"hostname",
"proxyPort":"portnumber"
}
}
Access Control for Applications
The Kore.ai Connector Agent requires an explicit set of white-listed URLs to access specific applications on your company intranet. Any other HTTP requests are denied by the Kore.ai Connector.
You must configure access control for each bot application that will use the Kore.ai Connector Agent in the accesscontrol.json file in the Kore.ai Connector installation directory in the …/config/configs directory with the following parameters:
- virtualhost – Specify the virtual host name exactly as specified in the Request URL property in the Set Up Request Chain dialog while configuring on-premises bots in the Bot Builder tool. For more information, see Defining a Request Chain Object in the Bot Builder documentation.
- virtualport – Specify the virtual port exactly as specified in the Request URL property in the Set Up Request Chain dialog while configuring on-premises bots in the Bot Builder tool. For more information, see Defining a Request Chain Object in the Bot Builder documentation.
- internalhost – Specify the actual host name of the on-premises enterprise application used for data exchange with your Bots.
- internalport – Specify the actual port of the on-premises enterprise application used for data exchange with your Bots.
- protocol – Specify HTTP or HTTPS for the connection to on-premises enterprise applications.
- allowedPaths – Specify all paths as “/*” or a specific array of paths for the host, not to include any parameters. The Kore.ai Connector checks the path up to, but not including parameters beginning with ” ? “
The following image is an example of a configured accesscontrol.json file with four Bot configurations.
Note: Comments cannot be used in configuration files.
Starting
This section describes how to start or stop the Kore.ai Connector Agent on Windows or Linux operating systems.
Linux/Unix Operating Systems
On Linux operating systems, you can manually start the Kore.ai Connector Agent, or configure the Kore.ai Connector Agent to autostart on boot.
Manually Starting/Stopping the Kore.ai Connector on Linux
Manually start or stop the Kore.ai Connector Agent on the Linux/Unit application server by running the following commands in the Kore.ai Connector installation directory, and check the status as follows:
./koreconnector.sh start ./koreconnector.sh stop ./koreconnector.sh status
The following image shows the response for a successful start and status check of the Kore.ai Connector.
Configuring Kore.ai Connector for Autostart on Linux
This section describes how to set the Kore.ai Connector Agent to automatically start when the Linux server is started or rebooted.
- To configure the autostart for the Kore.ai Connector Agent, on the application server, in the …/etc/rc.local file, add the following command:
cd <Kore.ai Connector Installation Root> ; ./koreconnector.sh start
For example:
cd /home/CompanyAdmin/kore-connector ; ./koreconnector.sh start
Windows Operating Systems
On Windows operating systems, you can manually start or stop the Kore.ai Connector Agent, and check the status of the Kore.ai Connector Agent.
Manually Starting/Stopping the Kore.ai Connector on Windows
Manually start or stop the Kore.ai Connector Agent on the Windows application server by running the following commands in the Kore.ai Connector installation directory, and check the status as follows:
.\koreconnector.cmd start .\koreconnector.cmd stop .\koreconnector.cmd status
Enabling Bots
In this section, you can verify the connection to the Kore.ai Connector Agent in the Bots Admin Console, and then enable the connection. When the connection is enabled, you can modify your custom Bots in the Bot Builder tool to use the Kore.ai Connector, publish those Bots, and then in the Bots Admin Console, deploy the published Bots and assign the Bots to users in your company.
- In the Bots Admin Console, in the Security & Control module, on the Kore.ai Connector page, verify the Kore.ai Connector status as CONNECTED, click the Ellipsis icon, and then on the Actions menu, click Enable as shown in the following illustration.
- In Bot Builder, for each Bot task that you want to run using the Kore.ai Connector, clone or upgrade each Bot.
- In the Set up Request Chain Object dialog, select Access using connector, save the changes, and then publish the Bot. For more information about configuring the request object, see Configuring an Alert Task Request Object or Configuring an Action Task Request Object in the Bot Builder tool documentation.
Note: The option in the Set up Request Chain Object dialog for Access using connector is only available after the Kore.ai connector is enabled in the Bots Admin Console.
- In the Set up Request Chain Object dialog, select Access using connector, save the changes, and then publish the Bot. For more information about configuring the request object, see Configuring an Alert Task Request Object or Configuring an Action Task Request Object in the Bot Builder tool documentation.
- In the Bots Admin Console, deploy the published Bot and assign the users that can use the Bot tasks in your enterprise. For more information, see Bot Management.
After the Kore.ai Connector is installed on your application server, enabled in Bots Admin Console, and your Bots customized to use the connector, you only need to monitor the status of your connector in the Bots Admin Console.
If you cannot start the Kore.ai Connector, or customers are reporting errors, you may need to reconfigure Kore.ai Connector settings.
Troubleshooting
Installing and configuring the Kore.ai Connector Agent involves many steps. And even after installation, you may need additional configuration to maintain connectivity between Kore.ai Bots and your on-premises applications. This topic describes some of the typical issues that may arise, and how to handle those issues.
Kore.ai Connect Agent Server Issues
Kore.ai Connector Fails to Start
Log Error Message: TypeError: Object #<Object> has no method ‘parse’
Solution: The server may have multiple node.js installations with different versions. You may need to specify which node.js version to run.
To check for versions, run the following command:
nvm list
This command may return:
v0.10.29

v0.10.30

v0.10.31

v0.10.35

v0.10.36

v0.11.13

v0.12.2

v0.12.4

v4.0.0
To set the version to use, run the following command:
nvm use v4.0.0
The command should return:
Now using node v4.0.0
Client Issues
Users in your organization may experience connectivity issues with the Kore.ai Connector.
- Error Message: “< Enterprise application >” is not reachable. Unable to communicate with the connector. Please try again.
- Solution: The “virtualhost” entry in the < Kore.ai Connector Install Dir >/config/configs/accesscontrol.json file is not defined, or is incorrectly configured. Verify the entry.
- Error Message: The server returned an error. Try again later. (404 – System not reachable).
- Solution: Connectivity between the Kore.ai Connector on your application server and the Kore.ai Gateway is broken. The Kore.ai Connector Agent may have stopped running. You may need to restart the Kore.ai Connector on the application server.
If you cannot resolve your issue, contact Kore.ai Support.