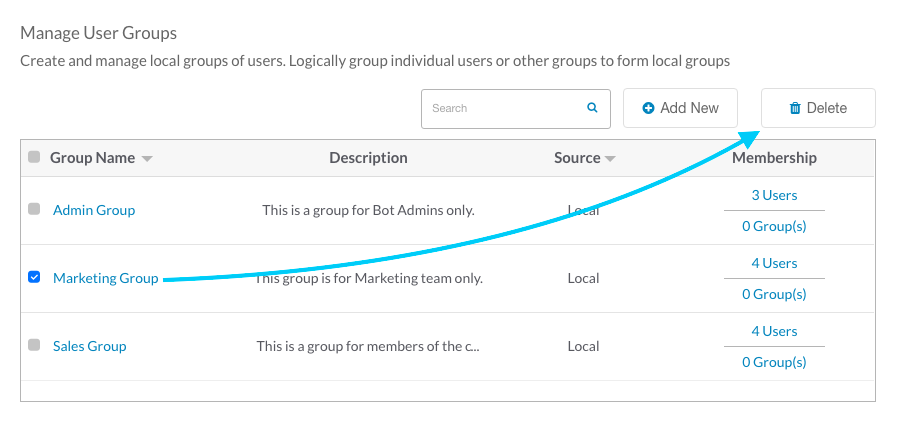
사용자 관리 모듈의 그룹 페이지에서, 회사 Active Directory와 같은 그룹을 가져올 뿐만 아니라 논리적으로 관련된 사용자 그룹을 생성하고 관리할 수도 있습니다. 기업에 다양한 부서 또는 비즈니스 라인을 위한 다양하고 뚜렷한 봇 요구 사항이 있는 경우, 그룹을 생성하고 개발자를 추가하고 그룹에 봇을 할당하는 것이 권장되는 옵션입니다. 예를 들어, 지리적 위치, 부서 제목 또는 공통 관심사별로 사용자 정의 사용자 그룹을 생성할 수 있습니다. 그룹은 Active Directory를 사용하여 조직 단위를 가져올 때 자동으로 생성됩니다. 다음 그림은 사용자 관리 모듈에서 그룹 페이지의 예입니다. 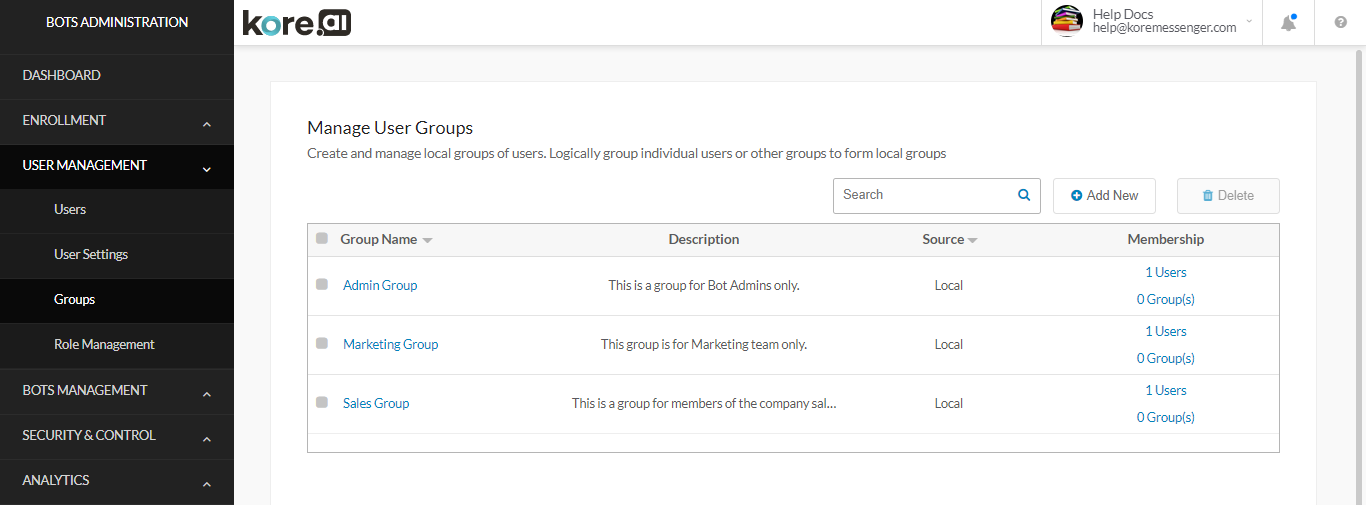
세부 정보
열 값 목록을 정렬하려면, 열 이름 오른쪽에 있는 위쪽 화살표 ![]() 아이콘 또는 아래쪽 화살표
아이콘 또는 아래쪽 화살표 ![]() 아이콘을 클릭합니다. 다음 목록은 그룹 목록에 표시되는 열을 설명합니다.
아이콘을 클릭합니다. 다음 목록은 그룹 목록에 표시되는 열을 설명합니다.
| 열 | 설명 |
|---|---|
| 그룹 이름 | 그룹 이름을 표시합니다. 그룹 이름을 클릭하여 선택한 그룹(이름, 설명 및 구성원)을 편집합니다. |
| 설명 | 그룹 설명을 표시합니다. 이것은 선택 필드입니다. |
| 원본 |
그룹 생성에 사용되는 원본입니다. 다음 중 하나입니다.
|
| 회원 | 사용자인 그룹 구성원 수와 부모 그룹의 자식 그룹인 그룹 구성원 수를 표시합니다. 링크를 클릭하면 선택한 그룹의 Kore.ai 사용자 및 자식 그룹을 편집할 수 있습니다. |
검색 필드 사용
관리자 콘솔 테이블의 항목 목록은 회사의 크기에 따라 매우 클 수 있습니다. 검색 필드에서 하나 이상의 특정 사용자 또는 그룹을 찾으려면, 최소 세 개의 문자를 입력하여 원하는 형식으로 찾기를 시작합니다.
참고 사항: 검색 질의에서 검색어 수에는 제한이 없지만, 각 검색어의 첫 20자 이하가 검색 결과를 반환하는 데 사용됩니다.
모든 항목을 보려면, 검색 필드를 지운 다음, Enter 키를 누릅니다.
생성
예를 들어, 관련 관심사, 부서 또는 위치를 사용하여 계정에서 하나 이상의 사용자 그룹을 생성할 수 있습니다. 관리자가 생성한 그룹은 사용자에게 표시되지 않으며 관리 목적으로만 사용됩니다. 이 항목에서는 새 그룹을 정의하고 사용자 또는 기존 사용자 그룹을 해당 그룹에 추가하는 방법을 설명합니다.
- 사용자 관리 모듈에서, 그룹 섹션을 선택합니다.
 버튼을 클릭하여 새 사용자 그룹 생성 대화 상자를 표시하고 계정에 새 Kore.ai 그룹을 추가합니다.
- 새 사용자 그룹 생성 대화 상자가 표시됩니다.
- 공통 탭에서,
- 그룹 이름 필드에서, 그룹의 이름을 입력합니다.
- 옵션으로, 설명 필드에서, 그룹 설명을 입력합니다.
- 구성원 탭으로 이동하고, 이 그룹에 추가할 사용자 및/또는 그룹을 선택합니다. 다음을 통해 사용 가능한 사용자/그룹 섹션에서 필요한 사용자/그룹을 찾을 수 있습니다
- 정렬을 사용한 다음, 필터를 사용하여 새 그룹에 추가할 수 있는 사용자와 그룹을 표시합니다.
- 검색 필드에 이름을 입력하거나
- 스크롤 하여 하나 이상의 Kore.ai 사용자 및 Kore.ai 그룹을 선택하고,
- 그런 다음,
 을 클릭하여, 선택한 목록을 현재 구성원 섹션으로 이동합니다.
 - 사용 가능한 모든 사용자 및 그룹을 추가하려면,
 을 클릭합니다
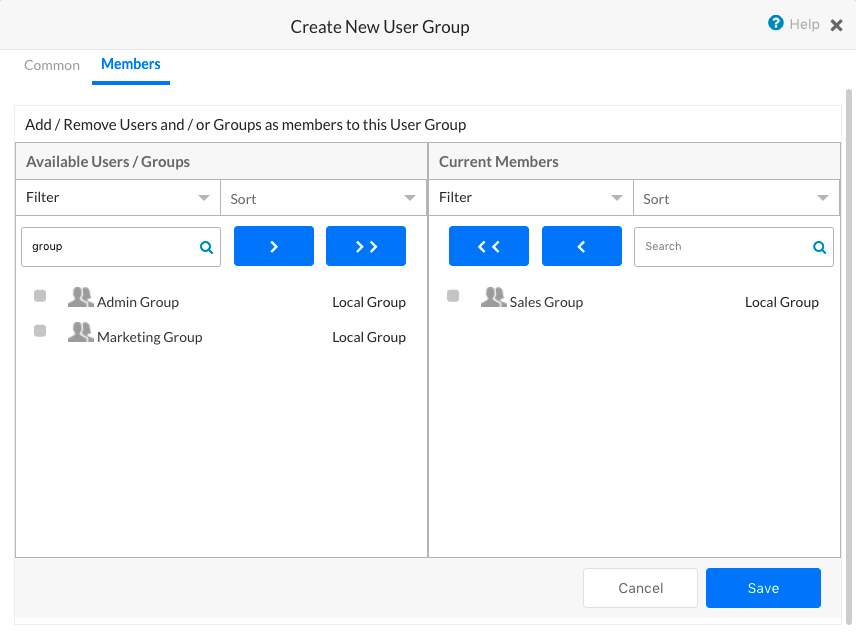
- 저장을 클릭합니다. 그룹이 생성되고 그룹 페이지가 표시됩니다.
- 그룹이 업데이트됨 메시지가 페이지의 상단에 표시됩니다.
수정
그룹의 구성원을 수정해야 할 수도 있습니다. 이 항목에서는 공통 그룹 속성 및 기존 그룹의 회원을 수정하는 방법을 설명합니다.
- 사용자 관리 모듈의, 그룹 페이지에 있는, 그룹 이름 열에서, 수정할 그룹의 이름을 클릭합니다.
- 사용자 그룹 편집 – < 그룹 이름 > 대화 상자가 표시됩니다.
- 공통 탭에서, 그룹 이름 및 설명 필드를 수정할 수 있습니다.
- 구성원 탭의, 사용 가능한 사용자/그룹 및 현재 구성원 섹션에서, 선택적으로 정렬한 다음, 필터를 사용하여 추가하거나 제거할 사용자와 그룹을 표시합니다.
- 그룹의 구성원을 수정하기 위해, 다음을 수행할 수 있습니다.
- 검색 필드에 이름을 입력하거나, 스크롤 하여 하나 이상의 사용자 및 그룹을 선택한 다음, 을 클릭하여 새 그룹 구성원을 추가하거나,
 을 클릭하여 선택한 그룹 구성원을 제거합니다.
 - 사용 가능한 모든 그룹 구성원을 추가하려면 을 클릭하거나, 현재 모든 그룹 구성원을 제거하려면
 을 클릭합니다.
- 검색 필드에 이름을 입력하거나, 스크롤 하여 하나 이상의 사용자 및 그룹을 선택한 다음,
- 저장을 클릭합니다. 그룹이 수정되고 그룹 페이지가 표시됩니다.
삭제
계정에 사용자 그룹이 더 이상 필요하지 않을 수 있습니다. 그룹을 삭제하기 전에 그룹에서 모든 사용자를 제거해야 합니다. 그룹을 삭제하려면 다음 절차의 단계를 완료합니다. 그룹을 삭제하는 대신, 기존 그룹의 회원뿐만 아니라 공통 설정도 수정할 수 있습니다. 자세한 내용은, 기존 사용자 그룹 수정을 참조하세요.
- 사용자 관리 모듈의, 그룹 페이지에 있는, 그룹 이름 열에서, 삭제할 그룹을 하나 이상 선택합니다.
- 액션 바에서,
 을 클릭합니다.
 - 그룹 삭제 확인 대화 상자에서, 삭제를 클릭합니다.
경고: 이 작업은 영구적이므로 취소할 수 없습니다.
그룹이 삭제되었습니다.
ユーザー管理モジュールのグループページでは、論理的に関連するユーザーグループを作成および管理したり、会社のActive Directoryグループなどのグループをインポートしたりできます。
エンタープライズが色々な部門や事業部門に対してさまざまで明確なボット要件を持っている場合は、グループを作成し、開発者を追加し、グループにボットを割り当てることをお勧めします。たとえば、地理的な場所、部門の役職、または共通の関心事ごとに、ユーザーのカスタムグループを作成できます。
Active Directoryを使用して組織ユニットをインポートすると、グループが自動的に作成されます。
次のイラストは、グループページのユーザー管理モジュールの例です。
詳細
列の値のリストを並べ替えるには、列名の右側にある上向き矢印![]() アイコンまたは下向き矢印
アイコンまたは下向き矢印![]() アイコンをクリックします。次のリストは、グループリストに表示される列について説明しています。
アイコンをクリックします。次のリストは、グループリストに表示される列について説明しています。
| 列 | 説明 |
|---|---|
| グループ名 | グループ名を表示。グループ名をクリックして、選択したグループ(名前、説明、メンバー)を編集します。 |
| 説明 | グループの説明を表示します。これはオプションのフィールドです。 |
| ソース |
グループの作成に使用されたソース。以下のうちの一つ:
|
| メンバーシップ | ユーザーとしてのグループメンバーの数、および親グループの子メンバーとしてのグループの数を表示します。リンクをクリックして、選択したグループのKore.aiユーザーと子グループのリストを編集します。 |
検索フィールドの使用
管理コンソールテーブルのエントリリストは、会社の規模によっては非常に大きくなる場合があります。1つ以上の特定のユーザーまたはグループを検索するには、検索フィールドに少なくとも3文字を入力して入力どおりに検索を開始します。
メモ:検索クエリ内の検索語の数に制限はありませんが、検索結果を返すために使用されるのは、各検索語の最初の20文字以内です。
すべてのエントリを表示するには、検索フィールドをクリアしてから、エンターキーを押します。
作成
たとえば、関連する興味、部門、または場所を持つユーザーのために、アカウントに1つ以上のユーザーグループを作成することができます。管理者によって作成されたグループはユーザーには表示されず、管理目的でのみ使用されます。このトピックでは、新しいグループを定義して、ユーザーまたは既存のユーザーグループをそのグループに追加する方法について説明します。
- ユーザー管理モジュールで、グループセクションを選択します。
- ボタンをクリックして新しいユーザーグループの作成ダイアログを表示し、アカウントに新しいKore.aiグループを追加します。
- 新しいユーザーグループの作成ダイアログが表示されます。
- 共通タブで、
- グループ名フィールドにグループの名前を入力します。
- オプションで、説明フィールドにグループの説明を入力します。
- メンバータブに移動し、このグループに追加するユーザーやグループを選択します。必要なユーザー/グループは、利用可能なユーザー/グループセクションから次のように見つけることができます。
- 新しいグループに追加できるユーザーとグループを表示するには、並べ替えを使用してからフィルターを選択します。
- 検索フィールドに名前を入力する、または
- スクロールして1人以上のKore.aiユーザーとKore.aiグループを選択します。
- 次に、をクリックして、選択したリストを現在のメンバーセクションに移動します。
- 利用可能なすべてのユーザーとグループを追加するには、をクリックします
- 保存をクリックします。グループが作成され、グループページが表示されます。
- グループが更新されましたというメッセージがページの上部に表示されます。
修正
グループのメンバーを変更する必要がある場合があります。このトピックでは、共通グループのプロパティと既存のグループのメンバーシップを変更する方法について説明します。
- ユーザー管理モジュールのグループページのグループ名列で、修正するグループの名前をクリックします。
- ユーザーグループの編集―グループ名ダイアログが表示されます。
- 共通タブで、グループ名と説明フィールドを変更できます。
- メンバータブの利用可能なユーザー/グループセクションと現在のメンバーセクションで、オプションで、追加または削除するユーザーとグループを表示するために、並べ替えを選択してから、フィルターを選択します。
- グループのメンバーを変更するには、次のことができます。
- 検索フィールドに名前を入力するか、スクロールして1人以上のユーザーとグループを選択し、次にをクリックして新しいグループメンバーを追加するか、をクリックして選択したグループメンバーを削除します。
- をクリックして利用可能なすべてのグループメンバーを追加するか、をクリックして現在のすべてのグループメンバーを削除します。
- 検索フィールドに名前を入力するか、スクロールして1人以上のユーザーとグループを選択し、次に
- 保存をクリックします。グループが修正され、グループページが表示されます。
削除
アカウントにユーザーのグループが不要になる場合があります。グループを削除する前に、グループからすべてのユーザーを削除する必要があります。次の手順のステップを実行して、グループを削除します。グループを削除する代わりに、既存のグループのメンバーシップはもちろん、共通の設定を変更することもできます。詳細については、既存のユーザーグループの変更を参照してください。
- ユーザー管理モジュールのグループページのグループ名列で、削除するいくつかのグループ名をクリックします。
- アクションバーで、をクリックします。
- グループの削除確認ダイアログで、削除をクリックします。
警告:この操作は恒久的で、元に戻すことはできません。
グループが削除されます。
On the Groups page in the User Management module, you can create and manage logically related groups of users, as well as import groups, such as your company Active Directory groups.
If the enterprise has varied and distinct Bot requirements for various departments or lines of business, creating groups, adding developers and assigning bots to the groups would be the recommended option. You can create a custom group of users, for example, by geographical location, department title, or common interest.
Groups are automatically created when you import organizational units using Active Directory.
The following illustration is an example of the Groups page in the User Management module.
Details
To sort the list of column values, click the Arrow Up ![]() icon or Arrow Down
icon or Arrow Down ![]() icon to the right of a column name.
icon to the right of a column name.
The following list describes the columns displayed in the Groups listing.
| COLUMN | DESCRIPTION |
|---|---|
| Group Name | Displays the group name. Click a group name to edit the the selected group – name, description & members. |
| Description | Displays the description of the group. This is an optional field. |
| Source | The source used to create the group. One of:
|
| Membership | Displays the number of group members as users, and the number of groups as child members of the parent group. Click the link to edit the list of Kore.ai users and child groups for the selected group. |
Using the Search Field
The list of entries in an admin console table can be very large depending on the size of your company. To find one or more specific users or groups, in the Search field, enter at least three characters to begin find-as-you-type.
Note: The number of search terms in a search query is unlimited, however, no more than the first 20 characters of each search term is used to return search results.
To view all entries, clear the search field, and then press the Enter key.
Creation
You may want to create one or more groups of users in your account for users with, for example, a related interest, department, or location. Groups created by the admin are not visible to the user and are for administrative purposes only. This topic describes how to define a new group and add users, or existing groups of users to that group.
- In the User Management module, select the Groups section.
- Click the button to display the Create New User Group dialog to add a new Kore.ai group to your account.
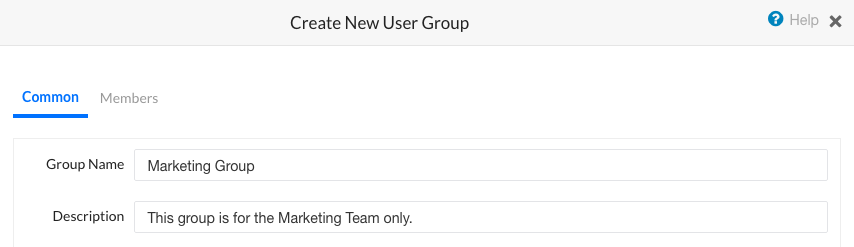
- The Create New User Group dialog is displayed.
- In the Common tab,
- in the Group Name field, enter the name for the group.
- Optionally, in the Description field, enter a description for the group.
- Navigate to the Members tab, and select the user(s) and/or group(s) to be added to this group. You can locate the needed users/groups from the the Available Users/Groups section by
- using Sort and then selecting a Filter to display users and groups that can be added to the new group.
- entering a name in the Search field, or
- scrolling to select one or more Kore.ai users and Kore.ai groups,
- Then click , to move the selected list to the Current Members section.
- To add all available users and groups, click
- Click Save. The group is created and the Groups page is displayed.
- The Group Updated message is displayed at the top of the page.
Modification
You may need to modify the members of a group. This topic describes how to modify the common group properties and the membership of an existing group.
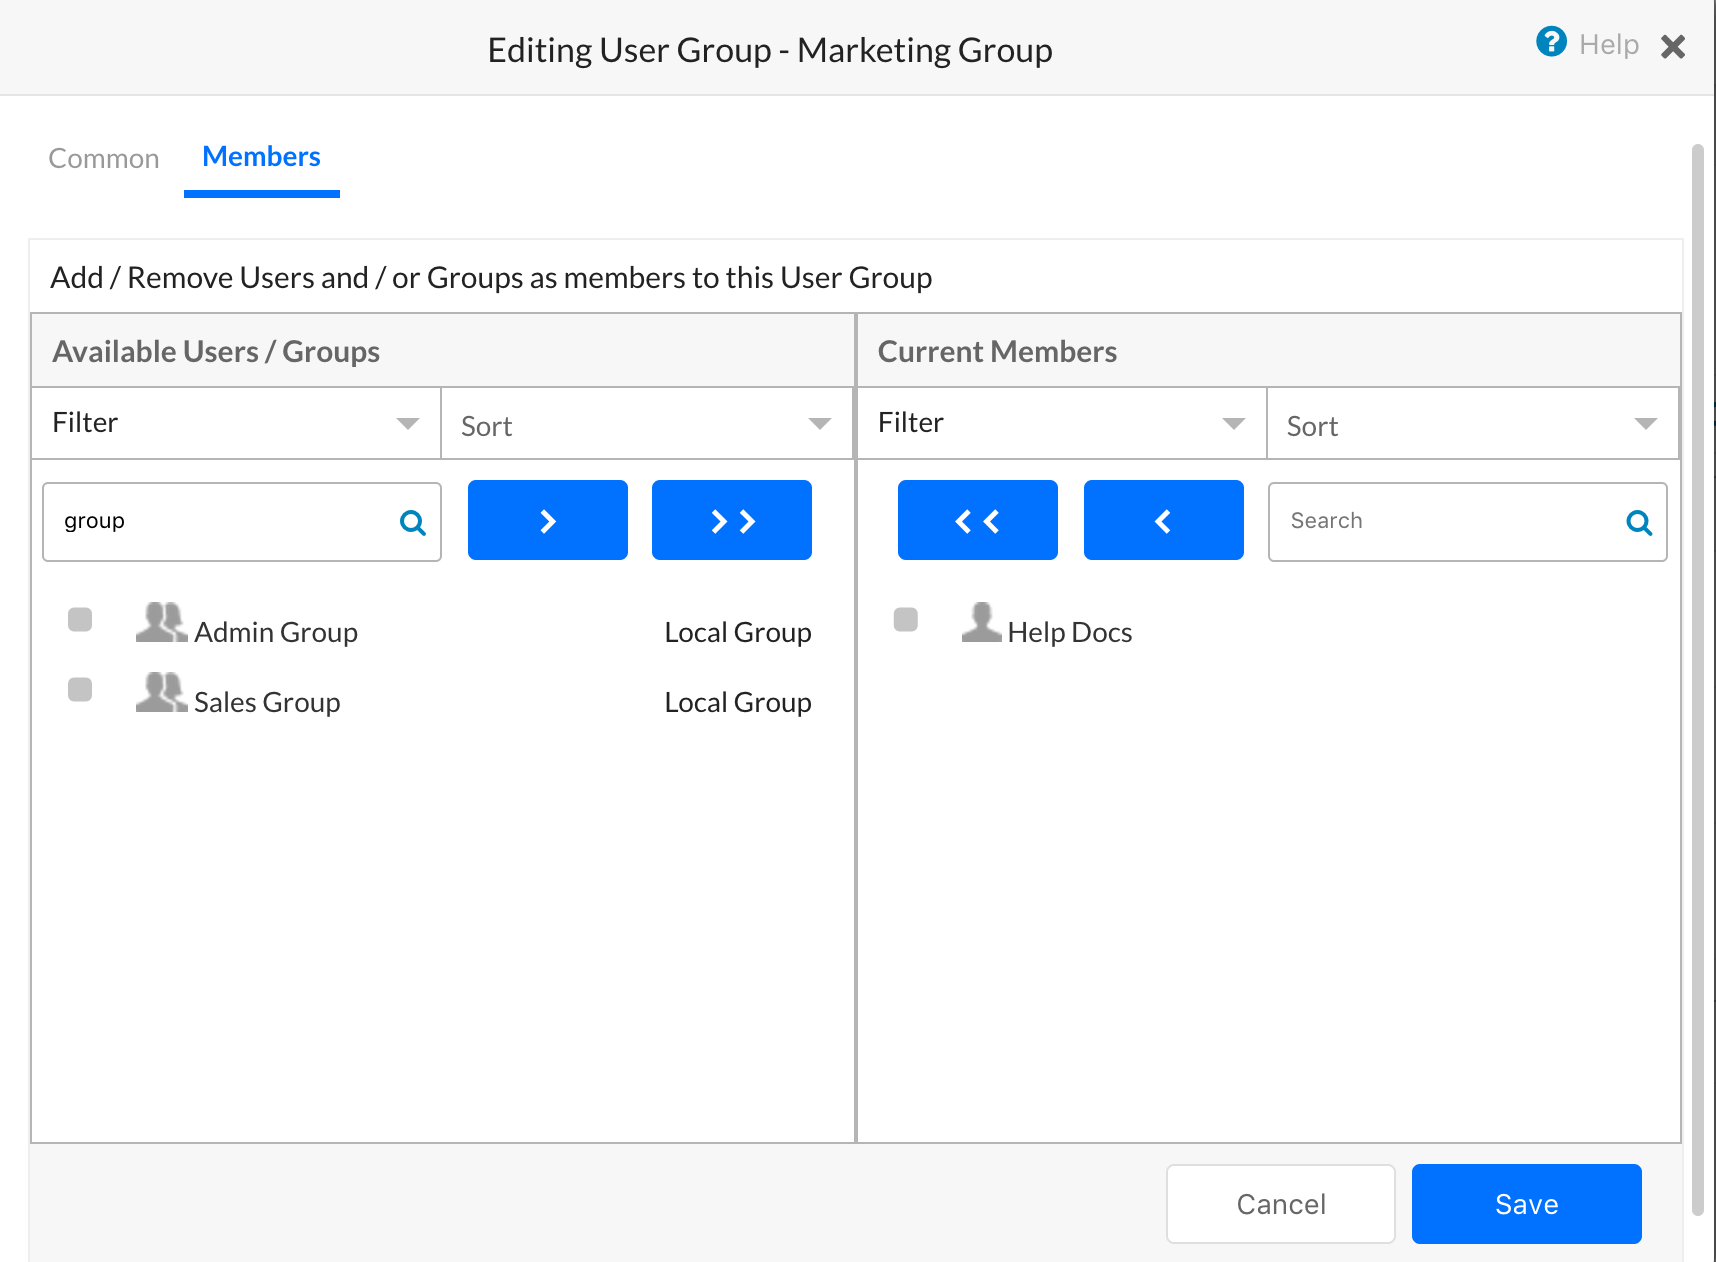
- In the User Management module, on the Groups page, in the Group Name column, click the name of the group to modify.
- The Editing User Group – < Group Name > dialog is displayed.
- On the Common tab, you can modify the Group Name and Description field.
- On the Members tab, in the Available Users/Groups and Current Members sections, optionally Sort, and then select a Filter to display users and groups to add or remove.
- To modify the members of the group, you can:
- Enter a name in the Search field, or scroll to select one or more users and groups, and then click to add new group members, or click to remove the selected group members.
- Click to add all available group members, or click to remove all current group members.
- Enter a name in the Search field, or scroll to select one or more users and groups, and then click
- Click Save. The group is modified and the Groups page is displayed.
Deletion
You may no longer need a group of users in your account. You must remove all users from a group before you can delete a group. Complete the steps in the following procedure to delete a group.
Instead of deleting a group, you can also modify the common settings as well as the membership of an existing group. For more information, see Modify an Existing User Group.
- In the User Management module, on the Groups page, in the Group Name column, select the name of one or more groups to delete.
- On the Action bar, click .
- In the Delete Group(s) confirmation dialog, click Delete.
Warning: This operation is permanent and cannot be undone.
The group is deleted.