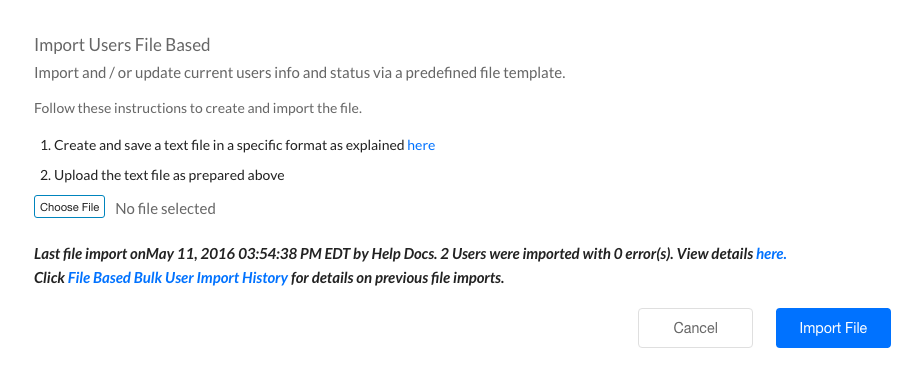
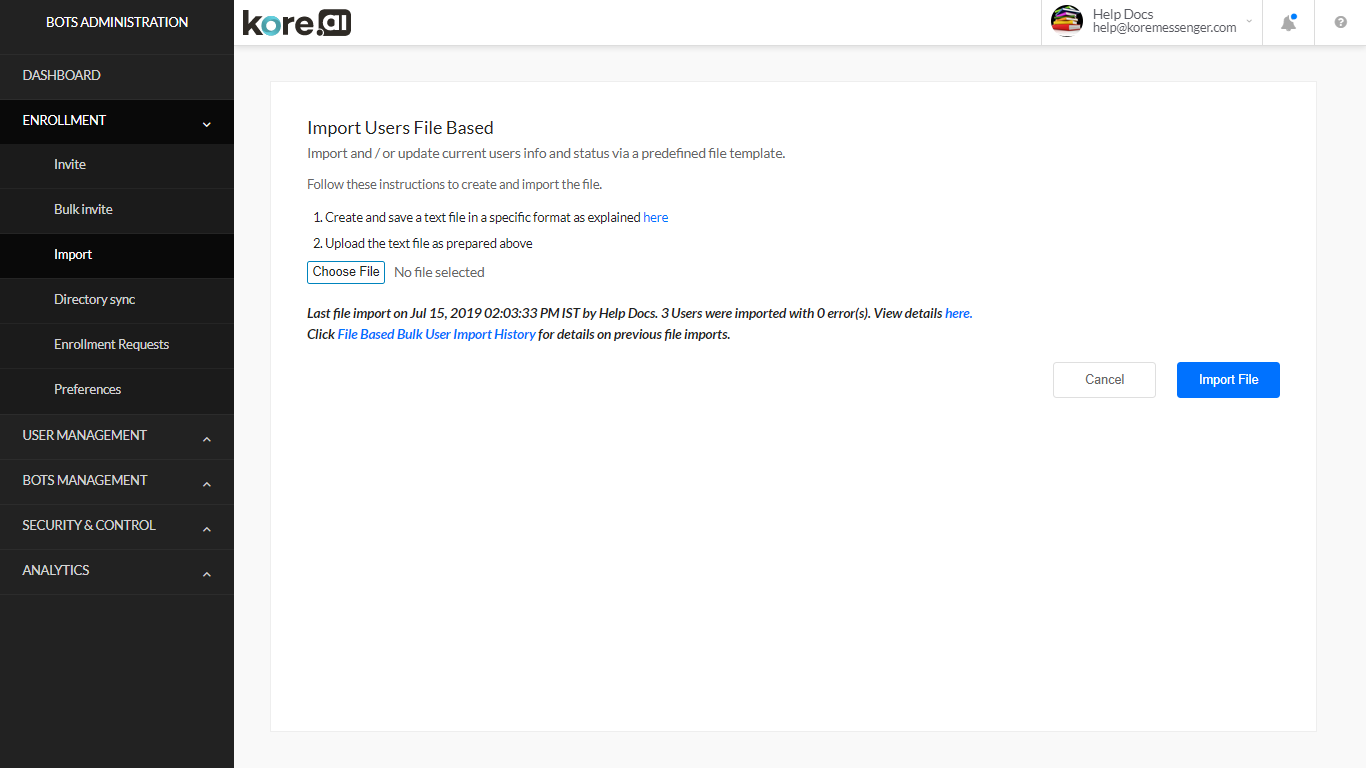
여러 Kore.ai 사용자를 초대해야 하며, 이메일 주소 외에 이름, , 부서전화 번호직함과 같은 사용자에 대한 정보가 있는 경우, 가져오기 페이지를 사용하여 추가 사용자 정보가 포함된 목록을 기반으로 새 사용자를 추가하고 기존 사용자를 업데이트할 수 있습니다. 다음 그림은 등록 모듈의 가져오기 페이지의 예입니다.
가져오기 파일은 기본 텍스트 파일일 수 있으며 .txt 또는 .csv 파일 형식으로 저장할 수 있습니다. 가져오기 파일을 생성한 후, 파일을 업로드하여 계정에 Kore.ai 사용자를 추가하거나 업데이트할 수 있습니다.

파일 요구 사항

가져오기 파일을 생성할 때, 다음 지침을 준수해야 합니다.

  • 첫 번째 행은 헤더 행의 일종인 Kore.ai 내에 데이터가 저장되는 필드의 이름을 식별합니다.
  • 다음 Kore.ai 계정 필드가 필요합니다.
    • 이메일 ID – 필수
    • 이름 – 필수
    • – 필수
    • 대체 ID, 직장 전화, 직함, 부서 – 옵션
    • 사용자 상태 – – 필수 – 다음 중 하나입니다
      • 신규
      • 수정
      • 삭제
      • 활성
  • 각 Kore.ai 사용자당 하나의 행 생성
  • 유효한 필드 구분자는 쉼표, 파이프, 세미콜론 및 탭입니다

가져오기 파일을 사용할 때, 다음 유효성 검사 규칙이 적용됩니다.

  • 유효하지 않은 이메일 형식이 있는 항목은 무시됩니다.
  • 이메일 주소를 성공적으로 가져올 때마다 Kore.ai 사용자가 될 수 있는 초대 이메일이 생성됩니다.
  • Kore.ai 계정의 기존 사용자에게는 초대 이메일이 발송되지 않습니다.
  • 상태가 활성으로 설정된 가져오기 된 사용자는 Kore.ai 계정이 활성화되었다는 알림을 받습니다.

샘플 파일

.txt 파일의 경우:

Email ID, First Name, Last Name, Alternate ID, Work Phone, Title, Department, User Status Kore.aiUser1@kore.com,User1FirstName,User1LastName,,800-555-1212,President,Executive,New Kore.aiUser2@kore.com,User2FirstName,User2LastName,,800-555-5555,VicePresident,Executive,New Kore.aiUser3@kore.com,User3FirstName,User1LastName,,,,,New

가져오기 파일 생성 및 업로드

봇 관리자로 관리할 수 있는 Kore.ai 사용자가 될 조직의 사용자를 초대하는 파일을 생성할 수 있습니다. 이 항목에서는 계정의 Kore.ai 사용자가 될 수 있도록 초대하려는 사용자에 대해 이메일 주소와 이름 및 성, 전화번호, 부서 등과 같은 사용자 정보가 포함된 파일을 생성하는 방법을 설명합니다. 사용자의 이메일 주소 정보만 있는 경우, 대량 초대 파일을 생성하고 가져와야 합니다. 가져오기 파일 생성 방법

  1. 텍스트 편집기 또는 스프레드시트에서, 첫 번째 줄에 필드 ID를 입력한 다음, 각 줄에 또는 다음 예와 같이 쉼표로 구분된 목록으로 전체 이메일 주소와 데이터를 입력합니다.

.txt 파일의 경우:

Email ID, First Name, Last Name, Alternate ID, Work Phone, Title, Department, User Status Kore.aiUser1@kore.com,User1FirstName,User1LastName,User1AlternateID,800-555-1212,President,Executive,New Kore.aiUser2@kore.com,User2FirstName,User2LastName,User2AlternateID,800-555-5555,VicePresident,Executive,New Kore.aiUser3@kore.com,User3FirstName,User1LastName,,,,New
  1. 가져오기 파일을 .txt 또는 .csv 파일(예: Kore.aiImport.txt 또는 Kore.aiImport.csv)로 저장합니다. 가져오기 파일을 생성한 후, 파일을 업로드하여 계정 사용자를 초대할 수 있습니다.

가져오기 파일을 생성한 후에는, 가져오기 파일을 업로드해야 합니다. 이 항목에서는 계정의 사용자의 가져오기 파일을 업로드하는 방법을 설명합니다. 사용자 가져오기 파일 업로드 방법

  1. 등록 > 가져오기 페이지에서, 파일 선택을 클릭합니다.
  2. 가져오기 파일로 이동한 다음, 열기를 클릭합니다. 파일 이름이 파일 선택 버튼 오른쪽에 표시됩니다.
  3. 파일 가져오기를 클릭합니다. 가져오기 상태는 파일 가져오기 버튼 바로 다음에 설명되어 있습니다.
  4. 파일 기반 대량 사용자 가져오기 기록 링크를 클릭하여 이전 가져오기에서 가져오기 상태를 검토할 수 있습니다.UserEnrollmentImportUsersWithData

결과 보기

필요한 경우 사용자별로 가져오기 작업 결과를 검토할 수 있습니다. 이 항목에서는 현재 가져오기 보고서의 결과를 보는 방법을 설명합니다. 현재 사용자 가져오기 결과 보는 방법

  1. 등록 > 가져오기 페이지에서, 아래와 같이 여기 링크를 클릭합니다.
  2. 파일 가져오기 보고서 대화 상자가 열립니다.

기록 보기

계정에서 사용자 목록을 생성하고 가져온 후, 가져오기 결과를 검토할 수 있습니다. 이 항목에서는 파일 기반 사용자 가져오기의 이전 목록을 보는 방법을 설명합니다. 이전 가져오기 보고서 보는 방법

  1. 등록 모듈의 가져오기 페이지에서, 다음 그림과 같이 파일 기반 대량 사용자 가져오기 기록을 클릭합니다.
    userenrollmentimportuserswithdatahistory
  2. 파일 기반 가져오기 기록 대화 상자에서, 가져오기의 결과를 보려면, 확인하려는 가져오기의 보고서 열에서, 결과를 클릭합니다. 가져오기의 개별 사용자 결과가 다음 그림과 같이 파일 기반 가져오기 결과 대화 상자에 표시됩니다.
    userenrollmentimportuserswithdatahistoryresult

多くのKore.aiユーザーを招待する必要があり、メールアドレスに加えて、部門電話番号役職などのユーザーに関する情報がある場合は、インポートページを使用できます。追加のユーザー情報を含むリストに基づいて、新しいユーザーを追加し、既存のユーザーを更新します。

次のイラストは、登録モジュールのインポートページの例です。 インポートファイルは基本的なテキストファイルであり、.txtまたは.csvファイル形式で保存できます。インポートファイルを作成したら、ファイルをアップロードして、Kore.aiのアカウントにユーザーを追加または更新できます。

ファイル要件

インポートファイルを作成するときは、次のガイドラインに従う必要があります。

  • 最初の行は、Kore.ai内でデータが保存されているフィールドの名前を特定するものであり、ヘッダー行のようなものです。
  • 次のKore.aiアカウントフィールドが必要です:
    • メールID―必須
    • ―必須
    • ―必須
    • 代替ID勤務先電話番号役職部門―オプション
    • ユーザーステータス―必須―の1つ
      • 新規
      • 更新
      • 削除
      • アクティブ
  • Kore.aiユーザーごとに1つの行を作成します
  • 有効なフィールド区切り文字は、コンマ、パイプ、セミコロン、およびタブです。

インポートファイルを使用する場合、次の検証ルールが適用されます。

  • 無効なメール形式のエントリは無視されます。
  • メールアドレスのインポートが成功するたびに、Kore.aiユーザーになるための招待メールが生成されます。
  • Kore.aiアカウントの既存のユーザーには、招待メールは送信されません。
  • ステータスがアクティブ化に設定されているインポートされたユーザーには、Kore.aiアカウントがアクティブ化されたという通知が送信されます。

サンプルファイル

.txtファイルの場合:

Email ID, First Name, Last Name, Alternate ID, Work Phone, Title, Department, User Status
Kore.aiUser1@kore.com,User1FirstName,User1LastName,,800-555-1212,President,Executive,New
Kore.aiUser2@kore.com,User2FirstName,User2LastName,,800-555-5555,VicePresident,Executive,New
Kore.aiUser3@kore.com,User3FirstName,User1LastName,,,,,New

インポートファイルを作成してアップロード

ボット管理者として、Kore.aiで管理できるユーザーにするために、組織内のユーザーを招待するファイルを作成できますこのトピックでは、自身のアカウントでKore.aiユーザーになるように招待したいユーザーの、電子メールアドレスとユーザー情報(姓名、電話番号、部門など)を含むファイルを作成する方法について説明します。ユーザーのメールアドレス情報しかない場合は、代わりに一括招待ファイルをインポートを作成する必要があります。インポートファイルを作成

  1. テキストエディタまたはスプレッドシートで、最初の行にフィールドIDを入力してから、次の各行、または次の例に示すようにカンマ区切りのリストに完全なメールアドレスとデータを入力します。

.txtファイルの場合:

Email ID, First Name, Last Name, Alternate ID, Work Phone, Title, Department, User Status
Kore.aiUser1@kore.com,User1FirstName,User1LastName,User1AlternateID,800-555-1212,President,Executive,New
Kore.aiUser2@kore.com,User2FirstName,User2LastName,User2AlternateID,800-555-5555,VicePresident,Executive,New
Kore.aiUser3@kore.com,User3FirstName,User1LastName,,,,New
  1. インポートファイルを.txtまたは.csvファイル、たとえばKore.aiImport.txtまたはKore.aiImport.csvとして保存します。インポートファイルを作成したら、ファイルをアップロードして、自身のアカウントユーザーを招待できます。

インポートファイルを作成したら、インポートファイルをアップロードする必要があります。このトピックでは、自身のアカウントのユーザーのインポートファイルをアップロードする方法について説明します。ユーザーインポートファイルをアップロード

  1. 登録インポートページで、ファイルの選択をクリックします。
  2. インポートファイルに移動し、開くをクリックします。ファイル名は、ファイルの選択ボタンの右側に表示されます。
  3. インポートファイルをクリックします。インポートのステータスは、ファイルのインポートボタンの直後に表示されます。
  4. “ファイルベースの一括ユーザーインポート履歴”リンクをクリックして、以前のインポートからのインポートステータスをレビューできます。UserEnrollmentImportUsersWithData

結果を参照

必要に応じて、ユーザーごとにインポート操作の結果をレビューできます。このトピックでは、現在のインポートレポートの結果を表示する方法について説明します。現在のユーザーインポートの結果を表示するには

  1. 登録インポートページで、以下に示すように、こちらのリンクをクリックします。
  2. ファイルのインポートに関するレポートダイアログが開きます。

履歴を表示

自身のアカウントにユーザーのリストを作成してインポートした後、インポートの結果を確認することをお勧めします。このトピックでは、ファイルベースのユーザーインポートの履歴リストを表示する方法について説明します。過去のインポートレポートを表示

  1. 次の図に示すように、登録モジュールのインポートページで、“ファイルベースの一括ユーザーインポート履歴”をクリックします。 userenrollmentimportuserswithdatahistory
  2. ファイルベースのインポート履歴ダイアログで、インポートの結果を表示するには、表示するインポートのレポート列で、結果.をクリックします。次のイラストに示すように、インポートの個々のユーザーの結果がファイルベースのインポート結果ダイアログに表示されます。 userenrollmentimportuserswithdatahistoryresult

If you need to invite multiple Kore.ai users and you have information about users in addition to the email address, such as the First Name, Last Name, Department, Phone, and Job Title, you can use the Import page to add new users and update existing users based on a list that contains additional user information.

The following illustration is an example of the Import page in the Enrollment module.

The import file can be a basic text file and saved as a .txt or .csv file format. After you create an import file, you can upload the file to add or update the Kore.ai users in your account.

File Requirements

When you create an import file, you must adhere to the following guidelines:

  • The first row identifies the name of the field under which the data is stored within Kore.ai, kind of header row.
  • The following Kore.ai account fields are required:
    • Email ID – mandatory
    • First Name – mandatory
    • Last Name – mandatory
    • Alternate ID, Work Phone, Title, Department – optional
    • User Status – – mandatory – One of
      • New
      • Update
      • Delete
      • Activate
  • Create one row for each Kore.ai user
  • Valid field delimiters are comma, pipe, semicolon, and tab

When using an import file, the following validation rules are applied:

  • Entries with invalid email formats are ignored.
  • Each successful import of an email address generates an invitation email to become a Kore.ai user.
  • Existing users in your Kore.ai account are not sent invitation emails.
  • Imported users with status set to Activate are sent a notification that the Kore.ai account is activated.

Sample File

For a .txt file:

Email ID, First Name, Last Name, Alternate ID, Work Phone, Title, Department, User Status
Kore.aiUser1@kore.com,User1FirstName,User1LastName,,800-555-1212,President,Executive,New
Kore.aiUser2@kore.com,User2FirstName,User2LastName,,800-555-5555,VicePresident,Executive,New
Kore.aiUser3@kore.com,User3FirstName,User1LastName,,,,,New

Create and Upload an Import File

You can create a file to invite users in your organization to become Kore.ai users that you can manage as a Bots Admin.

This topic describes how to create a file that contains the email addresses and user information, such as first and last name, phone number, department, and so forth, for the users that you want to invite to become Kore.ai users in your account.

If you only have email address information for your users, you should create and import a bulk invite file instead.

To create an import file

  1. In a text editor or spreadsheet, enter the field IDs on the first line, and then enter a complete email address and data on each following line or in a comma-separated list as shown in the following example:

For a .txt file:

Email ID, First Name, Last Name, Alternate ID, Work Phone, Title, Department, User Status
Kore.aiUser1@kore.com,User1FirstName,User1LastName,User1AlternateID,800-555-1212,President,Executive,New
Kore.aiUser2@kore.com,User2FirstName,User2LastName,User2AlternateID,800-555-5555,VicePresident,Executive,New
Kore.aiUser3@kore.com,User3FirstName,User1LastName,,,,New
  1. Save the import file as a .txt or .csv file, for example, Kore.aiImport.txt or Kore.aiImport.csv.
    After you create an import file, you can upload the file to invite your account users.

After you have created an import file, you need to upload the import file. This topic describes how you can upload your import file of users of your account.

To upload a user import file

  1. In the Enrollment > Import page, click Choose File.
  2. Navigate to your import file, and then click Open. The filename is displayed to the right of the Choose File button.
  3. Click Import File. The status of the import is described immediately following the Import File button.
  4. You can click the File Based Bulk User Import History link to review an import status from a prior import.UserEnrollmentImportUsersWithData

View Results

You can review the import operation results on a per-user basis if needed. This topic describes how to view the results of the current import report.

To view the results of the current user import

  1. On the Enrollment > Import page, click the here link, as shown below.
  2. The Report On File Import dialog opens.

View History

After you create and import a list of users in your account, you may want to review the results of the import. This topic describes how to view the historical list of file-based user imports.

To view historical import reports

  1. In the Enrollment module, on the Import page, click File Based Bulk User Import History as shown in the following illustration.
    userenrollmentimportuserswithdatahistory
  2. In the File Based Import History dialog, to view the results of an import, in the Report column for the import that you want to view, click Results. The individual user results for the import are displayed in the the File Based Import Results dialog as shown in the following illustration.
    userenrollmentimportuserswithdatahistoryresult