GETTING STARTED
Process Apps Overview
Concepts and Terminology
Quick Start Guide
Exploring the Process Apps Store
Building a Process Apps from Scratch
What's New
Current Version
Previous Versions

CONCEPTS
Flow Builder
Triggers
Logic
Introduction
Split
Merge
GoTo
End
Tasks
Introduction
Human Task
Script Task
Integrations
Introduction
Connect to Data Table
Connect to API
Events
Call a Subflow
Notify
Delay
Forms
Form Creation
Form Components
Form Actions
Simulate
Publish
Self-Service Portal
Dashboard

SETTINGS
General Settings
Members and Roles
Versioning
Channels
Bot Permissions
Alerts
Import & Export
Change Logs
Delete App

HOW TOs
Creating a Process App
Importing and Exporting a Process App
Sharing a Process App with Co-Developers
Configuring a Process App
Defining a Digital Form
Defining a Flow for a Process App
Defining Triggers for a Process App
Using Stencil to Define a Logic for a Process App
Using Events for a Process App
Adding Access Controls to a Digital Form
Calling a Subflow from Process App
Deploying a Process App
Configuring Channels to a Process App
Publishing a Process App
Analyzing a Process App
Stimulating a Process Instance
Creating and Publishing a Process App
Viewing a Process App Errors
Viewing Change Logs Made to Process App Definition
Creating or Restoring a Version of Process App
Adding Bot Permissions to let Bot Trigger the Process App

ADMINISTRATION
Introduction
Assistant Admin Console
Administration Dashboard
User Management
Add Users
Manage Groups
Assistant Management
Enrollment
Invite Users
Send Bulk Invites
Import User Data
Synchronize Users from AD
Security & Compliance
Using Single-Sign On
Security Settings
Cloud Connector
Billing

ヒューマンタスクを使用すると、承認アクションを実行できます。承認アクションの実行を必要とするプロセスフローを構築する場合、ヒューマンタスクはそのアクションの実行を支援します。たとえば、従業員の休暇申請について考えてみましょう。従業員が休暇申請を提出しました。システムは従業員の所属マネージャーの情報を取得し、休暇申請タスクを割り当てます。ここで、マネージャーは休暇申請を承認または拒否する必要があります。この承認アクションを実行するには、プロセスフローでヒューマンタスクを構成する必要があります。このヒューマンタスクは、承認拒否カスタム結果などのタスク結果を構成するのに役立ちます。対応する分割ステンシルで設定された条件に基づいて、マネージャーは要求を承認または拒否できます。 ヒューマンタスクでは、必要な入力を収集するために受信者に送信されるデジタルフォームを割り当てることもできます。たとえば、ITチームがいくつかの資産(コンピューター、サーバーなど)の購入を計画しているのに、予算を認識していないとします。このシナリオでは、ヒューマンタスクのフォームを使用して、意思決定を行うための財務チームからの入力として予算を取得します。

ヒューマンタスクを構成

プロセスフローでヒューマンタスクを構成するには、次のステップに従います。

  1. 左側のペインにタスクセクションが表示されます。このセクションからビルダーにヒューマンタスクステンシルをドラッグアンドドロップします。
  2. ヒューマンタスクステンシルをクリックして、ヒューマンタスクウィンドウを開きます
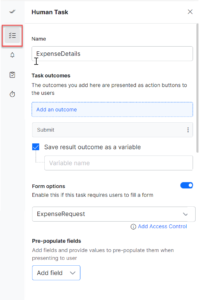
  3. ヒューマンタスクウィンドウで、「タスク」タブをクリックし、次の詳細を入力します。
    • 名前 – ヒューマンタスクの名前を入力。
    • タスクの結果―承認拒否オプションがあります。タスクを承認するか却下するかを選択します。また、これらのオプションの名前を変更したり成果を追加をクリックすると、保留などのオプションを追加できます
    • 成果の結果を変数として保存するチェックボックスをオンにして、結果に変数名を割り当て、JavaScriptコードで使用します。
    • このタスクで、ユーザーからの入力を収集するために、ユーザーが既存のフォームに入力するか、新しいフォームを作成する必要がある場合は、フォームオプションを選択してこれを有効にします。
    • フォームオプション]で、アクセス制御の追加リンクをクリックしてアクセス許可を設定します。フォームページが表示されマスターフォームにコンポーネントを追加できます。更新できるのは読み取り専用可視化および可視性の設定であり、アクセス制御で行うことができます。
    • 事前入力されたフィールドで、「フィールドの追加」ドロップダウンリストをクリックして、情報を収集するためにフォームに表示する既存のフィールドを選択します。
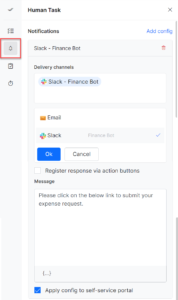
  4. 通知タブをクリックして通知設定を構成します。
      • ドロップダウンリストから配信チャネルを選択します。このアプリで利用可能なすべてのチャネルまたは特定のチャネルを選択できます。たとえば、Bot, Slack および Emailなどのチャネルを選択できます。これらは重要な更新をユーザーに通知したり、アラートを配信したり、ユーザーにデータを送信したりするためのチャネルです。
      • ヒューマンタスクの結果をプロセスアプリに送信するために選択したボットにダイアログを追加するには、アクションボタンを介してレスポンス登録するチェックボックスをオンにします。
      • メッセージセクションで、次の詳細を入力します。
        • 件名 – 通知メールの件名を入力。
        • メッセージを作成 – 応答メッセージの詳細を入力。
        • {..}をクリックして、メッセージに変数を追加します。
      • 構成の変更をポータルに適用するには、セルフサービスポータルに構成を適用するを選択し、チェックボックスをオンにします。
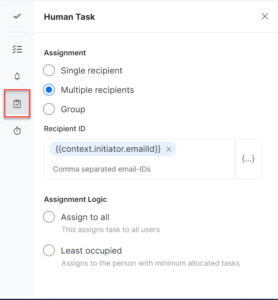
  5. 割り当てタブをクリックして受信者設定を構成します。下のオプションから何れかを選択できます:
    • 単一の受信者– 選択すると、このセクションで構成された受信者にレスポンスを送信できます。
      • 受信者IDフィールドには、受信者のメールアドレスを入力します。
    • 複数の受信者 – 選択すると、このセクションで設定した複数の受信者に応答を送信できます。
      • 受信者IDフィールドに受信者のメールアドレスをコンマで区切って入力します。
      • 割り当てロジックセクションで:オプションを選択します。
        • 全員への割り当て―選択すると、システムはタスクをすべての受信者に割り当てます。
        • 最も占有率が低い―選択すると、システムは、開いているタスクの数が最も少ない受信者にタスクを割り当てます。
      • グループ– 選択すると、応答をグループ宛に送信できます。グループの受信者のうち 1 人だけがタスクを完了する必要があります 
        • グループIDフィールドには、グループのメールアドレスをカンマで区切って入力します。
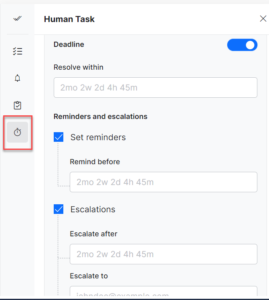
  6. タイマータブをクリックして、タスクを完了する期限を設定します。
    • デフォルトでは、期限オプションは無効になっています。トグルをオンにしてそれを有効にします。
    • 有効にした後、その範囲で解決フィールドに適切な日付と時刻を入力します。
    • リマインダーとエスカレーションセクションで、次の操作を実行できます:
      • リマインダーの設定―チェックボックスを選択して有効にし、以前のリマインドフィールドに適切な日付と時刻を入力します。 
      • エスカレーション―チェックボックスを選択して有効にします。後でエスカレートフィールドに、エスカレーションをトリガーする日時を入力します。エスカレート先フィールドに、エスカレーション通知を送信するマネージャー/管理者のメールアドレスを入力します。
  7. ヒューマンタスクウィンドウを閉じます

GETTING STARTED
Process Apps Overview
Concepts and Terminology
Quick Start Guide
Exploring the Process Apps Store
Building a Process Apps from Scratch
What's New
Current Version
Previous Versions

CONCEPTS
Flow Builder
Triggers
Logic
Introduction
Split
Merge
GoTo
End
Tasks
Introduction
Human Task
Script Task
Integrations
Introduction
Connect to Data Table
Connect to API
Events
Call a Subflow
Notify
Delay
Forms
Form Creation
Form Components
Form Actions
Simulate
Publish
Self-Service Portal
Dashboard

SETTINGS
General Settings
Members and Roles
Versioning
Channels
Bot Permissions
Alerts
Import & Export
Change Logs
Delete App

HOW TOs
Creating a Process App
Importing and Exporting a Process App
Sharing a Process App with Co-Developers
Configuring a Process App
Defining a Digital Form
Defining a Flow for a Process App
Defining Triggers for a Process App
Using Stencil to Define a Logic for a Process App
Using Events for a Process App
Adding Access Controls to a Digital Form
Calling a Subflow from Process App
Deploying a Process App
Configuring Channels to a Process App
Publishing a Process App
Analyzing a Process App
Stimulating a Process Instance
Creating and Publishing a Process App
Viewing a Process App Errors
Viewing Change Logs Made to Process App Definition
Creating or Restoring a Version of Process App
Adding Bot Permissions to let Bot Trigger the Process App

ADMINISTRATION
Introduction
Assistant Admin Console
Administration Dashboard
User Management
Add Users
Manage Groups
Assistant Management
Enrollment
Invite Users
Send Bulk Invites
Import User Data
Synchronize Users from AD
Security & Compliance
Using Single-Sign On
Security Settings
Cloud Connector
Billing

인간 작업을 통해 승인 작업을 수행할 수 있습니다. 승인 조치를 수행해야 하는 프로세스 흐름을 구축할 때 인간 작업을 통해 해당 조치를 수행할 수 있습니다. 예를 들어 직원 휴가 요청을 고려해 봅시다. 직원이 휴가 요청을 제출했습니다. 시스템은 직원의 보고 관리자 정보를 가져와 휴가 요청 작업을 할당합니다. 이 경우, 관리자는 휴가 요청을 승인하거나 거부해야 합니다. 이 승인 조치를 수행하려면 프로세스 흐름에서 설정할 인간 작업이 필요합니다. 이 인간 작업을 사용하여 승인, 거부사용자 정의 결과와 같은 작업 결과를 설정할 수 있습니다. 해당하는 조건에 따라 관리자는 분리 스텐실에서 요청을 승인하거나 거부할 수 있습니다.  인간 작업을 사용하면 필요한 입력을 수집하기 위해 수신자에게 보내는 디지털 양식을 할당할 수도 있습니다. 예를 들어, IT 팀이 몇 가지 자산(컴퓨터, 서버 등)을 구매할 계획을 세우는데 예산을 모르는 상황이라고 고려해 봅시다. 이 시나리오에서는 인간 작업 양식을 사용하여 재무 팀이 결정을 내리기 위한 내용을 입력하도록 예산을 가져옵니다.

인간 작업 설정

프로세스 흐름에서 인간 작업을 설정하려면 다음 단계를 따르세요.

  1. 왼쪽 창에서 작업 섹션을 찾을 수 있습니다. 이 섹션의 인간 작업 스탠실을 빌더로 끌어서 놓습니다.
  2. 인간 작업 스텐실을 클릭하여 인간 작업 창을 엽니다.
  3. 인간 작업 창에서 작업 탭을 클릭하고 다음 세부 정보를 입력합니다.
    • 이름 – 인간 작업의 이름을 입력합니다.
    • 작업 결과 – 승인거부 옵션을 찾을 수 있습니다. 작업을 승인하거나 거부하는 것을 선택합니다. 이 옵션의 이름을 바꾸거나 결과 추가를 선택하여 보류 중과 같은 더 많은 옵션을 추가할 수도 있습니다.
    • 결과를 변수로 저장 확인란을 선택하여 결과에 변수 이름을 할당하고 JavaScript 코드에서 해당 변수 이름을 사용합니다.
    • 이 작업에서 사용자가 기존 양식을 채우거나 새 양식을 생성하여 사용자에게서 입력을 수집해야 하는 경우 양식 옵션을 선택하여 이 기능을 활성화합니다.
    • 양식 옵션에서 접근 제어 추가 링크를 클릭하여 권한을 설정합니다. 그러면 양식 페이지로 이동하고 마스터 양식에 구성 요소를 추가할 수 있습니다. 접근 제어를 통해서만 읽기 전용, 표시 여부가시성 설정을 업데이트할 수 있습니다.
    • 미리 채워진 필드에서 필드 추가 드롭다운 목록을 클릭하여 정보 수집 양식에 표시할 기존 필드를 선택합니다.
  4. 알림 탭을 클릭하고 알림 설정을 설정합니다.
      • 드롭다운 목록에서 전달 채널을 선택합니다. 이 앱에서 사용할 수 있는 모든 채널 또는 특정 채널을 선택할 수 있습니다. 예를 들어 봇, Slack  이메일과 같은 채널을 선택할 수 있습니다. 사용자에게 중요한 업데이트 알림, 알림 전달, 사용자에게 데이터 전송 등을 수행하는 채널입니다.
      • 작업 버튼을 통한 응답 등록 확인란을 선택하여 프로세스 앱에 인간 작업 결과를 보내기 위해 선택한 봇에 대화를 추가합니다.
      • 메시지 섹션에서 다음 세부 정보를 입력합니다.
        • 제목 – 응답 메일의 제목을 입력합니다.
        • 메시지 작성 – 응답 메시지의 세부 정보를 입력합니다.
        • {..}를 클릭하여 메시지에 변수를 추가합니다.
      • 설정 변경 사항을 포털에 적용하려면 셀프 서비스 포털에 설정 적용 확인란을 선택합니다.
  5. 할당 탭을 클릭하고 수신자 설정을 설정합니다. 다음 옵션 중 선택할 수 있습니다.
    • 단일 수신자 – 선택하면 이 섹션에서 설정한 수신자에게 응답을 보낼 수 있습니다.
      • 수신자 ID 필드에 수신자의 이메일 주소를 입력합니다.
    • 다중 수신자 – 선택하면 이 섹션에서 설정한 다중 수신자에게 응답을 보낼 수 있습니다.
      • 수신자 ID 필드에 수신자의 이메일 주소를 쉼표로 구분하여 입력합니다.
      • 할당 논리 섹션에서 옵션을 선택합니다.
        • 모두에게 할당 – 선택하면 시스템이 모든 수신자에게 작업을 할당합니다.
        • 가장 적게 사용됨 – 선택하면 시스템이 열린 작업이 가장 적은 수신자에게 작업을 할당합니다.
      • 그룹 – 선택하면 그룹으로 응답을 보낼 수 있습니다. 그룹의 수신자 중 한 명만 작업을 완료할 수 있습니다 
        • 그룹 ID 필드에 그룹 이메일 주소를 쉼표로 구분하여 입력합니다.
  6. 타이머 탭을 클릭하여 작업을 완료할 마감일을 설정합니다.
    • 기본적으로 마감일 옵션은 비활성화되어 있습니다. 토글을 켜서 활성화합니다.
    • 활성화한 다음 해결 범위 필드에 적절한 날짜와 시간을 입력합니다.
    • 리마인더 및 에스컬레이션 섹션에서 다음을 수행할 수 있습니다.
      • 리마인더 설정 – 확인란을 선택하여 리마인더 설정을 활성화하고 이전 리마인드 필드에 적절한 날짜와 시간을 입력합니다. 
      • 에스컬레이션 – 확인란을 선택하여 활성화합니다. 이후 에스컬레이션 필드에 에스컬레이션을 트리거 할 날짜와 시간을 입력합니다. 보고 대상자 필드에 에스컬레이션 알림을 보낼 관리자의 이메일 주소를 입력합니다.
  7. 인간 작업 창을 닫습니다

GETTING STARTED
Process Apps Overview
Concepts and Terminology
Quick Start Guide
Exploring the Process Apps Store
Building a Process Apps from Scratch
What's New
Current Version
Previous Versions

CONCEPTS
Flow Builder
Triggers
Logic
Introduction
Split
Merge
GoTo
End
Tasks
Introduction
Human Task
Script Task
Integrations
Introduction
Connect to Data Table
Connect to API
Events
Call a Subflow
Notify
Delay
Forms
Form Creation
Form Components
Form Actions
Simulate
Publish
Self-Service Portal
Dashboard

SETTINGS
General Settings
Members and Roles
Versioning
Channels
Bot Permissions
Alerts
Import & Export
Change Logs
Delete App

HOW TOs
Creating a Process App
Importing and Exporting a Process App
Sharing a Process App with Co-Developers
Configuring a Process App
Defining a Digital Form
Defining a Flow for a Process App
Defining Triggers for a Process App
Using Stencil to Define a Logic for a Process App
Using Events for a Process App
Adding Access Controls to a Digital Form
Calling a Subflow from Process App
Deploying a Process App
Configuring Channels to a Process App
Publishing a Process App
Analyzing a Process App
Stimulating a Process Instance
Creating and Publishing a Process App
Viewing a Process App Errors
Viewing Change Logs Made to Process App Definition
Creating or Restoring a Version of Process App
Adding Bot Permissions to let Bot Trigger the Process App

ADMINISTRATION
Introduction
Assistant Admin Console
Administration Dashboard
User Management
Add Users
Manage Groups
Assistant Management
Enrollment
Invite Users
Send Bulk Invites
Import User Data
Synchronize Users from AD
Security & Compliance
Using Single-Sign On
Security Settings
Cloud Connector
Billing

The Human Task allows you to perform an approval action. When you build a process flow that requires an approval action to be performed, the human task helps you perform that action. For example, let us consider an employee leave request. An employee has submitted a leave request. The system fetches the employee’s reporting Manager’s information and assigns the leave request task. Here, the Manager must approve or reject the leave request. To perform this approval action, you need a human task to be configured in the process flow. This human task helps you to configure task outcomes like Approve, Reject, and Custom outcomes. Based on the conditions set in the corresponding Split stencil, the Manager can approve or reject the request. 

The Human Task also lets you assign a digital form, which is sent to the recipient to gather necessary inputs. For example, let us consider an IT team planning to purchase a few assets (computers, servers, etc.) and are not aware of the budget. In this scenario, use a form in the human task to get the budget as an input from the finance team to make the decision.

Configure Human Task

To configure a Human Task in the process flow, follow the below steps:

  1. On the left pane, you can find the Tasks section. Drag and drop the Human Task stencil from this section to the builder.
  2. Click the Human Task stencil to open the Human Task window.
  3. On the Human Task window, click the Task tab and enter the following details:

    • Name – Enter a name for the human task.
    • Task Outcomes- You can find Approve and Reject options. Choose to approve or reject the task. You can also rename these options or click Add an Outcome to add more options like On-Hold.
    • Select the Save result outcome as a variable check box to assign a variable name to the outcome and use it in the JavaScript code.
    • Select the Form Options to enable this if this task requires users to fill an existing form or create a new form to gather input from users.
    • Under the Form Options, click the Add Access Control link to set permissions. It lands you on the Forms page and you can add a component in the master form. You can only update Read-only, Is-Visible, and Visibility settings through access control.
    • Under the Pre-populated fields, click the Add Field drop-down list to select the preexisting fields that you want to display in the form for gathering information.
  4. Click the Notifications tab to configure the notification settings.
      • Select a Delivery Channel from the drop-down list. You can either select all channels or any specific channel that available for this app. For example, you can select channels such as Bot,  Slack and Email. These are the channels to notify users of important updates, delivering alerts, or sending data to users.
      • Select the Register response via action buttons check box to add dialog to the bots selected to send the human task result to the process app.
      • Under the Message section, enter the following details:
        • Subject – Enter the subject for the response mail.
        • Compose Message – Enter the details of the response message.
        • Click {..} to add variables to the message.
      • Select the Apply config to self-service portal check box to apply configuration changes to the portal.
  5. Click the Assignment tab to configure the recipient settings. You can select any of the below options:
    • Single Recipient – If selected, you can send the response to the recipient configured in this section.
      • Enter the recipient email address in the Recipient ID field.
    • Multiple Recipients – If selected, you can send the response to multiple recipients configured in this section.
      • Enter recipient email addresses separated by a comma in the Recipient ID field.
      • Under the Assignment Logic section, select an option:
        • Assign to All – If selected, the system assigns the task to all recipients.
        • Least Occupied – If selected, the system assigns the task to the recipient with the least number of open tasks.
      • Group – If selected, you can send the response to a group. Only one of the recipients from the group can complete the task 
        • Enter the group email addresses separated by a comma in the Group ID field.
  6. Click the Timer tab to set the deadline to complete the task.
    • By default, the deadline option is disabled. Turn on the toggle to enable it.
    • After you enable it, enter a proper date and time in the Resolve Within field.
    • Under the Reminders and Escalations section, you can perform the following:
      • Set Reminders – Select the checkbox to enable it and enter a proper date and time in the Remind Before field. 
      • Escalations – Select the checkbox to enable it. In the Escalate after field, enter the date and time to trigger the escalation. In the Escalate to field, enter the email address of a Manager/Admin to send the escalation notification.
  7. Close the Human Task window