You can integrate an active virtual assistant capable of performing actions related to intents from your SearchAssist app. This integration allows end-users to invoke virtual assistant actions from the search interface. SearchAssist identifies and maps the intent behind user queries, if any, which trigger actions that the linked virtual assistant offers.
Virtual assistant actions are the tasks that an enterprise bot can perform. The tasks offered by the linked virtual assistant must be visible to the SearchAssistant App to make the app task oriented.
Most end-users usually land on a search bar to enter a query. Traditional search is limited to the listing of search results. In SearchAssist, the feature of invoking virtual assistant actions overcomes that limitation by presenting actionable search results along with a list of relevant information links. The end-user is guided through the journey by the linked virtual assistant action required to fulfill the intent.
Kore.ai has transformed the simple customer or employee search experience from viewing listed results to accomplishing the tasks associated with the intents.
Prerequisites
- To view the list of the existing virtual assistants and link one to your SearchAssist app, you must have the Kore.ai XO platform license activated for your organization.
- To integrate a virtual assistant into the SearchAssist app, the virtual assistant has to be built on the Kore.ai XO Platform, published and active.
- To view existing virtual assistants and link to your SearchAssist app, navigate to Sources → Actions → Link Bot.
Note: If you do not see any virtual assistants listed in the LinkBot window, you can create your virtual assistant catering to your business needs by subscribing to the Kore.ai XO Platform. To learn more, see Kore.ai Virtual Assistant Builder Assistant.
Summary of Integration
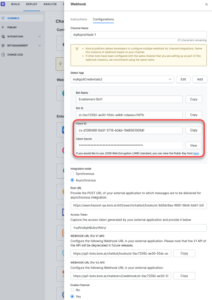
Keep both the SearchAssist app and the virtual assistant on the Kore.ai XO Platform open in separate browser tabs.
From the Link Bot configuration window of the SearchAssist app, fetch the following:
- POST URL, and
- Access token
And paste them into the respective fields in the webhook configurator window of the virtual assistant to generate the Webhook URL path for the channel.
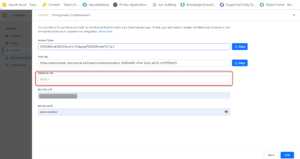
From the virtual assistant, webhook URL configurator window, fetch the following:
-
- Webhook URL
- Bot Client ID, and
- Bot Secret ID
And paste them into the respective fields in the Link Bot configuration window of the SearchAssist app.
This exchange of values of the parameters between the platforms/apps completes the integration procedure successfully.
The following section details the steps with relevant screenshots and guides you to complete the linking of a virtual assistant with your Search Assist App.
Integrating Virtual Assistant With Your SearchAssist App
From the SearchAssist app, you can integrate or link an existing and active virtual assistant built on the Kore.ai XO platform.
To integrate a virtual assistant with your SearchAssist app complete the following steps in both the Kore.ai XO and SearchAssist Platforms:
- Open the Kore.ai XO platform in a new browser tab.
- Navigate to the virtual assistant that you intend to link to your SearchAssist app.
- Navigate to Deploy → Channel → Webhook
- In the Configurations tab click Create App to fetch webhook credentials

- Enter the app name (say myApp4Credentials2), select HS256 as the JWT signing algorithm from the drop-down, and click Create.

- In the next screen enter the Channel name (say myAsyncHook-1 ), and choose the app created in the previous step from the Select App dropdown.
- Select Asynchronous Integration Method.
- Keep the SearchAssist app open and click the Sources menu tab.
- Click Actions in the left pane.
- On the Bot Actions page, click Link a Bot.

- On the next page, locate the virtual assistant you intend to integrate your SearchAssist app with.
- Click Link Bot.
- Capture “Post URL” and “Access token” values from the Searchassist Link Bot configuration window.

- In the Webhook configuration window enter the “Post URL” and “Access token” values captured in the previous steps.
- From the Webhook configuration window capture the “Client-ID” and “Bot Secret ID” values.

- Enter the “Client-ID” and “Bot Secret ID” values into the respective target fields in the SearchAssist Link Bot configuration window.

- Switch to the Webhook configuration window and click Save the configuration to generate the webhook URL.

- Click Ok on the confirmation message stating “Configuration Saved”.

- From the Webhook configuration window copy the Webhook URL.

- Enter the Webhook URL captured in the previous step into the Webhook URL field in the SearchAssist Link bot configuration window.
- In the Kore.ai XO platform publish the newly created channel (AsyncHook-1)
- In SearchAssist Link Bot configuration window, click the “Link” button to save the configuration and link a bot.

Managing Virtual Assistant Actions
Once you have linked a virtual assistant to your SearchAssist app, you can:
- View the virtual assistant and the associated tasks it’s capable of handling.
- Open the virtual assistant in Kore.ai’s Experience Optimization (XO) or bot platform.
- Click Edit Configuration to capture any changes from Kore.ai’s Experience Optimization (XO) or bot platform.
- To link a new virtual assistant to the given SearchAssist app click Unlink Bot to unlink the currently linked virtual assistant.

End-Users Experience Virtual Assistant Actions From Search
-
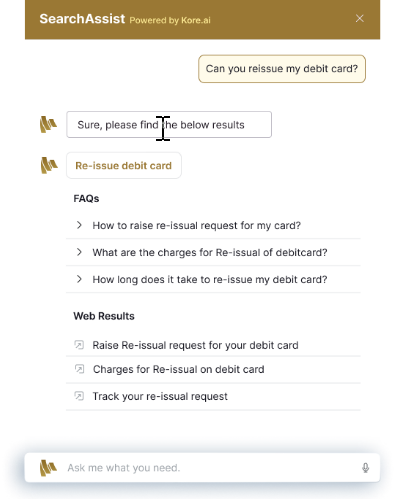
- End-user enters a query in the search interface, “Can you reissue my debit card?”
- The SearchAssist app detects the intent behind the query and maps it to the “request for reissuing a debit card” task.
- The SearchAssist app displays the following:
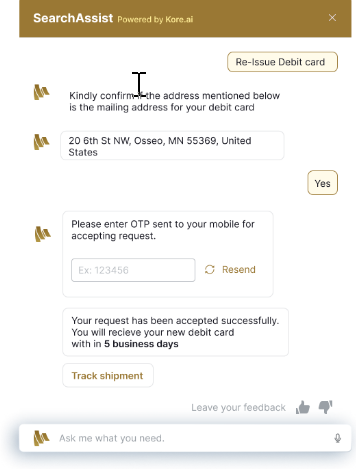
- Once you link with a bot or virtual assistant, the end-user can invoke virtual assistant actions inside the search interface. For example, if the linked virtual assistant is a BankAssistant, with the capability if reissuing a debit card, the following steps flow through
- The BankAssistant handholds the end-user through the entire journey and
- walks through the logical steps essential to complete the task:
- confirms customer address
- accepts a One-Time-Password (OTP) to authenticate the request
- acknowledges request that is accepted and gives the customer a tentative delivery timeline
- generates a shipment tracking number in the background and
- provides a link to track the shipment tracking number
- Once the task completes, control returns to the search bar.


