OVERVIEW
Virtual Assistants
Kore.ai Platform
Key Concepts
Natural Language Processing (NLP)
Accessing Platform
VIRTUAL ASSISTANTS
Virtual Assistant Builder
Virtual Assistant Types
Getting Started
Create a Simple Bot
SKILLS
Storyboard
Dialog Tasks
Introduction
Dialog Builder (New)
Dialog Builder (Legacy)
User Intent Node
Dialog Node
Entity Node
Supported Entity Types
Composite Entities
Supported Colors
Supported Company Names
Form Node
Logic Node
Message Nodes
Confirmation Nodes
Bot Action Node
Service Node
Custom Authentication
2-way SSL for Service nodes
Script Node
Agent Transfer Node
WebHook Node
Grouping Nodes
Connections & Transitions
Manage Dialogs
User Prompts
Knowledge Graph
Terminology
Building
Generation
Importing and Exporting
Analysis
Knowledge Extraction
Train
Build
Alert Tasks
Introduction
Ignore Words and Field Memory
How to Schedule a Smart Alert
Small Talk
Digital Views
Introduction
How to Configure Digital Views
Digital Forms
Overview
How to Configure Digital Forms
NATURAL LANGUAGE
Overview
Machine Learning
Introduction
Model Validation
Fundamental Meaning
Introduction
NLP Guidelines
Knowledge Graph
Traits
Introduction
How to Use Traits
Ranking and Resolver
Advanced NLP Configurations
INTELLIGENCE
Overview
Context Management
Overview
Session and Context Variables
Context Object
How to Manage Context Switching
Manage Interruptions
Dialog Management
Sub Intents & Follow-up Intents
Amend Entity
Multi-Intent Detection
Sentiment Management
Tone Analysis
Sentiment Management
Event Based Bot Actions
Default Conversations
Default Standard Responses
TEST & DEBUG
Talk to Bot
Utterance Testing
Batch Testing
Record Conversations
Conversation Testing
CHANNELS
PUBLISH
ANALYZE
Overview
Dashboard
Custom Dashboard
Overview
How to Create Custom Dashboard
Conversation Flows
NLP Metrics
ADVANCED TOPICS
Universal Bots
Overview
Defining
Creating
Training
Customizing
Enabling Languages
Store
Smart Bots
Defining
koreUtil Libraries
SETTINGS
Authorization
Language Management
PII Settings
Variables
Functions
IVR Integration
General Settings
Management
Import & Export
Delete
Bot Versioning
Collaborative Development
Plan Management
API GUIDE
API Overview
API List
API Collection
SDKs
SDK Overview
SDK Security
SDK App Registration
Web SDK Tutorial
Message Formatting and Templates
Mobile SDK Push Notification
Widget SDK Tutorial
Widget SDK – Message Formatting and Templates
Web Socket Connect & RTM
Using the BotKit SDK
Installing
Configuring
Events
Functions
BotKit SDK Tutorial – Agent Transfer
BotKit SDK Tutorial – Flight Search Sample Bot
Using an External NLP Engine
ADMINISTRATION
HOW TOs
Create a Simple Bot
Create a Banking Bot
Transfer Funds Task
Update Balance Task
Context Switching
Using Traits
Schedule a Smart Alert
Configure UI Forms
Add Form Data into Data Tables
Configuring Digital Views
Add Data to Data Tables
Update Data in Data Tables
Custom Dashboard
Custom Tags to filter Bot Metrics
Patterns for Intents & Entities
Build Knowledge Graph
Global Variables
Content Variables
Using Bot Functions
Configure Agent Transfer
RELEASE NOTES

ナレッジグラフ

Kore.aiのナレッジグラフ(Knowledge Graph、KG)は、静的なFAQの文字列をインテリジェントでパーソナライズされた会話型体験に変換します。これは、FAQの質問に対して単純に回答を当てはめるという通例とはかけ離れたものです。ナレッジグラフは、主な業界用語を階層構造化し、文脈固有の質問やその別の言い回し、同意語、機械学習対応のクラスに関連付けます。この構造がプラットフォームによりトレーニングされ、インテリジェントなFAQ体験を可能にするナレッジグラフを作り出すのです。

詳しくは、「ナレッジグラフの用語」をご覧ください。

作成

ナレッジグラフを生成するには、FAQを既存または新規のBotに追加する必要があります。まだBotを作成していない場合は、「Botの作成」をご覧ください。

ナレッジグラフを作成するには、以下のステップを実行します。

ステップ1:Botにナレッジグラフを追加する

ナレッジグラフビルダーを開くには、

  1. Kore.ai Botビルダーにログインし、ナレッジグラフを追加するBotを開きます。
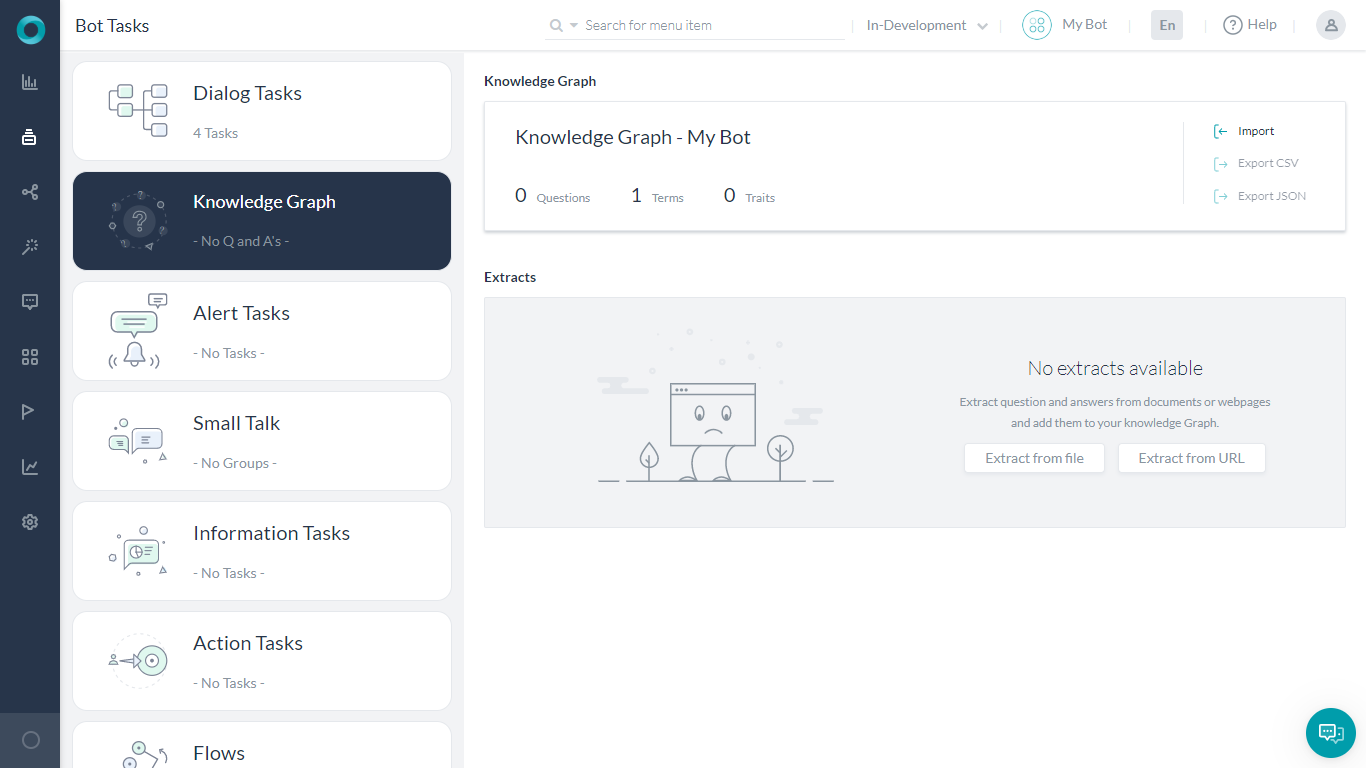
  2. 左側のナビゲーションメニューから、 [Botのタスク] を選んで [ナレッジグラフ] タブをクリックし、 [ナレッジグラフ] − <Botの名前> をクリックします。

ステップ2:グラフの作成

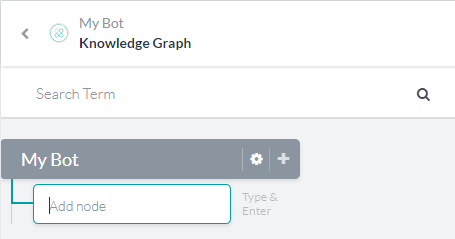
デフォルトでは階層のルートノードがBotの名前になりますが、変更することができます。ルートノード以下に他のノードを作成してください。

ノードを作成するには、

  1. ナレッジグラフウィンドウの左上で、マウスポインターをルートノードに置きます。
  2. プラスアイコンをクリックします。[ノードを追加] の下にボックスが表示されます。パフォーマンス向上のため、追加できるノードの数には20,000個までの制限があります。
  3. ボックスにノードの名前を入力し、Enterキーを押します。

    注意:このノードがルートノードの子となり、第1レベルのノードとして参照されます。
  4. 1から3までのステップを繰り返して、他の第1レベルのノードを作成します。
  5. 第1レベルのノードが作成できたら、次のように子ノードを作成します。
    • いずれかの第1レベルのノードにマウスポインターを置き、プラスアイコンをクリックしてそのノードの子ノードを作成します。
    • ノードにマウスポインターを置きプラスアイコンをクリックすることで、どのレベルのノードでも子ノードを作成することができます。

ステップ3:ナレッジグラフの構築

次のステップでは、以下のいずれかのナレッジグラフのインテントを追加します。

  • FAQ − ユーザーの問い合わせに回答する、または
  • タスク − ダイアログタスクを実行する。
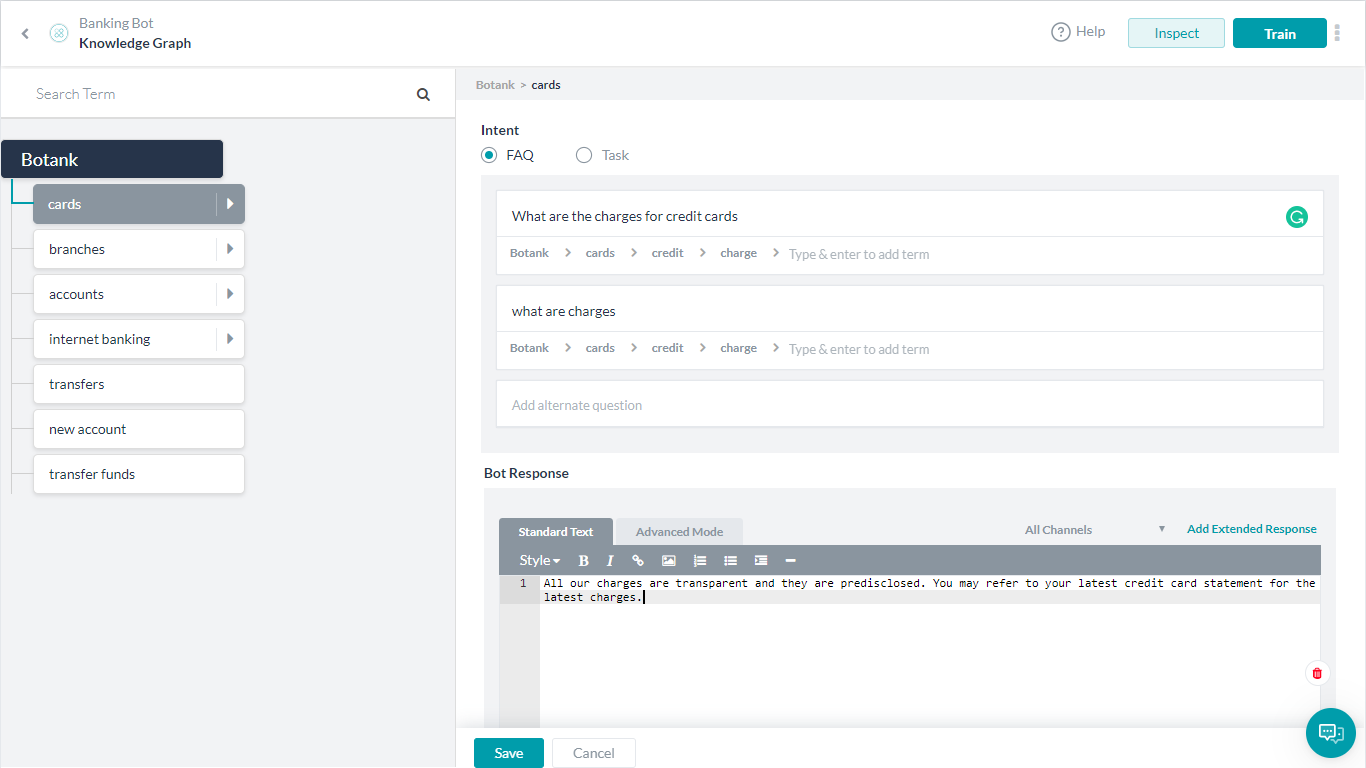
FAQの追加

このオプションを使って、関連性のある質問と回答のセットを階層のノードに追加することができます。パフォーマンスの問題を回避するため、追加できるFAQの数を5,000件から20,000件までに制限します。質問を追加するときには、FAQの階層にさらに追加する用語に注意してください。

質問と回答を選択したノードに入力するには、

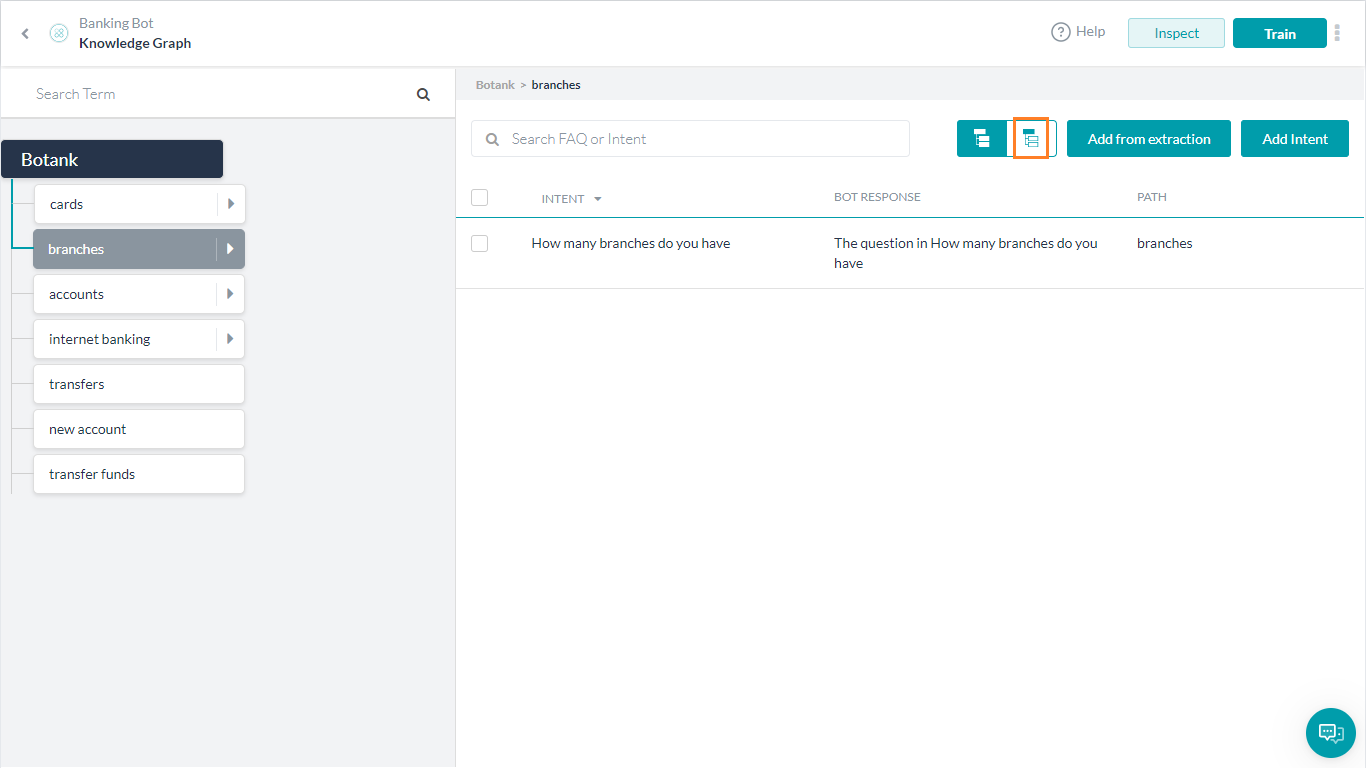
  1. ナレッジグラフウィンドウの左側のセクションで、質問を追加するノードをクリックします。
  2. ナレッジグラフの右上で、 [インテントを追加] をクリックします。
  3. FAQインテントを設定します。
  4. [質問を追加] のボックスに、ユーザーの問い合わせを説明する質問を入力します。
  5. オプションとして、同じ質問に別の言い回しがある場合には [代替の質問を追加] フィールドに追加することができます。追加するすべての代替の質問について、上記のステップを繰り返します。
  6. リリース7.2以降では、FAQの定義にパターンを使用することができます。「||」 (二重パイプライン、縦線) を使って、[代替の質問] フィールドにパターンを入力します。プラットフォームがこれらのパターンをマークし、評価します(パターンについての詳細はこちらをご覧ください)。
  7. それぞれの質問には、ナレッジグラフエンジンがより正確に質問を特定できるようにタグとして使える用語を追加することができます。

Botの応答

応答には、チャネル別の単純または複雑な返答を作成することができます。

ダイアログノードのメッセージなどプラットフォーム内の他のプロンプトエディタと同じように、エディタを使用することができます。方法についてはこちらを参照してください

ナレッジグラフには、質問に対してチャネル別の応答を追加することができます。応答に変化を持たせることで、選択したチャネルの強みを活かせるような文言やフォーマットにすることができます。チャネル別の応答を追加するには、応答を入力する前にチャネルリストからチャネルを選択します。

注意:チャネル固有の応答が存在しない場合に備えて、すべてのチャネルに1つの応答を追加することをお薦めします。

FAQの応答は長くなることも、主な回答の他にあると便利な情報が含まれていることもあります。可読性を高めるために、情報を複数の応答に分けて別々のメッセージにすることができます。 [メッセージを送信] ボックスの右上にある [拡張応答を追加] をクリックして次々と追加します。

オプションとして、応答に別の言い回しがある場合には、[代替の応答を追加] をクリックして追加することができます。すべての代替の応答について、上記のステップを繰り返します。実行時には、プラットフォームが応答をランダムに1つ選択します。
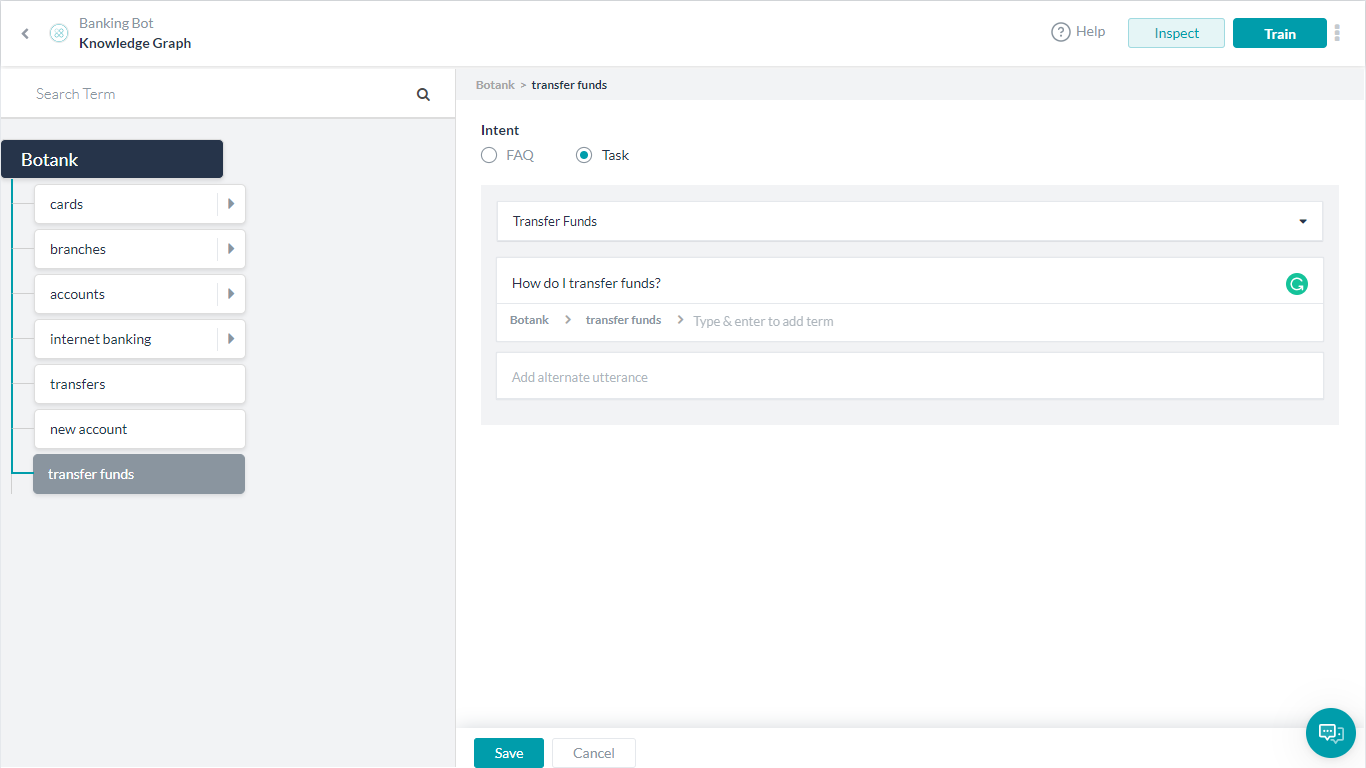
タスクの実行

ダイアログタスクをナレッジグラフのインテントにリンクすることができます。ナレッジグラフのとダイアログタスクの機能を活かして複雑な会話におけるFAQを処理するのに役立ちます。

タスクインテントとしてドロップダウンリストから選択します。このタスクをトリガーする発話を追加することができます。同じ内容に対して複数の発話がある場合には、代替の発話を追加します。

既存のソースからのFAQの構築

構築しようとしているナレッジグラフは、膨大で複雑なものかもしれません。すべてのFAQが1か所にまとまっている場合は、インポートまたは抽出することができます。

ステップ4:トレイト、同義語およびストップワード

タグや同義語、トレイトなどを追加して、ナレッジグラフのパフォーマンスを向上させることができます。詳細については、こちらを参照してください

ステップ5:変数の名前空間の管理

[変数の名前空間の管理] セクション(バージョン8.0で導入)で、変数の名前空間をこのナレッジグラフで使えるように関連付けることができます。このオプションは、Botの変数の名前空間が有効になっている場合にのみ表示されます。詳細については、「名前空間の管理」をご覧ください。

更新

ナレッジグラフの作成後、管理やプレゼンテーションの向上のために変更を加えたい場合があります。

注意:ナレッジグラフに変更を加えた後は、必ず [トレーニング] ボタンをクリックしてナレッジグラフに更新分を送信してください。Botをトレーニングするまで、変更はBotの応答に反映されません。

デフォルトでは、子ノードに追加された質問は、ルートノードまでのパス内のすべての親ノードで表示されます。特定の親ノード以下の子ノードを表示したくない場合は、選択した親ノードの [質問] パネルで次のアイコンをクリックします。

子ノードの質問は、選択された親ノードにのみ表示され、すべての親ノードに表示されるわけではありません。

質問と回答のノード間での移動

1つ以上の質問と回答の組み合わせを、ナレッジグラフのノード間で移動することができます。

質問と回答を関連ノードに移動するには、以下のステップを実行します。

  1. ナレッジグラフで、移動する質問と回答の組み合わせのノード名をクリックします。FAQが右側のパネルに表示されます。
  2. 移動する質問の組み合わせの隣にあるチェックボックスをオンにします。
  3. 質問をドラッグして、関連ノードの上にドロップします。ノードが強調表示され、質問がノード右側のパネルに表示されます。

用語の編集と削除

  1. 左側のパネルのノード階層で、編集する用語/ノードの上にマウスポインターを置きます。
  2. [編集] アイコンをクリックします。設定ウィンドウが開きます。
  3. ここで用語の名前や種類の変更、トレイトの追加、同義語の追加および削除、コンテキスト管理が行えます(詳細については、こちらを参照してください)。
  4. 用語を削除するには、
    1. ノード階層で、削除する用語の上にマウスポインターを置きます。
    2. ごみ箱のアイコンをクリックします。
    3. 確認ダイアログに以下のオプションが表示されます。
      • 用語とともにFAQを削除」− このオプションを選択すると、用語とそれ以下にあるFAQが削除されます。
      • 用語を削除し、FAQをルートに移動」 −
        このオプションを選択すると用語が削除され、FAQがルートの用語に移動します。
        注意:用語が子ノードを持っている場合は、すべてのノードが削除されます。
    4. Botがすでに公開されている場合は、削除を反映するためにBotをトレーニングする必要があります。
      • 第1レベルの用語を削除した場合、選択的にトレーニングすることで削除した用語を公開版から削除することができます。
      • その他のレベルの子用語を削除した場合は、親ノード全体を選択してトレーニングする必要があります。

質問と応答の編集

  1. ノードの階層で、用語を選択します。
  2. 用語に関連付けられた質問が右側のパネルに表示されます。
  3. 編集する質問の上にマウスポインターを置き、 [編集] アイコンをクリックします。
  4. 質問または応答に変更を加えて、 [保存] をクリックします。
  5. 質問はごみ箱アイコンを使って削除できます。
  6. 複数の質問を選択して、一度に削除することができます。
OVERVIEW
Virtual Assistants
Kore.ai Platform
Key Concepts
Natural Language Processing (NLP)
Accessing Platform
VIRTUAL ASSISTANTS
Virtual Assistant Builder
Virtual Assistant Types
Getting Started
Create a Simple Bot
SKILLS
Storyboard
Dialog Tasks
Introduction
Dialog Builder (New)
Dialog Builder (Legacy)
User Intent Node
Dialog Node
Entity Node
Supported Entity Types
Composite Entities
Supported Colors
Supported Company Names
Form Node
Logic Node
Message Nodes
Confirmation Nodes
Bot Action Node
Service Node
Custom Authentication
2-way SSL for Service nodes
Script Node
Agent Transfer Node
WebHook Node
Grouping Nodes
Connections & Transitions
Manage Dialogs
User Prompts
Knowledge Graph
Terminology
Building
Generation
Importing and Exporting
Analysis
Knowledge Extraction
Train
Build
Alert Tasks
Introduction
Ignore Words and Field Memory
How to Schedule a Smart Alert
Small Talk
Digital Views
Introduction
How to Configure Digital Views
Digital Forms
Overview
How to Configure Digital Forms
NATURAL LANGUAGE
Overview
Machine Learning
Introduction
Model Validation
Fundamental Meaning
Introduction
NLP Guidelines
Knowledge Graph
Traits
Introduction
How to Use Traits
Ranking and Resolver
Advanced NLP Configurations
INTELLIGENCE
Overview
Context Management
Overview
Session and Context Variables
Context Object
How to Manage Context Switching
Manage Interruptions
Dialog Management
Sub Intents & Follow-up Intents
Amend Entity
Multi-Intent Detection
Sentiment Management
Tone Analysis
Sentiment Management
Event Based Bot Actions
Default Conversations
Default Standard Responses
TEST & DEBUG
Talk to Bot
Utterance Testing
Batch Testing
Record Conversations
Conversation Testing
CHANNELS
PUBLISH
ANALYZE
Overview
Dashboard
Custom Dashboard
Overview
How to Create Custom Dashboard
Conversation Flows
NLP Metrics
ADVANCED TOPICS
Universal Bots
Overview
Defining
Creating
Training
Customizing
Enabling Languages
Store
Smart Bots
Defining
koreUtil Libraries
SETTINGS
Authorization
Language Management
PII Settings
Variables
Functions
IVR Integration
General Settings
Management
Import & Export
Delete
Bot Versioning
Collaborative Development
Plan Management
API GUIDE
API Overview
API List
API Collection
SDKs
SDK Overview
SDK Security
SDK App Registration
Web SDK Tutorial
Message Formatting and Templates
Mobile SDK Push Notification
Widget SDK Tutorial
Widget SDK – Message Formatting and Templates
Web Socket Connect & RTM
Using the BotKit SDK
Installing
Configuring
Events
Functions
BotKit SDK Tutorial – Agent Transfer
BotKit SDK Tutorial – Flight Search Sample Bot
Using an External NLP Engine
ADMINISTRATION
HOW TOs
Create a Simple Bot
Create a Banking Bot
Transfer Funds Task
Update Balance Task
Context Switching
Using Traits
Schedule a Smart Alert
Configure UI Forms
Add Form Data into Data Tables
Configuring Digital Views
Add Data to Data Tables
Update Data in Data Tables
Custom Dashboard
Custom Tags to filter Bot Metrics
Patterns for Intents & Entities
Build Knowledge Graph
Global Variables
Content Variables
Using Bot Functions
Configure Agent Transfer
RELEASE NOTES

Knowledge Graph Creation

Kore.ai Knowledge Graph (KG) helps you turn your static FAQ text into an intelligent, personalized conversational experience. It goes beyond the usual practice of capturing FAQs in the form of flat question-answer pairs. Instead, Knowledge Graph enables you to create a hierarchical structure of key domain terms and associate them with context-specific questions and their alternatives, synonyms, and Machine learning-enabled classes. This structure, when trained by the platform, generates a Knowledge Graph that enables an intelligent FAQ experience.

See here for more on KG Terminology.

To generate a Knowledge Graph, you need to add FAQs to an existing or new bot. If you have not created a bot, refer to Creating a new bot.

Creating a Knowledge Graph involves the following steps:

Add Knowledge Graph to Bot

To open the Knowledge Graph builder, follow the below steps:

  1. Log in to Kore.ai Bot Builder and open the bot to which you want to add the Knowledge Graph.
  2. Select the Build tab from the top menu.
  3. On the left menu, select Conversational Skills and click Knowledge Graph.
  4. Click  Create against <Bot Name>.

Create the Graph

By default, the name of the bot becomes the root node of the hierarchy and you can edit this. Create the rest of the nodes below the root node.

To create nodes, follow the below steps:

  1. Open the Knowledge Graph.
  2. On the top left of the Knowledge Graph window, hover over the root node.
  3. Click the + icon. A text box appears below to Add Node. For better performance, there is a restriction on the allowed maximum number of nodes of 20k.
  4. Type the name of the node in the text box and press Enter. A warning would be displayed in case you enter a duplicate node name, ie if a child node with the same name already exists under the parent node.

    Note: This node becomes a child for the root node and can be referred to as a First-level node.
  5. Repeat steps 1 to 3 to create other First-level nodes.
  6. After you create First-level nodes, create child nodes as follows:
    • Hover over any First-level node, and click the plus icon to create its child node.
    • You can create a child node for any level node by hovering over it and clicking the + icon.

Build Knowledge Graph

The next step is to add Knowledge Graph Intents which can be either:

  • FAQ – to answer user queries
  • Task – execute a dialog task.

Add FAQs

Using this option, you can add relevant question-answer sets to the nodes in the hierarchy. Restrict the number of FAQs to 50k over 20k nodes to avoid performance issues. As you enter these questions, pay attention to terms that you can further add to your FAQ hierarchy.

To enter the question and answer for a selected node, follow the below steps:

  1. On the left pane of the Knowledge Graph window, click the node to which you want to add questions.
  2. Click Add Intent on the top-right.
  3. On the Intent window, under the Intent section, select FAQ.
  4. Optionally, enter a Display Name. This name will be used for presenting the FAQ to the end-users in case of ambiguity.
  5. In the Add Question field, enter the question that describes the user’s query.
  6. Optionally, if there are alternatives to the same question, add the same in the Add Alternate FAQ field. Repeat the step for all the alternative questions you want to add.
  7. You can use patterns to define the FAQs. This can be done by preceding the pattern with || (two vertical bars) in the alternate question field. The platform marks these as patterns and evaluates them accordingly (see here for more on patterns).
  8. For each question, you can add terms that will serve as tags in better identifying the question by the Knowledge Graph Engine.
  9. You can also add a Reference Id. This field can be used to add a reference to any external content used as a source for this FAQ.

Bot Responses

For the Response, you can compose a simple or complex channel-specific reply.

You can use the editor like any other prompt editor in the platform like messages for dialog nodes, etc, refer here for more.

You can add channel-specific responses to questions in your Knowledge Graph. By varying the responses, you can make the language and formatting leverage the strengths of the selected channels. To add a channel-specific response, select the channel from the channels list before typing the response.

Note: We recommend you add one response for All Channels so that it can be used in the absence of a channel-specific response for a channel.

Sometimes the responses to the FAQ are quite lengthy or may include nice-to-have information along with the primary response. To improve the readability of such responses, you can split information into multiple responses that go as separate messages one after another by clicking Add Extended Response on the top-right of the Bot Response window.

Optionally, if there is an alternative response, click the Add Alternate Response to add the same. Repeat the step for all the alternative responses you want to add. At runtime, the platform will pick one response at random.

Run a Task

You can link a dialog task to a Knowledge Graph Intent. It helps you to leverage the capabilities of the Knowledge Graph and dialog tasks to handle FAQs that involve complex conversations.

  1. On the Intent window, under the Intent section, select Task.
  2. Optionally, enter a Display Name. This name will be used for presenting the FAQ to the end-users in case of ambiguity.
  3. Select a task from the drop-down list. You can Add Utterance that triggers this task.
  4. If multiple utterances mean the same, Add Alternate Utterance.
  5. You can also add a Reference Id. This field can be used to add a reference to any external content used as a source for this FAQ.
  6. Click Save.

Build FAQs from an Existing Source

Chances are the Knowledge Graph you are trying to build is huge and complex. If you have all the FAQs in one place you can use the Import or Extract process.

  • You can use Kore.ai Knowledge Graph Generator to generate Knowledge Graph from a FAQ list and import the same to your bot. See here for the steps.
  • You can use the Import option to import a Knowledge Graph exported from another bot. See here for more.
  • You can use an existing list of Q&As from Knowledge Extraction to populate the Questions and Responses. See here for more.

Traits, Synonyms, and Stop Words

You can improve the performance of your Knowledge Graph by adding tags, synonyms, traits, and more. Refer here to know more.

Manage Variable Namespaces

Manage Variable Namespaces section (introduced in v8.0) allows you to associate the Variable Namespaces to use with this Knowledge Graph. This option is visible only when the Variable Namespace is enabled for the bot. For more information, refer to Managing Namespace.

Update

Once created, there will be times when you want to make changes to the Knowledge Graph for better organization and presentation.

Note: After you make any changes to the Knowledge Graph, make sure to click Train on the top-right to send the updates to the Knowledge Graph engine. If you do not train the bot, the changes are not reflected in the bot responses.

By default, questions added to a child node are visible for all its parent nodes in the path, up to the root node. If you do not want the questions from child nodes to be seen beyond a certain parent node, click the following icon on the Questions pane of the selected parent.

The questions from all its child nodes are visible to the selected parent node and not to all its parent nodes.

Move Question and Answers Between Nodes

You can move one or more question-answer sets between nodes in your Knowledge Graph.

To move question and answers to the relevant nodes, follow the below steps:

  1. On the Knowledge Graph, click the name of the node from which you want to move the question-answer sets. The FAQs appear on the right pane.
  2. Identify the set of questions that you want to move to, and select the checkboxes next to them.
  3. Drag the questions and drop them on the relevant node. The node is highlighted and the questions appear on the right pane of the node.

Edit and Delete Terms

  1. On the nodes hierarchy from the left pane, hover over the term/node you want to edit.
  2. Click the edit icon. The settings window opens.
  3. You can change the name of the term, set the term types, add traits, add or remove synonyms, and manage context from here (see here for more).
  4. To delete a term:
    1. On the nodes hierarchy, hover over the term you want to delete.
    2. Click the bin icon.
    3. On the confirmation dialog box, you can find the following options:
      • Delete the FAQs along with the term – Choosing this option deletes the term and FAQs under it.
      • Delete the term and move FAQs to root term –
        Choosing this option deletes the term and move the FAQs under it to the root term.
        Note: If the term has child nodes, all those nodes will be deleted.
    4. If your bot is already published, you must train the bot for the deletions to be effective.
      • If you have deleted the first level term you can selectively train to remove the deleted terms from the published copy.
      • If you have deleted, say, the nth level child term, then you need to select the entire parent term for training.

Edit Questions and Responses

  1. From the nodes hierarchy, select the relevant term.
  2. Questions associated with the term appear on the right pane.
  3. Hover over the question to edit and click the edit icon.
  4. Make changes to the question or response and click Save.
  5. You can delete the question using the bin icon.
  6. Selecting multiple questions enables you to delete them in bulk.