OVERVIEW
Virtual Assistants
Kore.ai Platform
Key Concepts
Natural Language Processing (NLP)
Accessing Platform
VIRTUAL ASSISTANTS
Virtual Assistant Builder
Virtual Assistant Types
Getting Started
Create a Simple Bot
SKILLS
Storyboard
Dialog Tasks
Introduction
Dialog Builder (New)
Dialog Builder (Legacy)
User Intent Node
Dialog Node
Entity Node
Supported Entity Types
Composite Entities
Supported Colors
Supported Company Names
Form Node
Logic Node
Message Nodes
Confirmation Nodes
Bot Action Node
Service Node
Custom Authentication
2-way SSL for Service nodes
Script Node
Agent Transfer Node
WebHook Node
Grouping Nodes
Connections & Transitions
Manage Dialogs
User Prompts
Knowledge Graph
Terminology
Building
Generation
Importing and Exporting
Analysis
Knowledge Extraction
Train
Build
Alert Tasks
Introduction
Ignore Words and Field Memory
How to Schedule a Smart Alert
Small Talk
Digital Views
Introduction
How to Configure Digital Views
Digital Forms
Overview
How to Configure Digital Forms
NATURAL LANGUAGE
Overview
Machine Learning
Introduction
Model Validation
Fundamental Meaning
Introduction
NLP Guidelines
Knowledge Graph
Traits
Introduction
How to Use Traits
Ranking and Resolver
Advanced NLP Configurations
INTELLIGENCE
Overview
Context Management
Overview
Session and Context Variables
Context Object
How to Manage Context Switching
Manage Interruptions
Dialog Management
Sub Intents & Follow-up Intents
Amend Entity
Multi-Intent Detection
Sentiment Management
Tone Analysis
Sentiment Management
Event Based Bot Actions
Default Conversations
Default Standard Responses
TEST & DEBUG
Talk to Bot
Utterance Testing
Batch Testing
Record Conversations
Conversation Testing
CHANNELS
PUBLISH
ANALYZE
Overview
Dashboard
Custom Dashboard
Overview
How to Create Custom Dashboard
Conversation Flows
NLP Metrics
ADVANCED TOPICS
Universal Bots
Overview
Defining
Creating
Training
Customizing
Enabling Languages
Store
Smart Bots
Defining
koreUtil Libraries
SETTINGS
Authorization
Language Management
PII Settings
Variables
Functions
IVR Integration
General Settings
Management
Import & Export
Delete
Bot Versioning
Collaborative Development
Plan Management
API GUIDE
API Overview
API List
API Collection
SDKs
SDK Overview
SDK Security
SDK App Registration
Web SDK Tutorial
Message Formatting and Templates
Mobile SDK Push Notification
Widget SDK Tutorial
Widget SDK – Message Formatting and Templates
Web Socket Connect & RTM
Using the BotKit SDK
Installing
Configuring
Events
Functions
BotKit SDK Tutorial – Agent Transfer
BotKit SDK Tutorial – Flight Search Sample Bot
Using an External NLP Engine
ADMINISTRATION
HOW TOs
Create a Simple Bot
Create a Banking Bot
Transfer Funds Task
Update Balance Task
Context Switching
Using Traits
Schedule a Smart Alert
Configure UI Forms
Add Form Data into Data Tables
Configuring Digital Views
Add Data to Data Tables
Update Data in Data Tables
Custom Dashboard
Custom Tags to filter Bot Metrics
Patterns for Intents & Entities
Build Knowledge Graph
Global Variables
Content Variables
Using Bot Functions
Configure Agent Transfer
RELEASE NOTES

IVRのシステム連携

顧客とのやり取りを自動化する上で、組織にとってIVRシステムが上位レベルの選択肢であることが証明されています。しかし、カスタマーサービスにIVR (Interactive Voice Response) システムを使用している場合、以下の2つの問題に頻繁に直面している可能性があります。

  • 非直感的なインターフェイス:IVRシステムは、顧客が必要なことを伝えるだけのものではありません。インテントを検出する前に、ユーザーは膨大な数のメニューの中から選択しなければなりません。最初にユーザーが意思表示をできるようにしたとしても、バックエンドのプログラムは限られた数のフレーズしか理解できません。
  • 静的フロー:IVRシステムは静的なコールフローを使用していますが、これは人間による対話の非線形性および文脈的性質とは一致しません。次の例では、お客様が航空券を予約しようとしています。
    ユーザー: NYC行きのチケットを予約してください。IVR:かしこまりました。日付を教えてください。ユーザー: 現地での今週の日曜日の天気は雨ですか? IVR: すみません、入力内容が分かりません。

    従来のIVRシステムでは、ユーザーがプログラムの流れに沿って要望を伝える余地が限られていました。

Kore.ai IVRサポート

Kore.aiを使用すると、IVRシステムを会話型に変えることができます。人間味のある会話能力を持つチャットボットを構築し、既存のIVRシステムと連携させることで、組織のカスタマーサービス体験を新たなレベルに引き上げることができます。以下の機能により、お客様のKore.ai ボットと既存のIVRとのシームレスな連携が可能になります。

  • VXMLのネイティブサポート:W3C準拠のVXMLファイルを解析および生成する機能を内蔵。
  • ハイブリッド連携:ボットプラットフォーム上でユースケースやダイアログを構築し、IVRのダイアログと連動させることができる柔軟性があります。
  • 会話アナライザー:Kore.aiの会話アナライザーは、エンタープライズが過去のチャットや通話のトランスクリプトを使用して会話フローを生成するのに役立ちます。チャットや通話のトランスクリプトをニューラルネットワークベースの機械学習モデルを用いて分析し、特定のインテントを満たすためのインテントや会話パターンを識別します。この機能はベータ版のすぐに利用できる機能です。この機能を試してみたい方は、サポートチームまでお問い合わせください。
  • きめ細やかなコールフローのサポート:文法、プロンプト、リトライ、タイムアウト期間など、コールフローのすべての要素を定義する機能。Kore.aiは呼び出し終了ハンドラをサポートしており、例外が発生した場合に通話を終了したり、ダイアログを呼び出したりすることができます。

設定

IVR連携の設定は、以下の3つのステップで行います。

  1. ボットの設定トランスクリプションオプション、ウェルカムメッセージ、標準応答、VXMLプロパティなどのIVR設定を定義します。
  2. ダイアログの定義:ノード固有の文法、プロンプト、およびタイムアウトやリトライなどのコールフローの動作を設定することで、ダイアログを定義します。
  3. チャネルの設定:認証を設定し、IVRシステムにWebHookを設定し、チャネルを有効化します。

ボットの設定

ステップ1: ボットのIVR設定

連携の最初のステップとして、まずボットのIVR設定を有効にし、トランスクリプションオプションおよびVXMLプロパティを定義する必要があります。これらの設定は、ボットのデフォルトとして機能します。ダイアログタスクのノードレベルでカスタム値を定義することで、ボットレベルで定義されたVXMLプロパティを上書きすることができます。ボットのIVR設定を行うには

  1. IVRを連携したいボットを開きます。
  2. 左のナビゲーションパネルにカーソルを合わせてチャネルを選択します。
  3. IVR設定を見つけてクリックします。手順が記載されたIVRパネルが開きます。
  4. 設定タブから、
    1. ボットのテストにKore.ai IVRサンドボックスを使用することができます。詳細は以下をご確認くださいIMP:IVR設定を有効化せずにアプリを関連付けた後に設定を保存した場合、プラットフォームはサンドボックスに必要な設定を事前に入力します。
    2. 新しいアプリを作成するか、既存のアプリを選択して、アプリをIVRチャネルに関連付けます。
    3. 外部アプリケーションで提供されているWebHookのURLを使用します。
  5. 設定タブで各種設定を行います。

    IVRサンドボックスを有効化した場合、プラットフォームで以下の設定が必要となります。IVR設定が有効になっていない場合、これらは事前に入力されています。設定を有効にしている場合は、値が以下のものと同じであることをご確認ください。異なる値を使用すると、サンドボックスが期待通りに応答しない場合があります。- トランスクリプションの有効化をはいに設定 – トランスクリプションエンジンのソースをbuiltin:speech/transcribeに設定 – IVRデータ抽出キーをuserinputに設定 – ASR確信度しきい値をuserinput.confidenceに設定 – ASRしきい値確信度を50に設定

  6. (オプション)外部のトランスクリプションエンジンを有効にするには、トランスクリプションの有効化はいを選択します。
    • トランスクリプションエンジンを有効にすると、トランスクリプションエンジンのソースを入力するテキストボックスが表示されます。
      注意:ボットプラットフォームは、UniMRCPでエンコードされた、音声・テキスト変換サービスに対応しています。ボットにトランスクリプションの有効化オプションを選択した場合のみ、プラットフォームでは、任意のノードのIVR設定(ステップ2で説明)の際に、文法を定義する必要がなくなります。

      文法構文の詳細設定についてはこちらをご確認ください

    • 詳細を入力して設定を完了します。詳細はこちらをご確認ください
  7. IVRチャネルを有効にしたら、IVR設定の通話ウェルカムイベントを設定することをお勧めします。これは、ユーザーがIVRチャネルを介してボットに接続した際に、ウェルカムメッセージを再生するものです。以下の手順に従います。
    1. 自然言語 > イベントハンドラ通話ウェルカムイベントを設定します。
    2. 音声通話プロパティを使用ボタンをクリックして、音声設定セクションを開きます。
    3. 初期プロンプトテキストボックスで、ユーザーがボットに接続する際に再生するメッセージを入力します。
    4. その他の設定フィールドの詳細については、ノードの音声通話プロパティの設定セクションを参照してください。

サンドボックスの設定

注意:このオプションは、プラットフォームのバージョン7.1で導入されました。オンプレミスのインストールではご利用いただけません。Kore.aiは、IVRサンドボックス環境を提供しており、ボットを即座に起動して音声通話でやり取りをすることができます。これは、動作中のIVRシステムが実行不能である、あるいは音声チャネルを介したボットのテストに利用できない場合に特に有効です。IVRサンドボックスはオプションの連携であり、お客様のカスタムIVR連携と共存することができます。このオプションを有効にすると、電話番号、PIN、シークレットが表示されます。ボットに割り当てられた電話番号とPINを使用してボットを呼び出し、チームでボットの開発やテストを行うことができます。有効なPINとシークレットを受け取ると、やり取りを行うためにボットに接続されます。 
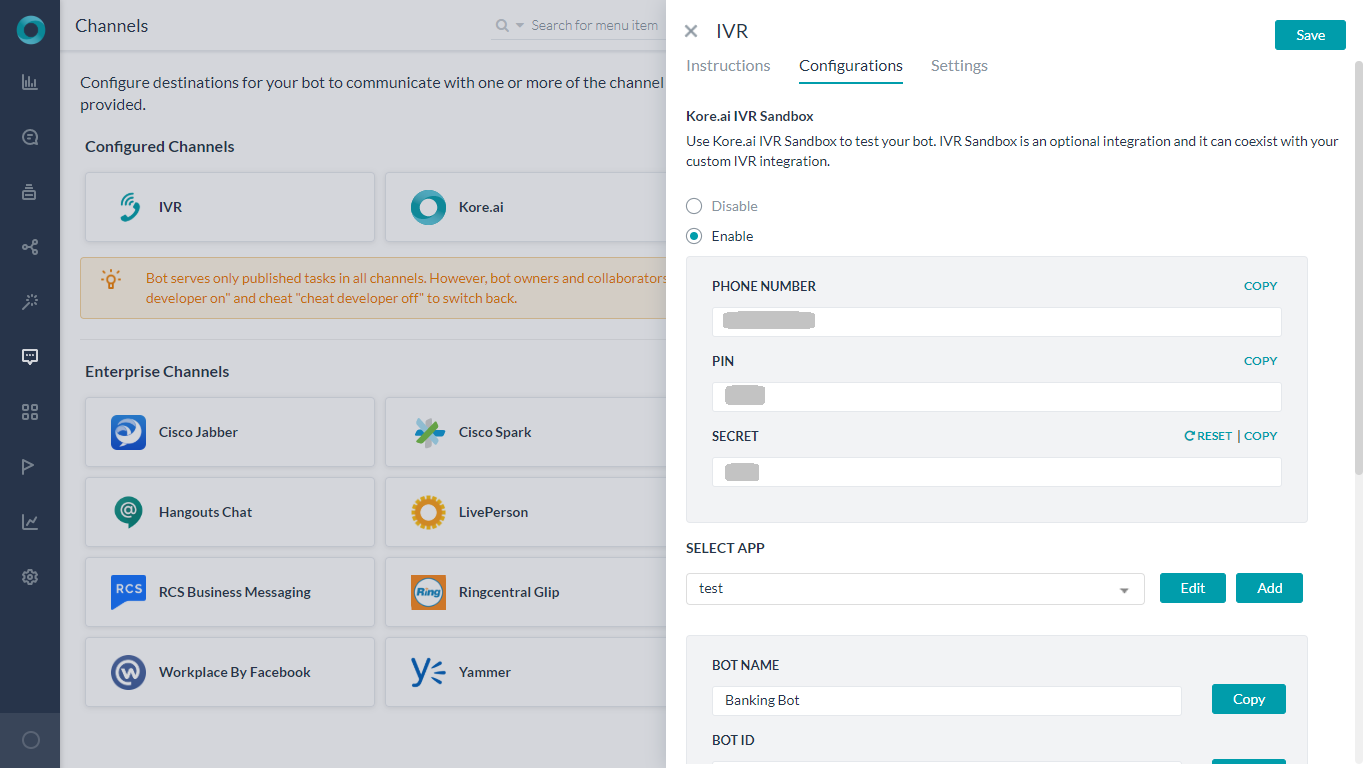
有効化されると、チャネルページのIVRアイコンにカーソルを合わせてテストボタンを選択することで、IVRサンドボックスの対話の詳細にアクセスできるようになります。制限事項

  • このプラットフォームは限られた数の同時回線しかサポートしていないため、IVRサンドボックスを介したボットへの呼び出しに応答できない場合があります。
  • IVRサンドボックスは、機能制限がある場合があるため、社内でのテスト目的のみに使用し、ボットのエンドユーザーには使用しないことを強くお勧めします。

チャネル設定

ステップ3: ボット用IVRチャネルの設定

ボットとダイアログの両方のレベルでIVR設定を行った後、ボットにIVRチャネルを設定する必要があります。IVRチャネルは、基本的な連携によってボットとIVRシステムを接続します。Kore.aiプラットフォームは、IVRシステムを介したエンドユーザーとのボットのやり取りの一環として、必要なVXMLファイルを生成します。
IVRチャネルの有効化とアプリの関連付け
Kore.ai ボットは、IVRからの受信リクエストを認証するためにJWTトークンを必要とします。JWTトークンを生成するには、アプリをボットに関連付ける必要があります。Kore.aiのアカウントで利用可能な既存のアプリを選択するか、新しいアプリを作成することができます。

    1. ボットのサイドナビゲーションパネルにカーソルを合わせてチャネルをクリックします。

<liチャネルページでIVRをクリックします。IVRチャネルの手順のページが開きます。

  • 設定タブをクリックします。
  • アプリを選択ドロップダウンリストから、既存のアプリを選択します。ボットを関連付けるアプリがない場合は、追加をクリックします。
  • 以下をコピーします。
    1. WebhookのURL:IVRからボットを呼び出す場合。
    2. クライアントシークレット: WebHook URLに付加されるJWTトークンを生成します。
  • チャネルの有効化ではいを選択します。


JWTトークンの生成

  1. JWTトークンの取得について参照するには、こちらをクリックしてください
  2. JWTは、クエリパラメータ「トークン」の値としてIVRフックURLで渡す必要があります。
    https://bots.kore.ai/ivr/hooks/{{botId}}?token={{JWT}}
    The token can also be passed as the body parameter.

IVRコールフローからのボットの呼び出し 下図のように、VXML を使用して、IVRコールフローからボットにデータを渡すことができます。サブダイアログのソースは、以下のパラメーターを入力として受け取るJWTトークンを含むWebhook URLです。
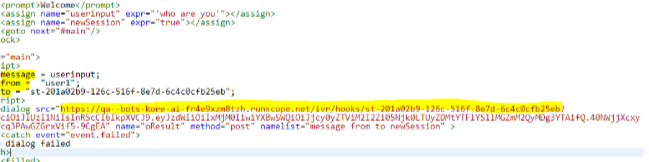
  • メッセージ:ユーザーからのメッセージ
  • From:ユニークなユーザーIDの例:電話番号
  • To:ボットのストリームID

endOfConversation変数は、サブダイアログから返ってきたデータをもとに処理する必要があります。この値が「true」に設定されると、ダイアログの実行(会話)が完了したことを示します。ユーザーとの通話を終了させるトリガーにもなります。

OVERVIEW
Virtual Assistants
Kore.ai Platform
Key Concepts
Natural Language Processing (NLP)
Accessing Platform
VIRTUAL ASSISTANTS
Virtual Assistant Builder
Virtual Assistant Types
Getting Started
Create a Simple Bot
SKILLS
Storyboard
Dialog Tasks
Introduction
Dialog Builder (New)
Dialog Builder (Legacy)
User Intent Node
Dialog Node
Entity Node
Supported Entity Types
Composite Entities
Supported Colors
Supported Company Names
Form Node
Logic Node
Message Nodes
Confirmation Nodes
Bot Action Node
Service Node
Custom Authentication
2-way SSL for Service nodes
Script Node
Agent Transfer Node
WebHook Node
Grouping Nodes
Connections & Transitions
Manage Dialogs
User Prompts
Knowledge Graph
Terminology
Building
Generation
Importing and Exporting
Analysis
Knowledge Extraction
Train
Build
Alert Tasks
Introduction
Ignore Words and Field Memory
How to Schedule a Smart Alert
Small Talk
Digital Views
Introduction
How to Configure Digital Views
Digital Forms
Overview
How to Configure Digital Forms
NATURAL LANGUAGE
Overview
Machine Learning
Introduction
Model Validation
Fundamental Meaning
Introduction
NLP Guidelines
Knowledge Graph
Traits
Introduction
How to Use Traits
Ranking and Resolver
Advanced NLP Configurations
INTELLIGENCE
Overview
Context Management
Overview
Session and Context Variables
Context Object
How to Manage Context Switching
Manage Interruptions
Dialog Management
Sub Intents & Follow-up Intents
Amend Entity
Multi-Intent Detection
Sentiment Management
Tone Analysis
Sentiment Management
Event Based Bot Actions
Default Conversations
Default Standard Responses
TEST & DEBUG
Talk to Bot
Utterance Testing
Batch Testing
Record Conversations
Conversation Testing
CHANNELS
PUBLISH
ANALYZE
Overview
Dashboard
Custom Dashboard
Overview
How to Create Custom Dashboard
Conversation Flows
NLP Metrics
ADVANCED TOPICS
Universal Bots
Overview
Defining
Creating
Training
Customizing
Enabling Languages
Store
Smart Bots
Defining
koreUtil Libraries
SETTINGS
Authorization
Language Management
PII Settings
Variables
Functions
IVR Integration
General Settings
Management
Import & Export
Delete
Bot Versioning
Collaborative Development
Plan Management
API GUIDE
API Overview
API List
API Collection
SDKs
SDK Overview
SDK Security
SDK App Registration
Web SDK Tutorial
Message Formatting and Templates
Mobile SDK Push Notification
Widget SDK Tutorial
Widget SDK – Message Formatting and Templates
Web Socket Connect & RTM
Using the BotKit SDK
Installing
Configuring
Events
Functions
BotKit SDK Tutorial – Agent Transfer
BotKit SDK Tutorial – Flight Search Sample Bot
Using an External NLP Engine
ADMINISTRATION
HOW TOs
Create a Simple Bot
Create a Banking Bot
Transfer Funds Task
Update Balance Task
Context Switching
Using Traits
Schedule a Smart Alert
Configure UI Forms
Add Form Data into Data Tables
Configuring Digital Views
Add Data to Data Tables
Update Data in Data Tables
Custom Dashboard
Custom Tags to filter Bot Metrics
Patterns for Intents & Entities
Build Knowledge Graph
Global Variables
Content Variables
Using Bot Functions
Configure Agent Transfer
RELEASE NOTES

IVR Integration

When it comes to automating customer interactions, IVR systems have proven to be among the top choices for organizations. But if you are using an Interactive Voice Response (IVR) system for your customer service, odds are you might have encountered these two issues quite often:

  • Non-Intuitive Interface: IVR systems do not simply let the customers state their need. They make the users go through a plethora of menu options from which to select before finding their intent. Even if they allow users to express their intent at first go, the backend programs can only understand a limited number of phrases.
  • Static Flows: IVR systems use static call flows that do not align with the nonlinear and contextual nature of human interactions. Take the following example of a customer trying to Book Flight tickets:
    User: Book me a ticket to NYC
    IVR: Sure, for which date?
    User: Wait, will it rain there this Sunday?
    IVR: Sorry, I don’t understand the input.

    Conventional IVR system leaves limited room for the users to articulate their requests beyond the rigid program flows.

Kore.ai IVR Support

Kore.ai allows you to give a conversational makeover to your IVR system. It lets you build chatbots with human-like conversation capabilities and integrate them with your existing IVR system, thus taking your organization’s customer service experience to a whole new level.

The following features enable  the seamless integration of your Kore.ai Bots with your existing IVR:

  • Native VXML Support: Built-in support to parse and generate W3C compliant VXML files.
  • Hybrid integration: Flexibility to build use cases or dialogs on the Bots Platform, which can work in-sync with the IVR dialogs.
  • Discourse Analyzer: Kore.ai’s discourse analyzer helps enterprises generate conversation flows using historical chat or call transcripts. Chat and call transcripts are analyzed using neural network-based machine learning models to identify intents and discourse patterns to fulfill a specific intent. This is an out-of-the-box feature which is in Beta state. Contact our support team if you want to try this feature.
  • Granular Call Flow Support: Ability to define all the call flow elements such as grammar, prompts, retry and time-out periods. Kore.ai supports call termination handlers, allowing you to end calls or invoke dialogs in case of exceptions.

Setting Up

Setting up IVR integration involves the following three steps:

  1. Configure Bot Settings: Define IVR settings such as transcription options, welcome messages, standard responses and VXML properties
  2. Dialog Definition: Define Dialog by configuring node-specific grammar, prompts, and call flow behavior like time-out, retries.
  3. Channel Setup: Set up authentication, configure WebHook in your IVR system and enable channel.

Bot Settings

Step 1: IVR Settings for a Bot

As the first step of the integration, you first need to enable the IVR settings for the bot and define the Transcription options and VXML properties. These settings act as the default for the bot. You may override VXML properties defined at the bot level by defining custom values at the node level of the Dialog tasks.

To configure IVR settings for the bot

  1. Open the Bot for which you want to integrate the IVR.
  2. Select the Deploy tab from the top menu.
  3. From the left menu, click Channels
  4. Locate and click the IVR voice channel. The IVR Panel with Instructions opens.
  5. From the Configuration tab,
    1. You can use Kore.ai IVR Sandbox for testing your Bot, see below for details.
      IMP: If you save the configuration after associating an app without Enabling IVR Settings, the platform will pre-populate the required settings for Sandbox.
    2. Associate an App with the IVR channel – either by creating a new one or selecting an existing one.
    3. Use the WebHook URL provided in your external application.
  6. From the Voice Call Properties tab set the configurations.

    If you have enabled IVR Sandbox, the following settings are required by the platform. These will be pre-populated if you do not enable the IVR settings. In case you have enabled the settings, ensure the values are the same as given below, sandbox may not respond as expected if you use different values:
    – Enable Transcription set to Yes,
    – transcription engine source set to builtin:speech/transcribe,
    – IVR Data Extraction Key set to userinput,
    – ASR Confidence Threshold Key set to userinput.confidence,
    – ASR Threshold Confidence set to 50

  7. (Optional) To enable an external transcription engine, under Enable Transcription, select Yes.
    • On enabling the transcription engine, a text box appears for entering the source of the transcription engine.
      Note: Bots Platform supports all UniMRCP-encoded voice-to-text services. Only if you select the Enable Transcription option for the bot, the platform allows you to do away with defining grammar during configuring IVR settings for any node (described in Step 2).

      See here for a detailed configuration for Grammar syntax.

    • Enter the details to complete the setup, see here for details.
  8. Once you have enabled the IVR channel, we recommend configuring the Telephony Welcome Event for IVR Settings. This would play a welcome message for users when they connect to the Bot via the IVR channel.
    For this:

    1. Under the Build tab, select Intelligence -> Event configure Telephony Welcome Event
    2. Click the Use Voice Call Properties button to open the voice settings section.
    3. Under the Initial Prompts text box, enter the message that needs to be played when the user connects to the Bot.
    4. For details regarding other configuration fields, refer to the Configuring voice call properties for a Node section.

Sandbox Configuration

Note: This option was introduced in ver 7.1 of the platform. It is not available for on-prem installation.

Kore.ai offers an IVR Sandbox environment to instantly launch your bot for interactions over voice calls. This is particularly useful when a working IVR system is not feasible or available for testing your Bot over a voice channel. IVR Sandbox is an optional integration and it can coexist with your custom IVR integration.

Enabling this option will give you a Phone Number, Pin, and Secret. You can call your bot by using the phone number and PIN allocated for your bot to develop and test the bot with your teams. On receiving the valid Pin and Secret you will be connected to the Bot for interactions.

Once enabled you can access the IVR Sandbox interaction details by selecting the Test button on hover over the IVR icon from the channels page.

Limitations

  • The platform supports only a limited number of concurrent lines hence calls to your bots via IVR Sandbox may not be responded to at times.
  • We strongly recommend you use IVR Sandbox only for serving internal testing purposes and not for the end-users of your bots as there might be some functional limitations.

Channel Settings

Step 3: Setting Up IVR Channel for the Bot

After configuring IVR Settings at both the Bot and the Dialog levels, you should configure IVR Channel for the bot. IVR channel provides a generic integration to connect bots with IVR systems. Kore.ai platform generates required VXML files to be exchanged as part of bot interaction with the end user via the IVR systems.
Enabling IVR Channel and Associating an APP
Kore.ai Bots require a JWT token to authenticate the incoming requests from IVR. For generating JWT token, you should associate an app with the bot. You can select any of the existing Apps available in your Kore.ai account or create a new app.

  1. Hover over the side navigation panel of the bot and click Channels.
  2. On the Channels page, click IVR. The IVR Channel Instructions page opens.
  3. Click the Configuration tab.
  4. From the Select App drop-down list, select an existing App. If you do not have any app to associate the bot with, click Add.
  5. Copy the following:
    1. WebHook URL: For calling the bot from IVR.
    2. Client Secret: To generate JWT token that must be appended to the WebHook URL.
  6. Select Yes for Enable Channel.

Generating JWT Token

  1. Refer here to get the JWT token, click here
  2. JWT has to be passed in the IVR hook URL as value for the query parameter “token”:
    https://bots.kore.ai/ivr/hooks/{{botId}}?token={{JWT}}
    The token can also be passed as the body parameter.

Calling Bot from IVR Call flow
You can pass data to the bot from the IVR call flow using VXML <subdialog> as shown in the picture below. The subdialog src should be Webhook URL with JWT Token which takes the following parameters as Input

  • message : Message from User
  • from: Unique User’s Identity Ex: Phone Number
  • to: Bot Stream Id

The endOfConversation variable should be processed from the data returned from the sub-dialog. If the value is set to true, it indicates that the dialog execution (conversation) is complete. It can be a triggering point to end the call with the user.