OVERVIEW
Virtual Assistants
Kore.ai Platform
Key Concepts
Natural Language Processing (NLP)
Accessing Platform
VIRTUAL ASSISTANTS
Virtual Assistant Builder
Virtual Assistant Types
Getting Started
Create a Simple Bot
SKILLS
Storyboard
Dialog Tasks
Introduction
Dialog Builder (New)
Dialog Builder (Legacy)
User Intent Node
Dialog Node
Entity Node
Supported Entity Types
Composite Entities
Supported Colors
Supported Company Names
Form Node
Logic Node
Message Nodes
Confirmation Nodes
Bot Action Node
Service Node
Custom Authentication
2-way SSL for Service nodes
Script Node
Agent Transfer Node
WebHook Node
Grouping Nodes
Connections & Transitions
Manage Dialogs
User Prompts
Knowledge Graph
Terminology
Building
Generation
Importing and Exporting
Analysis
Knowledge Extraction
Train
Build
Alert Tasks
Introduction
Ignore Words and Field Memory
How to Schedule a Smart Alert
Small Talk
Digital Views
Introduction
How to Configure Digital Views
Digital Forms
Overview
How to Configure Digital Forms
NATURAL LANGUAGE
Overview
Machine Learning
Introduction
Model Validation
Fundamental Meaning
Introduction
NLP Guidelines
Knowledge Graph
Traits
Introduction
How to Use Traits
Ranking and Resolver
Advanced NLP Configurations
INTELLIGENCE
Overview
Context Management
Overview
Session and Context Variables
Context Object
How to Manage Context Switching
Manage Interruptions
Dialog Management
Sub Intents & Follow-up Intents
Amend Entity
Multi-Intent Detection
Sentiment Management
Tone Analysis
Sentiment Management
Event Based Bot Actions
Default Conversations
Default Standard Responses
TEST & DEBUG
Talk to Bot
Utterance Testing
Batch Testing
Record Conversations
Conversation Testing
CHANNELS
PUBLISH
ANALYZE
Overview
Dashboard
Custom Dashboard
Overview
How to Create Custom Dashboard
Conversation Flows
NLP Metrics
ADVANCED TOPICS
Universal Bots
Overview
Defining
Creating
Training
Customizing
Enabling Languages
Store
Smart Bots
Defining
koreUtil Libraries
SETTINGS
Authorization
Language Management
PII Settings
Variables
Functions
IVR Integration
General Settings
Management
Import & Export
Delete
Bot Versioning
Collaborative Development
Plan Management
API GUIDE
API Overview
API List
API Collection
SDKs
SDK Overview
SDK Security
SDK App Registration
Web SDK Tutorial
Message Formatting and Templates
Mobile SDK Push Notification
Widget SDK Tutorial
Widget SDK – Message Formatting and Templates
Web Socket Connect & RTM
Using the BotKit SDK
Installing
Configuring
Events
Functions
BotKit SDK Tutorial – Agent Transfer
BotKit SDK Tutorial – Flight Search Sample Bot
Using an External NLP Engine
ADMINISTRATION
HOW TOs
Create a Simple Bot
Create a Banking Bot
Transfer Funds Task
Update Balance Task
Context Switching
Using Traits
Schedule a Smart Alert
Configure UI Forms
Add Form Data into Data Tables
Configuring Digital Views
Add Data to Data Tables
Update Data in Data Tables
Custom Dashboard
Custom Tags to filter Bot Metrics
Patterns for Intents & Entities
Build Knowledge Graph
Global Variables
Content Variables
Using Bot Functions
Configure Agent Transfer
RELEASE NOTES

デフォルトの会話

開発者が詳細なコードを書かなくても、プラットフォームがユーザーの発話に応答できる場面がいくつかあります。たとえば、:

  • ユーザー インテントが検出されない場合やボットが理解できない場合の、デフォルトのダイアログ
  • 特定の質問やあいさつ、エラーおよび警告のシナリオなどへの標準応答
  • イベント ハンドラで特定の共通ボット イベントを定義することができます。詳細については、こちらをご覧ください。

これらはプラットフォームによりデフォルトで設定されていますが、ビジネス要件に応じてカスタマイズすることができます。このドキュメントでは、そのようなカスタマイズについて説明しています。

デフォルト ダイアログ

Kore.ai の自然言語処理がユーザーのインテントを決定できない場合、ダイアログ タスクを実行するか標準のエラー メッセージを表示するかを選択することができます。デフォルトでは、エラー メッセージを表示するように設定されています。[自然言語] > [デフォルトの会話] セクションで、[デフォルト ダイアログ] タブを選択してデフォルトのダイアログ タスクを定義します。たとえば、ボットからライブ エージェントへ会話を切り替えたり、ボットとの会話でユーザー インテントが決定できない場合は、メイン メニューのような汎用ダイアログを実行したりすることができます。デフォルト ダイアログ タスクが定義されていない場合は、標準エラー メッセージや「標準応答」セクションで定義されているカスタマイズが使用されます。以下の図は、銀行ポータル ボットで、ユーザー インテントが決定できない場合にアカウント ヘルプの取得ダイアログ タスクを実行するように設定されたボットビルダーの、「デフォルト ダイアログ」セクションの例です。

デフォルト ダイアログの定義

以下の手順を完了するには、デフォルト ダイアログとして選択できる 1 つのダイアログがあらかじめ定義されている必要があります。

  1. [自然言語] > [デフォルトの会話] タブで、「デフォルト ダイアログ」セクションを選択します
  2. 「ユーザーのインテントを理解できない場合」のセクションで、[ダイアログ タスクを自動的に実行] を選択します。
  3. 表示されている [デフォルト ダイアログ タスク] フィールドで、リストからデフォルトのダイアログを選択して [保存] をクリックします。

「設定が正常に保存されました」のメッセージが表示されます。

標準応答

Kore.ai ボットビルダー ツールでは、デフォルトの自然言語処理や、ユーザー入力やイベントに対する NLP インタープリタの応答を確認することができます。たとえば、ユーザーの「やあ!」という入力に対し、ボットは実行時に以下の応答のうち 1 つをランダムに選択して返答します。

  • やあ
  • こんにちは
  • こんにちは!
  • どうも 🙂

NLP インタープリタは、イベントや条件、トリガーまたはユーザー入力に基づいて事前定義されたテキストの応答をユーザーに表示します。カスタム ボットやボットのユーザーに応じて、イベントや入力の要求に対してユーザーに表示されるデフォルトの応答を変更したい場合があります。たとえば、:

  • ユーザー入力 - 生年月日は?
  • イベント - 認証エラーです。
  • トリガー - タスクがキャンセルされました。

両方の標準ボット応答を定義することができますが、必要に応じてユーザーがいる指定されたチャネルにのみ表示する、チャネル オーバーライド応答を追加することもできます。デフォルトの標準応答の一覧についてはこちらをご覧ください。たとえば SMS チャネルでは、データ量を節約するために短いボット応答のみを使用したい場合があります。

デフォルトの応答

ボットビルダーのデフォルトの応答を管理するには、

  • 左側のナビゲーション メニューにマウス ポインターを置き、[自然言語] > [デフォルトの会話] を選択します
  • [標準応答] セクションを選択して、下記の図のように [ステートメント] タブを表示します。

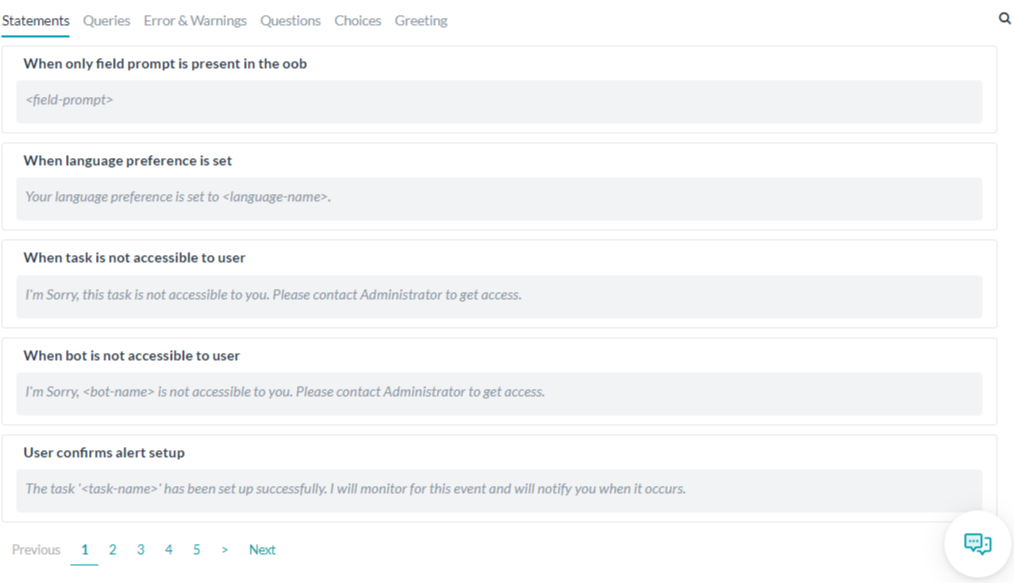
それぞれの標準応答のタブでは、イベントやユーザー入力に 1 つ以上の NLP インタープリタの標準応答がリスト化されています。デフォルトの応答を変更したり、必要に応じて NLP インタープリタがランダムに選んだ応答を、ユーザー入力やシステム イベントの応答として追加したりすることができます。「標準応答」セクションでは、標準のボット応答が以下のタブでカテゴリ分けされています。

  • ステートメント - ボットまたはユーザーの動作に応じて表示される応答です。たとえば、ユーザーがタスクをキャンセルしたり、ユーザーがボットの要求に対して有効でない応答を返した場合に表示されます。
  • 問い合わせ「どのフィールドを変更しますか?」のような、ボットからユーザーにさらなる情報を求めるためのステートメントです。
  • エラーと警告 - シナリオ内でエラーが発生した場合の、ボットからユーザーに向けたステートメントです。たとえば、「終了日を開始日以前に設定することはできません。」のようなものです。
  • 質問 - ボットがユーザーに尋ねる可能性のある、他のどのカテゴリにも該当しない質問です。
  • 選択肢 - ボットは「はい」または「いいえ」の入力を求めます。たとえば、「このタスクが発生するたびにプッシュ通知を受け取りますか?」のようなものです。
  • あいさつ - ボットがインストールされたとき、およびその他の初接触の際のボットの最初の応答です。たとえば、ユーザーがしばらくの非アクティブの状態から戻った場合など。

上記の図は、ボットの [自然言語] タブの「標準応答」セクションの [ステートメント] タブを示しています。

応答の追加および編集

新しい標準応答の追加 注意: あいまいさが提示されるような条件で標準応答が更新されている場合、ボットの応答はあいまいな選択肢を表示しないため、あいまいさのリストを提示するには “getChoices()“ 関数を使用する必要があります(以下のポイント 6 をご覧ください)。

  1. あいさつなどの標準応答のタブ カテゴリを選択して、応答を追加したい状況の上にマウス ポインターを置きます。 [応答を追加] をクリックします
    1. [チャネル オーバーライド を追加] ダイアログが表示されます。
    2. チャネル固有の応答を作成するには、[チャネルを選択] のドロップダウン リストでチャネルを選択します。[すべてのチャネル] オプションで、すべてのチャネルに応答を有効化できます。
    3. チャネル固有の応答の場合、[タスク] ドロップダウン リストから [すべてのタスク] を選択してこのチャネル固有の応答をすべてのタスクに適用するか、または特定のタスクを選択します。
    4. 特定のタスクが選択されている場合、[フィールドを選択] ドロップダウンが表示されます。[すべてのフィールド] またはこのチャネル固有の応答のための特定のフィールドを選択します。
    5. [ボット応答エディタ] では、[簡易モード] タブのベーシック エディタ コントロールを使用してこのチャネルのデフォルトのボット応答をオーバーライドできます。もしくは、[詳細設定モード] タブで応答のためのカスタム JavaScript を記述します。
      • [簡易モード] タブ - 「おかえりなさい、お待ちしていました。」のような、デフォルトの標準応答のテキストを入力します。必要に応じて、太字、イタリック、見出し、ハイパーリンク、番号付き/記号付きリストや、ラインの挿入などのボタンで書式を設定することもできます。詳しくは、「プロンプト エディタの使用」をご覧ください。
      • [詳細設定モード] タブ - 以下のコード例のように JavaScript を記述して、チャネル メッセージをオーバーライドします。

        注意:デフォルトの値を返すには、以下のキーを使用します。response.message - デフォルトのメッセージを文字列として返します。response.choices - オプションの選択肢または確認メッセージのタイプを配列として返します。

        • Slack チャネル オーバーライドの例
          var message = {};
          var attachments = [];
          var attachment = {
              'text': "Exception occurred during API execution",
              'color': '#FFCC00',
              'attachment_type': 'default'
          };
          attachments.push(attachment);
          message.attachments = attachments;
          print(JSON.stringify(message));
        • Facebook チャネル オーバーライドの例
          var message = {
              text: response.message
          };
          var buttons = [];
          for (var i = 0; i < response.choices.length; i++) {
              var choiceItem = response.choices[i];
              if (choiceItem.length > 20) {
                  choiceItem = choiceItem.substring(
                      0, 18) + '..';
              }
              var element = {
                  content_type: 'text',
                  title: choiceItem,
                  payload: choiceItem
              };
              buttons.push(element);
          }
          message.quick_replies = buttons;
          print(JSON.stringify(message));
        • メール チャネル オーバーライドの例
          var message = {};
          var text = response.message + ' <br> ';
          for (var i = 0; i < response.choices.length; i++) {
              text = text.concat(
                  '<u> + response.choices[i] + ' <
                  /u> <br>');
              }
              message.text = text;
              print(JSON.stringify(message));
        • SMS チャネル オーバーライドの例
          var message = {};
              var indexArray = ['a', 'b', 'c',
                  'd', 'e',
                  'f', 'g', 'h', 'i', 'j',
                  'k', 'l', 'm', 'n', 'o',
                  'p', 'q', 'r', 's', 't',
                  'u', 'v', 'w', 'x', 'y',
                  'z'
              ];
              var text = response.message + '\\n';
              for (var i = 0; i < response.choices
                  .length; i++) {
                  text = text.concat(indexArray[i] +
                      ') ' + response.choices[
                          i] + '\\n');
              }
              message.text = text;
              print(JSON.stringify(message));
    6. getChoices() 関数を使用すると、メッセージ書式テンプレートを使用して応答の表示形式をカスタマイズすることができます。getChoices() 関数が呼び出され、あいまいさが存在する場合、プラットフォームはあいまいな選択肢の情報をエンドユーザーに対してオプションとして提示できる配列として返します。たとえば、「もしかして」の標準応答をボタン形式で表示するには、以下のコードを使用します。
      var info =getChoices() ;
      var message = {
      "type": "template",
      "payload": {
        "template_type": "button",
        "text": "Did you mean",
        "subText": "You can now customize response for did you mean",
        "buttons": []
       }
      };
      for (i = 0; i < info.length; i++) {
      var button = {
        "type": "postback",
        "title": info[i],
        "payload": "payload1"
      };
      
      message.payload.buttons.push(button);
      }
      print(JSON.stringify(message)); 
      
    7. [完了] をクリックして [応答の編集] ダイアログを保存して終了し、新しい標準応答を適用します。
OVERVIEW
Virtual Assistants
Kore.ai Platform
Key Concepts
Natural Language Processing (NLP)
Accessing Platform
VIRTUAL ASSISTANTS
Virtual Assistant Builder
Virtual Assistant Types
Getting Started
Create a Simple Bot
SKILLS
Storyboard
Dialog Tasks
Introduction
Dialog Builder (New)
Dialog Builder (Legacy)
User Intent Node
Dialog Node
Entity Node
Supported Entity Types
Composite Entities
Supported Colors
Supported Company Names
Form Node
Logic Node
Message Nodes
Confirmation Nodes
Bot Action Node
Service Node
Custom Authentication
2-way SSL for Service nodes
Script Node
Agent Transfer Node
WebHook Node
Grouping Nodes
Connections & Transitions
Manage Dialogs
User Prompts
Knowledge Graph
Terminology
Building
Generation
Importing and Exporting
Analysis
Knowledge Extraction
Train
Build
Alert Tasks
Introduction
Ignore Words and Field Memory
How to Schedule a Smart Alert
Small Talk
Digital Views
Introduction
How to Configure Digital Views
Digital Forms
Overview
How to Configure Digital Forms
NATURAL LANGUAGE
Overview
Machine Learning
Introduction
Model Validation
Fundamental Meaning
Introduction
NLP Guidelines
Knowledge Graph
Traits
Introduction
How to Use Traits
Ranking and Resolver
Advanced NLP Configurations
INTELLIGENCE
Overview
Context Management
Overview
Session and Context Variables
Context Object
How to Manage Context Switching
Manage Interruptions
Dialog Management
Sub Intents & Follow-up Intents
Amend Entity
Multi-Intent Detection
Sentiment Management
Tone Analysis
Sentiment Management
Event Based Bot Actions
Default Conversations
Default Standard Responses
TEST & DEBUG
Talk to Bot
Utterance Testing
Batch Testing
Record Conversations
Conversation Testing
CHANNELS
PUBLISH
ANALYZE
Overview
Dashboard
Custom Dashboard
Overview
How to Create Custom Dashboard
Conversation Flows
NLP Metrics
ADVANCED TOPICS
Universal Bots
Overview
Defining
Creating
Training
Customizing
Enabling Languages
Store
Smart Bots
Defining
koreUtil Libraries
SETTINGS
Authorization
Language Management
PII Settings
Variables
Functions
IVR Integration
General Settings
Management
Import & Export
Delete
Bot Versioning
Collaborative Development
Plan Management
API GUIDE
API Overview
API List
API Collection
SDKs
SDK Overview
SDK Security
SDK App Registration
Web SDK Tutorial
Message Formatting and Templates
Mobile SDK Push Notification
Widget SDK Tutorial
Widget SDK – Message Formatting and Templates
Web Socket Connect & RTM
Using the BotKit SDK
Installing
Configuring
Events
Functions
BotKit SDK Tutorial – Agent Transfer
BotKit SDK Tutorial – Flight Search Sample Bot
Using an External NLP Engine
ADMINISTRATION
HOW TOs
Create a Simple Bot
Create a Banking Bot
Transfer Funds Task
Update Balance Task
Context Switching
Using Traits
Schedule a Smart Alert
Configure UI Forms
Add Form Data into Data Tables
Configuring Digital Views
Add Data to Data Tables
Update Data in Data Tables
Custom Dashboard
Custom Tags to filter Bot Metrics
Patterns for Intents & Entities
Build Knowledge Graph
Global Variables
Content Variables
Using Bot Functions
Configure Agent Transfer
RELEASE NOTES

Default Conversations

There are multiple places where the platform responds to user utterances without the developer having to code the details. Examples include:

  • Default Dialog when the user intent is not found or understood by the bot.
  • Standard Responses to certain questions, greetings, error and warning scenarios, etc.
  • Event Handlers for certain common bot events can be defined, click here for more.

Though these are set by default by the platform, you can customize them as per your business requirements. In this document, we look into such customizations.

Default Dialog

You can choose to run a dialog task or display a standard error message if the Natural Language Processor for Kore.ai cannot determine the user intent. The default setting is to display a standard error message.

Under the Build tab, from the left menu, click Intelligence > Default Dialog to define a default dialog task.

For example, you can switch the conversation from the bot to a live agent, or run a generic dialog such as the main menu if the user intent is not determined in the bot conversation.

If a default dialog task is not defined, standard error messages and any customizations defined in the Standard Responses section are used.

The following illustration is an example of the Default Dialog section in Bot Builder configured to run the Get Account Help dialog task when the user intent cannot be determined in the Banking Portal bot.

Define a Default Dialog

To complete the following procedure, you must have already defined a dialog to select as the default dialog.

  1. Select the Build tab from the top menu.
  2. From the left menu, click the Intelligence > Default Dialog option.
  3. In the If user’s intent is not understood section, select Automatically run a dialog task.
  4. In the Default Dialog Task field, select a default dialog from the list.
  5. Click Save.

The Settings successfully saved message is displayed.

Standard Responses

In the Kore.ai Bot Builder tool, you can view the default Natural Language Processing, or NLP interpreter responses to user inputs or events.

For example, a reply to a user input of Hi! The bot replies with one of the following responses, chosen randomly at runtime:

  • Hi!
  • Hello
  • Hi there!
  • Hey 🙂

The NLP interpreter displays pre-defined text responses to users based on an event, condition, trigger, or user input. Depending on your custom bot and users of that bot, you may want to modify the default responses to users displayed for an event or request for input.

Example

  • User Input – When were you born?
  • Event – Authorization Failure
  • Trigger – Task canceled

You can define both standard bot responses, or if desired, add a channel override response that is displayed only in the specified channel the user is in, otherwise, one of the standard default responses is displayed. Click here for a comprehensive list of default standard responses.

For example, in the SMS channel, you may only want to use short bot responses to save data.

Default Responses

To access and manage the default responses in bot builder, follow the below steps:

  • Select the Build tab from the top menu
  • From the left menu, click Intelligence > Standard Responses.

For each standard response category tab, the event or user input is listed followed by one or more NLP interpreter standard responses. You can modify the default response, and if needed, add additional responses selected randomly by the NLP interpreter in response to user input or system event.

In the Standard Response section, the standard bot responses are categorized in the following tabs:

  • Statements – Responses displayed to the user as the result of an action by the bot or user. For example, a user cancels a task, or a user gives an invalid response to your bot request.
  • Queries – Statements from the bot to the user to ask for more information. For example, Which field do you want to change?
  • Error & Warnings – Statements from the bot to the user when an error occurs during the scenario, such as the End date cannot be before or same as the start date!
  • Questions – Questions the bot may pose to the user when not included in any other category.
  • Choices – The bot is asking for Yes/No input. For example, Would you like to receive push notifications every time this task occurs?
  • Greeting – Initial responses by the bot when the bot is installed, or other initial contacts. For example, when a user returns to the interaction after a period of inactivity.

Add and Edit Responses

Add a New Standard Response

Note: If the standard responses are updated at the conditions wherein an ambiguity is presented to the user, the bot response will not display the ambiguous choices to the user and you need to use the function getChoices() to present the ambiguity list (refer to point 6 below).

  1. Select a tab category for the standard response. For example, Greeting, and then hover the situation for which you want to add the response. Click Add Response:
    1. The Add Channel Overrides dialog is displayed.
    2. In the Choose a channel drop-down list, select a channel to create a channel-specific response. You can go with the Any Channel option to enable the response for all channels.
    3. In the case of channel-specific response, from the Choose a Task drop-down list, select Any Task to apply this channel-specific response to all tasks or select a specific task.
    4. When a specific task is selected, the Choose a Field is drop-down is displayed. Select Any Field or a specific field for this channel-specific response.
    5. In the bot Response editor, you can override the default Bot Response for this channel using basic editor controls on the Simple Mode tab, or write custom JavaScript for the response on the Advanced Mode tab. For the:
      • Simple Mode tab – Enter the text for the default standard response. For example, *There* you are, I was ~hoping~ you would return soon! and then optionally, format the text using the formatting buttons for bold, italics, header styles, hyperlinks, ordered and unordered lists, and inserting a line. For more information, refer to Using the Prompt Editor.
      • Advanced Mode tab – Enter JavaScript to override the channel message as described in the following code examples.

        Note: Use the following keys to return default values for:
        response.message – Returns the default message as a string.
        response.choices – Returns the options choice or confirmation message types as an array.

        • Slack Channel Override Example
          var message = {};
          var attachments = [];
          var attachment = {
              'text': "Exception occurred during API execution",
              'color': '#FFCC00',
              'attachment_type': 'default'
          };
          attachments.push(attachment);
          message.attachments = attachments;
          print(JSON.stringify(message));
        • FaceBook Channel Override Example
          var message = {
              text: response.message
          };
          var buttons = [];
          for (var i = 0; i < response.choices.length; i++) {
              var choiceItem = response.choices[i];
              if (choiceItem.length > 20) {
                  choiceItem = choiceItem.substring(
                      0, 18) + '..';
              }
              var element = {
                  content_type: 'text',
                  title: choiceItem,
                  payload: choiceItem
              };
              buttons.push(element);
          }
          message.quick_replies = buttons;
          print(JSON.stringify(message));
        • Email Channel Override Example
          var message = {};
          var text = response.message + ' <br> ';
          for (var i = 0; i < response.choices.length; i++) {
              text = text.concat(
                  '<u> + response.choices[i] + ' <
                  /u> <br>');
              }
              message.text = text;
              print(JSON.stringify(message));
        • SMS Channel Override Example
          var message = {};
              var indexArray = ['a', 'b', 'c',
                  'd', 'e',
                  'f', 'g', 'h', 'i', 'j',
                  'k', 'l', 'm', 'n', 'o',
                  'p', 'q', 'r', 's', 't',
                  'u', 'v', 'w', 'x', 'y',
                  'z'
              ];
              var text = response.message + '\\n';
              for (var i = 0; i < response.choices
                  .length; i++) {
                  text = text.concat(indexArray[i] +
                      ') ' + response.choices[
                          i] + '\\n');
              }
              message.text = text;
              print(JSON.stringify(message));
    6. Using the getChoices() function, you can also customize the response display format using the message formatting templates. When the getChoices() function is called and there is an ambuguity, the platform returns the ambiguous choices information as an array which can be used to present the options to the end users.
      For example, to display the standard response for Did you mean in a button format, you can use the following code:

      var info =getChoices() ;
      var message = {
      "type": "template",
      "payload": {
        "template_type": "button",
        "text": "Did you mean",
        "subText": "You can now customize response for did you mean",
        "buttons": []
       }
      };
      for (i = 0; i < info.length; i++) {
      var button = {
        "type": "postback",
        "title": info[i],
        "payload": "payload1"
      };
      
      message.payload.buttons.push(button);
      }
      print(JSON.stringify(message)); 
      
    7. Click Done to save and close the Edit Response dialog and apply the new standard response.