대화 빌더에서 엔티티, 확인 또는 메시지 노드를 생성한 후 Kore.ai에서 다음을 수행할 수 있습니다.
- 최종 사용자에게 표시되는 기본 메시지 또는 사용자 프롬프트를 수정합니다.
- 새 프롬프트 또는 메시지를 추가합니다.
- 채널별 프롬프트 또는 메시지를 추가합니다.
대화 빌더에서 엔티티, 확인 또는 메시지 노드를 생성한 후 Kore.ai에서 다음을 수행할 수 있습니다.
대화 작업은 두 가지 유형의 사용자 프롬프트를 지원합니다.
프롬프트 편집기에는 다음 기능을 제공하는 세 개의 탭이 있습니다.
다음은 사용자 정의 형식으로 날씨 API의 응답을 사용자에게 제공하는 항공편 예약 봇의 JavaScript 메시지입니다.  오류 프롬프트의 경우 재시도 순서로 프롬프트 표시 토글을 활성화한 경우 각 오류 프롬프트 메시지가 표시되기 전 핸들바 아이콘이 표시됩니다. 이 아이콘을 사용하여 해당 순서대로 표시되도록 메시지 순서를 변경할 수 있습니다.
엔티티 노드, 확인 노드 또는 메시지 노드의 구성 요소 속성 탭에서 프롬프트 메시지 또는 봇 메시지를 추가하거나 편집할 수 있습니다. 엔티티 노드 및 확인 노드의 경우 프롬프트라고 하며 메시지 노드의 경우 응답이라고 합니다.


봇 응답을 더 추가하려면 2b단계부터 반복합니다.
편집기에서 일반 텍스트 탭을 사용하고 기본 편집기 컨트롤 및 HTML을 사용하여 사용자 프롬프트를 작성합니다. 텍스트를 입력한 다음 굵게, 기울임꼴, 머리글 스타일, 하이퍼링크, 순서 있는 목록 및 순서 없는 목록의 형식화된 버튼을 사용하여 텍스트 형식을 지정합니다. 일반 텍스트 탭은 다음 마크업을 지원합니다.
| 마크다운 | 출력 |
|---|---|
| #h1 | 제목 1 |
| #h2 | 제목 2 |
| #h3 | 제목 3 |
| #h4 | 제목 4 |
| #h5 | 제목 5 |
| #h6 | 제목 6 |
| “`안녕하세요”` |  |
| *굵게* | 굵게 |
| ~기울임~ | 기울임 |
| [링크](http://www.google.com) | 링크 |
|  |  |
| 순서 1. 첫 번째입니다 2. 두 번째입니다 |
순서
|
| 글머리 기호 * 첫 번째입니다 * 두 번째입니다 |
글머리 기호
|
| 안녕! 이것은 >>들여쓰기입니다 | |
| 이것은 밑줄입니다 ___ | 이것은 밑줄입니다 ___ |
| 이것은 <br> 새로운 라인 | 이것은 새로운 라인 |
편집기의 JavaScript 탭에서 사용자 정의 코드를 추가하고 시스템 변수와 세션 변수를 사용하여 사용자 프롬프트 메시지를 처리할 수 있습니다. 다음은 장소의 일기 예보를 표시하기 위한 샘플 코드입니다.
var loc=context.weatherapi.response.body.query.results.channel.item.condition.text.toLowerCase();
print("Here are the details:\n");
if(loc.indexOf("clear")>=0)
{
print('Its clear outside.');
}
 else if(loc.indexOf("sunny")>=0)
{
    print("Its sunny outside");
}
else if(loc.indexOf("cloud")>=0)
{
    print("Its very cloudy day");
}
else if (loc.indexOf('snow')>=0)
{
    print('Its snowy day');
}
else if(loc.indexOf('rain')>=0)
{
print('Yes, it looks like rainy day.');
}
else if(loc.indexOf('breeze')>=0)
{
    print("It's very breezy out there.");
}
else if(loc.indexOf('wind')>=0)
{
     print("It's very windy out there.");
}
else if(loc.indexOf('shower')>=0)
{
    print("It showering outside.");
}
print("Weather condition: " + context.weather +"\n");
print("Updated at: " + context.lastupdate+"\n");
print("Temperature: " + context.temp+"\n");
print("Wind: " + context.wind+"\n");
print("Pressure: " + context.pressure+"\n");
print("Visibility: " + context.humidity+"\n");
print("Humidity: " + context.visibility+"\n");
자세한 내용은 작업에서 세션 및 컨텍스트 변수 사용하기를 참조하세요.
미리 보기 탭에서 최종 사용자에게 마크업과 함께 표시할 렌더링된 출력 메시지의 샘플을 볼 수 있습니다. 컨텍스트 변수를 포함한 코드의 출력을 렌더링하려면 탭에서 컨텍스트 변수를 정의하고 키 및 값 상자를 사용하여 미리 보기를 위한 유효한 샘플 출력을 렌더링합니다.
기본적으로 대화 작업은 모든 채널에서 표준 사용자 프롬프트를 설정합니다. 그러나 기본 응답 대신 해당 채널의 최종 사용자에게 표시할 하나 이상의 채널에 특정 응답을 정의할 수 있습니다. 채널별 응답을 정의하려면 채널(예: Kore.ai)를 선택한 다음 필요에 따라 JavaScript 탭에서 사용자 프롬프트를 정의하세요. 각 채널에는 하나의 응답만 정의할 수 있습니다.
참고: 다음 키를 사용하여 기본값을 반환합니다. response.message – 기본 메시지를 문자열로 반환합니다. response.message.choices – 옵션 선택 또는 확인 메시지 유형을 배열로 반환합니다.
var message = {};
var attachments = [];
var attachment = {
    'text': "Exception occurred during API execution",
    'color': '#FFCC00',
    'attachment_type': 'default'
};
attachments.push(attachment);
message.attachments = attachments;
print(JSON.stringify(message));
var message = {
    text: response.message
};
var buttons = [];
for (var i = 0; i < response.choices.length; i++) {
    var choiceItem = response.choices[i];
    if (choiceItem.length > 20) {
        choiceItem = choiceItem.substring(
            0, 18) + '..';
    }
    var element = {
        content_type: 'text',
        title: choiceItem,
        payload: choiceItem
    };
    buttons.push(element);
}
message.quick_replies = buttons;
print(JSON.stringify(message));
var message = {};
var text = response.message + ' <br> ';
for (var i = 0; i < response.choices.length; i++) {
    text = text.concat(
        '<u> + response.choices[i] + ' <
        /u> <br>');
    }
    message.text = text;
    print(JSON.stringify(message));
var message = {};
    var indexArray = ['a', 'b', 'c',
        'd', 'e',
        'f', 'g', 'h', 'i', 'j',
        'k', 'l', 'm', 'n', 'o',
        'p', 'q', 'r', 's', 't',
        'u', 'v', 'w', 'x', 'y',
        'z'
    ];
    var text = response.message + '\\n';
    for (var i = 0; i < response.choices
        .length; i++) {
        text = text.concat(indexArray[i] +
            ') ' + response.choices[
                i] + '\\n');
    }
    message.text = text;
    print(JSON.stringify(message));
ダイアログビルダーでエンティティ、確認、メッセージの各ノードを作成した後、Kore.aiでは以下のことができます。
ダイアログタスクは、2タイプのユーザープロンプトをサポートしています。
プロンプトエディタには、次の機能を提供する3つのタブがあります。
以下は、天気APIからのレスポンスをカスタム形式でユーザーに表示する“フライトの予約”ボットのJavaScriptメッセージです。 エラープロンプトの場合、“現在のプロンプト”を再試行の順序トグルで有効にしていると、各エラープロンプトメッセージの前にハンドルバーのアイコンが表示されます。これを使用して、メッセージをその順序で表示するように並べ替えることができます。
エンティティ、確認、またはメッセージノードの コンポーネントプロパティ タブからプロンプトまたはボットメッセージを追加または編集できます。エンティティノードと確認ノードの場合はプロンプトを参照し、メッセージノードの場合はレスポンスを参照します。
メモ:保存されたコンテキスト変数は、{{variable brackets}}で使用できます。例:’こんにちは{{context.session.UserContext.firstName}}.どのようなご用件でしょうか?’ボットのレスポンスをさらに追加するには、ステップ2bから繰り返します。
エディターの プレーンテキスト タブを用いて、基本的なエディター制御とHTMLを使用するユーザープロンプトを構成します。テキストを入力して、さらに、太字、斜体、ヘッダースタイル、ハイパーリンク、順序付きリスト、記号付きリスト、行の挿入などのフォーマット設定ボタンを使用して、テキストの形式を設定できます。プレーンテキストタブは、以下のマークアップをサポートしています。
| マークダウン | 出力 |
|---|---|
| #h1 | 見出し1 |
| #h2 | 見出し2 |
| #h3 | 見出し3 |
| #h4 | 見出し4 |
| #h5 | 見出し5 |
| #h6 | 見出し6 |
| “`こんにちは”` | |
| *太字* | 太字 |
| ~斜体~ | 斜体 |
| [Link](http://www.google.com) | リンク |
|  | |
| 注文1。これは1つの2です。これは2です |
注文
|
| 記号 * これは1です * これは2です |
記号
|
| こんにちは!これは >>インデントされています | |
| これは _____ 行です | これは _____ 行です |
| これは<br>新しい行です | これは新しい行です |
エディターのJavaScriptタブにおいて、システム変数やセッション変数を用いてユーザープロンプトメッセージを取り扱うカスタムコードを追加することができます。ある場所の天気予報を表示するサンプルコードを以下に示します。
var loc=context.weatherapi.response.body.query.results.channel.item.condition.text.toLowerCase();
print("Here are the details:\n");
if(loc.indexOf("clear")>=0)
{
print('Its clear outside.');
}
 else if(loc.indexOf("sunny")>=0)
{
    print("Its sunny outside");
}
else if(loc.indexOf("cloud")>=0)
{
    print("Its very cloudy day");
}
else if (loc.indexOf('snow')>=0)
{
    print('Its snowy day');
}
else if(loc.indexOf('rain')>=0)
{
print('Yes, it looks like rainy day.');
}
else if(loc.indexOf('breeze')>=0)
{
    print("It's very breezy out there.");
}
else if(loc.indexOf('wind')>=0)
{
     print("It's very windy out there.");
}
else if(loc.indexOf('shower')>=0)
{
    print("It showering outside.");
}
print("Weather condition: " + context.weather +"\n");
print("Updated at: " + context.lastupdate+"\n");
print("Temperature: " + context.temp+"\n");
print("Wind: " + context.wind+"\n");
print("Pressure: " + context.pressure+"\n");
print("Visibility: " + context.humidity+"\n");
print("Humidity: " + context.visibility+"\n");
詳細については、タスクでのセッション変数とコンテキスト変数の使用を参照してください。
プレビュータブでは、マークアップによってエンドユーザーに表示されるレンダリング出力メッセージのサンプルを見ることができます。コンテキスト変数を含むコードの出力をレンダリングするには、タブ内の キーと値のボックスを使用するように定義して、プレビュー用の有効なサンプル出力をレンダリングします。
デフォルトでは、ダイアログタスクは、すべてのチャネルの標準的ユーザープロンプトを設定します。ただし、1つ以上のチャネルに特定のレスポンスを定義して、そのチャネルのエンドユーザーに、デフォルトのレスポンスの代わりにそれを表示することができます。チャネル固有のレスポンスを定義するには、Kore.aiのように、チャネルを選択して、必要に応じてJavaScript タブ上でユーザープロンプトを定義します。各チャネルでは1つの応答のみ定義できます。
メモ:以下のキーでデフォルト値に戻します。response.message – デフォルトのメッセージを文字列で返します。response.message.choices – 選択肢や確認メッセージのタイプを配列で返します。
var message = {};
var attachments = [];
var attachment = {
    'text': "Exception occurred during API execution",
    'color': '#FFCC00',
    'attachment_type': 'default'
};
attachments.push(attachment);
message.attachments = attachments;
print(JSON.stringify(message));
var message = {
    text: response.message
};
var buttons = [];
for (var i = 0; i < response.choices.length; i++) {
    var choiceItem = response.choices[i];
    if (choiceItem.length > 20) {
        choiceItem = choiceItem.substring(
            0, 18) + '..';
    }
    var element = {
        content_type: 'text',
        title: choiceItem,
        payload: choiceItem
    };
    buttons.push(element);
}
message.quick_replies = buttons;
print(JSON.stringify(message));
var message = {};
var text = response.message + ' <br> ';
for (var i = 0; i < response.choices.length; i++) {
    text = text.concat(
        '<u> + response.choices[i] + ' <
        /u> <br>');
    }
    message.text = text;
    print(JSON.stringify(message));
var message = {};
    var indexArray = ['a', 'b', 'c',
        'd', 'e',
        'f', 'g', 'h', 'i', 'j',
        'k', 'l', 'm', 'n', 'o',
        'p', 'q', 'r', 's', 't',
        'u', 'v', 'w', 'x', 'y',
        'z'
    ];
    var text = response.message + '\\n';
    for (var i = 0; i < response.choices
        .length; i++) {
        text = text.concat(indexArray[i] +
            ') ' + response.choices[
                i] + '\\n');
    }
    message.text = text;
    print(JSON.stringify(message));
After creating an Entity, Confirmation, or Message node in the Dialog Builder, Kore.ai lets you do the following:
Dialog Tasks support two types of user prompts:
The prompt editor has three tabs to offer the following features:
Below is the JavaScript message from the Book Flights bot that presents the response from a weather API to the users in a custom format:
In the case of Error Prompts, if you have enabled the Present Prompts in the Order of Retries toggle, the handlebar icon will be visible before each error prompt message. You can use this to re-order the messages so that it is displayed in that sequence.
You can add or edit the prompts or bot messages from the Component Properties tab of an Entity, Confirmation, or Message node.
In the case of Entity and Confirmation nodes, you refer to Prompts whereas, for the Message node, they are referred to as Responses.
Note: You can use stored context variables with {{variable brackets}}. For example, ‘Hello {{context.session.UserContext.firstName}}. How can I help you?’To add any more bot responses, repeat from step 2b.
Use the Plain Text tab in the editor to compose the user prompts using basic editor controls and HTML. You can enter text, and then format the text using the formatting buttons for bold, italics, header styles, hyperlinks, ordered and unordered lists, and inserting a line.
The plain text tab supports the following markups:
| Markdown | Output |
|---|---|
| #h1 | Heading One |
| #h2 | Heading Two |
| #h3 | Heading Three |
| #h4 | Heading Four |
| #h5 | Heading Five |
| #h6 | Heading Six |
| “`Hello“` | |
| *Bold* | Bold |
| ~Italic~ | Italic |
| [Link](http://www.google.com) | Link |
|  | |
| Order 1. This is one 2. This is two |
Order
|
| Bullet * This is one * This is two |
Bullet
|
| Hi! This is >>indented |
|
| This is line ___ | This is line ___ |
| This is <br> new line | This is new line |
On the JavaScript tab of the editor, you can add custom code to handle the user prompt message using system and session variables. The following is a sample code for displaying the weather forecast for a location:
var loc=context.weatherapi.response.body.query.results.channel.item.condition.text.toLowerCase();
print("Here are the details:\n");
if(loc.indexOf("clear")>=0)
{
print('Its clear outside.');
}
 else if(loc.indexOf("sunny")>=0)
{
    print("Its sunny outside");
}
else if(loc.indexOf("cloud")>=0)
{
    print("Its very cloudy day");
}
else if (loc.indexOf('snow')>=0)
{
    print('Its snowy day');
}
else if(loc.indexOf('rain')>=0)
{
print('Yes, it looks like rainy day.');
}
else if(loc.indexOf('breeze')>=0)
{
    print("It's very breezy out there.");
}
else if(loc.indexOf('wind')>=0)
{
     print("It's very windy out there.");
}
else if(loc.indexOf('shower')>=0)
{
    print("It showering outside.");
}
print("Weather condition: " + context.weather +"\n");
print("Updated at: " + context.lastupdate+"\n");
print("Temperature: " + context.temp+"\n");
print("Wind: " + context.wind+"\n");
print("Pressure: " + context.pressure+"\n");
print("Visibility: " + context.humidity+"\n");
print("Humidity: " + context.visibility+"\n");
For more information, see Using Session and Context Variables in Tasks.
On the Preview tab, you can view a sample of the rendered output message that is displayed to the end-user with markup. To render the output for the code involving context variables, define them to use the Key and Value boxes in the tab to render a valid sample output for preview.
By default, the Dialog Tasks configures the standard user prompts for all channels. However, you can define a specific response for one or more channels to display to the end-user in that channel instead of the Default response.
To define a channel-specific response, select a channel, for example, Kore.ai, and then define the user prompt on the JavaScript tab as needed. Only one response can be defined for each channel.
Note: Use the following keys to return default values for:
response.message – Returns the default message as a string.
response.message.choices – Returns the options choice or confirmation message types as an array.
var message = {};
var attachments = [];
var attachment = {
    'text': "Exception occurred during API execution",
    'color': '#FFCC00',
    'attachment_type': 'default'
};
attachments.push(attachment);
message.attachments = attachments;
print(JSON.stringify(message));
var message = {
    text: response.message
};
var buttons = [];
for (var i = 0; i < response.choices.length; i++) {
    var choiceItem = response.choices[i];
    if (choiceItem.length > 20) {
        choiceItem = choiceItem.substring(
            0, 18) + '..';
    }
    var element = {
        content_type: 'text',
        title: choiceItem,
        payload: choiceItem
    };
    buttons.push(element);
}
message.quick_replies = buttons;
print(JSON.stringify(message));
var message = {};
var text = response.message + ' <br> ';
for (var i = 0; i < response.choices.length; i++) {
    text = text.concat(
        '<u> + response.choices[i] + ' <
        /u> <br>');
    }
    message.text = text;
    print(JSON.stringify(message));
var message = {};
    var indexArray = ['a', 'b', 'c',
        'd', 'e',
        'f', 'g', 'h', 'i', 'j',
        'k', 'l', 'm', 'n', 'o',
        'p', 'q', 'r', 's', 't',
        'u', 'v', 'w', 'x', 'y',
        'z'
    ];
    var text = response.message + '\\n';
    for (var i = 0; i < response.choices
        .length; i++) {
        text = text.concat(indexArray[i] +
            ') ' + response.choices[
                i] + '\\n');
    }
    message.text = text;
    print(JSON.stringify(message));
If you select “All Channels” as an option in the Channel drop-down of Bot Responses, you can enter your response as either a Plain text or use JavaScript, but the JavaScript will not have any list of templates displayed (see the following screenshot), because one template/JSON may not work for ‘All’ channels.
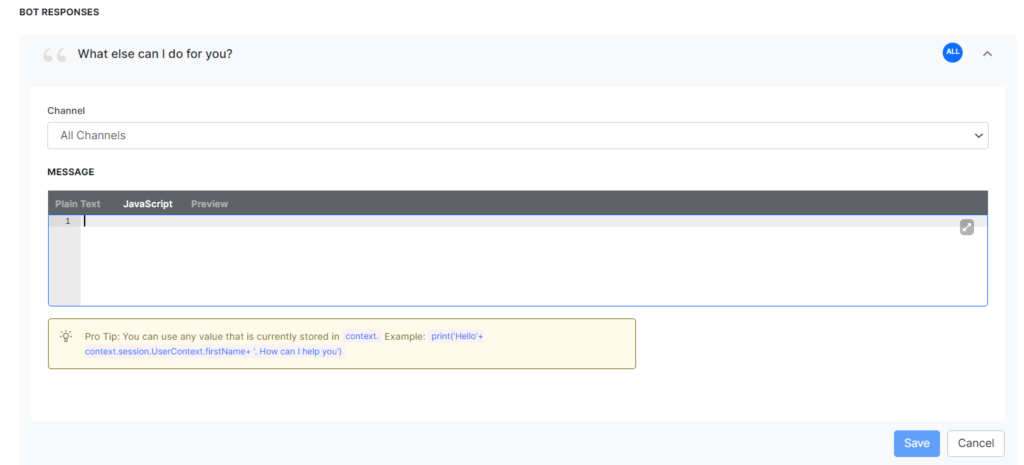
If your bot has multiple channels, most probably each channel has its own template.
For a few channel options in the Channel drop-down, you can see a list of templates displayed for JavaScript response. For example, select the Web/Mobile Client channel and choose any template from the Channel Templates list for your response as illustrated below.

For more information on templates, see Widget SDK – Message Formatting and Templates.
The same message configuration rules and principles apply while configuring any entity prompt or KG responses too.