Active Directoryからユーザーを同期する

Bot 管理者または管理者ユーザーは、組織の LDAP Active Directory と同期するように Kore.ai を設定して、会社のユーザーを Kore.ai に登録できます。[登録 > ディレクトリ同期] ページでは、次のことができます。

  • クラウドベースのエージェントを使用して Active Directory (AD) サーバーに接続する
  • 会社の Active Directory との同期を手動で開始する
  • 既存のユーザーまたはグループに対する不要な更新を防止するために使用される除外ルールを作成する
  • Active Directory からインポートする配布リストを定義する
  • Active Directory からインポートする組織単位を定義する
  • 同期の自動スケジュールをセットアップする

Kore.ai は LDAP Active Directory と同期して、組織のメンバー情報を照合し、名前、部署、役職、電話番号、場所、組織内のユーザー ステータスなどのユーザー プロファイル データを含めることができます。
Kore.ai ユーザーが退職し、Active Directory で無効になった場合、Kore.ai は次に予定されている Active Directory 同期中に Kore.ai アカウントを自動的に無効にすることができます。会社の Active Directory が同期中に変更されることはありません。

注意: v8.1 以降、AD Sync 用の Kore.ai Directory Agent のサポートは終了しました。このドキュメントで詳しく説明されているクラウド コネクタ オプションを使用するか、ユーザーを同期するための公開 API を使用できます。詳しくは、ここをクリックしてください

Prerequisites

Active Directory 同期を設定するには、次のことを行う必要があります。

  1. LDAP サーバーでアクションを読み取り、実行するための管理アクセス権を持っている必要があります。
  2. LDAP クエリと LDAP サーバー管理に精通している必要があります。
  3. Microsoft Active Directory LDAP サーバーを持っている必要があります。

Kore.ai は、Active Directory へのアクセスをセットアップし、会社のニーズに合わせてカスタマイズされた同期プロセスを設定するプロセスを案内するウィザード ベースのアプローチを提供します。メンバー、および必要に応じて配布リストと組織単位の同期を定義できます。

設定

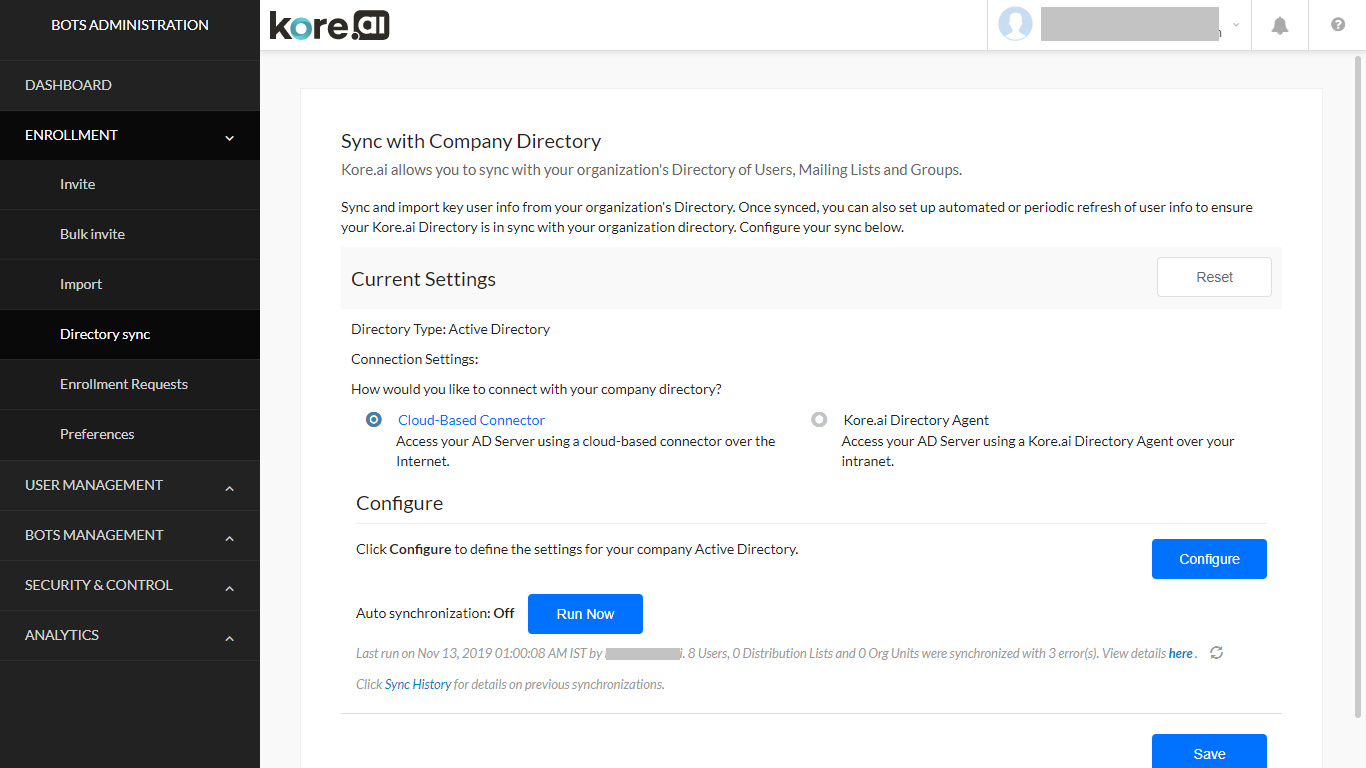
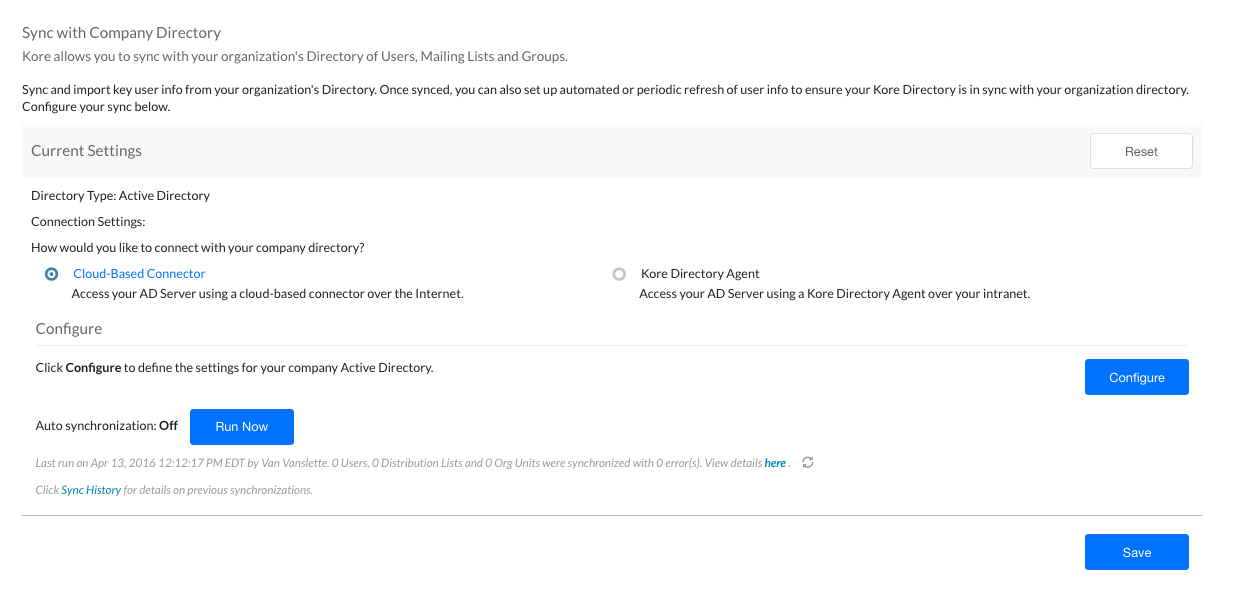
クラウドベースのコネクタを使用して Active Directory を設定するには、ボット 管理コンソールにログオンし、次の手順を実行して、会社の Active Directory 同期の設定にアクセスする必要があります。

  1. [登録] モジュールの [ディレクトリ同期] ページで、[クラウドベース コネクタ]を選択します。
  2. 設定セクションで、[設定]をクリックします。
  3. 会社ディレクトリとの同期の設定ダイアログが表示されます。ここに記載されている手順に従って続行してください。

AD 同期設定

以下の手順を実行して、同期の設定を定義します。すでに同期設定を行っている場合は、設定を変更して手動で同期を開始できます。

注意: v7.3 以前のプラットフォームで構築された ボット を使用している場合は、アップグレードまたは設定のオプションを利用できます。「アップグレードせずに設定」に進むと、設定手順のうち以下のオプションが利用できなくなります。
– AD のサブグループへのアクセス、または AD の OU に対して Kore.ai 内にグループを作成するオプション;
– AD サーバーの受信ペイロードからの適切なキーにマッピングすることにより、ユーザー データにカスタム フィールドを追加するオプション
– 包含ルールを指定するオプション。
また、前のバージョンは今後のリリースで非推奨となります。

以下の手順では、クラウドベースの接続設定ダイアログについて説明します。

  1. [接続] タブで、次のフィールドを定義します。
    EnrollmentDirectorySyncConfigTab
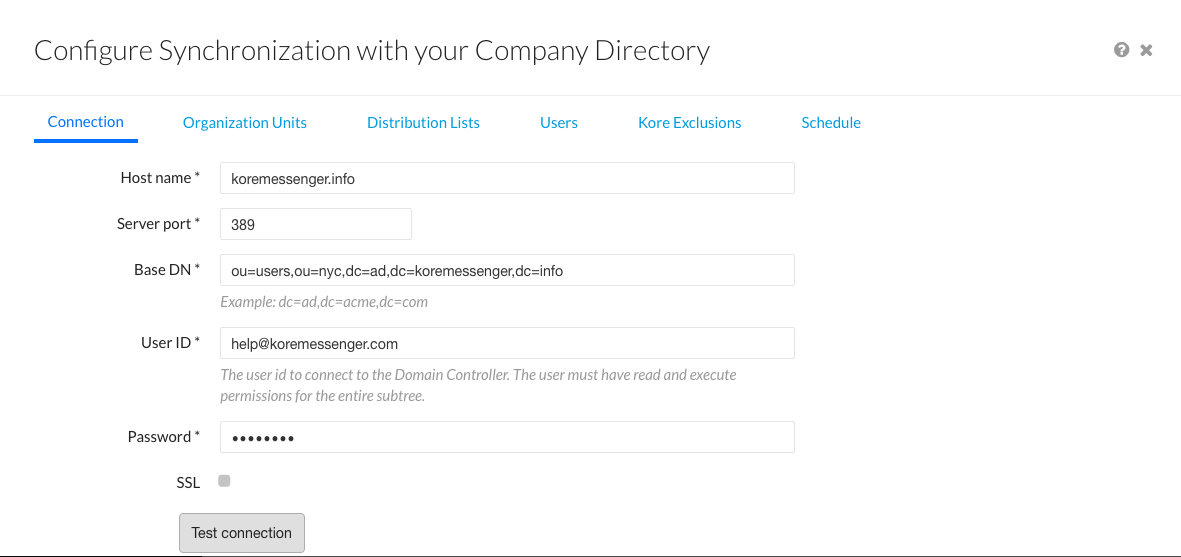
  1. ホスト名 – ドメイン ホストの名前 (例: MyCompany.com または 10.12.6.151)。
  2. サーバー ポート – ドメイン ホストのポート番号 (10042 など)
  3. ベース DN – ドメイン内のユーザーとグループのサーバーの場所。(dc=kore,dc=com など)
  4. ユーザー ID – ドメイン コントローラーに接続するための認証用のユーザー名。
  5. パスワード – ドメイン コントローラーに接続するための認証用パスワード。
  6. SSL – HTTPS の SSL を有効にする場合に選択します。
  7. テスト接続 – クリックして、認証とホスト設定をテストします。
  8. [保存して次へ]をクリックして続行します。
  • 必要に応じて [組織単位] タブで、会社のディレクトリからインポートする必要がある組織単位を定義できます。選択した OU のグループとサブグループがプラットフォームに同期され、AD サーバーに存在するグループの階層がプラットフォームで維持されます。
    1.  以下のオプションから選択できます。
      • すべての組織単位をインポート
      • 単位をインポートしない
      • 特定の単位をインポート
    2. .[保存して次へ]をクリックして続行します。
  • 必要に応じて、[配布リスト] タブで、Active Directory から配布リストをインポートを選べます。
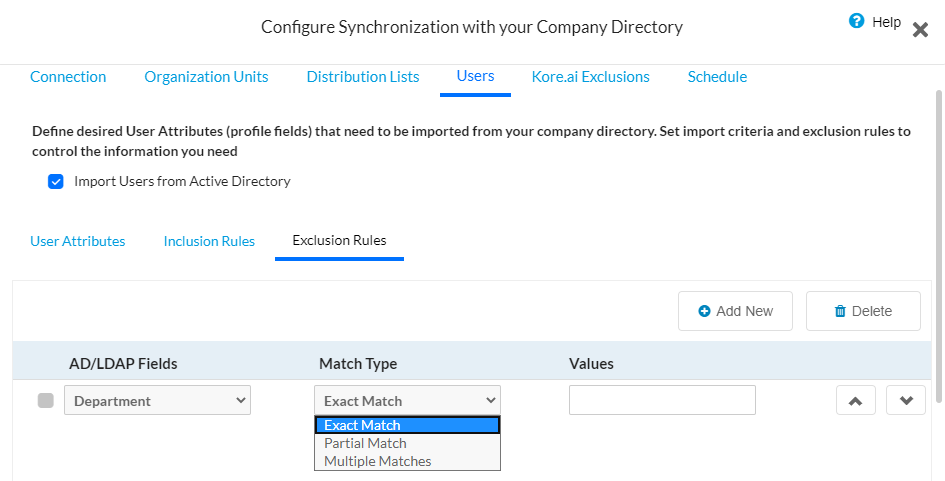
  • [ユーザー] タブでは、会社のディレクトリからインポートする必要がある必要なユーザー属性 (プロファイル フィールド) を定義できます。インポート条件、包含ルール、除外ルールを設定して、組織からインポートする情報を管理できます。
    1. [ユーザー属性]子タブでは、
      • Kore.ai ユーザー プロファイル フィールドの定義済みのデフォルト マッピングを関連する LDAP 属性に使用してユーザー プロファイル情報をインポートするか、
      • 顧客属性の名前と値を使用して独自のカスタム マッピングを作成できます。
    2. 包含ルールでは、プロファイル パラメータを使用して同期条件またはフィルターを定義することにより、AD サーバーから選択したユーザーを同期できます。LDAP フィルター構文を使用してルールを作成できます。詳しくは、こちらを参照してください
    3. [除外ルール]子タブで、ユーザー (デフォルトおよびカスタム) データの受信ユーザー レコードを制限するルールを作成できます。
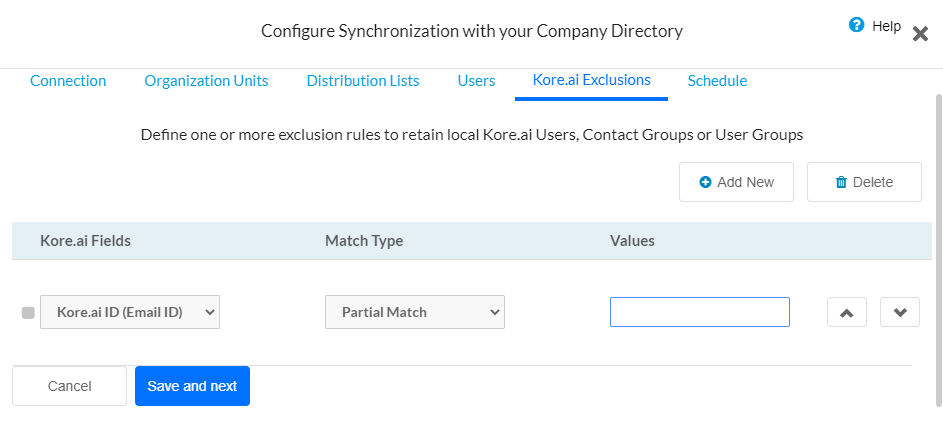
  • 必要に応じて、[Kore.ai の除外] タブで、Active Directory が特定のユーザー (デフォルトおよびカスタム)、配布リスト、または組織グループを置き換えないように同期の除外を定義することができます。
  • [スケジュール] タブで、次の図に示すように、Active Directory との同期スケジュールを有効にして定義します。
    botsadminenrollmentdirectorysyncscheduletab

    1. 同期を有効にする – クリックして同期スケジュールを有効または無効にします。
    2. 同期頻度 – 以下のうち、いずれかを選択します。
      • 毎日 – 毎日の同期を開始する同期の開始日時を指定します。
      • 毎週 – 同期する曜日と、毎週の同期を開始する同期の開始日時を指定します。
      • 毎月 – 同期する日と、毎月の同期を開始する同期の開始日時を指定します。
      • その他 – 同期する曜日数または週の数と、同期を開始する同期の開始日時を指定します。
  • [保存]をクリックして同期設定を保存し、会社ディレクトリとの同期の設定ダイアログを閉じます。

Active Directory の同期の結果を表示したい場合があります。ここを参照してください

削除されたユーザーに関する注意事項:

  • AD サーバーで削除または削除済みとしてマークされたユーザーは、ボット プラットフォームからも削除され、AD 同期プロセス中にユーザーのリストに表示されなくなります。
  • ユーザー レコードは、相互参照および監査の目的でデータベースに保持されます。
  • そのようなユーザーによるログイン試行は、システムによってブロックされます。
  • 削除は、ユーザーが属する特定のアカウントに対して行われます。例えば、ユーザーが複数のアカウントの一部である場合、ユーザーは、ユーザーがまだアクティブな状態である他のアカウントにアクセスできます
  • 次のユーザーはアカウントから削除できません
    • ユーザーは 1 つ以上の ボット の ボット オーナーです
    • ユーザーはアカウント オーナーです

    このようなユーザーは、AD 同期プロセス中にアカウントから削除されません。AD 同期のログには、削除できなかったユーザーのリストとその理由が含まれます。

手動同期

スケジュールされた同期の間に多くの変更がある場合は、Active Directory との手動同期を開始して更新することをお勧めします。
この手順を完了するには、アカウントの同期設定を定義しておく必要があります。

Active Directory同期設定にアクセスする方法は、使用しているコネクタのタイプによって異なります。Kore.ai Active Directory 設定ダイアログにアクセスするには、次のいずれかの手順を実行します。

クラウドベースのコネクタを使用して Active Directory 同期を手動で開始する場合

  • 次の図に示すように、[登録 >ディレクトリ同期] ページの[現在の設定] セクションで、[今すぐ実行]をクリックします。
    ディレクトリ同期を手動で開始する

ディレクトリ同期が進行中のメッセージがページの上部に表示されます。

レポートの表示

アカウントの Active Directory 同期を設定して実行したら、同期の結果を確認する必要があります。このトピックでは、現在の Active Directory 同期のレポートにアクセスして表示する方法について説明します。

Active Directory 同期実行の最終実行結果にアクセスする方法は、使用しているコネクタのタイプによって異なります。Kore.ai Active Directory 同期の最終実行結果にアクセスするには、次のいずれかの手順を実行します。

クラウドベースのコネクタを使用して Active Directory 同期の最終実行レポートを表示する場合

  • 次の図に示すように、ボット 管理コンソールの[登録] モジュールの [ディレクトリ同期] ページで、ここをクリックします。
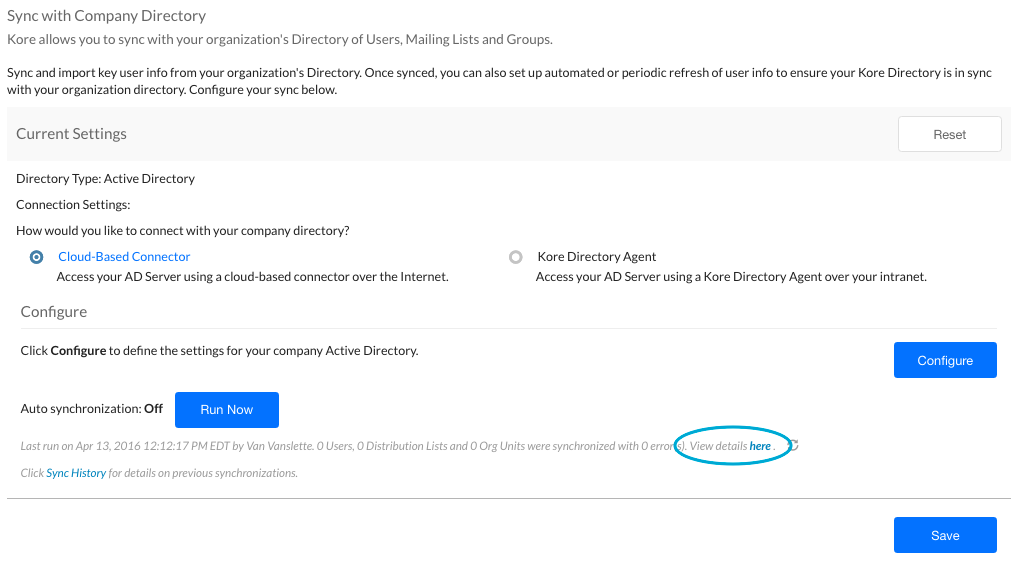
    最新の同期レポート - クラウドコネクタ

最新の実行レポートの表示

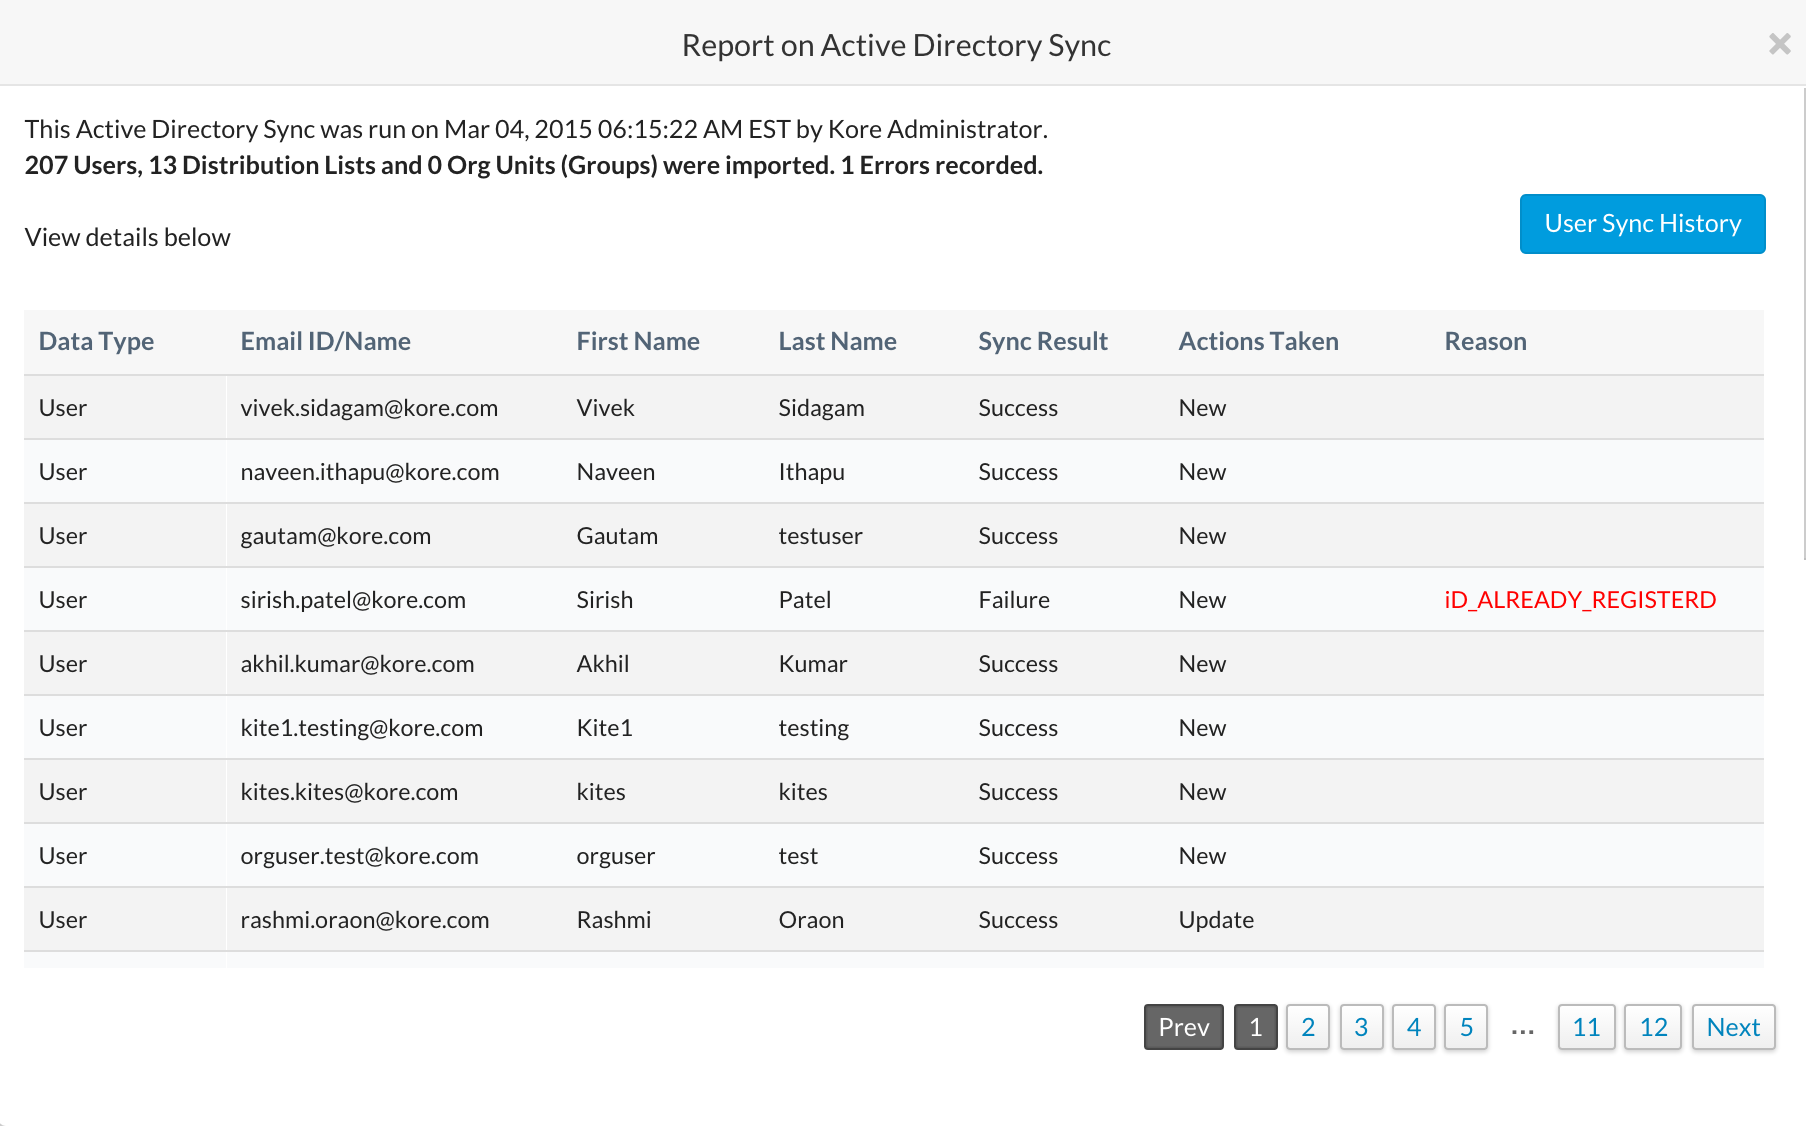
次の図に示すように、Active Directory 同期のレポートダイアログが表示されます。
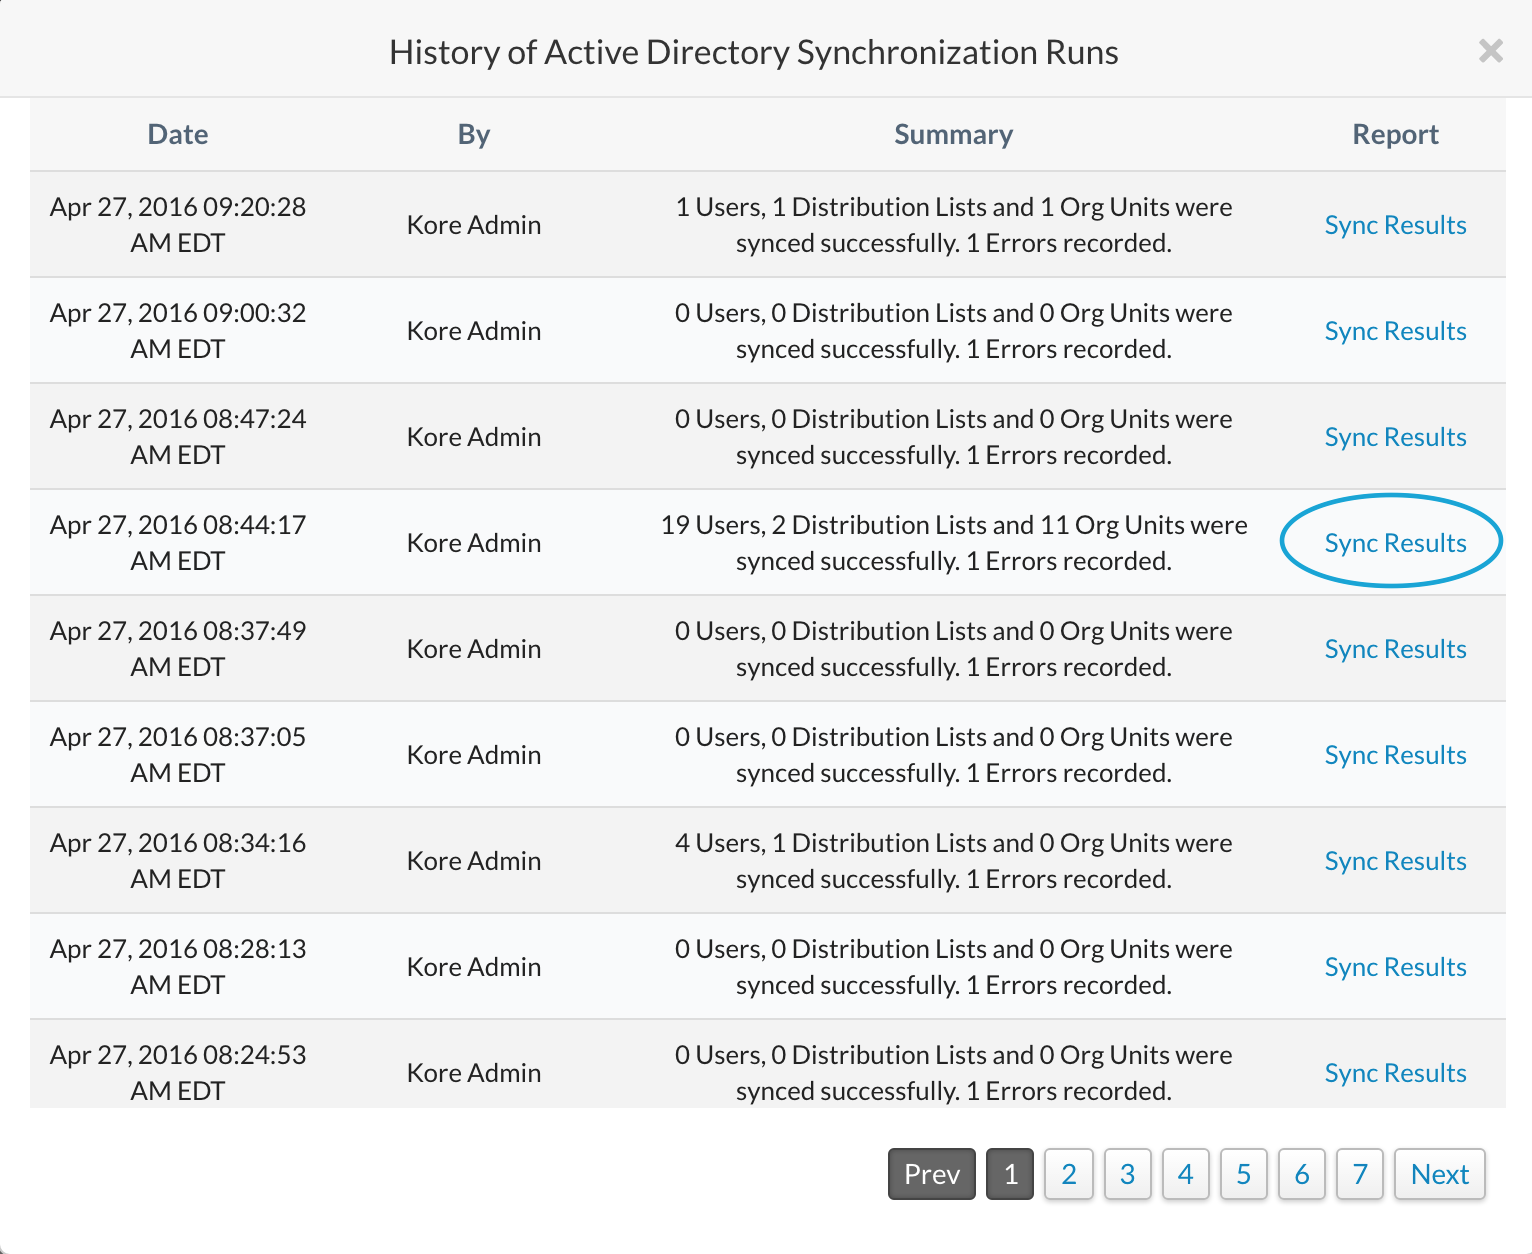
レポートの表示

履歴の表示

その同期の結果とともに、すべての過去の Active Directory 同期操作を確認できます。このトピックでは、レポートにアクセスする方法と、同期に関する詳細を取得する方法について説明します。

Active Directory 同期実行の履歴にアクセスする方法は、使用しているコネクタのタイプによって異なります。Kore.ai Active Directory 同期の履歴結果にアクセスするには、次のいずれかの手順を実行します。

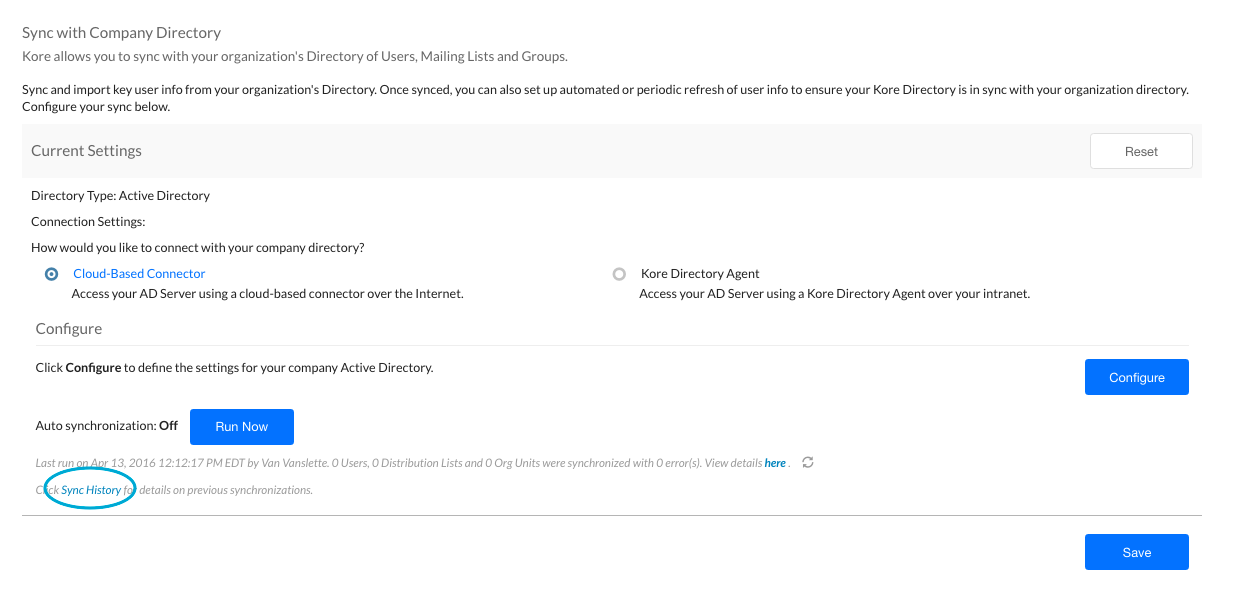
クラウドベースのコネクタを使用して Active Directory 同期の履歴レポートを表示する場合

  • 次の図に示すように、ボット 管理コンソールの[登録] モジュールの [ディレクトリ同期] ページの[現在の設定] セクションで、[同期履歴]をクリックします。
    クラウド コネクタ ディレクトリ同期の結果

レポートの表示

Active Directory 同期実行の履歴ダイアログで、インポートの結果を表示するには、表示するインポートのレポート列で [同期結果]をクリックします。
ディレクトリ同期結果ダイアログ

Synchronizing Users from Active Directory

As a Bots Admin or admin user, you can configure Kore.ai to synchronize with your organizational LDAP Active Directory to enroll users from your company into Kore.ai. On the Enrollment > Directory sync page, you can do the following:

  • Use a cloud-based agent to connect to your Active Directory (AD) server
  • Manually start synchronization with your company Active Directory
  • Create exclusion rules used to prevent unwanted updates to existing users or groups
  • Define distribution lists to import from Active Directory
  • Define organizational units to import from Active Directory
  • Set up an automated schedule for synchronization.

Kore.ai can synchronize with your LDAP Active Directory to match the member information from your organization to include, for example, user profile data such as name, department, title, telephone number, location, and user status in the organization.
If a Kore.ai user leaves your company and is deactivated in Active Directory, Kore.ai can automatically deactivate the Kore.ai account during the next scheduled Active Directory synchronization. Your company’s Active Directory is never modified during synchronization.

Note: Post v8.1, the support for Kore.ai Directory Agent for AD Sync has been discontinued. You can use the Cloud Connector option discussed in detail in this document or use the public APIs for synchronizing your users, click here for details.

Prerequisites

To configure Active Directory synchronization, you must:

  1. Have administrative access for reading and executing actions on your LDAP server.
  2. Familiarity with LDAP queries and LDAP server administration.
  3. Have a Microsoft Active Directory LDAP Server.

Kore.ai offers a wizard-based approach that will take you through the process to set up access to an Active Directory and configure the synchronization process customized for your company. You can define synchronization for members, and if needed, distribution lists and organizational units.

Configuration

To configure Active Directory using the cloud-based connector, you must log on to the Bots Admin Console, and complete the following steps to access the configuration settings for your company Active Directory sync.

  1. In the Enrollment module, on the Directory Sync page, select Cloud-Based Connector.
  2. From the Configure section, click Configure.
  3. The Configure Synchronization with your Company Directory dialog is displayed. Follow the steps given here to proceed.

AD Sync Configuration

Complete the steps in the following procedure to define the synchronization settings. If you have already defined your synchronization settings, you can modify the settings and initiate a manual sync.

NOTE: If you are using a bot built on the platform from before v7.3, you will have an option to Upgrade or Configure. If you proceed to Configure without Upgrade the following options from the configuration steps will not be available:
-access to AD sub-Groups or option to create a group within Kore.ai for the OUs in AD;
-add custom fields to the user data by mapping it to the right key from the AD server incoming payload;
– specify the inclusion rules.
Also, the older version would be deprecated in the upcoming releases.

In the following procedure, the cloud-based connection settings dialogs are described.

  1. On the Connection tab, define the following fields:
    EnrollmentDirectorySyncConfigTab
  1. Host Name – The name of the domain host, for example, MyCompany.com or 10.12.6.151.
  2. Server Port – The port number for the domain host, for example, 10042.
  3. Base DN – The server location for users and groups in a domain, for example, dc=kore,dc=com.
  4. User ID – The username for authentication to connect to the domain controller.
  5. Password – The password for authentication to connect to the domain controller.
  6. SSL – Select to enable SSL for HTTPS.
  7. Test Connection – Click to test the authentication and Host configuration settings.
  8. Click Save and next to continue.
  • Optionally, on the Organizational Units tab, you can define the Org Units that need to be imported from your company directory. Groups and sub-groups from the selected OU will be synchronized into the platform and the hierarchy of groups as present in the AD Server will be maintained in the platform.
    1.  You can choose to
      • Import all Organization Units,
      • Not Import any unit, or
      • Import specific units.
    2. . Click Save and next to continue.
  • Optionally, on the Distribution Lists tab, you can select to Import Distribution Lists from Active Directory.
  • On the Users tab, you can define the desired User Attributes (profile fields) that need to be imported from your company directory. You can set import criteria, inclusion rules, and exclusion rules to control the information that you want to import from your organization.
    1. On the User Attributes child tab you can import the user profile information
      • using predefined Default mapping of Kore.ai user profile fields to relevant LDAP attributes or
      • create your own custom mapping with the Customer Attribute name and values.
    2. On the Inclusion Rules, you can sync select users from your AD Server by defining the sync criteria or filters using the profile parameters. You can write the rules using the LDAP filter syntax, refer here for more.
    3. On the Exclusion Rules child tab, you can create rules to limit incoming user records for the user (default and custom) data.
  • Optionally, on the Kore.ai Exclusions tab, you can define exclusions for synchronization to prevent Active Directory from replacing specific users (default and custom), distribution lists, or organizational groups.
  • On the Schedule tab, enable and define the synchronization schedule with the Active Directory as shown in the following illustration.
    botsadminenrollmentdirectorysyncscheduletab

    1. Enable Synchronization – Click to enable or disable a synchronization schedule.
    2. Synchronization Frequency – Select one of:
      • Daily – Specify the Start Synchronization date and time to begin the daily sync.
      • Weekly – Specify the day of the week to synchronize and the Start Synchronization date and time to begin the weekly sync.
      • Monthly – Specify the day of the month to synchronize and the Start Synchronization date and time to begin the monthly sync.
      • Other – Specify the number of DAY(S) or WEEK(S) to synchronize and the Start Synchronization date and time to begin the sync.
  • Click Save to save the synchronization settings and close the Configure Synchronization with your Company Directory dialog.

You may want to view the results of Active Directory sync, see here.

Notes regarding deleted users:

  • Users who are deleted or marked as deleted in the AD Server will be deleted from the Bots Platform as well and will be not available in the list of users during AD sync process
  • The user record will be retained in the database for any cross-reference and audit purposes
  • Any login attempts by such users will be blocked by the system
  • Deletion would be against a specific Account to which the user belongs to i.e. if the user is part of multiple accounts, then the user will be able to access any other accounts in which the user is still an active state
  • The following user cannot be deleted from the account
    • User is Bot Owner for one or more bots
    • User is Account Owner

    Such users will not be deleted from the account during the AD Sync process. The AD Sync logs will contain the list of such users who could not be deleted along with the reason.

Manual Sync

You may want to initiate manual sync with your Active Directory to update when there are many changes between scheduled syncs.
To complete this procedure, you must have already defined synchronization settings for your account.

How you access the Active Directory Sync configuration depends which type of connector you are using. Complete one of the following procedures to access the Kore.ai Active Directory configuration dialog.

To manually start an Active Directory sync using the cloud-based connector

  • In the Enrollment > Directory Sync page, in the Current Settings section, click Run Now as shown in the following illustration.
    Manually Start a Directory Sync

The Directory Synchronization is in-progress message is displayed at the top of the page.

View Report

After you configure and run an Active Directory sync for your account, you should review the results of the sync. This topic describes how to access and view a report for the current Active Directory sync.

How you access the last run results for your Active Directory sync runs depends which type of connector you are using. Complete one of the following procedures to access the last run results for Kore.ai Active Directory sync.

To view the last run report for an Active Directory sync using the cloud-based connector

  • In the Bots Admin Console Enrollment module, on the Directory Sync page, click here as shown in the following illustration.
    Latest Sync Report - Cloud Connector

Viewing the Last Run Report

The Report on Active Directory Sync dialog is displayed as shown in the following illustration.
View Report

View History

You can review all historical Active Directory sync operations along with the results of that sync. This topic describes how to access the report and how to retrieve details about the synchronization.

How you access the history for your Active Directory sync runs depends which type of connector you are using. Complete one of the following procedures to access the history results for Kore.ai Active Directory sync.

To view historical reports for Active Directory sync using the cloud-based connector

  • In the Bots Admin Console Enrollment module, on the Directory Sync page, in the Current Settings section, click Sync History as shown in the following illustration.
    Cloud Connector Directory Sync Results

Viewing a Report

In the History of Active Directory Synchronization Runs dialog, to view the results of an import, in the Report column for the import that you want to view, click Sync Results.
Directory Sync Results Dialog