ユーザーとユーザー データのインポート

複数の Kore.ai ユーザーを招待する必要があり、メール アドレスに加えて、ユーザーに関する部署電話番号役職などのユーザーの追加情報を持っている場合、[インポート] ページを使用して、追加のユーザー情報を含むリストに基づいて、新しいユーザーを追加したり、既存のユーザーを更新したりできます。次の図は、[登録] モジュールの [インポート] ページの例です。 
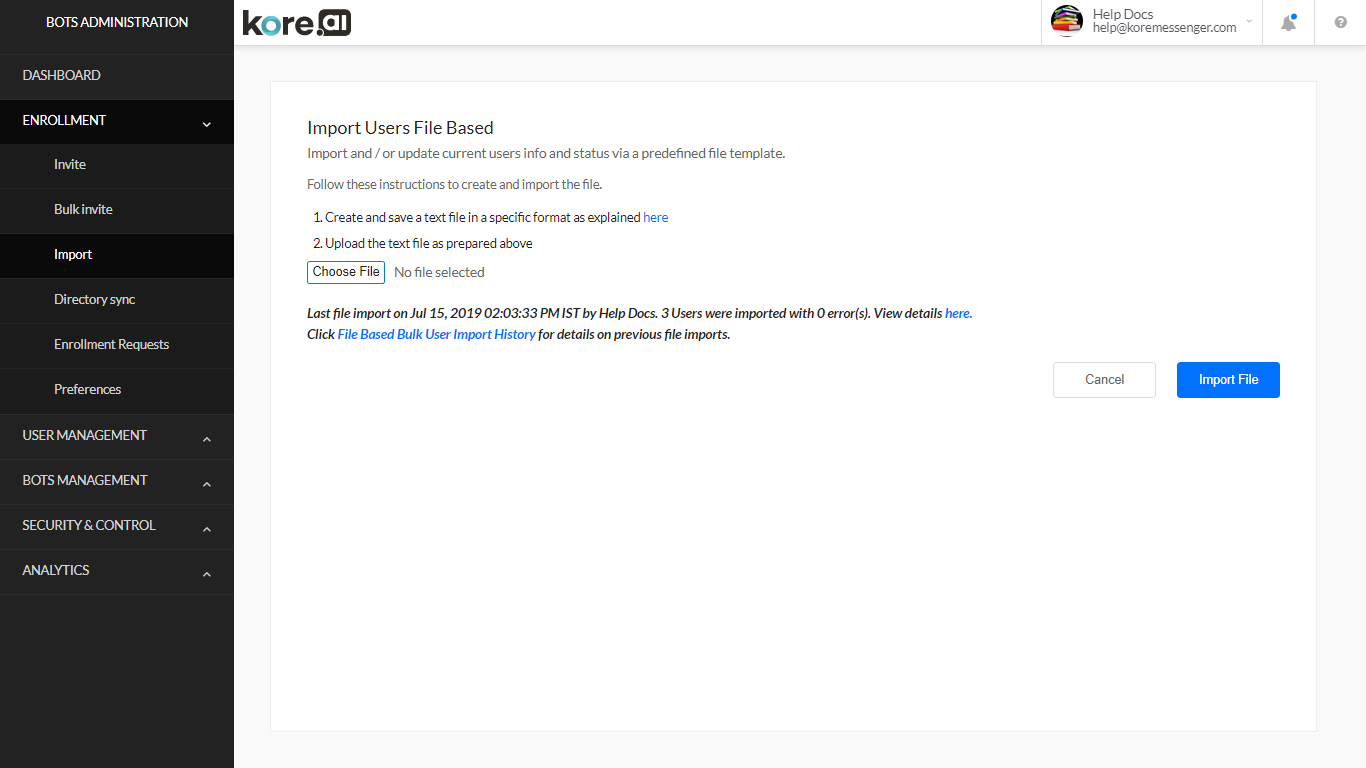
インポート ファイルは基本的なテキスト ファイルで、.txt または .csv ファイル形式で保存できます。インポート ファイルを作成したら、ファイルをアップロードして、アカウントの Kore.ai ユーザーを追加または更新できます。

ファイル要件

インポート ファイルを作成するときは、次のガイドラインを参照してください。

  • 最初の行は、ヘッダー行のような、Kore.ai 内でデータが保存されるフィールドの名前を識別します。
  • 以下の Kore.ai アカウント フィールドは必須です。
    • メール ID – 必須
    • 名前(名)– 必須
    • 苗字(姓)– 必須
    • 代替 ID, 職場電話番号, 役職, 部署 – オプション
    • ユーザー ステータス – – 必須 – 以下のうち一つを選びます。
      • 新規
      • 更新
      • 削除
      • 有効
  • Kore.aiユーザーごとに 1 行作成します
  • 有効なフィールド区切り文字は、コンマ、パイプ、セミコロン、タブです

インポート ファイルを使用する場合、次の検証ルールが適用されます。

  • 使用できないメール形式のエントリーは無視されます。
  • メール アドレスのインポートが成功するたびに、Kore.ai ユーザーになるための招待メールが生成されます。
  • Kore.ai アカウントの既存のユーザーには、招待メールは送信されません。
  • ステータスが有効に設定されているインポートされたユーザーには、Kore.aiアカウントが有効になったことを示す通知が送信されます。

サンプル ファイル

.txt ファイルの場合:

メール ID、姓、名、代替 ID、職場電話番号、役職、部署、ユーザー ステータス Kore.aiUser1@kore.com,User1FirstName,User1LastName,,800-555-1212,President,Executive,New Kore.aiUser2@kore.com,User2FirstName,User2LastName,,800-555-5555,VicePresident,Executive,New Kore.aiUser3@kore.com,User3FirstName,User1LastName,,,,,New

インポート ファイルを作成してアップロードする

ボット 管理者として管理できる Kore.ai ユーザーになるように組織内のユーザーを招待するファイルを作成できます。このトピックでは、アカウントで Kore.ai ユーザーとして招待したいユーザーのメール アドレスやユーザー情報 (姓、名、電話番号、部署など) を含むファイルを作成する方法について説明します。ユーザーのメール アドレス情報しか持っていない場合は、代わりに一括招待ファイルを作成してインポートする必要があります。インポート ファイルを作成する場合

  1. テキスト エディターまたはスプレッドシートで、次の例に示すように、最初の行にフィールド ID を入力し、メール アドレスとデータを次の各行またはコンマ区切りのリストに入力します。

.txt ファイルの場合:

メール ID、姓、名、代替 ID、職場電話番号、役職、部署、ユーザー ステータス Kore.aiUser1@kore.com,User1FirstName,User1LastName,User1AlternateID,800-555-1212,President,Executive,New Kore.aiUser2@kore.com,User2FirstName,User2LastName,User2AlternateID,800-555-5555,VicePresident,Executive,New Kore.aiUser3@kore.com,User3FirstName,User1LastName,,,,New
  1. インポート ファイルを .txt または .csv ファイルとして保存します (Kore.aiImport.txt または Kore.aiImport.csv など)。インポート ファイルを作成したら、ファイルをアップロードしてアカウント ユーザーを招待できます。

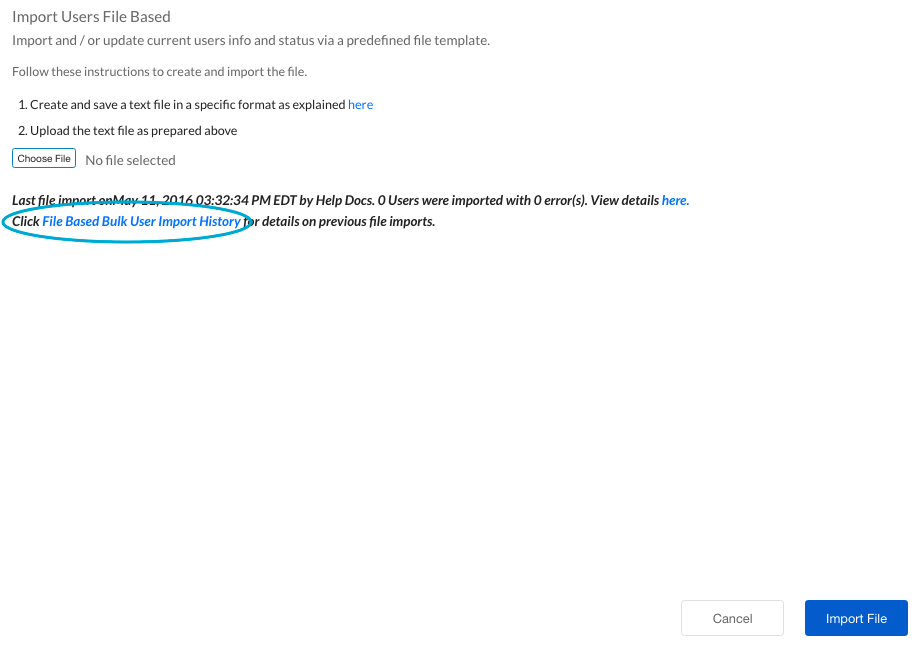
インポート ファイルを作成したら、インポート ファイルをアップロードする必要があります。このトピックでは、アカウントのユーザーのインポート ファイルをアップロードする方法について説明します。ユーザー インポート ファイルをアップロードする場合

  1. [登録>インポート] ページで、[ファイルを選択]をクリックします。
  2. インポート ファイルに移動し、[開く]をクリックします。ファイル名は、[ファイルを選択] ボタンの右側に表示されます。
  3. [インポート ファイル]をクリックします。ファイルのインポートボタンの直後に、インポートのステータスが表示されます。
  4. ファイル ベースの一括ユーザー インポート履歴リンクをクリックして、以前のインポートからのインポート ステータスを確認できます。UserEnrollmentImportUsersWithData

結果を表示する

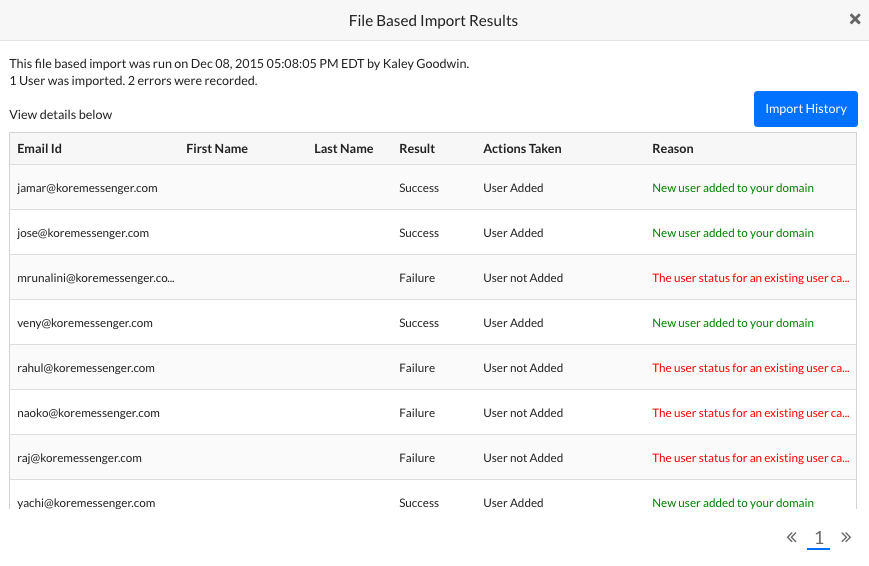
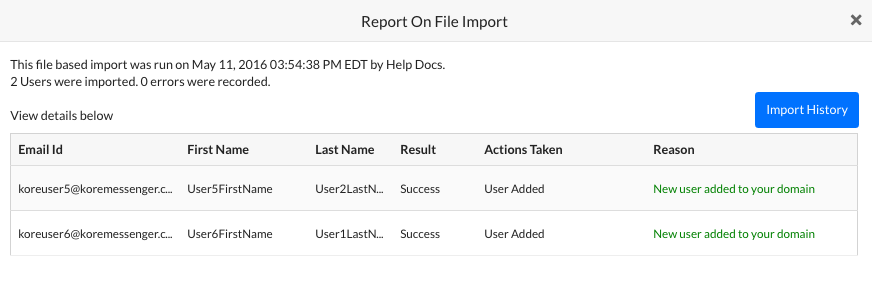
必要に応じて、ユーザーごとにインポート操作の結果を確認できます。このトピックでは、現在のインポート レポートの結果を表示する方法について説明します。現在のユーザー インポートの結果を表示する場合

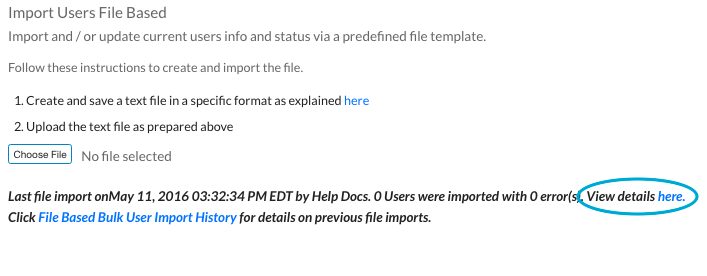
  1. [登録>インポート] ページで、以下に示すように、ここのリンクをクリックします。
  2. ファイルのインポートに関するレポート ダイアログが開きます。

履歴の表示

アカウント内のユーザーのリストを作成してインポートした後、インポートの結果を確認できます。このトピックでは、ファイルベースのユーザー インポートの履歴リストを表示する方法について説明します。過去のインポート レポートを表示する場合

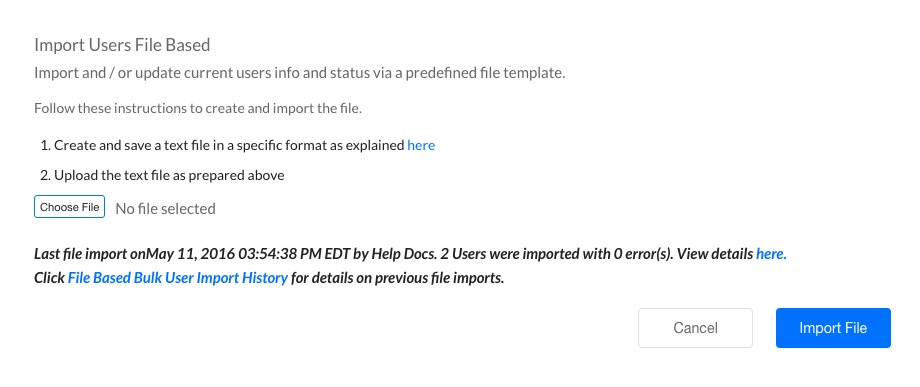
  1. 次の図に示すように、[登録] モジュールの [インポート] ページで、[ファイル ベースの一括ユーザー インポート履歴]をクリックします。 userenrollmentimportuserswithdatahistory
  2. ファイル ベースのインポート履歴ダイアログで、インポートの結果を表示するには、表示するインポートのレポート列で [結果]をクリックします。インポートの個々のユーザー結果は、次の図に示すように、ファイル ベースのインポート結果ダイアログに表示されます。 userenrollmentimportuserswithdatahistoryresult

Importing Users and User Data

If you need to invite multiple Kore.ai users and you have information about users in addition to the email address, such as the First Name, Last Name, Department, Phone, and Job Title, you can use the Import page to add new users and update existing users based on a list that contains additional user information.

The following illustration is an example of the Import page in the Enrollment module.

The import file can be a basic text file and saved as a .txt or .csv file format. After you create an import file, you can upload the file to add or update the Kore.ai users in your account.

File Requirements

When you create an import file, you must adhere to the following guidelines:

  • The first row identifies the name of the field under which the data is stored within Kore.ai, kind of header row.
  • The following Kore.ai account fields are required:
    • Email ID – mandatory
    • First Name – mandatory
    • Last Name – mandatory
    • Alternate ID, Work Phone, Title, Department – optional
    • User Status – – mandatory – One of
      • New
      • Update
      • Delete
      • Activate
  • Create one row for each Kore.ai user
  • Valid field delimiters are comma, pipe, semicolon, and tab

When using an import file, the following validation rules are applied:

  • Entries with invalid email formats are ignored.
  • Each successful import of an email address generates an invitation email to become a Kore.ai user.
  • Existing users in your Kore.ai account are not sent invitation emails.
  • Imported users with status set to Activate are sent a notification that the Kore.ai account is activated.

Sample File

For a .txt file:

Email ID, First Name, Last Name, Alternate ID, Work Phone, Title, Department, User Status
Kore.aiUser1@kore.com,User1FirstName,User1LastName,,800-555-1212,President,Executive,New
Kore.aiUser2@kore.com,User2FirstName,User2LastName,,800-555-5555,VicePresident,Executive,New
Kore.aiUser3@kore.com,User3FirstName,User1LastName,,,,,New

Create and Upload an Import File

You can create a file to invite users in your organization to become Kore.ai users that you can manage as a Bots Admin.

This topic describes how to create a file that contains the email addresses and user information, such as first and last name, phone number, department, and so forth, for the users that you want to invite to become Kore.ai users in your account.

If you only have email address information for your users, you should create and import a bulk invite file instead.

To create an import file

  1. In a text editor or spreadsheet, enter the field IDs on the first line, and then enter a complete email address and data on each following line or in a comma-separated list as shown in the following example:

For a .txt file:

Email ID, First Name, Last Name, Alternate ID, Work Phone, Title, Department, User Status
Kore.aiUser1@kore.com,User1FirstName,User1LastName,User1AlternateID,800-555-1212,President,Executive,New
Kore.aiUser2@kore.com,User2FirstName,User2LastName,User2AlternateID,800-555-5555,VicePresident,Executive,New
Kore.aiUser3@kore.com,User3FirstName,User1LastName,,,,New
  1. Save the import file as a .txt or .csv file, for example, Kore.aiImport.txt or Kore.aiImport.csv.
    After you create an import file, you can upload the file to invite your account users.

After you have created an import file, you need to upload the import file. This topic describes how you can upload your import file of users of your account.

To upload a user import file

  1. In the Enrollment > Import page, click Choose File.
  2. Navigate to your import file, and then click Open. The filename is displayed to the right of the Choose File button.
  3. Click Import File. The status of the import is described immediately following the Import File button.
  4. You can click the File Based Bulk User Import History link to review an import status from a prior import.UserEnrollmentImportUsersWithData

View Results

You can review the import operation results on a per-user basis if needed. This topic describes how to view the results of the current import report.

To view the results of the current user import

  1. On the Enrollment > Import page, click the here link, as shown below.
  2. The Report On File Import dialog opens.

View History

After you create and import a list of users in your account, you may want to review the results of the import. This topic describes how to view the historical list of file-based user imports.

To view historical import reports

  1. In the Enrollment module, on the Import page, click File Based Bulk User Import History as shown in the following illustration.
    userenrollmentimportuserswithdatahistory
  2. In the File Based Import History dialog, to view the results of an import, in the Report column for the import that you want to view, click Results. The individual user results for the import are displayed in the the File Based Import Results dialog as shown in the following illustration.
    userenrollmentimportuserswithdatahistoryresult