ステップ1: 作成
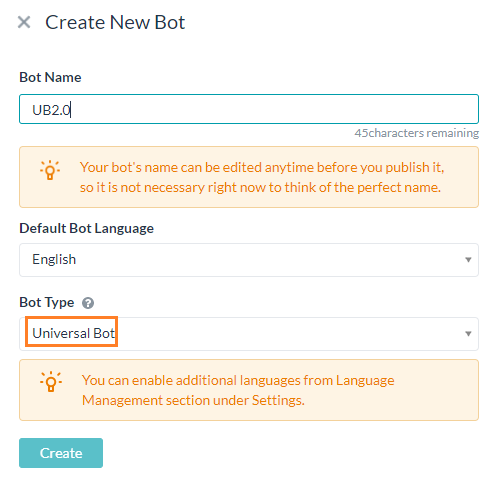
ボットビルダーを開き、ボットの名前やデフォルトの言語など、ボットの基本情報を設定することで、ユニバーサルボットの作成を開始します。
- ボットビルダーを開きます。
- ボット一覧ページの右上にある+新規ボットをクリックします。
- ボット名フィールドにボットの名前を入力します。
- デフォルトのボット言語を設定します。
- ボットタイプにユニバーサルボットを選択します。

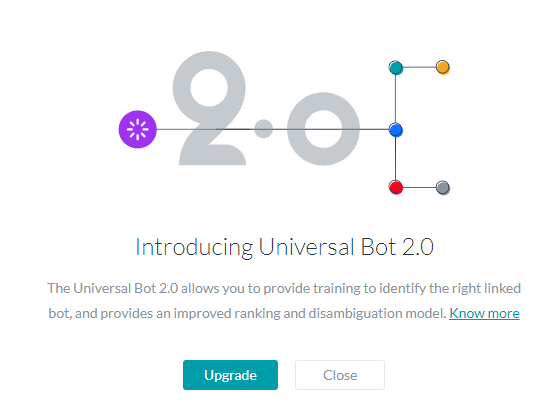
ユニバーサルボットのバージョン
(プラットフォームのバージョン7.3リリース後)
- ユニバーサルボット2.0へのアップグレードを促されます。このバージョンは、ユニバーサルボットにトレーニング機能を提供します。
- アップグレードするか、旧バージョンのまま継続するかを選択することができます。旧バージョンは、まもなくプラットフォーム上で非推奨になることにご注意ください。
- 旧バージョンで動作させたい場合は、こちらを参照してください。
- このドキュメントは、ユニバーサルボットのアップグレード版の手順を参照しています。
ステップ2: リンクされたボットを追加する
ユニバーサルボットの作成後、1つ以上の既存のボットをリンクさせます。ユニバーサルボットは他のボットで構成されているため、少なくとも1つの標準ボットを作成しておく必要があります。重要な注意事項:
- 標準ボットをリンクしても、ユニバーサルボットの所有者または開発者は、リンクされたボットのタスクや機能にアクセスすることはできません。
- ユニバーサルボットは、リンクされたボットのタスクを複製するのではなく、リンクされたボットでタスクを実行します。そのため、リンクされたボットに変更を加えると、ユニバーサルボットの機能が反映されます。
リンクされたボットをユニバーサルボットに追加するには、以下の手順に従います。
- 他のボットにリンクしたいユニバーサルボットを開きます。
- 左のナビゲーションメニューからリンクされたボットを選択するか、ボットの概要ページ(ボットを開いたときのランディングページ)のリンクされたボットカードから+ボットをリンクのリンクを使用します。
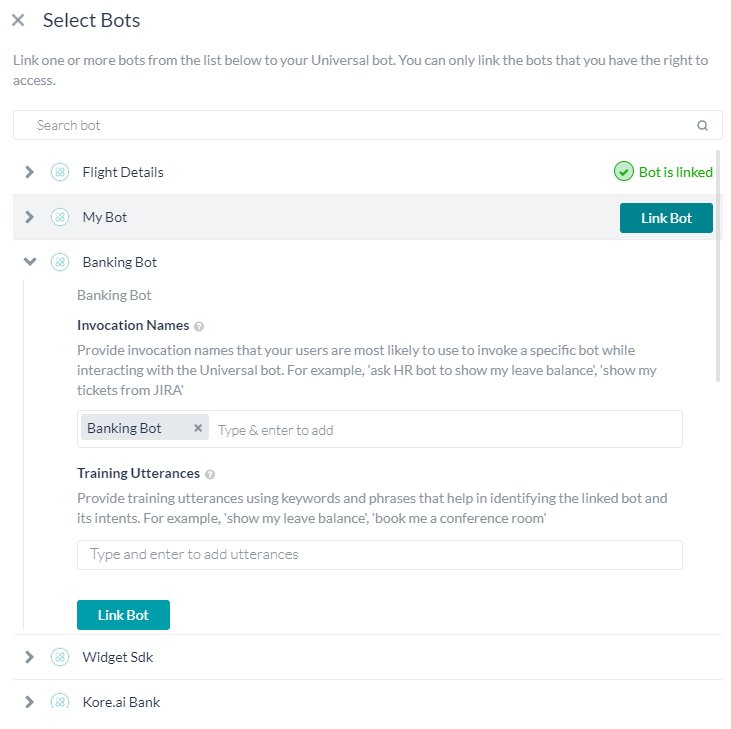
- ボットをリンクのリンクをクリックするとボットを選択ダイアログが表示されます。注意: ボットを選択ダイアログでは、自分が所有者または共同開発者であるボットのみが表示されます。こちらのウィンドウにボットが表示されない場合は、そのボットが所有者に共有されていることをご確認ください。
- ボットにカーソルを合わせてボットをリンクボタンにアクセスし、クリックしてリンクします。
- リンクされると、同じ内容のメッセージが表示されます。
- ボット名を展開すると、呼び出し名やトレーニングの発話などの詳細を確認することができます。ステップ3で説明したように、同一のものをこちらで追加することも、後から追加することもできます。ユニバーサルボットのトレーニング。
- ボットにリンクさせたいボットを選択して、ダイアログを閉じます。
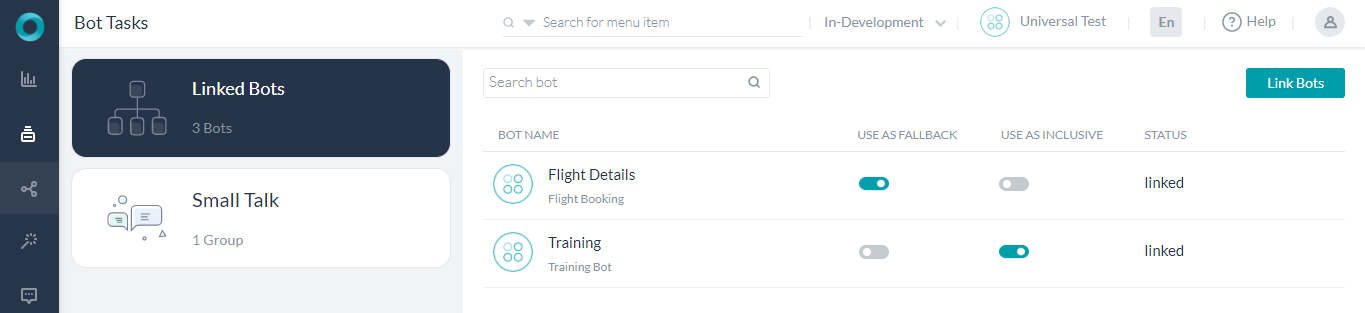
- ボットをユニバーサルボットにリンクさせると、リンクされたボットのページに、リンクされたボットすべての一覧が表示されます。ボットをリンクボタンを使用して、他のボットをリンクさせることができます。
- 一部のボットをフォールバックボットまたはインクルーシブボットとしてマークすることができます。
- トグルスイッチを使用して、指定されたボットのフォールバックとして使用オプションを有効または無効にします。このようにマークされたボットは、他のトレーニングオプションでどのボットも識別されなかった場合に、インテントを検出するために使用されます。フォールバックボットとしてマークできるボット数は最大15です。
- トグルスイッチを使用して、指定されたボットのフォールバックとして使用オプションを有効または無効にします。これらのボットは、ボットのスコーププロセスに参加するためにサンプル発話を使用してトレーニングする必要はありません。これらのボットは、ユーザーの発話を評価する際に、ユーザーが’「呼び出しフレーズ」または「トリガーフレーズ」を使用してリンクされたボットを起動した場合を除いて、常にインテント検出の対象となります。インクルーシブボットとしてマークできるリンクされたボット数は最大15です。


ボットのリンク解除
リンクされたボットのリンクを解除したい場合は、以下の手順に従います。
- リンクされたボットのページで、リンクを解除したいボットの上にカーソルを合わせます。
- 省略(モアアイコン)をクリックして、リンク解除のオプションを表示します。
- リンク解除をクリックします。
公開されたボットに変更を反映させるには、ボットを公開することを忘れないでください。
ステップ3: トレーニング
ボットプラットフォームのバージョン7.3のリリース後、ユニバーサルボットの機能が強化され、ボットのトレーニングが可能になりました。このセクションでは、ボットのトレーニングの手順について詳述しています。トレーニングの詳細については、こちらを参照してください。
- トレーニングしたいユニバーサルボットを開きます。このボットには、ボットがリンクされているはずです。
- 左のナビゲーションメニューから、自然言語 > トレーニングを選択します。
- リンクされたボットのトレーニングセクションを選択し、トレーニングしたいボットを選択します。
- インクルーシブボットはトレーニングを必要とせず、トレーニングはボットのスコーピングには使用されないことにご注意ください。 同一トレーニングを選択した場合、リンクされたボットがインクルーシブボットとして選択解除された場合、このトレーニングは後で使用されます。
- 呼び出し名セクションを展開して、同じものを追加します。 これらは、リンクされたボット名に対して定義された、特別な同義語のセットとして扱われます。詳細はこちらを参照してください。
- ボットの名前は、デフォルトでは呼び出し名として追加されますが、必要でなければ削除することができます。
- 必要に応じて追加の呼び出し名を入力します。
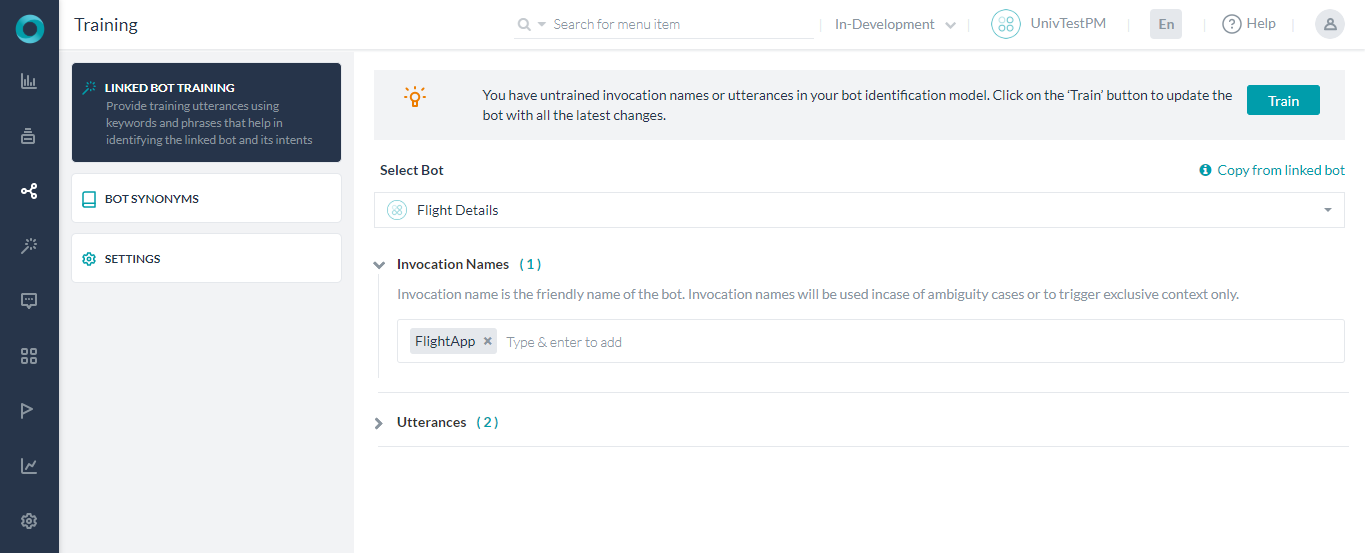
- 発話セクションを展開して、発話を追加します。これらは、ユーザーがリンクされたボットにインテントを要求するための典型的な方法を指します。 詳細については、こちらを参照してください。
- 必要に応じて発話を追加します。
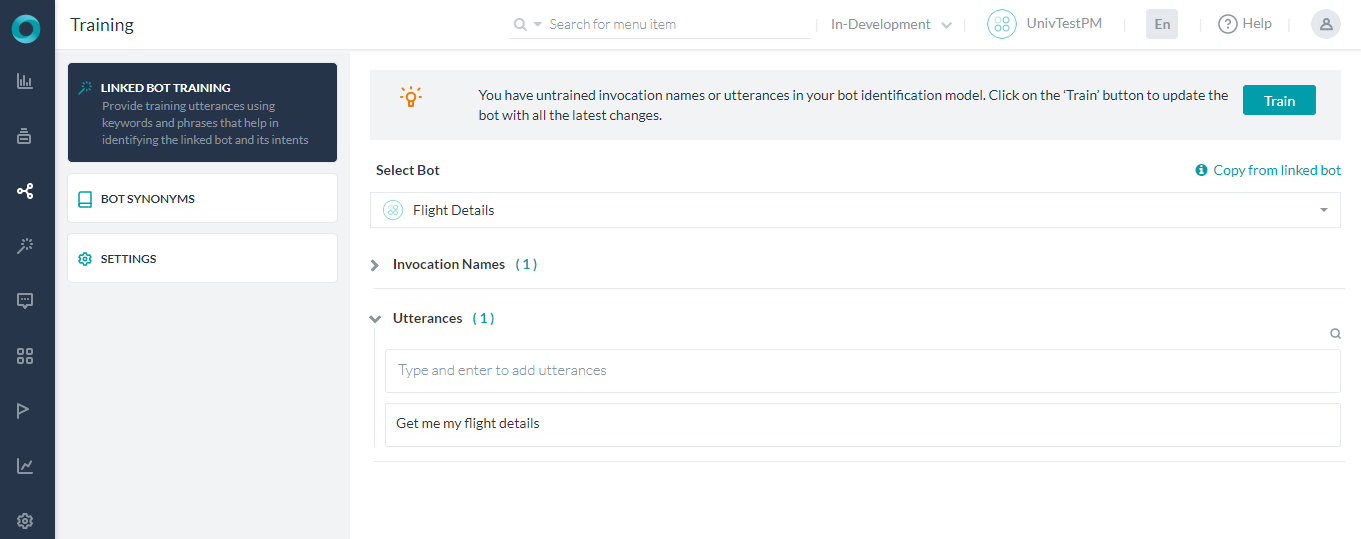
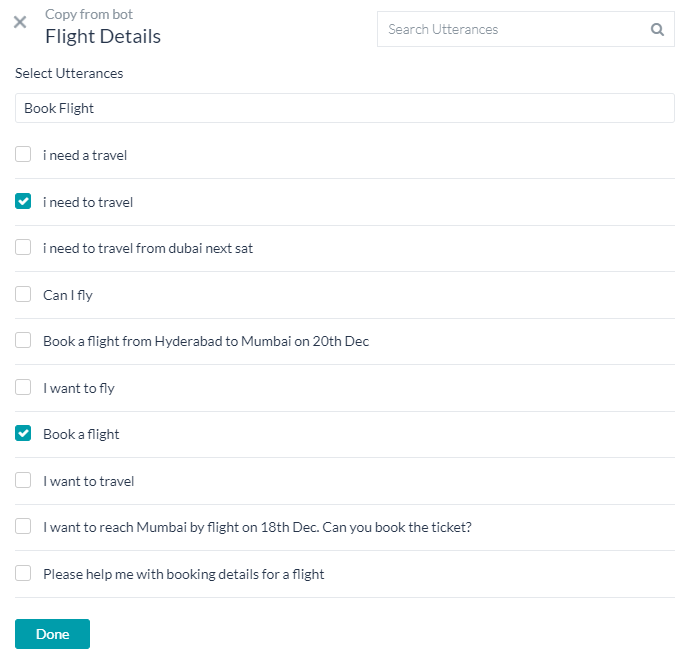
- リンクされたボットからコピーオプションを使用して、リンクされたボットの発話を追加することもできます。
- このオプションを選択すると、トレーニング中のリンクされたボットのコピーページが表示されます。
- リンクされたボットからの関連するタスクを、タスクを選択ドロップダウンから選択します。
- そのタスクのすべての発話が一覧表示され、リストから選択することができます。多重選択が可能です。
- 完了をクリックして、発話を追加します。
- 必要に応じて発話を追加します。
- 上記の変更を有効化するようボットをトレーニングします。
ステップ4: チャネルを設定する
ユニバーサルボットは、リンクされているボットとは別のチャネル設定が必要なため、再度チャネルを設定または有効化する必要があります。リンクされたボットのチャネルに関係なく、ユニバーサルボットのチャネルを設定することができ、リンクされたボットの公開済みタスクは、ユニバーサルボットのチャネルから実行されます。はじめに この記事では、Kore.aiのチャネル設定の基礎について、お客様が理解していることを前提としていますので、ユニバーサルボットに特化して設定に焦点を当てています。ボットビルダーでチャネルを設定するための基礎については、ボットにチャネルを追加を参照してください。重要な注意事項:
- ユニバーサルボットは、リンクされたボットの有効なチャネルに関係なく、ユニバーサルボットに有効なチャネルでのみ利用可能です。
- リンクされたボットとユニバーサルボットの両方にチャネルが設定されている場合、ユーザーに配信されるメッセージは、リンクされたボットで設定されたチャネル固有のメッセージやフォーマットに従います。
- ユニバーサルボットに有効なチャネルがリンクされたボットで有効化されていない場合、ユニバーサルボットはリンクされたボットの機能に対して定義されたデフォルトメッセージで応答します。
- ユニバーサルボットまたはリンクされたボットの設定で、チャネル固有のフォーマットを設定していない場合は、標準フォーマットのデフォルトメッセージが適用されます。
- ユニバーサルボットで設定された通知は、ユニバーサルボットを介して配信されます。
チャネル設定の手順
- 新しいチャネルを設定したいユニバーサルボットを開きます。
- 左のナビゲーションパネルにカーソルを合わせてチャネルをクリックします。
- チャネルページのサポートされているチャネル一覧から、チャネルをクリックして設定します。
- 各チャネルの設定内容は、チャネルによって異なります。チャネルを設定するためにチャネルをクリックすると、設定方法が表示されます。チャネルの設定は、そちらの表示に従います。
- チャネルの設定を行い、保存します。
ステップ5: テスト
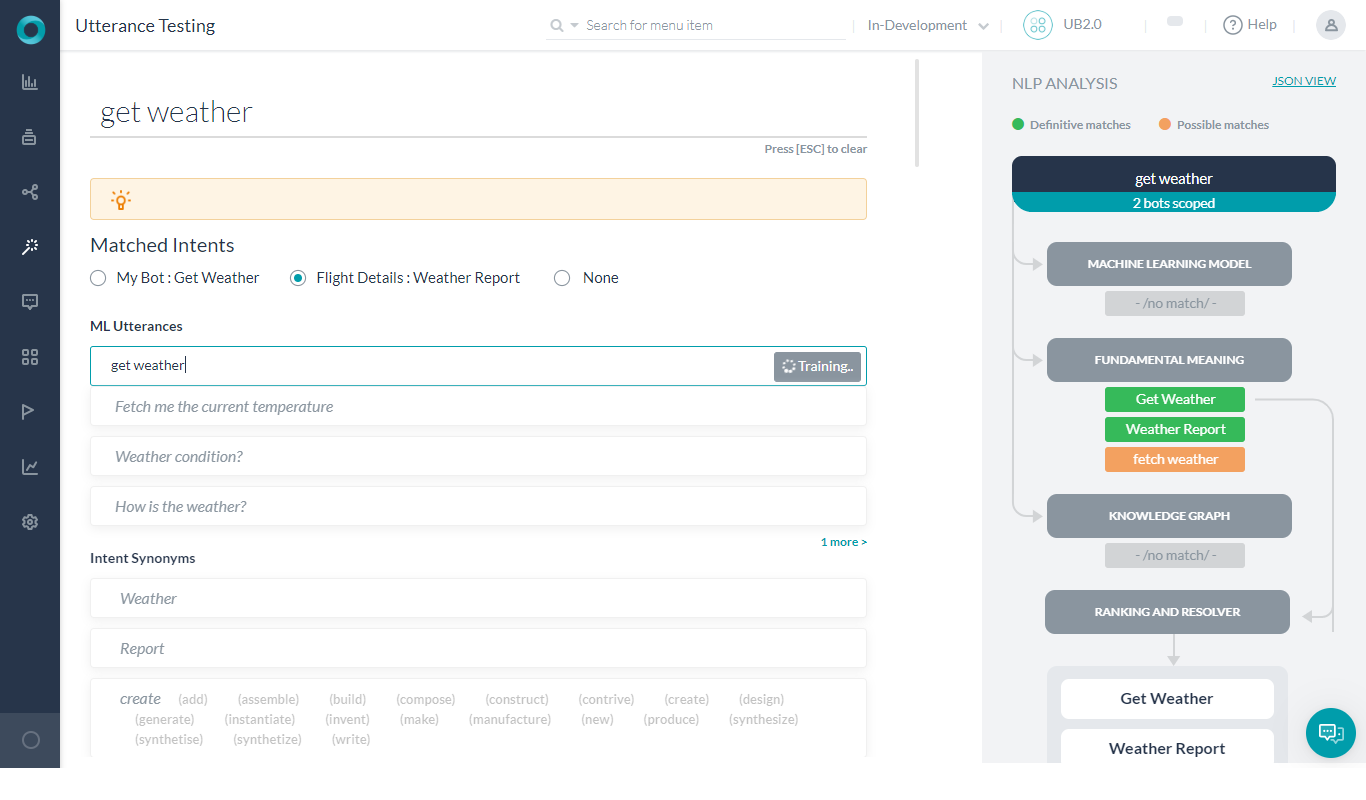
ユニバーサルボットは多くの標準ボットをリンクさせるので、関連するボットとインテントを正確に認識するためには、自然言語処理の設定を複数のユーザーの発話に対して最適化する必要がある可能性があります。ユニバーサルボットのテストは、ユーザーの発話を入力してその結果を分析する標準ボットのテストと同様です。ただし、ユニバーサルボットの場合は、発話に対して絞り込まれたインテントだけでなく、それが属するボットも表示されます。ボットの名前は、以下の構文でインテントの前に付けられます。ボット名:タスク名はじめに この記事では、Kore.ai ボットプラットフォームのボットのテストの基礎について、お客様が理解していることを前提としていますので、ユニバーサルボットに特化してテストに焦点を当てています。ボットビルダーでのボットのテストの基本を参照するには、ボットのテストをお読みください。
ユーザー発話のテストの手順
ユニバーサルボットのユーザーの発話をテストするには、以下の手順に従います。
- ユーザーの発話をテストしたいユニバーサルボットを開きます。
- 左のナビゲーションパネルにカーソルを合わせてテスト > 発話テストをクリックします。
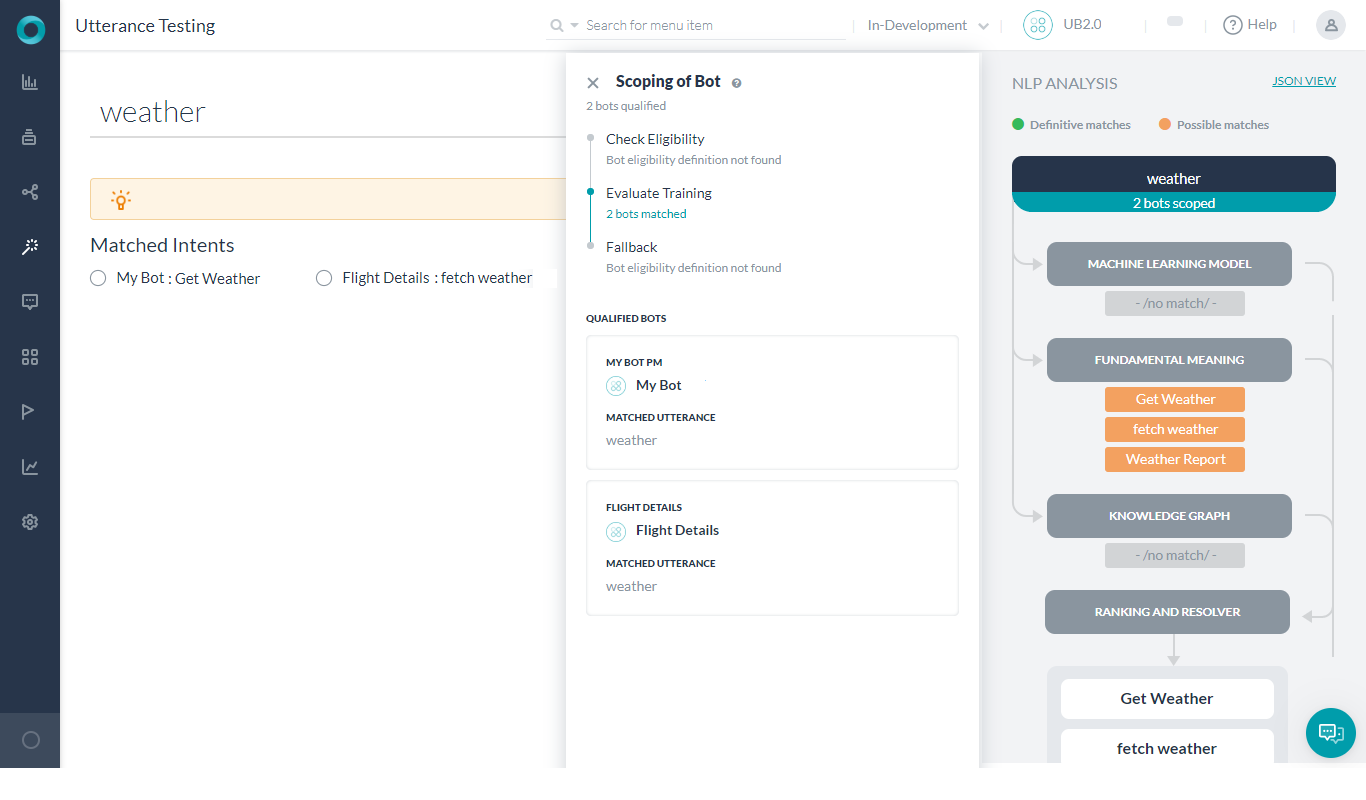
- ユーザーの発話を入力フィールドの中に、テストしたい発話を入力します。例:天気
- 結果は以下に表示されます(単一一致、複数一致、またはインテントの一致なし)。例えば、以下は天気の発話に対する複数一致の結果です。
- スコープされたボットをクリックすると、リンクされたボットの評価に関わるプロセスの詳細が表示されます。詳細はこちらを参照してください。
テスト結果の確認
テスト発話の結果は、以下3つのカテゴリのいずれかに分類されます。
- 単一の一致したインテント:リンクされているボットのタスクまたはユーザーインテントが入力と一致しました。
- 一致が正しい場合は、同一ボットの同一タスクをさらにトレーニングしてスコアを向上させたり、別のボットの別のタスクをトレーニングして発話を認識させたりすることができます。
- 一致が正しくない場合は、一致したインテントの横にある正しくない一致としてマークリンクをクリックします。リンクをクリックすることで、同一ボットまたは別のボットから一致するタスクやインテントを選択することができます。
- 同一スコアの複数一致:認識スコアが同じ1つ以上のタスクが、インテントに一致しました。これらのタスクは、1つ以上のリンクされたボットに属することができます。発話に一致させたいタスクの横にあるラジオボタンを選択します。
- 未特定のインテント:ユーザー入力は、リンクされたボットのいずれのタスクとも一致しませんでした。適切なボットとリンクされたタスクを一致させるために、以下の説明に従ってボットをトレーニングします。
ユニバーサルボットのパフォーマンスの向上
より効率的で正確な機能を実現するために、ユニバーサルボットをトレーニングすることができます。ユニバーサルボットのウィンドウからリンクされたボットをトレーニングしても、そのトレーニングはリンクされたボットに直接保存されます。ユニバーサルボットでリンクされたボットのトレーニングを行うには、以下の手順に従います。
- ユニバーサルボットの発話のテストウィンドウで、インテントを選択します。
- 以下のフィールドが表示され、機械学習の発話、同義語、パターンを使用してタスクをトレーニングすることができます。
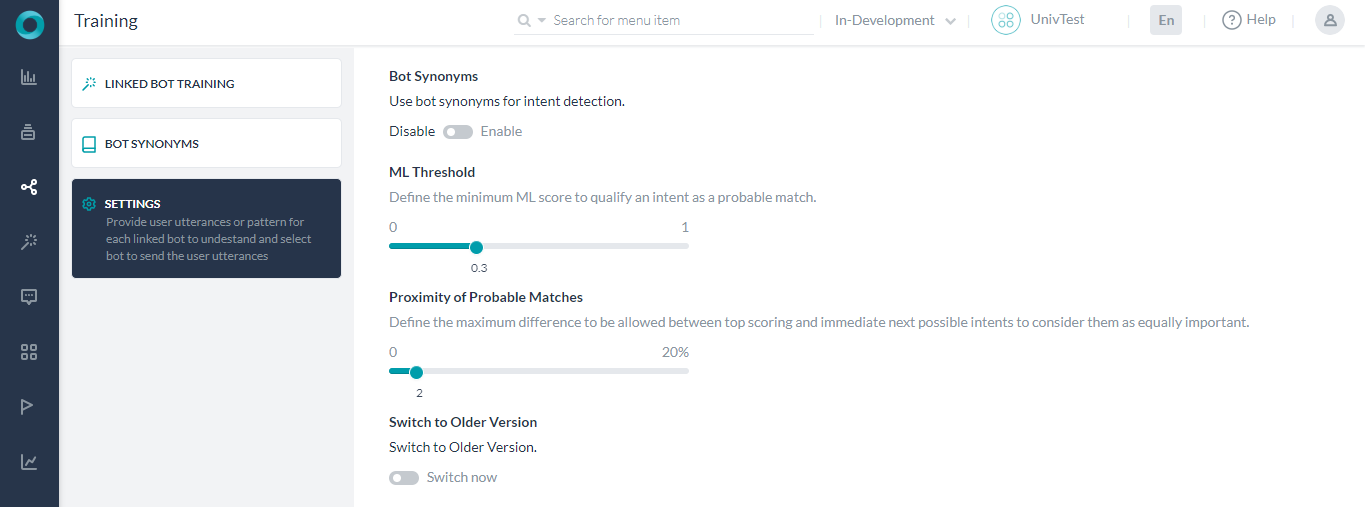
- トレーニングの設定からしきい値を設定することもできます。詳細はこちらをご確認ください。
ステップ6: 公開
ユニバーサルボットの新しい設定を定義し、トレーニングし、保存すると、ボットビルダーのホームページに表示されるようになります。ボットの管理者が公開および承認するまでは、ボットの開発者以外のユーザーは利用することができません。
ユニバーサルボットのステータス
ユニバーサルボットに関連する様々なステータスは以下の通りです。これらのステータスは、公開のために選択されたリンクされたボットに対して、リンクされたボットページに表示されます。
| ユニバーサルボットのステータス | 説明 |
|---|---|
| リンク済み | ボットの設定が完了し、標準ボットがリンクされます。 |
| 承認待ち | ボットはエンタープライズ向けに公開されていますが、ボットの管理者には承認されていません。 |
| 公開済み | ユニバーサルボットは、個人、エンタープライズ、または公共の場で使用するために公開されています。 |
| 拒否 | ボット管理者は、エンタープライズにボットを導入していません。ボット管理者からのコメントが、メールで開発者に送信されます。 |
| 一時停止 | ボット管理者は、導入されたボットの使用を一時停止しました。ボット管理者からのコメントが、メールで開発者に送信されます。 |
ボットを公開する
ユニバーサルボットを公開するには、以下の手順に従います。
- 公開したいユニバーサルボットを開きます。
- 左のナビゲーションパネルにカーソルを合わせて公開をクリックします。
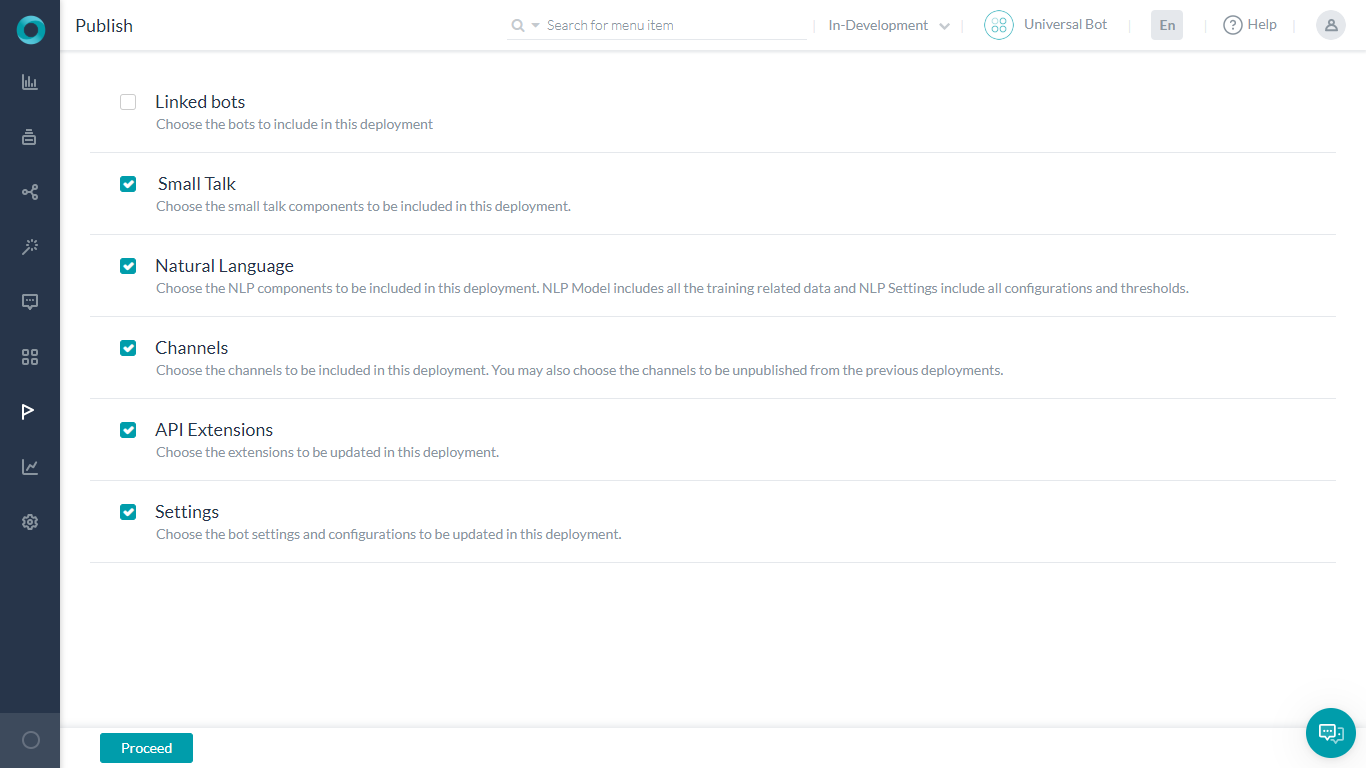
- 公開ページで、公開したいリンクされたボットを選択します。以下のような場合があります。
- 新しいリンクされたボットを含む
- すでに公開済みのリンクされたボットを更新する
- リンク解除されたボットを削除する
注意:デフォルトダイアログは自動的に選択されます。これは公開することが必須であるため、選択を解除することはできません。 - 以下のトレーニングコンポーネントの公開を選択することができます。
- トレーニング発話、呼び出し名、同義語、フォールバックボット、NLP設定 注意:ユニバーサルボットを初めて公開する際には、すべてのNLP設定を選択して公開する必要があります。
- 有効な言語一覧から、ボットを公開する言語を選択して、続行をクリックします。
- 適切なコメントを入力し、公開をクリックします。


