자금 이체 의도
- 자금 이체 작업에서는 사용자에게 수취인 및 지급인 계좌 번호를 입력하라는 메시지가 표시됩니다.
- 다음으로 전송할 금액을 묻는 메시지가 표시됩니다.
- 그런 다음 서비스 호출을 통해 계좌를 알맞게 업데이트합니다.
- 성공 또는 실패를 나타내는 메시지가 표시됩니다.
1단계: 대화 작업
Bot의 첫 번째 단계로 의도 대화를 추가해야 합니다. 의도 대화는 사용자와 봇 간 대화 흐름의 첫 번째 단계입니다.
- 사전 설정된 두 가지 작업인 잔액 가져오기 및 잔액 업데이트를 통해 뱅킹 봇을 엽니다.
- 상단 메뉴에서 구축 탭이 선택되어 있는지 확인합니다.
- 왼쪽 메뉴에서 대화형 스킬 -> 대화 작업 페이지로 이동합니다.
- 오른쪽 상단에서 대화 생성을 클릭합니다.
- 대화 생성 화면이 열립니다.
- 다음 세부 정보를 입력합니다:
- 의도 이름 – 의도 이름을 입력합니다. 이는 대화를 트리거 하는 구문입니다. 의도 이름은 간단해야 하며 3~4개 단어를 초과해서는 안 됩니다. 예: '자금 이체'
- 기타 옵션 아래에서 설명 및 기타 대화 관련 세부 정보를 추가할 수 있습니다. 기본 설정을 그대로 유지하겠습니다.
- 이러한 의도를 학습하기 위해 발화도 포함할 수 있습니다.
- 대화 기반 대화 빌더 시도 옵션을 선택합니다.
- 진행을 클릭합니다.
- 사용자 의도에 대한 속성 패널이 표시됩니다. 기본 속성은 그대로 유지됩니다.
- 참고 사항: 이전 대화 빌더에 대한 지시 사항은 여기 참조
- 사용자 의도 속성 패널을 닫습니다.
2단계: 엔티티 노드
엔티티 노드는 일반적으로 사용자로부터 정보를 수집하는 데 사용됩니다. 여기서는 이를 수취인 및 지급인 계좌 번호와 이체할 금액에 대한 사용자 입력값을 캡처하는 데 사용합니다.
- 아래의 +를 클릭하여 사용자 의도 노드로 이동
- 엔티티 옵션 선택
- + 새 엔티티 클릭
- 엔티티 노드에 대한 속성 패널이 표시됩니다. 표시되지 않았다면 새로 추가된 엔티티 노드를 클릭하여 엽니다
- 다음 세부 정보를 입력합니다:
- 이름: PayerAccount
- 표시 이름: 지급인 계좌
- 유형: 번호
- 사용자 프롬프트: 다음 텍스트를 입력합니다:
Enter the Account from where you want to transfer funds.
- PayerAccount 엔티티 속성 패널을 닫습니다.
- 위의 단계를 반복하여 다음과 같은 세부 사항을 가진 다른 엔티티를 추가합니다:
- 이름: 수취인 계좌
- 표시 이름: 수취인 계좌
- 유형: 번호
- 사용자 프롬프트: 다음 텍스트를 입력합니다
Enter the Account to which you want to transfer funds.
- PayeAccount 엔티티 속성 패널을 닫습니다.
- 위의 단계를 반복하여 다음과 같은 세부 사항을 가진 다른 엔티티를 추가합니다:
- 이름: 이체할 금액
- 표시 이름: 이체할 금액
- 유형: 번호
- 사용자 프롬프트: 다음 텍스트를 입력하고 Enter 키를 눌러 저장합니다:
Enter the amount to transfer.
- 금액 엔티티 속성 패널을 닫습니다.
다음 단계에서는 지급인 및 수취인 계좌의 잔액을 모두 업데이트합니다. 잔액 업데이트 작업이 이미 있으므로 현재 작업에서 실행하는 방법을 확인할 수 있습니다.
3단계: 대화 작업 실행
사전 정의된 대화 작업은 다른 작업 내에서 트리거 할 수 있습니다. 방법을 살펴보겠습니다.
- 아래의 +를 클릭하여 금액 엔티티 노드로 이동
- 대화 작업 선택
- 지정된 작업 목록에서 필요한 작업 선택 – UpdateBalance
- 대화 노드에 대한 속성 패널이 표시됩니다. 표시되지 않았다면 새로 추가된 대화 노드를 클릭하여 엽니다
- 인스턴스 속성 탭으로 이동하여 다음 세부 정보를 입력합니다:
- 엔티티 사전 할당 섹션 – 대화 작업에 필요한 엔티티 값으로, 여기에 값이 입력되지 않았다면 같은 값을 입력하라는 메시지가 표시됩니다. 이전 단계에서 정의한 엔티티를 통해 정보를 이미 수집했으므로 사용자가 입력한 값을 UpdateBalance 작업으로 전달합니다
- 계좌 유형: 저축
- AccountNumber: context.entities.PayerAccount
- 금액: context.entities.Amount
- TransactionType: 인출액 (지급인 계좌에서 이체 금액을 차감해야 함)

- UpdateBalance 대화 속성 패널을 닫습니다.
- 동일한 단계를 반복하여 다음 값으로 수취인 계좌 업데이트
- 엔티티 사전 할당 섹션
- 계좌 유형: 저축
- AccountNumber: Context.Entities.PayeAccount
- 금액: context.entities.Amount
- TransactionType: 신용
- UpdateBalance 대화 속성 패널을 닫습니다.
4단계: 메시지 노드
메시지 노드는 봇에서 사용자에게 메시지를 표시하는 데 사용됩니다. 여기에서는 메시지 노드를 사용하여 밸런스를 표시합니다.
- UpdateBalance [2] 서비스 노드 아래의 + 기호를 클릭
- 메시지를 선택하고 '+ 새 메시지'를 클릭합니다.
- 메시지 노드에 대한 속성 패널이 표시됩니다. 표시되지 않았다면 새로 추가된 대화 노드를 클릭하여 엽니다
- 다음 세부 정보를 입력합니다:
-
- 이름: FinalMessage
- 표시 이름: 최종 메시지
- 봇 응답:
The amount {{context.entities.AmountToTransfer}} has been transferred from {{context.entities.PayerAccount}} to {{context.entities.PayeeAccount}}
-
- 봇 응답 속성 패널에서 '연결' 아이콘을 클릭하여 연결 탭을 엽니다.
- 기본 연결을 '연결되지 않음’ 에서 '대화 끝'으로 변경합니다.
- 저장을 클릭합니다.
- 속성 패널을 닫습니다.
테스트
대화 작업을 테스트하려면 오른쪽 하단 코너에 있는 '봇과 대화'를 사용하면 됩니다. 다음 발화(의도 이름) "자금 이체"를 입력합니다. 봇 지시 사항을 따릅니다.
- 지급인 계정 입력 – 02929664
- 수취인 계정 입력 – 44994354
- 이체 금액 입력 – 200
- 성공 메시지를 확인합니다.
この文書では、バンキングボットのサンプルを作成する手順を詳しく説明しています。このボットは、開発者向け文書の「ハウツー」セクションで紹介されているさまざまなユースケースシナリオで使用されます。
必要条件:
- Kore.aiボットプラットフォームにサインアップしている必要があります
- ボット構築の基本を認識している必要があります(このリンクをご参照ください)
- 簡単なボットを作成したことがある必要があります(例としてはこちらをご参照ください)
- バンキングボットを作成したことがある必要があります(例としてはこちらをご参照ください)
ボットの概要
これから構築しようとするボットは、基本的な銀行取引を行うものです。このボットは以下のことを行います。
- ユーザーが入力した口座番号と口座の種類に基づいて、口座残高を手に入れます( こちらで見えます)。
- こちらで見えるように、口座残高を更新します。
- ユーザーアカウントから受取人アカウントへ、指定した金額を送金します。
資金移動タスクを追加しましょう。
資金移動のインテント
- 資金移動タスクでは、受取人と支払人の口座番号を入力するように指示されます。
- 次に、送金額の入力が指示されます。
- その後、ボットはサービスコールを行い、アカウントを適切に更新します。
- 成功または失敗を示すメッセージが表示されます。
ステップ1: ダイアログタスク
ボットにおける最初のステップとして、インテントダイアログを追加する必要があります。インテントダイアログは、ユーザーとボットの会話フローの最初のステップです。
- 事前設定されている2つのタスク残高取得と残高更新で、バンキングボットを開きます。
- トップメニューから、構築タブが選択されていることを確認します。
- 左側メニューから、会話スキル->ダイアログタスクのページへ移動します。
- 右上から、ダイアログの作成をクリックします。
- ダイアログの作成の画面が開きます。
- 以下の詳細を入力します。
- インテント名-インテント名を入力します。これは、ダイアログをトリガーするフレーズです。インテント名はシンプルにして、3~4語を超えないようにする必要があります。例:「資金の移動」
- その他のオプションで、説明やその他のダイアログ関連の詳細を追加できます。デフォルトの設定のままにしておきましょう。
- また、このインテントをトレーニングするために、発話を入れることもできます。
- 会話駆動型ダイアログビルダーの試行 オプションを選択します。
- 続行をクリック。
- ユーザーインテントのプロパティパネルが表示されます。デフォルトのプロパティを保持します。
- メモ:旧ダイアログビルダーの操作方法については こちらをご参照ください。
- ユーザーインテントプロパティパネルを終了します。
ステップ2: エンティティノード
エンティティノードは、通常、ユーザーから情報を収集するために使用されます。ここでは、ユーザーが入力した「受取人と支払人の口座番号」と「送金額」をキャプチャするために使用します。
- 下の+をクリックすると、ユーザーインテントノードに移動します。
- エンティティオプションを選択します
- +新規作成をクリックします
- エンティティノードのプロパティパネルが表示されます。そうでない場合、新規追加されたエンティティノードをクリックして、開きます
- 以下の詳細を入力します。
- 名前:PayerAccount
- 表示名:支払人口座
- タイプ:番号
- ユーザープロンプト:以下のテキストを入力します。
Enter the Account from where you want to transfer funds.
- 支払人口座エンティティプロパティパネルを終了します。
- 以下の詳細から、上記の手順を繰り返して、別のエンティティを追加します。
- 名前:受取人口座
- 表示名:受取人口座
- タイプ:番号
- ユーザープロンプト:以下のテキストを入力します。
Enter the Account to which you want to transfer funds.
- 受取人口座エンティティプロパティパネルを終了します。
- 以下の詳細から、上記の手順を繰り返して、別のエンティティを追加します。
- 名前:送金額
- 表示名:送金額
- タイプ:番号
- ユーザープロンプト:以下のテキストを入力し、Enterキーを押して保存:
Enter the amount to transfer.
- 金額エンティティプロパティパネルを終了します。
次のステップでは、支払人と受取人の両方の口座残高を更新します。残高更新タスクはすでにありますので、現在のタスクから実行する方法を見てみましょう。
ステップ3: ダイアログタスクの実行
事前定義済みのダイアログタスクは、他のタスクの中からトリガーすることができます。その方法を見てみましょう。
- 下の+をクリックすると、金額エンティティノードに移動します。
- ダイアログタスクを選択します
- 与えられたタスクリストから、必要なタスクであるUpdateBalanceを選択します。
- ダイアログノードのプロパティパネルが表示されます。そうならない場合、新規追加されたダイアログノードをクリックして、開きます
- インスタンスプロパティタブに移動し、以下の詳細を入力します。
- エンティティ事前割り当てセクション – これらは、ダイアログタスクで必要とされるエンティティの値であり、ここに入力されていない場合は、ユーザーは同じ値を入力するように指示されることになります。前のステップで定義したエンティティを通じてすでに情報を収集ましたので、それらのユーザー入力値をUpdateBalanceタスクに渡すことになっています。
- AccountType:普通預金
- 口座番号:context.entities.PayerAccount
- 金額:context.entities.Amount
- TransactionType: デビット(支払人口座から送金額を控除する必要があります)
- UpdateBalanceダイアログのプロパティパネルを終了します。
- 同じ手順を繰り返して、受取人口座を以下の値で更新します。
- エンティティ事前割り当てセクション
- AccountType:普通預金
- 口座番号:context.entities.PayeeAccount
- 金額:context.entities.Amount
- TransactionType: クレジット
- UpdateBalanceダイアログのプロパティパネルを終了します。
ステップ4: メッセージノード
メッセージノードは、ボットからユーザーへのメッセージを表示するのに使用します。ここでは、メッセージノードを使用して残高を表示します。
- UpdateBalance [2] サービスノードの下の+をクリックします。
- メッセージを選択し、「+ 新規メッセージ」をクリックします。
- メッセージノードのプロパティパネルが表示されます。そうならない場合、新規追加されたダイアログノードをクリックして、開きます
- 以下の詳細を入力します。
-
- 名前:FinalMessage
- 表示名:最終メッセージ
- ボットレスポンス
The amount {{context.entities.AmountToTransfer}} has been transferred from {{context.entities.PayerAccount}} to {{context.entities.PayeeAccount}}
-
- ボットレスポンスのプロパティパネルで、「接続」アイコンをクリックして[接続]タブを開きます。
- デフォルトの接続を「未接続」から「ダイアログの終了」に変更します。
- 保存をクリック。
- プロパティパネルを終了します。
テスト
ダイアログタスクをテストするには、右下の「ボットと会話」を使用します。次の発話(インテント名)「資金移動」入力します ボットの指示に従います。
- 支払人口座 – 02929664を入力します。
- 受取人口座 – 44994354を入力します。
- 送金額 – 200を入力します
- 成功メッセージを確認します。
Leave a Reply
This is document details steps in creating a sample banking bot. This bot is used in various use case scenarios presented in the How-Tos section of the developer documentation.
Prerequisites:
- You must have signed up with the Kore.ai Bots Platform
- You must be aware of the basics of Bot building (refer to this link)
- You must have created a simple bot (refer here for an example)
- You must have created a Banking Bot (refer here for example)
Bot Overview
The Bot we will be building will be performing the basic banking transactions.
This Bot will:
- Get account balance based on the Account Number and Account Type entered by the user, as seen here.
- Update accounts with the balance, as seen here.
- Transfer a specified amount from the user account to a payee account.
Let us add the Transfer Funds task.
Transfer Funds Intent
- The Transfer Funds task will prompt the user to enter Payee and Payer account number.
- Next it would prompt for the amount to be transferred.
- It will then make a service call to update the accounts appropriately.
- The message indicating success or failure is displayed.
Step 1: Dialog Task
We need to add an Intent Dialog as the first step in the Bot. Intent Dialog is the first step in the user-bot conversation flow.
- Open the Banking Bot with the two pre-configured tasks – Get Balance and Update Balance.
- Ensure that the Build tab is selected from the top menu.
- Navigate to the Conversational Skills -> Dialog Task page from the left menu.
- Click Create Dialog from the top right.
- Create Dialog screen will open.
- Enter the following details:
- Intent Name – Enter the Intent name, this is the phrase that triggers the dialog. The intent name should be simple and not more than 3-4 words. For example, ‘Transfer Funds’
- Under More Options, you can add a description and other dialog-related details. Let’s retain the default settings.
- You can also include utterances to train this intent.
- Select Try Conversation Driven Dialog Builder option.
- Click Proceed.
- Property Panel for User Intent will be displayed. We will retain the default properties.
- Note: For instructions with the older Dialog Builder, refer here
- Close the User Intent Property Panel.
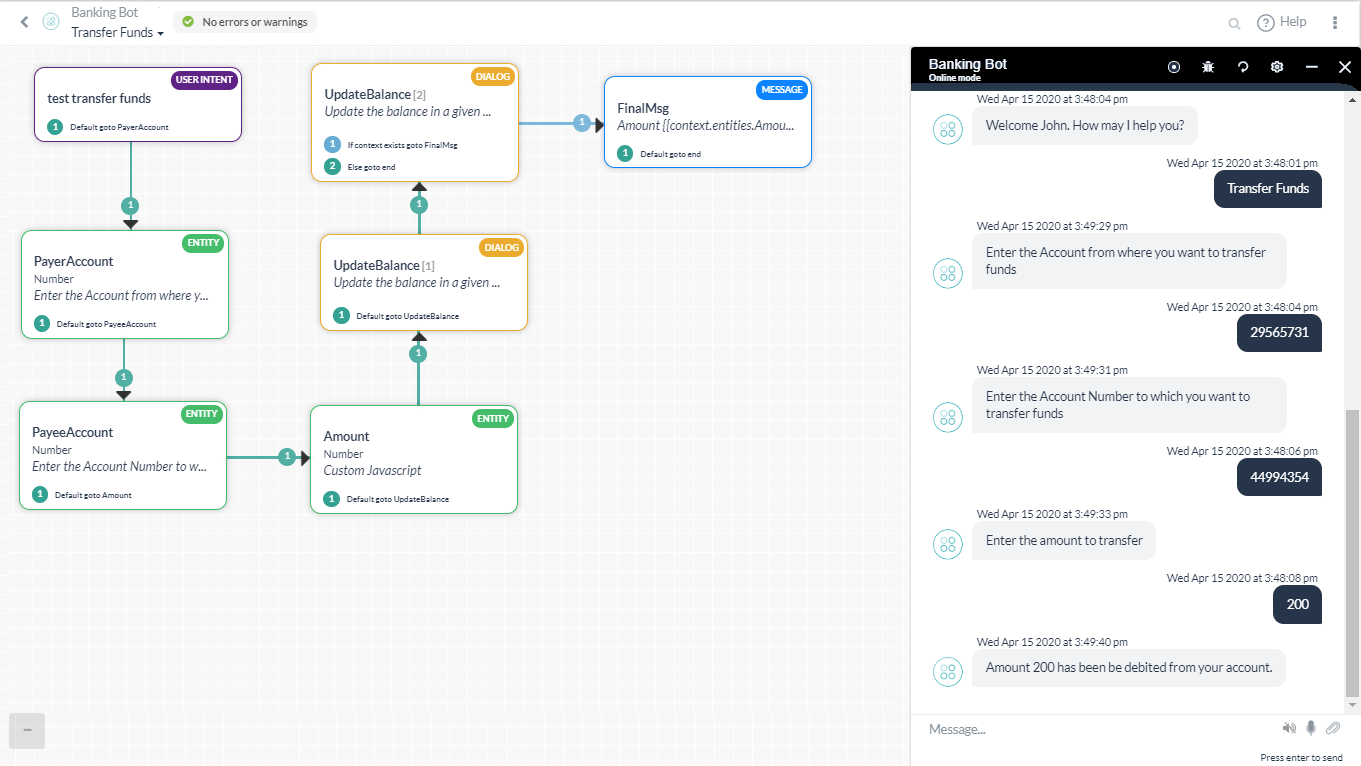
Step 2: Entity nodes
Entity Node is typically used to gather information from the user.
Here we will be using it to capture the user input for the Payee and Payer Account Number and amount to be transferred.
- Click the + below to the User Intent node
- Select the Entity option
- Click the + New entity
- Property Panel for the Entity Node is displayed. If not click on the newly added entity node to open
- Enter the following details:
- Name: PayerAccount
- Display Name: Payer Account
- Type: Number
- User Prompts: Enter the following text:
Enter the Account from where you want to transfer funds.
- Close the PayerAccount Entity Property Panel.
- Repeat the above steps to add another entity with the following details:
- Name: PayeeAccount
- Display Name: Payee Account
- Type: Number
- User Prompts: Enter the following text
Enter the Account to which you want to transfer funds.
- Close the PayeeAccount Entity Property Panel.
- Repeat the above steps to add another entity with the following details:
- Name: AmountToTransfer
- Display Name: Amount To Transfer
- Type: Number
- User Prompts: Enter the following text and hit enter to save:
Enter the amount to transfer.
- Close the Amount Entity Property Panel.
The next steps would update the balance in both the Payer and Payee accounts. Since we already have Update Balance task, we will see how to run it from the current task.
Step 3: Run Dialog Task
Pre-defined dialog tasks can be triggered from within another task. Let us see how.
- Click the + below to the Amount Entity node
- Select Dialog Task
- From the given task list, select the required task – UpdateBalance
- Property Panel for the Dialog Node is displayed. If not click on the newly added dialog node to open
- Navigate to the Instance Properties tab and enter the following details:
- Entity Pre-Assignments section – these are the entity values required by the Dialog Task if they are not populated here the user will be prompted to enter the same. Since we have already collected the information through the entities defined in the previous step we will be passing those user-entered values to the UpdateBalance task
- AccountType: savings
- AccountNumber: context.entities.PayerAccount
- Amount: context.entities.Amount
- TransactionType: Debit (payer account needs to be deducted of the transferred amount)
- Close the UpdateBalance Dialog Properties panel.
- Repeat the same steps to Update the Payee Account with the following values
- Entity Pre-Assignments section
- AccountType: savings
- AccountNumber: context.entities.PayeeAccount
- Amount: context.entities.Amount
- TransactionType: Credit
- Close the UpdateBalance Dialog Properties panel.
Step 4: Message Node
A Message Node is used to display a message from the Bot to the user.
Here we will be using the Message node to show the balance.
- Click the + below the UpdateBalance [2] Service node
- Select Message and click the ‘+ New message‘
- Property Panel for the Message Node is displayed. If not click on the newly added dialog node to open
- Enter the following details:
-
- Name: FinalMessage
- Display Name: Final Message
- Bot Responses:
The amount {{context.entities.AmountToTransfer}} has been transferred from {{context.entities.PayerAccount}} to {{context.entities.PayeeAccount}}
-
- On the Bot Response Property Panel, open the connections tab by clicking the ‘Connections‘ icon.
- Change the Default connection from ‘Not Connected‘ to ‘End of Dialog‘.
- Click Save.
- Close the Property Panel.
Test
To test the Dialog task, you can use the ‘Talk to bot’ at the bottom right corner.
Enter the following utterance (intent name)
“Transfer Funds”
Follow the Bot instructions:
- Enter Payer Account – 02929664;
- Enter Payee Account – 44994354;
- Enter Transfer Amount – 200
- See the success message.