이 섹션에는 봇 생성 및 게시, Kore.ai 봇 빌더 도구를 사용해 생성한 봇에 자연어 처리를 활성화하고 사용하는 과정을 설명하는 주제를 포함합니다.
봇 빌더 사용이 처음이고 사용하는 용어와 개념에 익숙해지려면 봇 개념을 참조하세요.
이 섹션에는 봇 생성 및 게시, Kore.ai 봇 빌더 도구를 사용해 생성한 봇에 자연어 처리를 활성화하고 사용하는 과정을 설명하는 주제를 포함합니다.
봇 빌더 사용이 처음이고 사용하는 용어와 개념에 익숙해지려면 봇 개념을 참조하세요.
Kore.ai 봇 빌더 플랫폼에 접근하면 아래 단계에 따라 순식간에 첫 번째 봇을 구축할 수 있습니다. 각 단계는 이 문서에서 자세히 설명합니다. 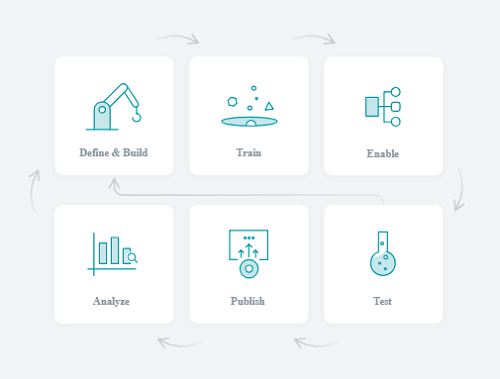
위에서 언급된 각 단계를 자세히 살펴봅시다.
이 단계는 두 가지 하위 작업으로 구성됩니다.
모든 봇은 잘 정의된 사용 사례 해결을 위해 구축되어야 합니다. 잘 정의된 사용 사례를 생성하는 첫 번째 단계에서는 시장 요구 사항을 수집하고 내부 요구 사항을 평가합니다. 일반적으로 이 프로세스에 모든 관련 비즈니스 스폰서와 제품 소유자, 비즈니스 분석가, 봇 개발자를 포함하는 것이 좋습니다. 봇이 해야 할 일을 잘 생각해 보세요.
각 단계에 대한 명확한 설명과 다양한 대화 흐름의 플로우 차트는 봇을 구축하는 과정이 수월하는데 큰 도움이 됩니다.
플랫폼 권장 사항: 봇을 설계할 때 다음 단계를 고려합니다.
봇 기능과 이상적인 사용 사례가 잘 정의되면 봇 개발자는 봇 작업 구성 프로세스를 시작하고, 인텐트와 엔티티를 정의하고, 대화형 대화를 구축할 수 있습니다. 챗봇 설계 시 유의할 사항: 다음 질문(전부가 아닌 일부)에 답변을 시도하세요.
봇 기능과 이상적인 사용 사례가 잘 정의되면, 봇 개발자는 봇 작업 설정 과정을 시작하고 의도와 엔티티를 정의하고 대화형 대화를 구축합니다.
요구 사항에 따라 생성하려는 봇 유형을 선택하세요. 다음 중 하나의 봇을 생성할 수 있습니다
표준 봇을 생성한 후 봇의 작동 방식을 정의할 수 있습니다. 봇 작업으로 시작하여 봇을 정의할 수 있습니다. 봇 기능과 대화는 이전 단계에서 정의한 사양에서 자연스럽게 진행되어야 합니다. 항상 시간을 할애하여 봇이 수행할 작업 목록을 검토하는 것이 중요합니다. 실제 개발을 시작하기 전에 봇이 제공할 이점과 해결하고자 하는 불만 사항을 제공하는지 확인하세요.
이를 통해 장기적으로 시간을 절약할 수 있습니다. 다음 방법 중 하나로 하나 이상의 작업 또는 흐름을 정의합니다.
스킬은 최종 사용자 요구 사항을 충족하는 데 도움이 되는 봇 기능입니다. 여기에는 항공편 예약, 날씨 알림 받기 또는 사용자 문의(지식 그래프)에 응답 또는 스몰 토크에 사용자 참여시키기 등 대화 작업 또는 경고 작업이 포함됩니다. Kore.ai 봇 빌더에서 다음 스킬을 정의할 수 있습니다.
최고의 봇은 반복 과정을 사용하여 학습이 잘 되었습니다. 작업 및 대화 흐름 개발 후 봇을 학습시킬 수 있습니다. 이렇게 하면 봇은 사용자 발화를 더 잘 이해할 수 있고 엔진은 사용자 입력에 따라 봇 작업 또는 의도의 우선 순위 지정을 더 잘할 수 있습니다.
봇 개발자와 업무 분석가는 협력하여 초기 학습을 완료하는 데 사용되는 샘플 발화와 패턴을 제공합니다. 봇을 배포한 후 내부 테스트 및 현장 데이터로 더 늘릴 수 있습니다.
다음 도구를 사용하여 봇을 학습시키면 NLP 엔진은 사용자 입력을 효율적으로 정확하게 인식하고 응답할 수 있습니다.
자세한 내용은 자연어 처리를 위한 봇 최적화하기를 참조하세요.
이 단계는 봇이 배포된 후 최종 사용자가 봇에 접근하여 상호 작용하는 데 사용할 수 있는 채널을 봇에 추가하는 것을 말합니다. 최종 사용자는 봇이 활성화된 채널에 게시 및 배포된 후 봇과 상호 작용하고 더 나아가 봇 작업을 수행할 수 있습니다.
채널은 SMS, 이메일, 모바일 앱, 웹 사이트, 메시징 앱 등 로봇이 존재할 수 있는 다양한 커뮤니케이션 플랫폼을 말합니다. 봇 빌더를 사용하면 체크 박스를 선택하는 것만으로 한 번에 챗봇 작업을 설계하고 20개 이상의 채널에 배포할 수 있습니다.
자세한 내용은 봇에 채널 추가하기를 참조하세요.
봇을 구축하고 학습시킨 후 발생한 가장 중요한 의문점은 여러분 봇의 NLP 모델은 얼마나 좋은가입니다. 이것이 바로 테스트를 하는 이유입니다. 더 나은 사용자 경험을 위해 계획된 모든 메시징 채널에서 봇 테스트를 고려해야 합니다.
옳다고 잘못 판단한 것과 틀리다고 잘못 판단한 것에 세심한 주의를 기울이면서 ML과 NLP 모델을 꼼꼼히 테스트하고 분석하여 많은 상충되는 발화를 사용하여 의도치 않게 모델을 학습시키지 않았는지 확인해야 합니다.
테스트를 통해 봇을 배포하기 전 추가 학습이 더 필요한지 여부를 결정하는 데 도움이 됩니다. 모든 학습 또는 재학습을 끝낸 후에는 학습 모델을 검토하여 변경 사항이 적절한지 확인하고 NLP 모델이 개선되었는지 또는 저하되었는지 확인해야 합니다.
봇과 대화 옵션, 발화 테스트, 배치 테스트는 봇 성능을 테스트하고 개선하는 데 도움이 됩니다.
자세한 내용은 봇 테스트를 참조하세요.
봇을 구축하고 충분히 테스트 했다면 이제는 선택한 환경과 사용자가 참여할 커뮤니케이션 채널에 배포할 시간입니다.
배포를 진행하기 전에 주요 비즈니스 이해 관계자와 협업하여 모든 봇과 봇 기능을 검토하고 승인하는 것이 좋습니다.
여러분의 계정, Kore.ai 공간 또는 회사 계정에 봇 작업을 게시하세요. 작업을 게시할 때 해당 배포를 검토 및 승인/미승인할 수 있는 봇 관리자에게 게시 요청을 시작합니다. 모든 관련 당사자가 봇을 승인하면 이전에 활성화된 채널을 통해 최종 사용자에게 배포할 수 있습니다.
자세한 내용은 작업 게시하기를 참조하세요.
봇이 배포되면 사용자가 어떻게 사용하는지 지속적으로 모니터링하고 반복 과정을 사용하여 봇을 관리하고 개선하는 데 적극적인 역할을 수행하는 것이 중요합니다. 봇 수행은 참여와 성능, 기능적 관점에서 모니터링하여야 하며 대화, 세션 당 메시지, 유지, 위치, 사용자 인구 통계, 감정 등과 같은 기타 변수 모니터링을 포함하여 결과를 분석해야 합니다.
또한, 봇 개발자와 분석가는 협업하여 드랍 오프 지점을 식별하고 작업 또는 언어 오류를 발견하고 대화가 중단된 이유를 알아내고 서비스 또는 스크립트 수행을 모니터링하여 봇의 NLP 및 기능적 수행을 개선해야 합니다. 수집된 데이터는 NLP를 개선하고 봇의 기능 수행을 개선하는 데 사용해야 합니다. 예를 들어, 봇이 봇 의도나 FAQ에 매핑하지 못한 발화를 살펴보고 나중에 봇이 이를 식별하도록 재학습시키세요.
작업 실패의 경우 과정이 잘못된 부분을 파악하여 바로잡고 해결 방법을 찾을 수 있습니다.
우수한 봇을 구축하는 것이 그렇게 쉬운 일은 아니지만 올바른 플랫폼과 적당한 구조, 테스트와 반복의 과정을 수행하려는 의지는 성공적인 봇 구축을 달성하는 데 큰 도움이 됩니다.
자세한 내용은 봇 분석을 참조하세요.
요약하면, 봇 빌더는 반복 가능한 단계가 있는 웹 기반 도구를 제공하여 엔터프라이즈 규모의 스마트 챗봇을 설계, 개발, 테스트, 배포합니다. 코드, 맞춤형 소프트웨어, 상당한 서버 공간, 인프라의 큰 변경 사항 없이 이 모든 작업을 수행할 수 있습니다. 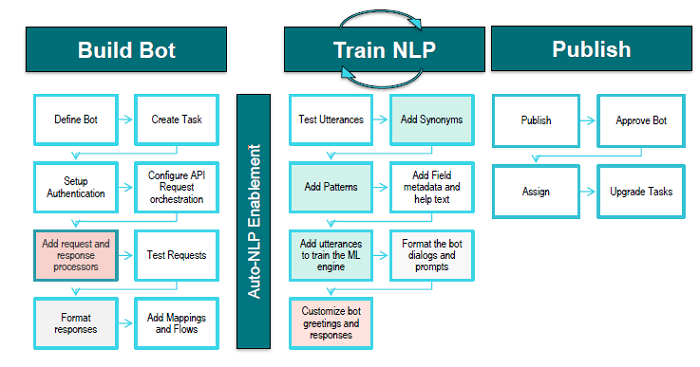
このセクションは、ボットの作成と公開、Kore.aiボットビルダーツールを使用して作成されたボットの自然言語処理の有効化と使用のプロセスを説明するトピックを含んでいます。ボットビルダーの利用が初めてで、使用する用語と概念を理解したい場合は、ボットの概念を参照してください。
Kore.aiボットビルダープラットフォームにアクセスすると、以下のステップに従って、すぐに最初のボットを構築できます。このドキュメントでは、各ステップについて詳しく説明します。
上記の各ステップを詳しく見ていきましょう。
このステップは、2つのサブタスクで構成されています:
すべてのボットは、明確に定義されたユースケースを解決できるように構築される必要があります。明確に定義されたユースケースを作成するための最初のステップには、市場要件を収集し、内部ニーズを評価することが含まれます。通常このプロセスには、関係するすべてのビジネススポンサー、プロダクトオーナー、ビジネスアナリスト、およびボット開発者を含めるのが良いでしょう。ボットに何をさせる必要があるのか、よく検討してください。各ステップの明確な説明とさまざまな会話の流れのフローチャートは、ボットの構築プロセスを容易にするのに大いに役立ちます。プラットフォームの推奨事項:ボットを設計する際には、次のステップを考慮します:
ボットの機能と理想的なユースケースが明確に定義されると、ボット開発者はボットタスクの構成プロセスを開始し、インテントとエンティティを定義し、会話型ダイアログを構築できます。チャットボットを設計する際に留意すべき点:次の質問に答えてみてください(一部でも結構です):
ボットの機能と理想的なユースケースが明確に定義されると、ボット開発者はボットタスクの構成、インテントとエンティティの定義、会話型ダイアログの構築のプロセスを開始します。
要件に基づいて、作成するボットのタイプを選択します。次のいずれかを作成できます
標準ボットを作成したら、ボットの動作を定義する準備が整います。ボットを定義するには、ボットタスクから始めます。ボットの機能とダイアログは、前のステップで定義した仕様から自然に決まるはずです。ボットに実行させたいタスクのリストの確認に時間をかけることには、常に価値があります。実際に開発を開始する前に、ボットに提供させたい利点と解決させたい問題点が挙げられていることを確認してください。長い目で見れば、これは間違いなく時間の節約につながります。次のいずれかの方法で、ボットの1つ以上のタスクまたはフローを定義します。
スキルは、エンドユーザーのニーズに応えるのに役立つボットの機能です。スキルには、フライトの予約、気象警報の取得、ユーザーの問い合わせへの応答(ナレッジグラフ)、さらにはユーザーをスモールトークに参加させるなどのダイアログおよびアラートタスクが含まれます。Kore.aiボットビルダーから次のスキルを定義できます。
優秀なボットは、反復プロセスを使用して十分にトレーニングされています。タスクと会話フローを開発した後に、ボットをトレーニングできます。そうすると、ボットはユーザーの発話をより正確に理解し、エンジンはユーザー入力に基づいて1つのボットタスクまたはインテントを別のタスクよりも優先させることができます。ボット開発者とビジネスアナリストは協力して、初期トレーニングを完了させるために使用するサンプル発話とパターンを用意します。ボットを一旦デプロイすると、内部テストとフィールドデータによってさら増強されます。次のツールは、NLPエンジンがユーザー入力を効率的かつ正確に認識して応答するように、ボットをトレーニングするのに役立ちます。
詳細については、自然言語処理用のボットの最適化を参照してください。
このステップでは、公開後にエンドユーザーがボットにアクセスして使用するボットへのチャネルの追加について説明します。エンドユーザーは、ボットが公開されて有効なチャネルにデプロイされた後にのみ、拡張ボットタスクによりボットと対話できます。チャネルとは、SMS、メール、モバイルアプリ、Webサイト、メッセージングアプリなど、ボットが存在できるさまざまな通信プラットフォームを指します。ボットビルダーを使用すると、チャットボットタスクを一度設計し、チェックボックスを選択するだけで、20以上のチャネルにデプロイできます。詳細については、ボットへのチャネルの追加を参照してください。
ボットを構築してトレーニングが完了した後に生じる最大の疑問は、ボットのNLPモデルがどれだけ優れているかということです。これがテストのすべてです。エンドユーザーエクスペリエンスを向上させるには、計画しているすべてのメッセージングチャネルでボットをテストすることを考慮する必要があります。MLモデルとNLPモデルを注意深くテストおよび分析し、正検知と誤検知に細心の注意を払いながら、多数の競合する発話を使用してモデルに誤ったトレーニングをしていないことを確認しなければなりません。テストは、ボットをデプロイする前にさらにトレーニングが必要かどうかを判断するのに役立ちます。トレーニングまたは再トレーニングのすべてのラウンドの完了後、トレーニングモデルを確認して、加えられた変更が適切であるかどうか、またそれらがNLPモデルを強化できたのか、劣化させていないかどうかを判断する必要があります。ボットに話しかけるオプション、発話テスト、およびバッチテストは、ボットのパフォーマンスのテストと改善に役立ちます。詳細については、ボットのテストを参照してください。
ボットを構築して十分なテストが完了したら、選択した環境とユーザーが関与する通信チャネルにボットをデプロイします。デプロイを進める前に、主要関係者と協力し、すべてのボットとボット機能をレビューしてから承認することをお勧めします。ボットタスクをあなたのアカウント、Kore.aiスペース、又は会社のアカウントに公開します。タスクを公開すると、ボット管理者への公開リクエストが発動されます。ボット管理者は、デプロイを確認して承認または不承認にすることができます。ボットがすべての関係者によって承認されると、事前に有効化されたチャネルを介してエンドユーザーにデプロイできます。詳細については、タスクの公開を参照してください。
ボットが一旦デプロイされたら、ユーザーがボットをどのように使用しているかを継続的に監視し、反復プロセスを使用してボットの管理と改良に積極的に努めることが大切です。ボットのパフォーマンスを、エンゲージメント、パフォーマンス、機能の観点から監視し、会話や、セッションごとのメッセージ、保持、場所、ユーザーの人口統計、感情などの他の変数の監視を含め、結果を分析する必要があります。さらに、ボットの開発者とアナリストは協力して離脱地点を特定し、取り扱われなかったタスクや言語の障害を明らかにし、会話が放棄された理由を見極めて、サービスとスクリプトのパフォーマンスを監視しながらボットのNLPと機能的パフォーマンスを向上させます。ボットのNLPと機能的パフォーマンスを向上させるには、収集したデータを使用する必要があります。たとえば、ボットがボットのインテントまたはFAQにマッピングできなかったすべての発話を確認し、ボットを再トレーニングして将来それを特定できるようにします。タスクの失敗については、プロセスがどこで失敗したかをトラブルシューティングし、解決策を見出すことができます。優れたボットを構築することは容易ではありませんが、適切なプラットフォーム、少しの工夫、そしてテストと反復の意欲は、ボットの成功を達成するのに大いに役立ちます。詳細については、ボットの分析を参照してください。
まとめると、ボットビルダーは、エンタープライズ規模でスマートチャットボットを設計、開発、テスト、および展開するための繰り返し可能なプロセスを備えたWebベースのツールを提供します。コードやカスタムソフトウェア、大規模なサーバースペースやインフラストラクチャの変更を必要とせずに、これらすべてを実行できます。
This section contains topics that describe the process of creating and publishing virtual assistants using the Kore.ai XO Platform.
If you are new to Kore.ai’s XO Platform and want to familiarize yourself with the terms and concepts we use, refer to Bot Concepts.
Once you get access to the Kore.ai XO Platform, you can build your first Virtual Assistant within no time by following the below-mentioned steps. Each step is elaborated in detail in this document.
Let’s look at each of the above-mentioned steps in detail.
This step consists of two sub-tasks:
Every VA must be built to solve a well-defined use case. The first step is creating a well-defined use case involves gathering market requirements and assessing internal needs. Typically, you want to include all relevant business sponsors, product owners, business analysts, and VA developers in this process.
Get a good idea of what the VA needs to do. A clear description of each step and a flow chart of the various conversation flows will go a long way in easing the process of building the VA.
Platform Recommendations: The following steps are considered while designing a VA:
Understand the User Needs: To set the scope of the VA. The business sponsors, business analysts, and product owners play an important role to identify the user requirement by gathering market requirements and assessing internal needs.
Set the Virtual Assistant Goals: It helps you create a well-defined use case. This involves converting the above-identified scope to a use case. It is advisable to involve the VA developer in this phase.
Design a Virtual Assistant Conversation: To define the virtual assistant behavior in every possible scenario in its interaction with the user. Simulating conversations goes a long way in identifying every possible scenario.
Once the VA capabilities and ideal use case are well-defined, the VA developer can begin the process of configuring the virtual assistant tasks, defining intents and entities, and building the conversational dialog.
Things to keep in mind while designing a virtual assistant: Try to answer the following questions (some if not all):
Who is the target audience? Technical help VA targeted for a tech-savvy customer needs a different design when compared to VAs for a help VAs for a layman like, say, a bank customer. Hence assessing the target audience is always important.
What VA persona will resonate the most with this group? This will help define how the VA talks and acts in every situation.
What is the purpose of the VA? The goal i.e. the customer query that the VA needs to address defines the endpoint of any conversation.
What pain points will the VA solve? The purpose and scope of VA are set to identify what the VA addresses and when the human agent needs to take over.
What benefits will the VA provide for us or our customers? The main benefit of using a VA is time-saving. The users need not waste their time waiting for a human agent to be available for answering their query. You, as the business owner, don’t need to worry about not being there to cater to all customer needs.
What tasks do I want my VA to perform? Simulation of user conversation helps identify the tasks that need to be catered to by the VA.
What channels will the VA live in? This will to some extent drive the way the VA is presented, the various options available for the VA are limited by the channel/medium it is used.
What languages should the VA interpret or speak? When catering to a multilingual community language support is imperative and building the dictionary simultaneously is useful.
Once the VA’s capabilities and ideal use case are well-defined, the VA developer begins the process of configuring VA tasks, defining intents, and entities, and building the conversational dialog.
Based on the requirements, select the type of Bot you want to create. You can create either a
Virtual Assistant capabilities and dialogs should flow naturally from the specifications you defined in the previous step. It is always valuable to take time to review the list of tasks you want the virtual assistant to perform. Ensure that it delivers on the benefits you want the virtual assistant to provide and the pain points you want it to solve, before starting actual development. This will certainly save your time in the long run.
Define one or more tasks or flows for your VA in one of the following methods:
On the Bot Summary page, click + New Task on the Tasks widget. This would allow you to add a Dialog or an Alert task.
In addition to the tasks mentioned above, from the Conversational Skills menu on the left navigation, you can select a skill to be added by clicking the Create button on the corresponding skills page.
Skills are VA capabilities that help in catering to the end-user needs. These include dialog and alert tasks such as booking a flight, getting weather alerts, or respond to user queries (Knowledge Graph), or even engaging the user in Small Talk.
You can define the following skills from the Kore.ai XO Platform:
Storyboard – Design engaging conversations as well as simplifies the communication between business users, conversation designers, language experts, and VA developers.
Dialog Tasks – Consist of multiple intents, sub-intents, and component nodes to conduct a complex conversational flow between a user and the VA.
Alert Tasks – Monitors a web service for events and sends a notification message to the user when the event occurs. You can use this task type for scheduled polling or near real-time notification using webhooks.
Knowledge Graph – Turns static FAQ pages into an intelligent, personalized conversational experience. Build a hierarchy of crucial terms, add questions to the right nodes in the hierarchy, and leave the responding to users’ tasks to the VA, thus enabling your support staff to engage with more complex tasks.
Small Talk – Engage the end-users in casual conversations that help socialize your VA and improve the recall rates.
The best virtual assistants are well trained using an iterative process. After developing the tasks and conversation flow, you can train your VA. Doing so allows your VA to better understand user utterances and the engine to better prioritize one VA task or intent over another based on the user input.
Both developers and business analysts work together to provide sample utterances and patterns that are used to complete the initial training. It can be further augmented by internal testing and field data once you deploy the VA.
Train the VA using Machine Learning to improve utterance recognition.
You can fine-tune the FM Engine and the virtual assistant’s configuration by adding additional utterances, synonyms, and patterns for a task or intents.
Enhance your VA Intelligence by defining interruption handling, multi-intent detection, and more.
The following tools help train your virtual assistant so that the NLP engine recognizes and responds to user inputs efficiently and accurately.
For more information, refer to Optimizing Bots for Natural Language Processing.
This step refers to adding channels to your VA that end users can use to access and interact with your VA after it is published. End users can only interact with your VA, and by extension VA tasks, after the VAs are published and deployed to enabled channels. Channels refer to various communication platforms where a VA can live such as SMS, email, mobile apps, websites, messaging apps, and more. With the Bot Builder, you can design VA tasks once and deploy them across 20+ channels by merely selecting a checkbox.
For more information, refer to Adding Channels to your Bot.
After you have built and trained your VA, the most important question that arises is how good is your VA NLP model? This is what testing is all about. You must consider testing your VA across all planned messaging channels for a better end-user experience.
You need to carefully test and analyze your ML and NLP models and ensure you have not inadvertently trained your models using a large number of conflicting utterances while paying close attention to false positives and false negatives.
Testing helps determine whether or not more training is needed before deploying your VA. After every round of training or retraining, you must review the training model to determine whether the changes made are appropriate and to determine whether they have enhanced or deteriorated the NLP model.
Talk to V option, Utterance Testing, and Batch Testing helps in testing and improving the performance of the VA.
For more information, refer to Test your Bot.
Once your VA is built and sufficiently tested, it is time to deploy it in the environment of your choice and the communication channels where users engage.
It is recommended that you work with the key business stakeholders to review and approve all VAs and their functionality before moving forward with the deployment.
You can then publish your VA tasks to your account, a Kore.ai space, or your company account. When you publish tasks, a request is initiated to the Virtual Assistant’s Admin who can review and approve/disapprove their deployment. Once your VA is approved by all relevant parties, you can deploy it to end-users through previously enabled channels.
For more information, refer to Publishing Tasks.
Once your VA is deployed, it is important that you continually monitor how users use it and take an active role in managing and refining it using an iterative process. Your VA’s performance should be monitored from an engagement, performance, and functional standpoint and the results analyzed, including monitoring conversations and other variables like messages per session, retention, location, user demographics, sentiment, and more.
Furthermore, developers and analysts work together to identify drop-off points, uncover task or language failures, determine why conversations are abandoned and monitor service and script performance to improve the NLP and functional performance of your VAs.
The data collected must be used to improve the NLP and functional performance of your VAs. For example, take a look at all the utterances that your VA was not able to map to intent or FAQ and retrain the VA to identify it in the future. For task failures, you can troubleshoot where the process went wrong and come up with solutions.
Building great virtual assistants is not easy, but the right platform, a little bit of structure, and a willingness to test and iterate some more, all are factors that go a long way in achieving success.
For more information, refer to Analyze your Bot.