Kore.ai Store is an online marketplace for bots that run on the Kore.ai platform. The purpose of the store is to enable developers to explore the bot’s capabilities and import them into their accounts. Only Template Bots are available in the store and users visiting the store can explore all these bots. You must have a Kore.ai platform account to import the template bots.
Kore.ai template bots are available for use with your Kore.ai account and channels such as email, Kore.ai messaging, Kore.ai spaces, SMS, Facebook Messenger, and more. You can get Kore.ai template bots at the Kore.ai Store to receive alerts from your favorite apps and websites through text messages, emails, or other web service systems.
Access Store
There are different ways you can access the store. You can access the store from:
- Store
- Kore.ai Platform
Store
Go to https://bots.kore.ai/botstore/ to access the store. You can view, explore, and install all the template bots available in the store.
Kore.ai Platform
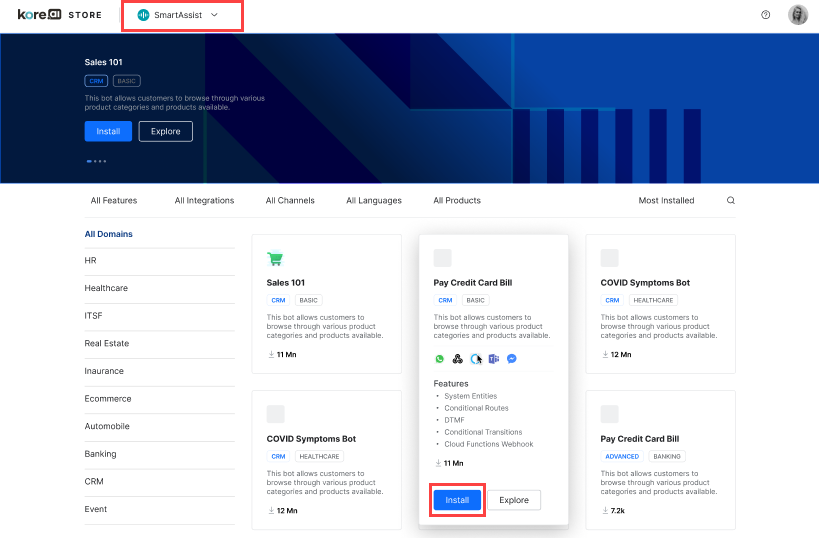
As a Kore.ai platform user, you can access the store from within the platform. You can view, explore, and install only the bots related to the Kore.ai platform.
In the store, you can view, explore, and install the template bots. But to install a template bot, you must log in to the Kore.ai platform account. Also, you can filter the bots based on the following criteria:
- Domains
- Features
- Integrations
- Channels
- Languages
- Products
You can sort the template bots based on:
- Popularity
- Most Installed
- Recently Added
- Sort by A-Z
Explore Bots
You can explore the template bot before installing it. The explore option allows you to get an overview of the bot including the technical specifications, supported channels, integrations, and languages.
Explore from the Store
To explore the template bot from the store, follow the below steps:
- Go to https://bots.kore.ai/botstore/.
- On the store landing page, you can find a list of template bots.
- If you select a product from the drop-down list on the top, it displays only the template bots of that product. For example, if you select Kore.ai Platform from the drop-down list, it displays only the Kore.ai Platform template bots.
- Hover over the template bot and it gives a preview of that bot. The preview displays the template bot details along with the features.
- On the preview display, click Explore.
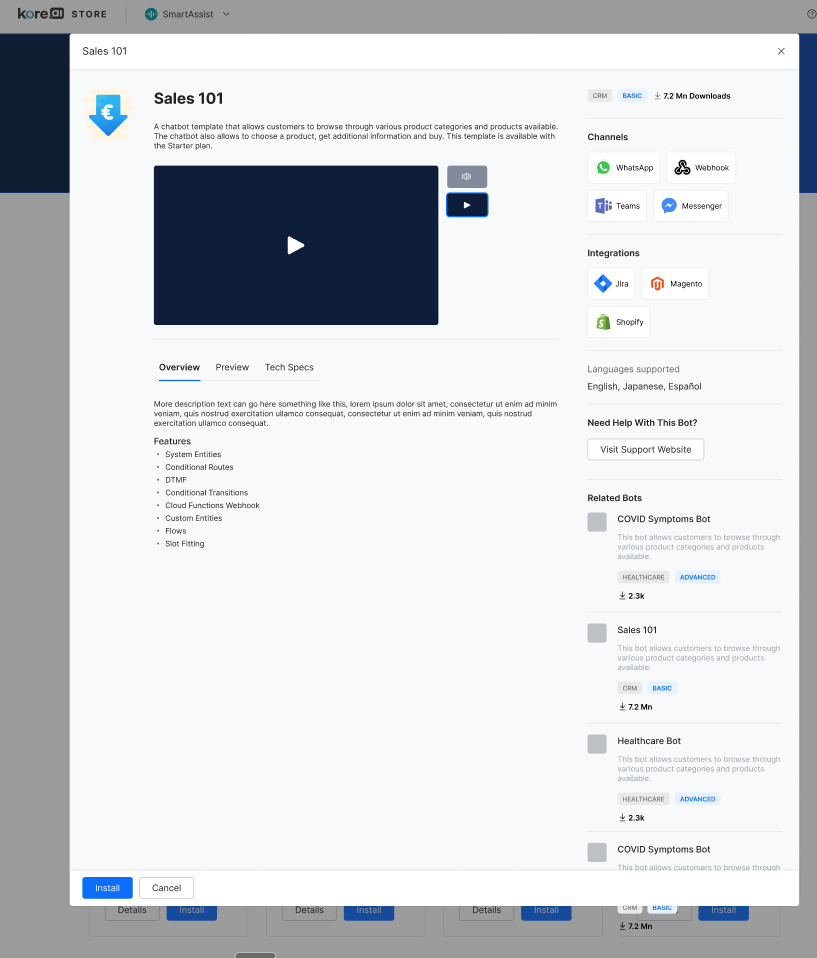
- On the bot dialog box, you can find a video of the bot that explains the bot’s features.
- You can find three sections that give an overview of the bot:
- Overview – This section gives a summary of the template bot and the features supported in this bot.
- Preview – This section displays the list of stories that are built from the storyboard in the template bot. If you click a story, it gives a preview of that particular story.
- Technical Specifications – This section gives a detailed overview of the technical aspects of the bot. It displays information about how the bot was built.
- On the right column, you can find the list of channels and languages supported, and apps that you can integrate with the template bot.
- If you want more information or any help with the bot, click Visit Support Website.
- You can find the Related Bots section to find bots related to the template bot.
- On the top-right of the page, you can find the number of times the bot was downloaded. For example, 3.1 million downloads.
- After exploring the bot, if required, you can click Install to install the bot.
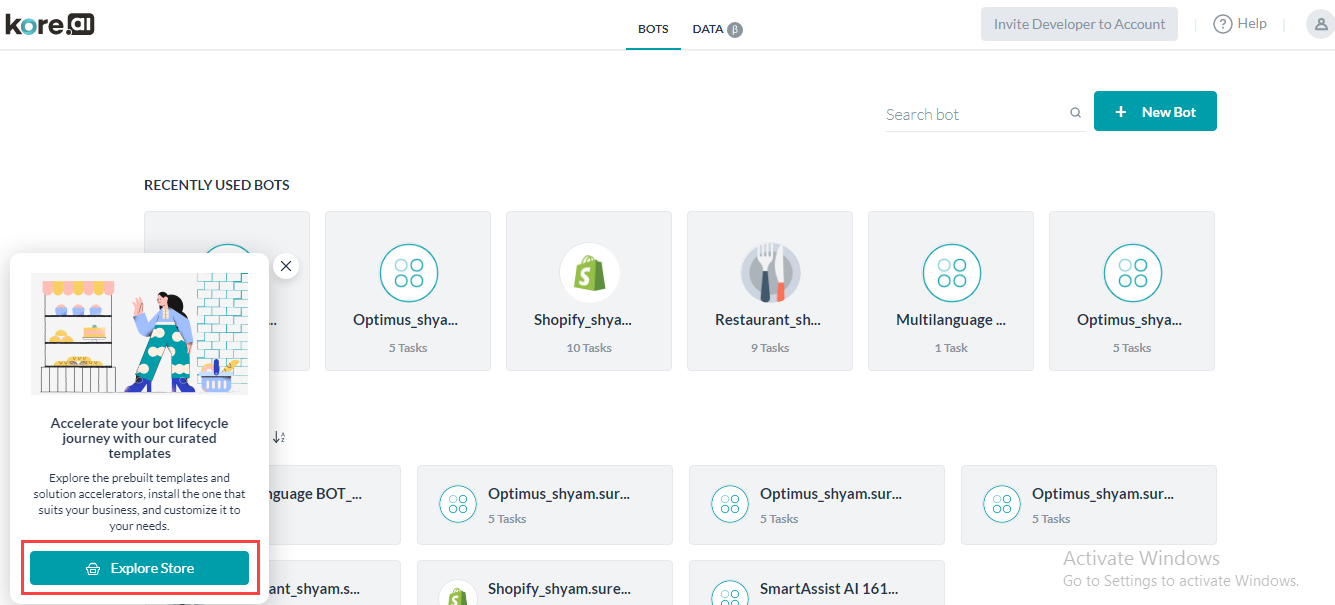
Explore from the Kore.ai Platform
To explore the template bot from the Kore.ai platform, follow the below steps:
- Log in to the Kore.ai platform with valid credentials.
- On the landing page, you can find the Explore Store banner at the bottom left.
- Click Explore Store.
- On the Templates from Bot Store page, you can find the list of template bots.
- Hover over a template bot and it gives a preview of that bot. The preview displays the bot description, channels supported, and bot features.
- On the preview display, click Explore to explore the template bot before you install it.
- On the bot dialog box, you can find a video of the bot that explains the bot’s features.
- You can find three sections that give an overview of the bot:
- Overview – This section gives a summary of the template bot and the features supported in this bot.
- Preview – This section displays the list of stories that are built from the storyboard in the template bot. If you click a story, it gives a preview of that particular story.
- Technical Specifications – This section gives a detailed overview of the technical aspects of the bot. It displays information about how the bot was built.
- On the right column, you can find the list of channels and languages supported, and apps that you can integrate with the template bot.
- If you want more information or any help with the bot, click Visit Support Website.
- You can find the Related Bots section to find bots related to the template bot.
- On the top-right of the page, you can find the number of times the bot was downloaded. For example, 3.1 million downloads.
- After exploring the bot, if required, you can click Install to install the bot.
Install Bots
Install refers to importing the template bots into your account. You can install template bots from the store and Kore.ai platform.
Install from the Store
To install template bots from the store, follow the below steps:
- Go to https://bots.kore.ai/botstore/.
- On the store landing page, you can find a list of template bots available based on products.
- If you select a product from the drop-down list on the top, it displays only the template bots of that product. For example, if you select Kore.ai Platform from the drop-down list, it displays only the Kore.ai Platform template bots.
- Hover over the template bot you want to install. The preview displays the template bot details along with the features.
- On the preview display, click Install.
- On the corresponding dialog box, enter the email address.
- If the entered email address is identified as the existing user, it prompts you to enter the password to log in.
- If the entered email address is new, it prompts you to sign up for an account.
- Upon successful login, the bot is installed with a dialog box displaying the status.
Install from the Kore.ai Platform
To install template bots from the Kore.ai platform, follow the below steps:
- Log in to the Kore.ai Platform with valid credentials.
- On the landing page, click + New Bot on the top-right and select Start from the Store from the list.
- On the Templates from Bot Store page, you can find the list of template bots.
- Hover over a template bot and it gives a preview of that bot. The preview displays the bot description, channels supported, and bot features.
- On the preview display, click Install.
- A Configure Sample Bot window appears on the Bot Summary page.
- By default, the Instructions tab is selected and you can find the installation instructions.
- Click Next.
- On the Bot Settings page, enter the Bot Name.
- Select an icon:
- Generic bot icon
- Custom icon
- Click Next.
- On the Setup Bot Variables page, enter the corresponding values for the variable names.
- Click Done.
