OVERVIEW
Virtual Assistants
Kore.ai Platform
Key Concepts
Natural Language Processing (NLP)
Accessing Platform
VIRTUAL ASSISTANTS
Virtual Assistant Builder
Virtual Assistant Types
Getting Started
Create a Simple Bot
SKILLS
Storyboard
Dialog Tasks
Introduction
Dialog Builder (New)
Dialog Builder (Legacy)
User Intent Node
Dialog Node
Entity Node
Supported Entity Types
Composite Entities
Supported Colors
Supported Company Names
Form Node
Logic Node
Message Nodes
Confirmation Nodes
Bot Action Node
Service Node
Custom Authentication
2-way SSL for Service nodes
Script Node
Agent Transfer Node
WebHook Node
Grouping Nodes
Connections & Transitions
Manage Dialogs
User Prompts
Knowledge Graph
Terminology
Building
Generation
Importing and Exporting
Analysis
Knowledge Extraction
Train
Build
Alert Tasks
Introduction
Ignore Words and Field Memory
How to Schedule a Smart Alert
Small Talk
Digital Views
Introduction
How to Configure Digital Views
Digital Forms
Overview
How to Configure Digital Forms
NATURAL LANGUAGE
Overview
Machine Learning
Introduction
Model Validation
Fundamental Meaning
Introduction
NLP Guidelines
Knowledge Graph
Traits
Introduction
How to Use Traits
Ranking and Resolver
Advanced NLP Configurations
INTELLIGENCE
Overview
Context Management
Overview
Session and Context Variables
Context Object
How to Manage Context Switching
Manage Interruptions
Dialog Management
Sub Intents & Follow-up Intents
Amend Entity
Multi-Intent Detection
Sentiment Management
Tone Analysis
Sentiment Management
Event Based Bot Actions
Default Conversations
Default Standard Responses
TEST & DEBUG
Talk to Bot
Utterance Testing
Batch Testing
Record Conversations
Conversation Testing
CHANNELS
PUBLISH
ANALYZE
Overview
Dashboard
Custom Dashboard
Overview
How to Create Custom Dashboard
Conversation Flows
NLP Metrics
ADVANCED TOPICS
Universal Bots
Overview
Defining
Creating
Training
Customizing
Enabling Languages
Store
Smart Bots
Defining
koreUtil Libraries
SETTINGS
Authorization
Language Management
PII Settings
Variables
Functions
IVR Integration
General Settings
Management
Import & Export
Delete
Bot Versioning
Collaborative Development
Plan Management
API GUIDE
API Overview
API List
API Collection
SDKs
SDK Overview
SDK Security
SDK App Registration
Web SDK Tutorial
Message Formatting and Templates
Mobile SDK Push Notification
Widget SDK Tutorial
Widget SDK – Message Formatting and Templates
Web Socket Connect & RTM
Using the BotKit SDK
Installing
Configuring
Events
Functions
BotKit SDK Tutorial – Agent Transfer
BotKit SDK Tutorial – Flight Search Sample Bot
Using an External NLP Engine
ADMINISTRATION
HOW TOs
Create a Simple Bot
Create a Banking Bot
Transfer Funds Task
Update Balance Task
Context Switching
Using Traits
Schedule a Smart Alert
Configure UI Forms
Add Form Data into Data Tables
Configuring Digital Views
Add Data to Data Tables
Update Data in Data Tables
Custom Dashboard
Custom Tags to filter Bot Metrics
Patterns for Intents & Entities
Build Knowledge Graph
Global Variables
Content Variables
Using Bot Functions
Configure Agent Transfer
RELEASE NOTES

基本認証を使用した認証の設定

ボットに基本認証を定義するには、以下の手順に従います。

  1. 基本認証プロファイルを設定するボットを開きます。
  2. 左側のナビゲーションパネルにカーソルを合わせ、設定 > 設定するから認証プロファイルを選択します。
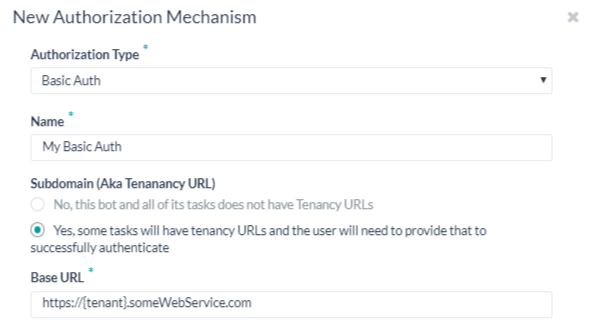
  3. 追加をクリックします。新しい認証メカニズムダイアログが開きます。
  4. 認証タイプドロップダウンリストで基本認証を選択します。
  5. 名前フィールドに基本認証タイプの名前を入力します。

テナントを定義する

テナントを定義するWeb アプリケーションやユーザー インターフェイスがベース URL にテナント名を使用する場合は、必要に応じて [サブドメイン] セクションで [はい] を選択します。例えば、koreは、www.kore.someCompany.comとしてテナントを使用したウェブサービスのテナント組織です。下記の設定の例では、テンナンシーURLは{tenant}組織のプレースホルダが含まれます。
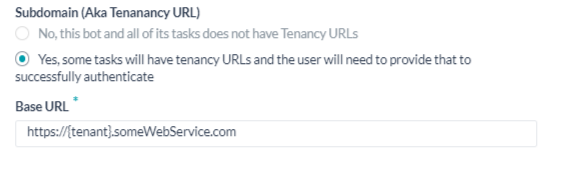
フォーム フィールドの追加 

デフォルトのユーザー名とパスワードのフィールドが承認入力のニーズを満たしていない場合は、承認 IDP フォームフィールドを追加することで、エンドユーザーに表示されるカスタムフィールドを追加できます。これらのフォームフィールドを使用することができます。たとえば、ユーザー名パスワードのフォームフィールドに加えて、認証プロセスでPINコードが必要な場合などです。 
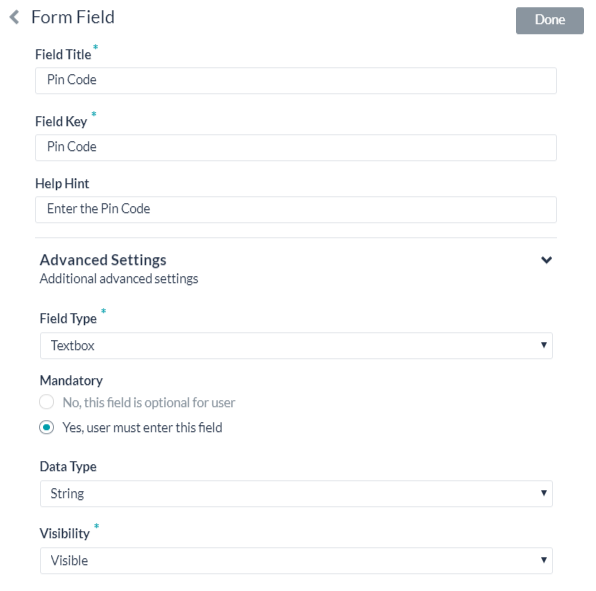
以下のテーブルは認証IDPフォームフィルドの定義に使用するフィルドの説明です。

フィールド名 説明
フィールド タイトル 承認ダイアログでエンドユーザー表示するフィールド名を指定します。
フィールドキー 認証サービスにエンドユーザーが入力する値を示す値。
ヘルプのヒント フィールドに表示されるヘルプ文字はフィールドに入力すべくものを説明しています。
フィールドタイプ 上級オプションと選択した場合、エンドユーザーインターフェイスに表示されるフィールドのタイプを指定して、ユーザー入力の割り当てたフィールドキー値として収集します、以下のうちの一つ:

  • テキストボックス
  • パスワード
必須 上級オプションと選択した場合、認証を完了するためにエンドユーザーがこのフィールドを定義する必要があるかどうかを選択します。
データタイプ 上級オプションと選択した場合、エンドユーザーからの入力と予想するデータタイプを指定してください。例えば、文字列
可視性 [詳細オプション] を選択した場合、承認フィールドを表示、非表示、または読み取り専用のいずれにするかを指定します。

認証フィールドの追加

デフォルトでは、認証フィルドとはボットリクエストのメッセージのヘッダーの一部として調整されたものです。ボットのリクエストに追加の認証フィールドが必要、または想定される認証がヘッダーの一部ではない場合(例:ソーシャルセキュリティ番号やPINなど)、認証フィールド追加をクリックして必要なフィールドを定義します。

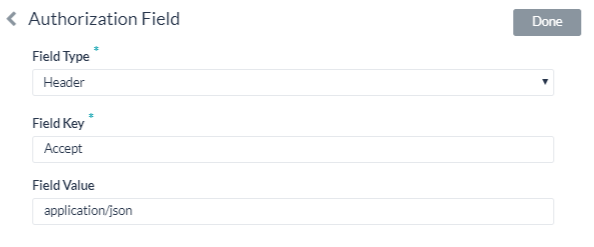
  1. フィールドタイプフィルドに、以下のうちの一つを選択することができます: 必須のボットリクエストメッセージの位置および認証フィルドのタイプの次第です。
    • ヘッダー―ボットは、リクエストヘッダーで認証フィールドを探します。
    • ペイロード―ボットは、リクエスト本文のコンテンツで認証フィールドを探します。
    • クエリ文字列―ボットは、リクエスト本文のクエリとして認証フィールドを探します。
    • パスパラメータ―ボットは、リクエストURLパスで認証フィールドを探します。
  2. フィールドキーフィールドに、選択済のフィールドタイプフィールド名を入力してください。
  3. フィールド値フィールドに、フィールドキーの指定された値を入力してください。
  4. 追加をクリックします。新規の認証フィールドは認証フィールドのセクションに追加されました。

認証フィールドを追加する場合、認証フィールドセクションの追加をクリックしてください。

認証チェックURL

認証チェックURLフィールドで、認証メカニズムでボットを展開する前にボットビルダー から認証設定をテストするために使用できるURLを定義します。ダイナミックフィールド、パスパラメータフィールド、クエリフィールドなどを使用して、テストURLを定義することができます。(例:https://kore.someCompany.com/sap/opu/odata/sap/{{authfield1}}/?$format=jsonまたはhttps://{tenant}.service-now.com/api/now/v1/table/incident)詳細については、タスクのセッション変数とコンテキスト変数を使用を参照してください。

コネクタを使用してアクセス

コネクタでアクセスのセクションで、はいを選択するとKore.aiコネクタエイジェントでKore.aiボットへのアクセスをできるようにします。Kore.ai Connector Agent を使用すると、クラウドベースの Kore.ai ボットとオンプレミスのボットアプリケーション間の安全なデータ接続を確立し、維持できます。オンプレミスのボットアプリケーションでは、イントラネット内のユーザーやシステムを制限したり、特定のデータ交換のために特定のチャネルを設定することで、通信のセキュリティを確保しています。もしご使用のドメインは定義済の活動的なKore.ai コネクタではないの場合、警告メッセージは表示され、ボットのアドミンコンソールのシステムアドミニストレータに連絡します。詳細については、ボット管理コンソールのドキュメントのKore.aiコネクタの使用をご確認ください。保存をクリックして保存認証を保存して新規認証メカニズムのダイアログを閉めます。

認証テスト 

認証設定を保存した後、認証プロファイルページからテストをクリックすると、認証の定義をテストすることができます。テストをクリックすると、テスト認証ダイアログ。
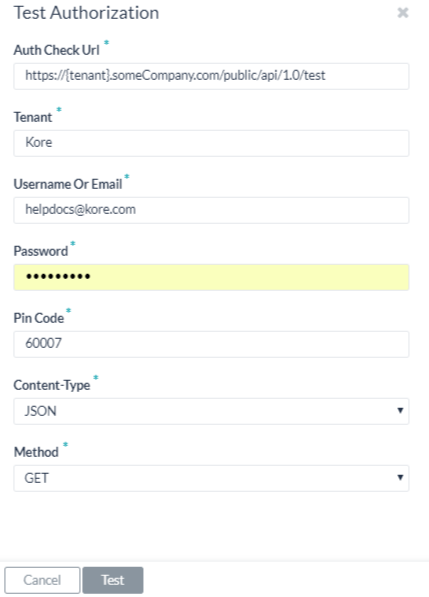
 テスト認証の設定―基本認証

  1. 認証チェックURLフィールドに、実証やURLをテスト認証調整に入力してください。
  2. ボットはサブドメインを使用する場合、テンナンシーフィールドは表示されて、必ずテナントを指定してください。
  3. ウェブサービスのユーザー名パスワードを入力します。
  4. URL として求めるコンテンツ タイプは、 [コンテンツ タイプ] フィールドで選択します。
  5. URLのテストの場合、方法フィールドはリードオンリーそしてGETと設定されました。
  6. テストをクリックすると認証テストを開始します。

認証の検証が完了すると、テスト認証ダイアログが閉じ、画面右上に検証結果(成功または失敗)が表示されます。認証失敗の場合、認証テスト失敗のメッセージがヘッダーおよび応答のタブとともに表示されます。

仕組みについて 

ボットに基本認証を使用する場合、下記の図の通り、Kore.aiアプリケーションは自動的にユーザーをプロンプトしてクレデンシャルのロクインでウェブアプリケーションやウェブサービスへのアクセスへ進めます。DIYBasicAuthRequest 
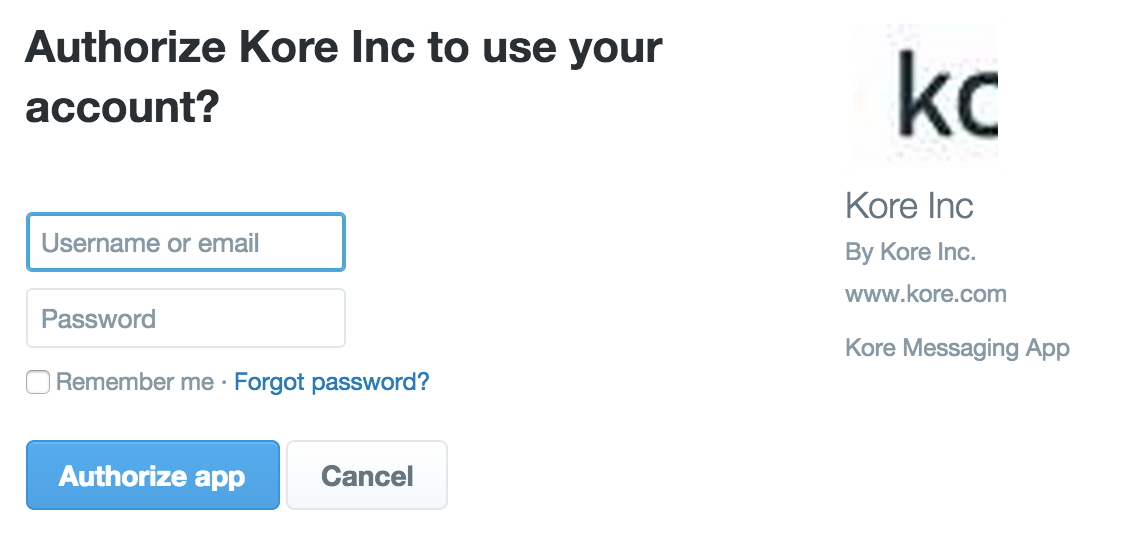
エンドユーザーが承認された後、以下のシンタックスを使用して設定が保存されます。

{{ First Name }} {{ Last Name }} {{ Bot Name }} {{ Account # }} {{ Sequence # }}

たとえば、ジョン・スミスのツイッター アカウント#1。Kore.aiアプリケーションは、このアカウントを使用して、将来のすべてのボットリクエストに対して、WebアプリケーションまたはWebサービスにアクセスすることができます。その他、エンドユーザーはアカウントを他のタスクに同じボットで再使用することができます。

OVERVIEW
Virtual Assistants
Kore.ai Platform
Key Concepts
Natural Language Processing (NLP)
Accessing Platform
VIRTUAL ASSISTANTS
Virtual Assistant Builder
Virtual Assistant Types
Getting Started
Create a Simple Bot
SKILLS
Storyboard
Dialog Tasks
Introduction
Dialog Builder (New)
Dialog Builder (Legacy)
User Intent Node
Dialog Node
Entity Node
Supported Entity Types
Composite Entities
Supported Colors
Supported Company Names
Form Node
Logic Node
Message Nodes
Confirmation Nodes
Bot Action Node
Service Node
Custom Authentication
2-way SSL for Service nodes
Script Node
Agent Transfer Node
WebHook Node
Grouping Nodes
Connections & Transitions
Manage Dialogs
User Prompts
Knowledge Graph
Terminology
Building
Generation
Importing and Exporting
Analysis
Knowledge Extraction
Train
Build
Alert Tasks
Introduction
Ignore Words and Field Memory
How to Schedule a Smart Alert
Small Talk
Digital Views
Introduction
How to Configure Digital Views
Digital Forms
Overview
How to Configure Digital Forms
NATURAL LANGUAGE
Overview
Machine Learning
Introduction
Model Validation
Fundamental Meaning
Introduction
NLP Guidelines
Knowledge Graph
Traits
Introduction
How to Use Traits
Ranking and Resolver
Advanced NLP Configurations
INTELLIGENCE
Overview
Context Management
Overview
Session and Context Variables
Context Object
How to Manage Context Switching
Manage Interruptions
Dialog Management
Sub Intents & Follow-up Intents
Amend Entity
Multi-Intent Detection
Sentiment Management
Tone Analysis
Sentiment Management
Event Based Bot Actions
Default Conversations
Default Standard Responses
TEST & DEBUG
Talk to Bot
Utterance Testing
Batch Testing
Record Conversations
Conversation Testing
CHANNELS
PUBLISH
ANALYZE
Overview
Dashboard
Custom Dashboard
Overview
How to Create Custom Dashboard
Conversation Flows
NLP Metrics
ADVANCED TOPICS
Universal Bots
Overview
Defining
Creating
Training
Customizing
Enabling Languages
Store
Smart Bots
Defining
koreUtil Libraries
SETTINGS
Authorization
Language Management
PII Settings
Variables
Functions
IVR Integration
General Settings
Management
Import & Export
Delete
Bot Versioning
Collaborative Development
Plan Management
API GUIDE
API Overview
API List
API Collection
SDKs
SDK Overview
SDK Security
SDK App Registration
Web SDK Tutorial
Message Formatting and Templates
Mobile SDK Push Notification
Widget SDK Tutorial
Widget SDK – Message Formatting and Templates
Web Socket Connect & RTM
Using the BotKit SDK
Installing
Configuring
Events
Functions
BotKit SDK Tutorial – Agent Transfer
BotKit SDK Tutorial – Flight Search Sample Bot
Using an External NLP Engine
ADMINISTRATION
HOW TOs
Create a Simple Bot
Create a Banking Bot
Transfer Funds Task
Update Balance Task
Context Switching
Using Traits
Schedule a Smart Alert
Configure UI Forms
Add Form Data into Data Tables
Configuring Digital Views
Add Data to Data Tables
Update Data in Data Tables
Custom Dashboard
Custom Tags to filter Bot Metrics
Patterns for Intents & Entities
Build Knowledge Graph
Global Variables
Content Variables
Using Bot Functions
Configure Agent Transfer
RELEASE NOTES

Setting Up Authorization using Basic Auth

To define Basic Authorization for your bot, follow these steps:

  1. Open the bot for which you want to configure the Basic Authorization profile.
  2. Select the Build tab from the top menu.
  3. From the left menus, click Configurations -> Authorization Profile
  4. Click Add. The New Authorization Mechanism dialog opens.
  5. In the Authorization Type drop-down list, select Basic Auth.
  6. In the Name field, enter the name for your Basic Auth type.

Defining Tenancy

If required, in the Subdomain section, select Yes if the base URL for a web application or user interface uses a tenant name in the URL. For example, kore is the tenant organization for a web service using tenants as www.kore.someCompany.com.

In the following example configuration, the tenancy URL contains the {tenant} organization placeholder.

Adding Form Fields 

If the default username and password fields do not meet your needs for authorization input, you can add custom fields displayed to the end-user by adding authorization IDP form fields. You can use these form fields. For example, if PIN code is required in the authorization process, in addition to the Username and Password form fields.


The following table describes the fields used to define an authorization IDP form field.

FIELD NAME DESCRIPTION
Field Title Specify the name of the field displayed to the end-user in the authorization dialog.
Field Key The value that represents the end-user input value to the authorizing service.
Help Hint The help text displayed in the field to describe what should be entered into the field.
Field Type When Advanced Options is selected, specify the type of field displayed in the end-user interface to collect the user input assigned as the value for the Field Key, one of:

  • Textbox
  • Password
Mandatory When Advanced Options is selected, select if the end-user must define this field to complete the authorization.
Data Type When Advanced Options is selected, specify the type of data expected as input from the end-user, for example, String.
Visibility When Advanced Options is selected, specify if the authorization field should be visible, hidden, or displayed as read-only.

Adding Authorization Fields

By default, authorization fields are configured as part of the header of the Bot request message. If your Bot request requires additional authorization fields or the expected authorization is not part of the header, for example, social security number or PIN, click Add in the Authorization Fields section and then define the required fields.

  1. In the Field Type field, you can select one of the following depending on where in the Bot request message and the type of authorization fields that are required.
    • Header – The bot looks for the authorization fields in the request header.
    • Payload – The bot looks for the authorization fields in the request body content.
    • Query String – The bot looks for the authorization fields as a query in the request body.
    • Path Param – The book looks for the authorization fields in the request URL path.
  2. In the Field Key field, enter the name of the field for the selected Field Type.
  3. In the Field Value field, enter the value for the Field Key specified.
  4. Click Add. The new authorization field is added in the Authorization Fields section.

To add additional authorization fields, click Add in the Authorization Fields section.

Authorization Check URL

In the Authorization Check URL field, optionally define a URL that can be used to test the authorization settings from Bot Builder before you deploy the Bot with the authorization mechanism. You can use dynamic fields, path parameter fields, query fields, and so forth, to define the test URL.

For example

https://kore.someCompany.com/sap/opu/odata/sap/{{authfield1}}/?$format=json
or
https://{tenant}.service-now.com/api/now/v1/table/incident
For more information, see Using Session and Context Variables in Tasks.

Access Using a Connector

In the Access Using a Connector section, select Yes to enable access for Kore.ai Bots using the Kore.ai Connector Agent.

The Kore.ai Connector Agent can be used to establish and maintain secure data connectivity between cloud-based Kore.ai Bots and your on-premises Bots application. Using an on-premise Bots application, communications security is maintained by restricting users and systems within the company intranet or by configuring specific channels for specific data exchange.

If your domain does not have any active Kore.ai Connectors defined, a warning message is displayed to contact the Bots Admin Console system, administrator. For more information, see Using the Kore.ai Connector in the Bots Admin Console documentation.

Click Save to save the authorization settings and close the New Authorization Mechanism dialog.

Testing the Authorization 

Once you save the authorization settings, you can test your authorization definition when you click Test from the Authorization Profile page.

When you click Test, the Test Authorization dialog.


To configure the Test Authorization – Basic Auth

  1. In the Auth Check URL field, verify or enter the URL to test the authorization configuration.
  2. If your bot uses subdomains, the Tenancy field is displayed and you must specify the tenant.
  3. Enter your User Name and Password for the web service.
  4. Select the content type expected for the URL in the Content-Type field.
  5. For testing the URL, the Method field is read-only and set to GET.
  6. Click Test to begin the authorization test.

When the validation of authorization is complete, the Test Authorization dialog closes and you can see the results of the validation, either success or failure, on the top-right corner of the screen.

If the authorization fails, the Auth Test Failed message is displayed along with the Headers and Response tabs.

How it all Works 

When basic authorization is used for a Bot, the Kore.ai application automatically prompts the user for login credentials to access the web application or web service as shown in the following illustration.
DIYBasicAuthRequest

After the end-user authorizes, the settings are saved using the following naming syntax:

{{ First Name }} {{ Last Name }} {{ Bot Name }} {{ Account # }} {{ Sequence # }}

For example, John Smith’s Twitter Account #1.

The Kore.ai application can access the web application or web service for all future Bot requests using this account. In addition, the end-user can reuse the account for other tasks for the same Bot.