ロールおよび許可は、作業範囲に基づき開発者コミュニティを整理する上で役立ちます。
- デフォルトで、マスター管理者、ボット オーナー、ボット 開発者および ボット テスターのロールは、システムが作成します。
- 各ロールには許容された許可セットがあります。
- ボット 開発者と ボット テスターの許可設定は編集できますが、マスター管理者と ボット オーナーのロールは編集できません。
- ユーザーが ボット を作成すると割り当てられる ボット オーナーを除き、ユーザーはこれらのロールに割り当てできます。
これらは別として、 プライマリ マスター管理者のロールが作成され、アカウントの作成者に割り当てられます。これらのロールは、以下に分類できます。
管理者ロール
管理者ロールは、ユーザー コミュニティの管理用にあらかじめ定義された許可のセットです。このセクションでは、管理者ロール、それに関連付けられた許可、これらの管理者ロールの作成方法およびユーザーに割り当てる方法を説明します。
ビルトイン管理者ロール
デフォルトで、マスター管理者ロールが作成され、このロールは管理者アクセスのためにユーザーに割り当てできます。マスター管理者ロールに付与されたさまざまな許可を、以下にリストします。
| 許可 | マスター管理者 |
|---|---|
| 招待 | あり |
| ユーザー/Sync のインポート | あり |
| ディレクトリ Sync | 編集 |
| ユーザーの管理 | 編集 |
| ユーザー設定の管理 | 編集 |
| グループの管理 | 編集 |
| カスタム管理者ロールの管理 | あり |
| ビルトイン管理者ロールの管理 | あり |
| ボット ロールの管理 | あり |
| デプロイの管理 | あり |
| エンタープライズ Bot | あり |
| コンシューマー Bot | あり |
| スマート Bot | あり |
| 設定 | あり |
| シングル サインオン | あり |
| Kore.ai コネクタ | あり |
| エンタープライズ キー | あり |
| API スコープ | あり |
| 監査報告書の表示および実行 | あり |
| ボット チャット履歴の表示および実行 | あり |
注意: アカウントの作成者にはプライマリ マスター管理者のロールが割り当てられます。このロールは削除できず、他のユーザーに割り当てできません。プライマリ マスター管理者の[プロフィール] タブからのみ表示できます。
カスタム管理者ロール
マスター管理者はカスタム管理者ロールを作成でき、ユーザーに割り当てできます。以下の許可は管理者ロールに付与できます。
| 許可 | アクセス レベル | 説明 |
| 招待 | あり、なし | メールでユーザーを招待する、すでにインポートされたユーザーを招待する |
| ユーザー/Sync のインポート | あり、なし | ファイルでユーザーを一括インポート |
| ディレクトリ Sync | あり、なし | ディレクトリ Sync でユーザーを登録 |
| ユーザーの管理 | あり、なし | ユーザー プロフィール、ユーザー ステータス、ロール割り当てを管理 |
| グループの管理 | あり、なし | ローカル グループを作成、ユーザー メンバーシップを管理、配布リストを表示(DL) |
| カスタム管理者ロールの管理 | あり、なし | カスタム管理者ロールのセットアップおよび管理。ユーザーの割り当て/取り消し |
| ビルトイン管理者ロールの管理 | あり、なし | ビルトイン管理者ロールからユーザーを割り当て/ユーザーを取り消し |
| ボット ロールの管理 | あり、なし | ボット ロールのセットアップおよび管理; ユーザーの割り当て/取り消し |
| デプロイの管理 | あり、なし | Bot(タスク)デプロイ リクエストの承認および公開 |
| エンタープライズ Bot | あり、なし | 管理対象ユーザーへの承認済みエンタープライス ボット タスクの割り当て |
| コンシューマー Bot | あり、なし | コンシューマー Bot、タスク、チャネルの管理 |
| スマート Bot | あり、なし | スマート Bot、タスク、チャネルの管理 |
| 設定 | あり、なし | 自動デプロイおよび割り当ての管理 |
| シングル サインオン | あり、なし | シングル サインオンの設定および管理 |
| Kore.ai コネクタ | あり、なし | Kore.ai コネクタの開始、有効化および無効化 |
| エンタープライズ キー | あり、なし | エンタープライズ データの暗号化に使用するキーの表示 |
| API スコープ | あり、なし | アカウントのすべてのユーザー、ロール、ボット を管理する API スコープのセットアップ |
| 監査報告書の表示および実行 | あり、なし | 監査報告書へのアクセス、報告書、フィルター基準などを実行する能力 |
| ボット チャット履歴の表示および実行 | あり、なし | アカウントのすべての ボット からのチャット履歴の表示 |
管理者ロールの作成
- ボット 管理者コンソールを開きます。
- [管理者] メニューで、[ユーザー管理 > ロール管理]を選択します。
- [ロール管理] ウィンドウの右上隅の、[新規ロール]をクリックします。
- [ロール名]および[ロールの説明]を入力します。
- [ロール タイプの選択]で、 管理者ロールおよびロールに必要な許可を選択します。
- デフォルトの許可設定を保持したり、要件に従ってその設定を変更したりできます。
- [保存]をクリックします。
作成すると、ロールを個別ユーザーまたはユーザー グループに割り当てできます。ボット 管理者コンソールからロールを編集できます。
管理者ロールの割り当て
- ボット 管理者コンソールを開きます。
- [管理者] メニューで、[ユーザー管理 > ユーザー]を選択します。
- ボット ロールを追加するユーザーのレコードをクリックします。ユーザーのプロフィール スライドが開きます。
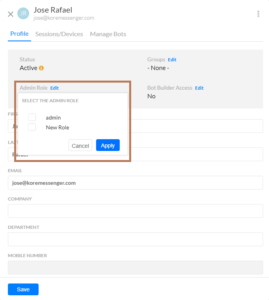
- [プロフィール] タブで、 管理者ロールを編集します。
- 利用可能なロールが表示されたドロップダウンから適切な管理者ロールを選択します。
- 選択したユーザーに複数の管理者ロールを割り当てできます。
ユーザー グループへの管理者ロールの割り当て
- ボット 管理者コンソールを開きます。
- [管理者] メニューで、[ユーザー管理 > ロール管理]を選択します。
- リストからロール レコードにカーソルを合わせ、[編集] アイコンをクリックします。[ロールの管理] ウィンドウのスライドが開きます。
- [割り当て > ロールを割り当て]をクリックします。
- [グループの選択] ドロップダウン リストを開き、ボット ロールを順次割り当てるすべてのグループを選択します。
- ユーザーは、[ユーザーの選択]タイプアヘッド インプット ボックスからのこのダイアログから割り当てることもできます。
- [保存]をクリックします。
なお、デフォルトのマスター管理者ロールは、プライマリ マスター管理者が(グループではなく)ユーザーに割り当てられます。
ボット ロール
このセクションでは、さまざまな ボット ロール、その許可、カスタム ボット ロールの作成およびユーザーへの割り当ての手順を説明します。ボット ロールは、ボット のさまざまなコンポーネントにアクセスするための許可の定義に使用できます。 これらの許可には、タスクの作成、ボット のトレーニング、チャネルの有効化、SDK で機能拡張の有効化、ボット の公開、および使用分析の表示に使用される機能が含まれます。ボット オーナー、ボット 開発者、ボット テスターは、すべてのアカウントで使用できる 3 つの内蔵された ボット ロールです。ボット 作成者は自動的にボット オーナーロールに割り当てられます。特定の要件を満たす追加カスタム ボット ロールを作成できます。ボット ロールは、ボット ビルダーまたは ボット 管理者コンソールのいずれかから ボット 開発者に割り当てできます。以下は、ボット ロールに割り当てできる許可のリストです。
| 許可 | アクセス レベル | 説明 |
| タスク | フル、表示、なし | ダイアログ、アクション、アラートおよび情報タスクを追加、変更、更新および削除する機能。 |
| 自然言語 | フル、表示、なし | 発話、同義語、 パターン、標準の応答を追加、変更、削除できる能力。デフォルトのダイアログ、 除外ワード、フィールド メモリ、詳細設定を管理する機能。
注意: ダイアログ タスクおよび ボット 分析ページ内から変更できる自然言語設定も、これらの許可に従います。
|
| ナレッジ グラフ | フル、表示、なし | 知識収集を追加および変更する機能 |
| バッチ テスト | フル、表示、なし | テスト スイートを追加および管理する機能「ビュー」モードでは、ユーザーは結果をレビューできるだけで、テスト スイートは実行できません |
| ボット 開発者 | フル、表示、なし | ユーザーを ボット へ招待し、ロールを割り当てる機能 |
| ボット 設定 | フル、表示、なし | 一般設定、言語管理、認証プロファイル、PII 設定、IVR 設定、ボット 変数、ボット のエクスポート、詳細設定、変更ログ、ボット の削除を管理する機能 |
| ボット のインポート | あり、なし | 新しい ボット 定義ファイルをインポートして ボット をアップグレードする機能 |
| 拡張機能 | あり、なし | アプリを BotKit、WebSDK、エージェントへの転送およびイベントに関連付ける機能
注意: アプリの作成および管理はすべての ボット 開発者に許可されています。ただし、拡張機能に対するアプリの関連性はこの許可で管理されます。
|
| API スコープ | あり、なし | API スコープを管理する機能 |
| ボット 公開 | あり、なし | ボット を公開する機能 |
| チャネル | あり、なし | チャネル設定を有効化および管理する機能 |
| ダッシュボード | あり、なし | ダッシュボード データの表示 |
| ボット 分析 | あり、なし | ボット 分析の表示 |
ビルトイン ボット ロール
以下の ボット ロールは、デフォルトで作成されます。これらのロールは、標準 Bot、サンプルおよびスマート ボット に適用されます。ユニバーサル ボット の場合、タスク アクセス コントロールがリンク済み ボット に適用されます。
| 許可 | ボット オーナー | ボット 開発者 | ボット テスター |
|---|---|---|---|
| タスク | 編集 | 編集 | 表示 |
| 自然言語 | 編集 | 編集 | 表示 |
| ナレッジ グラフ | 編集 | 編集 | 表示 |
| バッチ テスト | 編集 | 編集 | 表示 |
| ボット 開発者 | 編集 | 表示 | 表示 |
| ボット 設定 | 編集 | 編集 | アクセスなし |
| ボット のインポート | あり | あり | なし |
| 拡張機能 | あり | あり | なし |
| API スコープ | あり | あり | なし |
| ボット 公開 | あり | あり | なし |
| チャネル | あり | あり | なし |
| ダッシュボード | あり | あり | あり |
| ボット 分析 | あり | あり | あり |
カスタム ボット ロール
管理者はカスタム ボット ロールを作成し、これらのロールに ボット 許可を設定できます。
カスタム ボット ロールの作成
- ボット 管理者コンソールを開きます。
- [管理者] メニューで、[ユーザー管理 > ロール管理]を選択します。
- [ロール管理] ウィンドウの右上隅の、[新規ロール]をクリックします。
- ロール名とロールの説明を入力します。
- [ロール タイプの選択]で、[ボット ロール]を選択し、ロールに必要な許可を選択します。
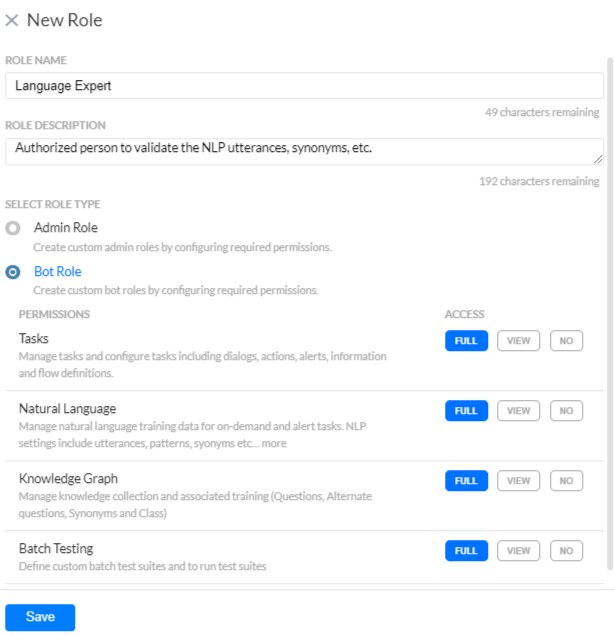
- デフォルトの[許可]設定を保持したり、要件に従ってその設定を変更したりできます。
- [保存]をクリックします。
カスタムロールを作成したら、そのロール、その名前と説明の変更、許可の追加、または特定のユーザーへのこのロールの割り当てについての詳細情報にアクセスできます。
ボット ロールの割り当て
ロールは個人ユーザーまたはユーザー グループに割り当てできます。ボット 管理者コンソールからロールを追加および編集できます。また、ボット ロールは、ボット プラットフォームから ボット を共有中にユーザーに割り当てできます。
ボット 管理者コンソールからユーザーへの ボット ロールの割り当て
- ボット 管理者コンソールを開きます。
- [管理者] メニューで、[ユーザー管理 > ユーザー]を選択します。
- ボット ロールを追加するユーザーのレコードをクリックします。ユーザーのプロフィール スライドが開きます。
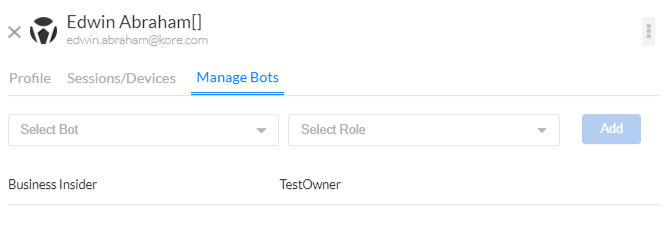
- [ボット の管理]をクリックし、以下を実行します。
- 最初のドロップダウン リストから、[ ボット ]を選択します。
- 2 番目のドロップダウン リストから、選択した ボット に対してユーザーを割り当てる [ボット ロール]を選択します。
- [追加]をクリックします。ボット 名と ボット ロールが行としてドロップダウンの下に表示されます。ボット 割り当ては後でいつでも、レコードにカーソルを合わせ、[編集] アイコンをクリックして編集できます。
ユーザー グループへの ボット ロールの割り当て
- ボット 管理者コンソールを開きます。
- [管理者] メニューで、[ユーザー管理 > ロール管理]を選択します。
- リストからロール レコードにカーソルを合わせ、[編集] アイコンをクリックします。[ロールの管理] ウィンドウのスライドが開きます。
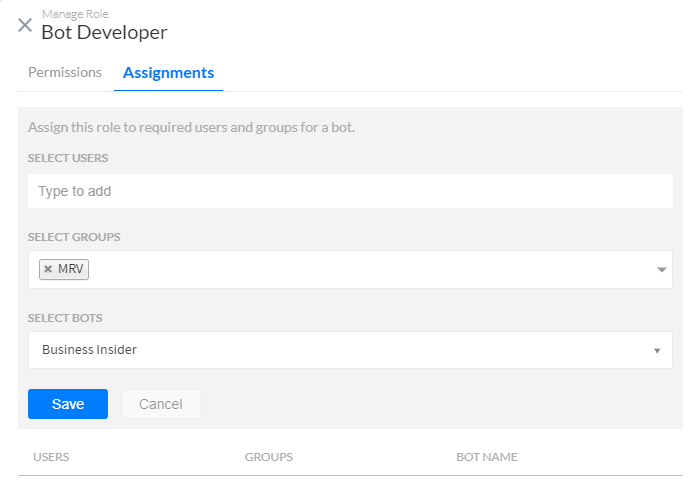
- [割り当て > ロールを割り当て]をクリックします。
- [グループの選択] ドロップダウン リストを開き、ボット ロールを順次割り当てるすべてのグループを選択します。
- [ユーザーの選択] タイプアヘッド ボックスからユーザーを追加することもできます。
- [保存]をクリックします。
ボット ビルダーからの ボット ロールの割り当て
- [ボット ビルダー] メニューで、[設定 > 開発者を招待]を選択します。
- 開発者の招待ページの右上隅の、[招待]をクリックします。
- 以下のいずれかを実行します。
- ロールをユーザーに割り当てるには、[ユーザーの選択] ボックスにユーザー名を入力し、ユーザーの名前を選択します。または
- グループにロールを割り当てるには、[グループの選択]ドロップダウン リストからグループの名前を選択してから、[ロール]ドロップダウン リストからロールを選択します。
- [保存]をクリックします。