OVERVIEW
Virtual Assistants
Kore.ai Platform
Key Concepts
Natural Language Processing (NLP)
Accessing Platform
VIRTUAL ASSISTANTS
Virtual Assistant Builder
Virtual Assistant Types
Getting Started
Create a Simple Bot
SKILLS
Storyboard
Dialog Tasks
Introduction
Dialog Builder (New)
Dialog Builder (Legacy)
User Intent Node
Dialog Node
Entity Node
Supported Entity Types
Composite Entities
Supported Colors
Supported Company Names
Form Node
Logic Node
Message Nodes
Confirmation Nodes
Bot Action Node
Service Node
Custom Authentication
2-way SSL for Service nodes
Script Node
Agent Transfer Node
WebHook Node
Grouping Nodes
Connections & Transitions
Manage Dialogs
User Prompts
Knowledge Graph
Terminology
Building
Generation
Importing and Exporting
Analysis
Knowledge Extraction
Train
Build
Alert Tasks
Introduction
Ignore Words and Field Memory
How to Schedule a Smart Alert
Small Talk
Digital Views
Introduction
How to Configure Digital Views
Digital Forms
Overview
How to Configure Digital Forms
NATURAL LANGUAGE
Overview
Machine Learning
Introduction
Model Validation
Fundamental Meaning
Introduction
NLP Guidelines
Knowledge Graph
Traits
Introduction
How to Use Traits
Ranking and Resolver
Advanced NLP Configurations
INTELLIGENCE
Overview
Context Management
Overview
Session and Context Variables
Context Object
How to Manage Context Switching
Manage Interruptions
Dialog Management
Sub Intents & Follow-up Intents
Amend Entity
Multi-Intent Detection
Sentiment Management
Tone Analysis
Sentiment Management
Event Based Bot Actions
Default Conversations
Default Standard Responses
TEST & DEBUG
Talk to Bot
Utterance Testing
Batch Testing
Record Conversations
Conversation Testing
CHANNELS
PUBLISH
ANALYZE
Overview
Dashboard
Custom Dashboard
Overview
How to Create Custom Dashboard
Conversation Flows
NLP Metrics
ADVANCED TOPICS
Universal Bots
Overview
Defining
Creating
Training
Customizing
Enabling Languages
Store
Smart Bots
Defining
koreUtil Libraries
SETTINGS
Authorization
Language Management
PII Settings
Variables
Functions
IVR Integration
General Settings
Management
Import & Export
Delete
Bot Versioning
Collaborative Development
Plan Management
API GUIDE
API Overview
API List
API Collection
SDKs
SDK Overview
SDK Security
SDK App Registration
Web SDK Tutorial
Message Formatting and Templates
Mobile SDK Push Notification
Widget SDK Tutorial
Widget SDK – Message Formatting and Templates
Web Socket Connect & RTM
Using the BotKit SDK
Installing
Configuring
Events
Functions
BotKit SDK Tutorial – Agent Transfer
BotKit SDK Tutorial – Flight Search Sample Bot
Using an External NLP Engine
ADMINISTRATION
HOW TOs
Create a Simple Bot
Create a Banking Bot
Transfer Funds Task
Update Balance Task
Context Switching
Using Traits
Schedule a Smart Alert
Configure UI Forms
Add Form Data into Data Tables
Configuring Digital Views
Add Data to Data Tables
Update Data in Data Tables
Custom Dashboard
Custom Tags to filter Bot Metrics
Patterns for Intents & Entities
Build Knowledge Graph
Global Variables
Content Variables
Using Bot Functions
Configure Agent Transfer
RELEASE NOTES

個人を特定できる情報の編集

個人を特定できる情報(PII)、または取り扱いに注意すべき個人情報(SPI)とは、単独で、または他の情報と組み合わせて、一人の個人を特定、連絡、または探し出すことができる情報、あるいはコンテキスト内で個人を特定することができる情報を指します。PIIの例としては、社会保障番号、メールアドレス、クレジットカード番号、パスポート番号、自宅の住所などがあります。Kore.aiでは、ユーザーがボットと共有する取り扱いに注意すべきあらゆる機密情報を編集することができます。ある情報タイプに対して編集を有効にした場合、その値を、理解可能なデータを含まないパターンに変換することができます。このプラットフォームでは、指定した情報タイプを編集するために、以下の3つのモードが用意されています。

オプション 説明
編集 データを一意のランダムな英数字で置き換える 入力されたメールアドレスは、jjh4ezb2などのランダムな値に置き換えられます。
置き換え PII編集の設定で入力した静的な値でデータを置き換えます。 入力された静的な値がasdf1234の場合、入力されたメールアドレスはasdf1234に置き換えられます。
文字でのマスキング データの最初と最後の数文字を「+」または「#」の記号で置き換えます。マスキングする文字数と記号を選択することができます。 最初の4文字と最後の4文字を「+」でマスキングするように設定した場合、helpdocs@kore.aiのようなメールアドレスは、++++docs@kor++++として編集されます。

情報タイプに対して編集を有効にすると、ボットプラットフォームはそのタイプのインスタンスの編集済みデータのみを保存します。そのため、ユーザーが元のPIIデータにアクセスすることはできません。

注意:;ダイアログタスクでPIIの値が転送を決定する場合、元の値が転送に使用されます。ただし、開発者は、編集されたデータをコンテキスト変数内またはそれが表示される場所でしか見ることができません。

編集の方法

  1. PII設定を行うボットを開きます。
  2. 左のナビゲーションにカーソルを合わせて、設定 > 環境設定を選択します。
  3. 設定ページで、PII設定をクリックします。PII編集ページが開きます。
  4. ボットでPII編集が有効になっていない場合は、スイッチを有効に切り替えます。ページには、編集設定がデフォルトで設定されている情報タイプの一覧が表示されます。
  5. これらの追加設定がない情報タイプの編集を有効にするには、それらの横にあるスイッチを有効に切り替えます。編集設定を編集するには、名前をクリックします。
  6. その他の情報タイプの編集設定を行うには、PII編集ページの右上にある新規追加をクリックします。

設定フィールド

フィールド 説明
情報タイプ クレジットカード番号など、保護したい情報タイプの名前を入力します。
定義 ユーザーの入力内容から情報タイプを認識するための正規表現を入力します。例えば、Visaクレジットカードの正規表現は、^4[0-9]{12}(?:[0-9]{3})?$のようになります。
エンティティをマップする ボットの対話タスクで、情報タイプに対応するすべてのエンティティをマッピングします。注意:編集された情報タイプに対応するエンティティをマッピングしないと、それらのエンティティに対する有効なユーザーエントリの場合でも、ダイアログタスクでエラーが発生します。例えば、メール情報タイプの編集を有効にしたとします。メールが編集用に設定されているため、エンティティノードが情報を取得する前でも、プラットフォームは即座に情報を編集します。その後、エンティティノードは編集されたデータを受信しますが、エンティティは編集設定でマッピングされていないため、編集された値を無効なメールエントリと見なしてしまいます。一方、編集設定でエンティティをマッピングした場合、エンティティは編集されたデータを認識し、受け入れます。
表示タイプ 編集済みデータをプラットフォーム内の任意の場所に表示するには、編集置換文字でのマスキングのモードのいずれかを選択します。注意:表示される値の前には、プラットフォームで生成されたランダムな一意のIDが付けられます。これは、条件付きの転送などの場合に元の値を取得するために内部で使用されるキーです。
OVERVIEW
Virtual Assistants
Kore.ai Platform
Key Concepts
Natural Language Processing (NLP)
Accessing Platform
VIRTUAL ASSISTANTS
Virtual Assistant Builder
Virtual Assistant Types
Getting Started
Create a Simple Bot
SKILLS
Storyboard
Dialog Tasks
Introduction
Dialog Builder (New)
Dialog Builder (Legacy)
User Intent Node
Dialog Node
Entity Node
Supported Entity Types
Composite Entities
Supported Colors
Supported Company Names
Form Node
Logic Node
Message Nodes
Confirmation Nodes
Bot Action Node
Service Node
Custom Authentication
2-way SSL for Service nodes
Script Node
Agent Transfer Node
WebHook Node
Grouping Nodes
Connections & Transitions
Manage Dialogs
User Prompts
Knowledge Graph
Terminology
Building
Generation
Importing and Exporting
Analysis
Knowledge Extraction
Train
Build
Alert Tasks
Introduction
Ignore Words and Field Memory
How to Schedule a Smart Alert
Small Talk
Digital Views
Introduction
How to Configure Digital Views
Digital Forms
Overview
How to Configure Digital Forms
NATURAL LANGUAGE
Overview
Machine Learning
Introduction
Model Validation
Fundamental Meaning
Introduction
NLP Guidelines
Knowledge Graph
Traits
Introduction
How to Use Traits
Ranking and Resolver
Advanced NLP Configurations
INTELLIGENCE
Overview
Context Management
Overview
Session and Context Variables
Context Object
How to Manage Context Switching
Manage Interruptions
Dialog Management
Sub Intents & Follow-up Intents
Amend Entity
Multi-Intent Detection
Sentiment Management
Tone Analysis
Sentiment Management
Event Based Bot Actions
Default Conversations
Default Standard Responses
TEST & DEBUG
Talk to Bot
Utterance Testing
Batch Testing
Record Conversations
Conversation Testing
CHANNELS
PUBLISH
ANALYZE
Overview
Dashboard
Custom Dashboard
Overview
How to Create Custom Dashboard
Conversation Flows
NLP Metrics
ADVANCED TOPICS
Universal Bots
Overview
Defining
Creating
Training
Customizing
Enabling Languages
Store
Smart Bots
Defining
koreUtil Libraries
SETTINGS
Authorization
Language Management
PII Settings
Variables
Functions
IVR Integration
General Settings
Management
Import & Export
Delete
Bot Versioning
Collaborative Development
Plan Management
API GUIDE
API Overview
API List
API Collection
SDKs
SDK Overview
SDK Security
SDK App Registration
Web SDK Tutorial
Message Formatting and Templates
Mobile SDK Push Notification
Widget SDK Tutorial
Widget SDK – Message Formatting and Templates
Web Socket Connect & RTM
Using the BotKit SDK
Installing
Configuring
Events
Functions
BotKit SDK Tutorial – Agent Transfer
BotKit SDK Tutorial – Flight Search Sample Bot
Using an External NLP Engine
ADMINISTRATION
HOW TOs
Create a Simple Bot
Create a Banking Bot
Transfer Funds Task
Update Balance Task
Context Switching
Using Traits
Schedule a Smart Alert
Configure UI Forms
Add Form Data into Data Tables
Configuring Digital Views
Add Data to Data Tables
Update Data in Data Tables
Custom Dashboard
Custom Tags to filter Bot Metrics
Patterns for Intents & Entities
Build Knowledge Graph
Global Variables
Content Variables
Using Bot Functions
Configure Agent Transfer
RELEASE NOTES

Redacting Personally Identifiable Information

Personally identifiable information (PII), or sensitive personal information (SPI), refers to information that can be used on its own or with other information to identify, contact, or locate a single person, or to identify an individual in context.

Some examples of PII include Social Security Number, email address, credit card numbers, passport number, home address, and so forth.

Kore.ai allows you to redact any sensitive information that users share with your bots. When you enable redaction for an information type, you can transform its value into a pattern that doesn’t contain comprehensible data.

The platform provides the following three modes to redact specified information types:

Option Description Example
Redaction Replaces the data with a unique random alphanumeric value An email address entered gets replaced with a random value such as jjh4ezb2
Replacement Replaces the data with a static value that you enter in the PII Redaction settings. If the static value entered is asdf1234, any email address entered is replaced with asdf1234
Mask with Character Replaces the first few and last few characters of the data with ‘+’ or ‘#’ symbols. You can select the number of characters to mask as well as the symbol for masking. If you configure the first four and last four characters to be masked with ‘+’, an email address such as helpdocs@kore.ai gets redacted as ++++docs@kor++++


Once redaction is enabled for an information type, Bots Platform stores only the redacted data of instances of the specific type. Therefore, no user can get access to original PII data from the platform.

Note: If a PII value determines the transition in a Dialog task, then the original value is used for transition. However, developers can only see the redacted data in the context variable or other places where it is displayed.

How to Redact

  1. Open the bot for which you want to configure the PII settings.
  2. Select the Build tab from the top menu.
  3. From the left menu, click Configuration -> PII Settings.
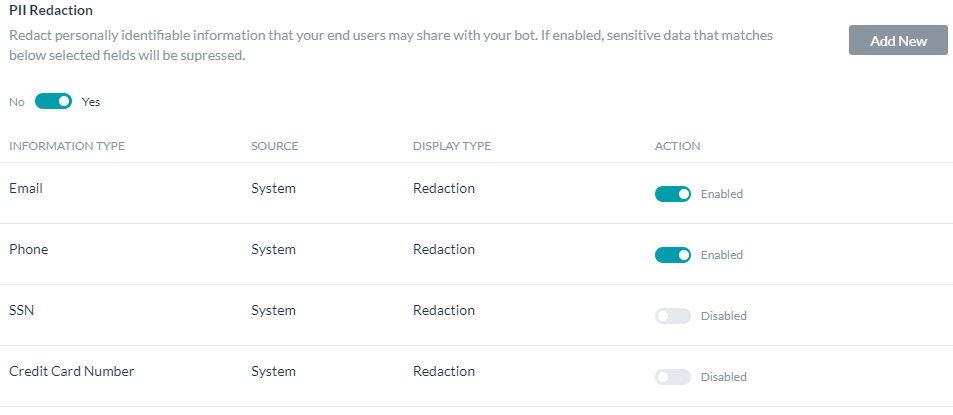
  4. The PII Redaction page opens.
  5. If PII Redaction isn’t enabled for the bot, toggle the switch to Yes. The page now shows a list of information types whose redaction settings are configured by default.
  6. To activate the redaction of any of these out-of-the-box information types, toggle the switch next to them to Enable. To edit their redaction settings, click their name.
  7. To configure redaction settings for any other information types, click Add New on the top-right side of the PII Redaction page.

Configuration Fields

Field Description
Information Type Enter a name for the information type you want to secure, for example, Credit Card Number.
Definition Enter a regular expression for recognizing the information type from user entries. For example, a regex value for a Visa credit card could be similar to ^4[0-9]{12}(?:[0-9]{3})?$
Map Entities Map all the entities in the bot’s Dialog tasks that correspond to the information type.
Note: If you do not map entities corresponding to redacted information types, even valid user entries for those entities cause errors in the dialog tasks. For example, let’s say you have enabled redaction for email information type. When a user enters an email address for a bot entity, the platform immediately redacts the information even before the entity node captures it, as emails are set up for redaction. The entity node then receives redacted data, and since the entity is not mapped in the redaction settings, it assumes the redacted value as an invalid email entry. Whereas, if you map the entity in the redaction settings, the entity recognizes the data redacted and accepts it.
Display Type Select one of these modes to display the redacted data anywhere in the platform: Redaction, Replacement, Mask with Character.

Note: The value displayed would be prefixed with a platform generated random unique identifier. This is the key used internally to retrieve the original value in case of conditional transitions etc..