Kore.ai コネクタ

ボット 管理者コンソールの[セキュリティおよび管理] モジュールの[Kore.ai コネクタ] ページでは、会社の安全なイントラネット内に ボット の Kore.ai コネクタ エージェントをダウンロードおよび設定して、クラウドとネットワーク内の Kore.ai ボット プラットフォーム間に安全な通信を提供できます。

Kore.ai コネクタを使用する理由

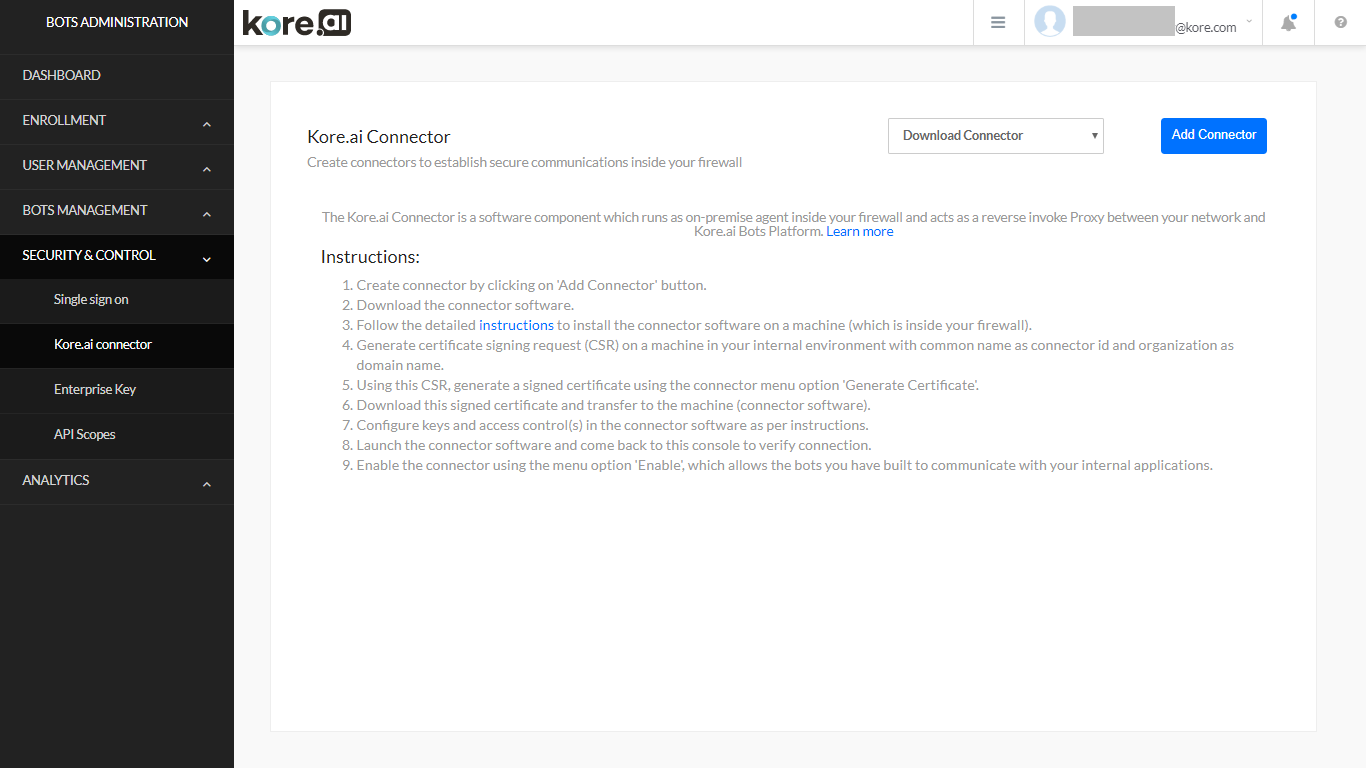
Kore.ai ボット は、更新の実行、ユーザーへの通知およびタスクを実行するためにデザインされています。実行するタスクは、ウェブベースのアプリケーションまたはオンプレミス ボット アプリケーションとして、イントラネット上で使用できるサード パーティのアプリケーション上で受信または実行されます。オンプレミスシステムの Kore.ai ボット では、コミュニケーション セキュリティは、会社のイントラネット内のユーザーとシステムを制限したり、または特定のデータ交換用に特定のチャネルを設定することで管理されます。それに対して、Kore.ai の ボット はクラウド環境内に存在し、データを処理しますが、直接 ボット プレミスには接続できません。Kore.ai コネクタ エージェントを使用すると、Kore.ai とイントラネット内のオンプレミス アプリケーション間の安全なデータ接続を設定および管理できます。Kore.ai コネクタは、企業のイントラネット内にインストールして設定するスタンドアロン型のアプリケーションです。このイントラネットは、指定された ボット アプリケーションへの接続が制限され、安全に設定されています。Kore.ai コネクター エージェントは、お客様のオンプレミス アプリケーションと Kore.ai の間でデータ アクセスのリクエストを受け渡し、それらのアプリケーションの権利・権限を持つエンド ユーザーが設定した特定の ボット タスクを処理するように設計されています。以下の説明は、ボット 管理者コンソールの[セキュリティおよび管理] モジュールの [Kore.ai コネクタ] ページを示しています。 Kore.ai コネクタページ管理 以下の管理は、ボット 管理者コンソールの [Kore.ai コネクタ] ページにあります。ダウンロード コネクタ – [ダウントードコネクタ]ドロップダウン矢印をクリックしてから、以下のオペレーティング システムの1つを選択します。
  • Windows ベース
  • Unix/Linux ベース

Kore.ai コネクタ エージェントを、デフォルトのブラウザ ダウンロード ディレクトリにダウンロードします。エージェントを DMZ またはイントラネットにインストールします。もっと詳しい情報については、Kore.ai コネクタエージェントのインストールを参照してください。コネクタの追加 – クリックして最大 2 つのコネクタを追加します。コネクタを追加したら、Kore.ai コネクタ エージェントをインストールして設定する必要があります。[アクション] メニュー – [Kore.ai コネクタ] ページで、追加した各コネクタに対して、[省略記号] アイコンをクリックして[アクション] メニューを表示し、以下のコマンドを実行します。

  • 指示 – 全手順を説明する[コネクタ指示] ダイアログを表示し、Kore.ai コネクタ エージェントをインストールおよび設定します。
  • 編集– Kore.ai コネクタ名、説明、ID、CONNECTED または DISCONNECTEDというステータス 、前回の接続日を表示する、[コネクタ詳細] ダイアログを表示します。
  • 証明書の生成 -セキュリティのための.pemファイルを作成するための[署名入り証明書の生成] ダイアログを表示し、ファイルの作成方法を説明します。もっと詳しい情報については、Kore.ai コネクタ エージェントのインストールを参照してください。
  • 有効化/無効化 – クリックし、[このコネクタを有効にしてもよろしいですか?] ダイアログを表示します。[続行]をクリックし、コネクタを有効にします。コネクタを有効にすると、Kore.ai コネクタ エージェントのその他の有効になっているインスタンスが無効になります。
  • [削除] – クリックし、[コネクタを削除]ダイアログを表示します。コネクタを恒久的に削除するには、[確認]をクリックします。

Kore.ai コネクタについて

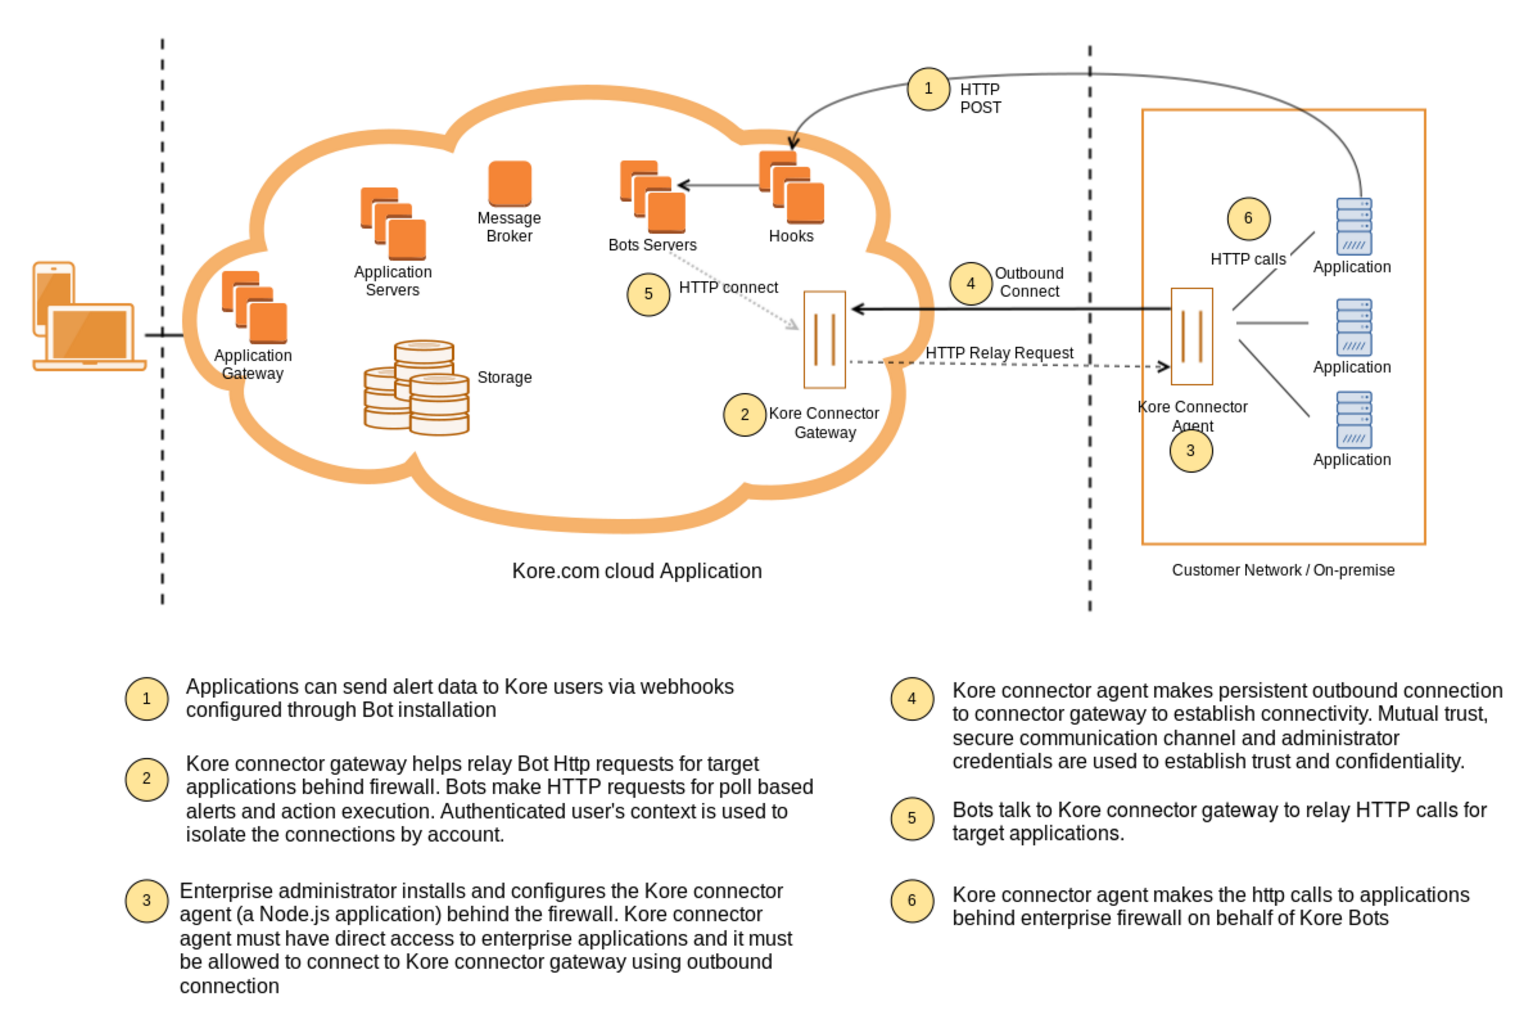
Kore.ai コネクタは、会社のイントラネットまたは周辺ネットワーク(DMZ)内の ボット ファイヤウォールの背後で実行するエージェントで、クラウドおよびオンプレミス アプリケーションで実行されるKore.ai 間の安全なデータ交換を提供します。以下の図では、エンド ユーザーはクラウドで Kore.ai に接続する Kore.ai ボット を設定します。Kore.ai ボット サーバー(5)は、ボット リクエストで Kore.ai コネクタ ゲートウェイ(2)に連絡します。Kore.ai コネクタ ゲートウェイは、ボット アプリケーションと通信するために、オンプレミスのイントラネットまたはDMZにインストールされ、安全に設定されたKore.ai コネクタ(3)にリクエストを中継します。アプリケーションからの応答は、Kore.ai コネクタ経由で Kore.ai クラウドに戻され、処理されます。オプションで、オンプレミス アプリケーションを有効にし、データを、たとえば、アラート メッセージ をWebhook を使用して Kore.ai クラウドにプッシュできます。BotsAdminKore.aiConnectorOverview 動作方法 Kore.ai コネクタをネットワークにインストールした後、エージェントには、定義した ボット アプリケーションに具体的にアクセス、通信、データのリクエストやポストを行うための詳細を設定します。起動すると、Kore.ai コネクタ エージェントは Kore.ai との持続的な SSL 接続を開始し、 ボット アプリケーションおよび Kore.ai 間のデータ転送のリクエストを監視します。持続的な接続が破損すると、Kore.ai コネクタは自動的に通信を再確立します。接続性は、ボット 管理者コンソールで直接監視できます。
インストール

このトピックでは、クラウドベースの Kore.ai Bots プラットフォームと社内イントラネットのオンプレミス アプリケーションを安全に接続するために使用する Kore.ai Bots用のKore.ai コネクタエージェントのインストールと設定方法について説明します。前提条件 Kore.ai コネクタをインストールするには、以下のハードウェアおよびソフトウェア要件を確認する必要があります。ハードウェア要件 Kore.ai コネクタ エージェントをホストするサーバーには、以下のものが必要です。 RAM: 4 GB ハード ディスク容量: 10 GB – 以下をサポート:

  • Kore.ai コネクタ ダウンロード – 10 MB
  • インストール ファイル – 20 MB
  • ロギングおよび設定ファイル – < 5 GB

ソフトウェア要件 Kore.ai コネクタは、以下のように Windows および Linux オペレーティング システムをどちらもサポートしています。Linux/Unix 以下の Red Hat® Enterprise Linux® バージョンがサポートされています。

  • RHEL 5(32-bit および 64-bit)
  • RHEL 6(32-bit および 64-bit)
  • RHEL 7(64-bit)

以下の CentOS バージョンがサポートされています。

  • CentOS 5(32-bit および 64-bit)
  • CentOS 6(32-bit および 64-bit)
  • CentOS 7(64-bit)

Node.js – Kore.ai コネクタ エージェントの実行に必要です。Kore.ai コネクタ エージェントがインストールされているサーバー上の https://nodejs.org/en/download/ からダウンロードし、インストールします。Windows 以下の Microsoft Windows 64-bit のオペレーティング システムがサポートされています。

  • Windows 7(64-bit)
  • Windows 8.1(64-bit)
  • Windows 10(64-bit)
  • Windows Server 2008 R2(64-bit)
  • Windows Server 2012 (64-bit)
  • Windows Server 2012 R2(64-bit)

Node.js – Kore.ai コネクタ エージェントの実行に必要です。Kore.ai コネクタ エージェントがインストールされているサーバー上の https://nodejs.org/en/download/ からダウンロードし、インストールします。さらに、[Forever] モジュールもインストールする必要があります。Node.js をインストール後、以下のコマンドを実行し、[Forever] モジュールをインストールします。 npm  install forever -g インストール プロセス このセクションでは、Kore.ai コネクタ エージェントがインストールされているアプリケーション サーバーのインストールと設定、ボット 管理者コンソールで必要な設定、そして最後に、Kore.ai コネクタ エージェントのエンタープライズ Botを有効にし、アップグレードされた ボット をエンタープライズ ユーザーにデプロイする方法を説明します。

追加

ボット 管理者コンソールに、コネクタを追加して開始します。接続を追加すると、会社と一意の Kore.ai に一意の ID が作成されます。

  1. ボット 管理者コンソールの[セキュリティおよび管理] モジュールにある[Kore.ai コネクタ] ページの[コネクタを追加]をクリックします。[コネクタを追加] ダイアログが表示されます。
  2. オプションで、最初のフィールドでコネクタの名前を編集してから、2 番目のフィールドにコネクタの説明を入力します。
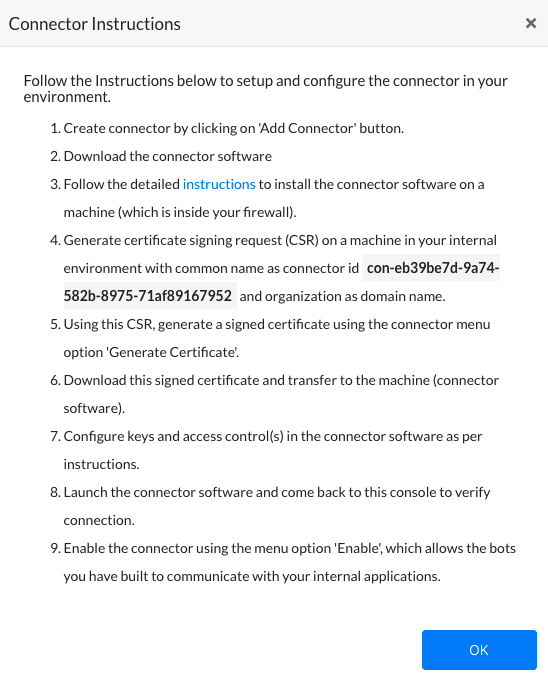
  3. [追加]をクリックします。以下の図に示すように、[コネクタ指示] ダイアログが表示されます。 Bot 管理者セキュリティ モジュール Kore.ai コネクタ指示ダイアログ
  4. [コネクタ指示] ダイアログで、[OK]をクリックします。[Kore.ai コネクタ] ページが表示されます。
  5. ダウンロード コネクタ ドロップダウンリストで、オペレーティング システムを選択し、Kore.ai コネクタ エージェントの圧縮ファイルをダウンロードします(以下のいずれか)。
    1. Linux/Unix -kore-connector-1.0.0.tar.gz
    2. Windowskore-connector-1.0.0.zip
  6. コピーしてから、アプリケーション サーバーにファイルを解凍します。
    1. Linux の場合は、以下のコマンドを使用します。 tar -xvf kore-connector-X.X.X.tar.gz
    2. Windows の場合は、File Explorer でファイルを右クリックし、コマンド メニューの [抽出先]を選択します。

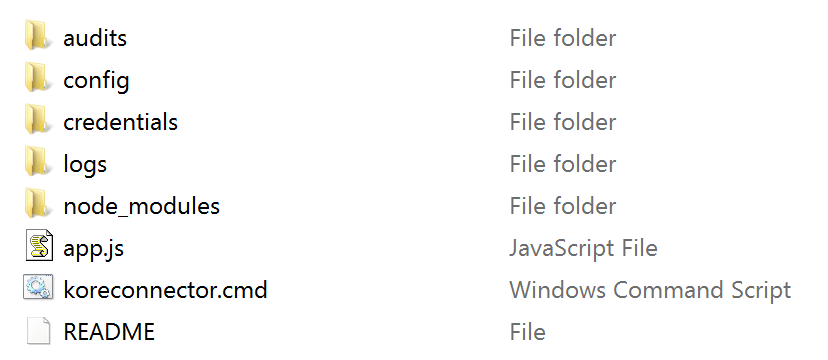
Kore.ai コネクタ エージェント ファイルは、以下のディレクトリ構造下に解凍されます。Kore.ai コネクタ ディレクトリ 署名入りセキュリティ証明書の生成 クラウド上の Kore.ai サーバーとイントラネット間で安全にデータ交換するには、署名入りのセキュリティ証明書を生成する必要があります。まず、ボット 管理者コンソールに表示されるコマンドを使用してアプリケーション サーバーに.csr ファイルを作成します。そして、.csr ファイルのコンテンツを、[署名入り証明書の生成] ダイアログにペーストします。.csr コンテンツを使用して、.pem ファイルを生成およびダウンロードします。そして、この.pemファイルを、アプリケーション サーバーにインストールされたKore.ai コネクタ エージェントにコピーします。
  1. ボット 管理者コンソールで、[セキュリティおよび管理] モジュールにある[Kore.ai コネクタ] ページの[省略記号] アイコンをクリックします。
  2. [アクション] メニューで、[証明書を生成]をクリックします。以下の図に示すように、[署名入り証明書の生成] ダイアログが表示されます。 BotsAdminSecurityKore.aiConnectorGenerate
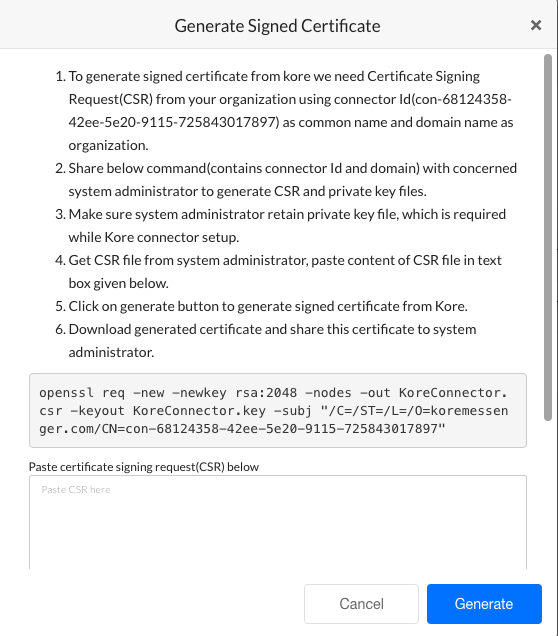
  3. 指示を確認し、次の図で示されるように、指示のステップ 6 の後に表示されるカスタム コマンドをコピーします。 BotsAdminSecurityKoreConnectorCommand
  4. 社内イントラネット内のアプリケーション サーバーで、Kore.ai コネクタ エージェントをインストールした際に作成した/Credentialsディレクトリに、このコマンドをペーストして実行します。
  5. /Credentials ディレクトリに、Kore.aiConnector.key ファイルとともに、Kore.aiConnector.csr ファイルが作成されます。テキスト エディタで、Kore.aiConnector.csr ファイルを開き、ファイルのコンテンツ全体をコピーします。そして、以下の図に示される[署名入り証明書の生成] ダイアログの証明書署名リクエストフィールドにコンテンツをペーストします。 BotsAdminSecurityKore.aiConnectorCert
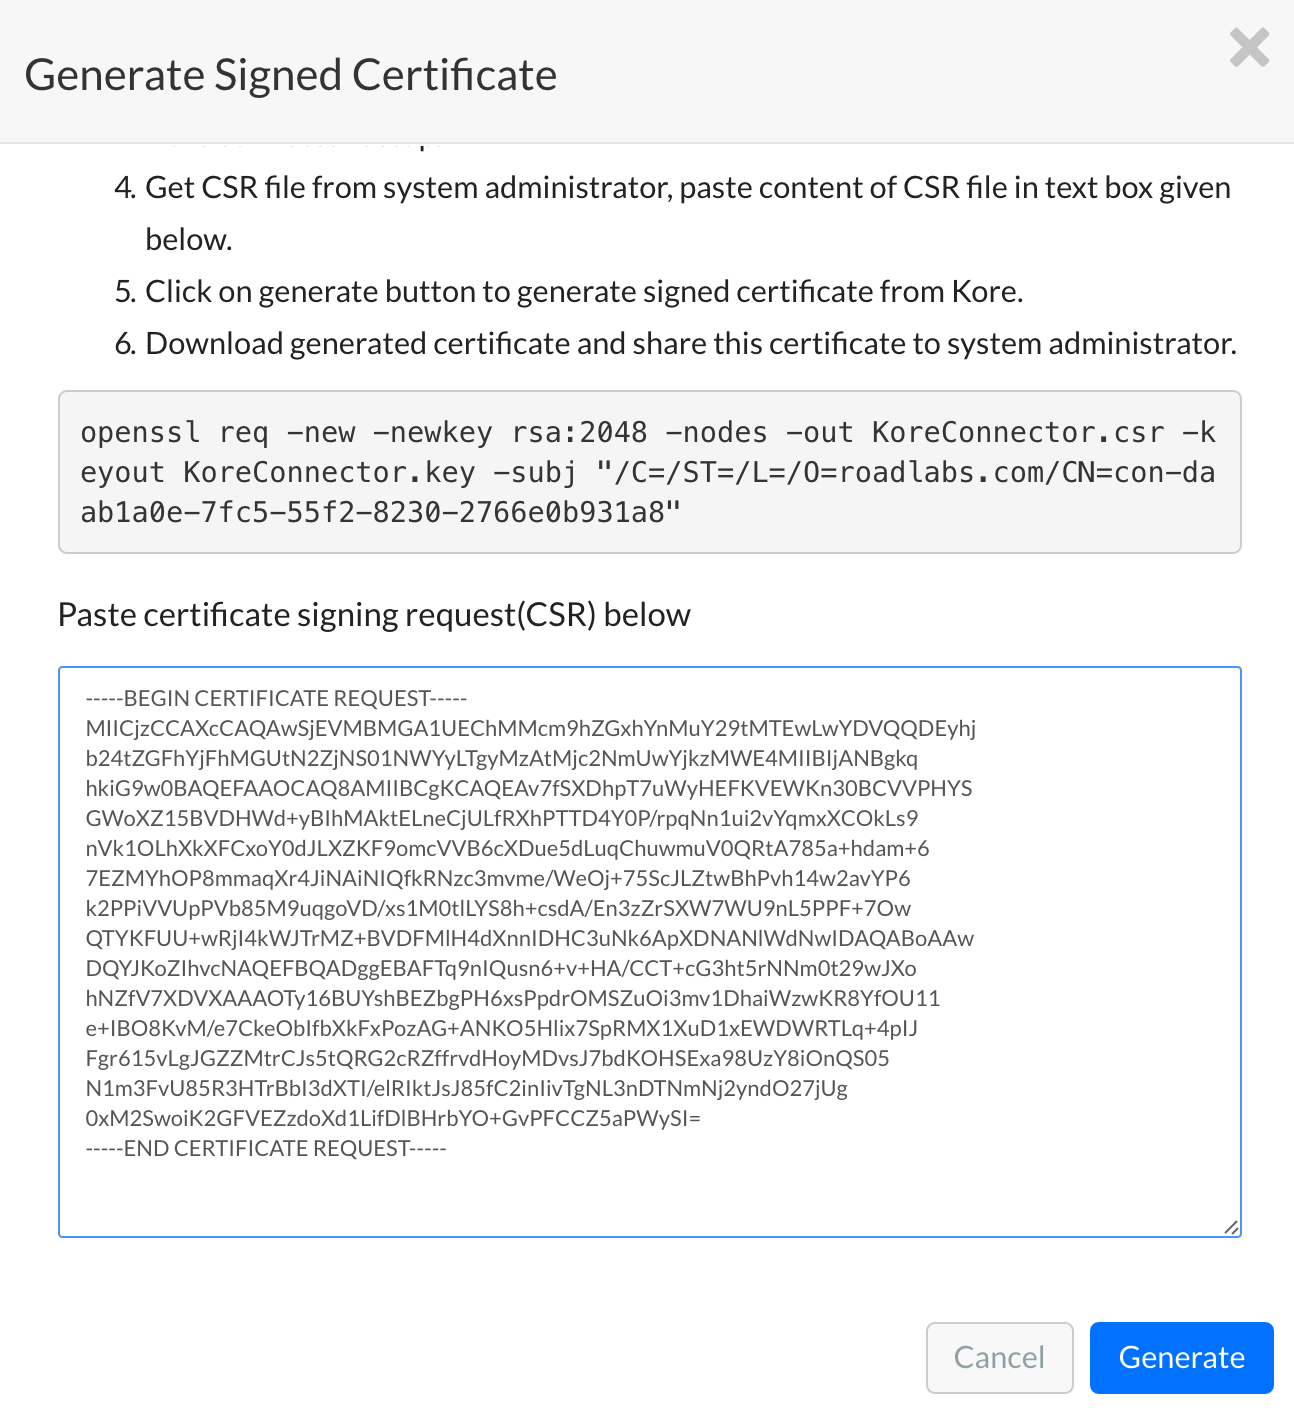
  6. [生成]をクリックします。[証明書をダウンロード] および [証明書を表示] ボタンが表示されます。
  7. [証明書をダウンロード]をクリックします。Kore.aiConnectorCert.pem ファイルが、ローカル コンピュータのブラウザのデフォルト ダウンロード フォルダにダウンロードされます。
  8. Kore.aiConnectorCert.pem ファイルを、アプリケーション サーバー上にKore.aiコネクタをインストールしたときに作成された、 [/Credentials] フォルダにコピーします。

セキュリティ ファイルはアプリケーション サーバーに配置されます。

設定 

Kore.ai コネクタ エージェント ソフトウェアをインストール後は、以下を検証、またはプロパティを設定する必要があります。

  • 証明書情報connectorconfig.json ファイルの credentials を参照してください。
  • ログ ディレクトリconnectorconfig.json ファイルの logger を参照してください。
  • クラスタ環境connectorconfig.json ファイルの cluster を参照してください。
  • アウトバウンド接続のプロキシ管理connectorconfig.json ファイルの tunnel を参照してください。
  • エンタープライズ アプリケーションのアクセス管理accesscontrol.json ファイルを参照してください。

デフォルト設定 – connectorconfig.json このセクションでは、< Kore.ai コネクタ エージェントのインストールパス >/config/connectorconfig.json ファイルの証明書情報、ロギングのデフォルト設定、やクラスタ モード設定を示します。

{    "credentials":{       "key":"./credentials/Kore.aiConnector.key",       "cert":"./credentials/Kore.aiConnectorCert.pem",       "ca":"./credentials/ca.crt"    },    "logger":{       "applogs":{          "path":"./logs",          "level":"info"       },       "auditlogs":{          "path":"./audits",          "level":"info"       }    },    "cluster":{       "enabled":true,       "workers":2    } }

証明書情報 Kore.ai コネクタ エージェントのセキュリティ キーを、Kore.ai コネクタ エージェントのインストール ディレクトリ以外の別の場所に保存する必要がある場合があります。クレデンシャル ファイルはアプリケーション サーバー上の別のディレクトリ、またはネットワーク内の別のサーバーに移動して、以下のパラメータを含むconnectorconfig.json ファイルにある credentials セクションでの相対または絶対パスを指定できます。

  • key – クライアント証明書デフォルト設定:
    ./credentials/Kore.aiConnector.key
  • cert – Bot管理者コンソールで生成された .pem ファイル。デフォルト設定:
    ./credentials/Kore.aiConnectorCert.pem
  • ca – Kore.ai コネクタ エージェントの一部としてインストール。デフォルト設定:
    ./credentials/ca.crt

ロギング設定 Kore.ai コネクタ エージェントは、実行時に以下の 2 つのロギング ファイルを生成します。

  • kore-connector.log.< dd-MM-yyyy > – アプリケーション ロギング イベントには、以下が含まれます。
    • コネクタ ステータス – ログ エントリとして、エージェントの起動または停止が追加されるなど、ステータスの変更
    • エラー – app.log ファイルでエージェントのエラー メッセージが取得されます。
  • kore-connector-audit.log.< dd-MM-yyyy > – 監査ロギング イベント。
    • 設定変更connectorconfig.json ファイルおよびaccesscontrol.json ファイルでの変更。オリジナル ファイルは自動的にバックアップされ、ログ エントリが作成されます。
    • リクエストされた URL – Kore.ai コネクタに入るすべてのリクエストされた URL はログ エントリとして取得されます。

デフォルトでは、アプリケーション ログと監査ログのログ ファイルが作成され、デフォルトのインストール パスである< Kore.ai コネクタ エージェントイン ストール パス >/ログ< Kore.ai コネクタ エージェント インストール パス>/監査に保存されます。アプリケーション サーバー、またはネットワークでの別のサーバーに別のディレクトリを指定でき、フルパスを指定できます。必要に応じて、ロギング レベルも、ロギング ファイルに対して増減できます。

  • 致命的 – データ損失または追加データ損失を防止するためのサービスまたはアプリケーションのシャットダウンを強制するエラー。プロセスで1回のみ発生し、通常ログの最終エントリです。
  • クリティカル – サービスまたはアプリケーションはまだシャットダウンしていないが、そうなる可能性がある、直ちに調査が必要なエラー。
  • エラー – 現在のオペレーションにとっては致命的であるが、サービスまたはアプリケーションにとっては致命的ではないエラー。例、ファイルを開けない、ファイルが欠落している、またはデータが欠落している。このタイプのエラーは、通常管理者介入が必要です。
  • 警告 – アプリケーションの異常を引き起こす可能性のあるもので、回復可能なもの。例、プライマリ サーバーからバックアップ サーバーへの切り換え、再試行またはセカンダリ データの欠落。
  • 情報 – 通常のアプリケーションのオペレーションに関する一般的な情報。サービス開始や停止の計画、設定の前提など。これは Kore.ai コネクタ エージェントのデフォルト設定です。
  • デバッグ – 診断情報、通常は、システム管理者およびIT担当者用。
  • トレース – すべてのオペレーション情報。例えば、関数の一部。

致命的下の各ログ レベルには、上記のロギング レベルからの情報が含まれます。たとえば、情報としてのデフォルト レベルには、致命的クリティカルエラー警告、およびログ ファイルの情報のすべての情報が含まれます。スケーラビリティおよびクラスタ設定 Kore.ai コネクタ エージェントはスケーラブルで、必要に応じてリクエスト ロードを処理します。Kore.ai コネクタ エージェントをインストールすると、クラスタ モード設定はデフォルトで有効になり、2 ワーカーまたは CPU で設定して使用します。Kore.ai コネクタ エージェントからのリクエストの処理の負荷が増える場合は、多くのワーカーを有効にする必要があります。クラスタ モードを使用しない場合は、 [有効化] プロパティを false に設定します。フェイルオーバーならびにスケーラビリティ要件を満たすために複数のサーバーでクラウド コネクタを実行できます。証明書およびその他の設定は同じです。クラウド コネクタは、Kore.ai クラウド ゲートウェイへのアウトバウド接続を行うクライアントです。複数のコネクタが接続されている場合は、クラウド ゲートウェイはロードをコネクタに分散します。アウトバウンド接続のプロキシ管理 Kore.ai コネクタ エージェントのアウトバウンド プロキシ設定は、< Kore.ai コネクタ エジェント インストール パス >/config/connectorconfig.json ファイルで設定できます。すべてのアウトバウンド データがプロキシ サーバー経由でルーティングされない限り、この設定はオプションです。アウトバウンド プロキシを設定するには、以下の設定サンプルでtunnelとラベル付けされたエントリとして表示された、以下の設定を追加します。

{ "credentials":{ "key":"./credentials/Kore.aiConnector.key", "cert":"./credentials/Kore.aiConnectorCert.pem", "ca":"./credentials/ca.crt" }, "logger":{ "applogs":{ "path":"./logs", "level":"info" }, "auditlogs":{ "path":"./audits", "level":"info" } }, "cluster":{ "enabled":true, "workers":2 }, "tunnel":{ "proxyHost":"hostname", "proxyPort":"portnumber" } }

アプリケーションのアクセス管理 Kore.ai コネクタ エージェントは、会社のイントラネット上の特定のアプリケーションにアクセスするには、ホワイト リストに登録されたURLの明示的セットが必要です。その他の HTTP リクエストは Kore.ai コネクタによって拒否されます。以下のパラメータを使用して、…/config/configsディレクトリ下の Kore.ai コネクタ インストール ディレクトリのaccesscontrol.json ファイルで、Kore.ai コネクタ エージェントを使用する各 ボット アプリケーションのアクセス管理を設定する必要があります。

  • virtualhost – ボット ビルダー ツールでオンプレミス ボット を設定する際に、[リクエスト チェーンのセットアップ] ダイアログのリクエスト URL プロパティで指定したものと同じ仮想ホスト名を指定します。詳細については、ボット ビルダー ドキュメントのリクエスト チェーン オブジェクトの定義を参照してください。
  • virtualport – ボット ビルダー ツールでオンプレミス ボット を設定する際に、[リクエスト チェーンのセットアップ] ダイアログのリクエスト URL プロパティで指定したものと同じ仮想ポートを指定します。詳細については、ボット ビルダー ドキュメントのリクエスト チェーン オブジェクトの定義を参照してください。
  • internalhost – ボット とのデータ交換に使用したオンプレミス エンタプライズ アプリケーションの実際のホスト名を指定します。
  • internalport – ボット とのデータ交換に使用したオンプレミス エンタプライズ アプリケーションの実際のポートを指定します。
  • protocol – オンプレミス エンタープライズ アプリケーションへ接続するための HTTP または HTTPS を指定します。
  • allowedPaths – パラメータを含めないですべてのパスを「/*」として指定します。またはホスト用のパスの特定のアレイとしてを指定します。Kore.ai コネクタは、パスを 「?」で始まるパラメータを含めないでチェックします。

以下のイメージは、4 つの ボット 設定で設定した accesscontrol.json ファイルの例です。 BotsAdminSecurityKore.aiConnectorAccessFile
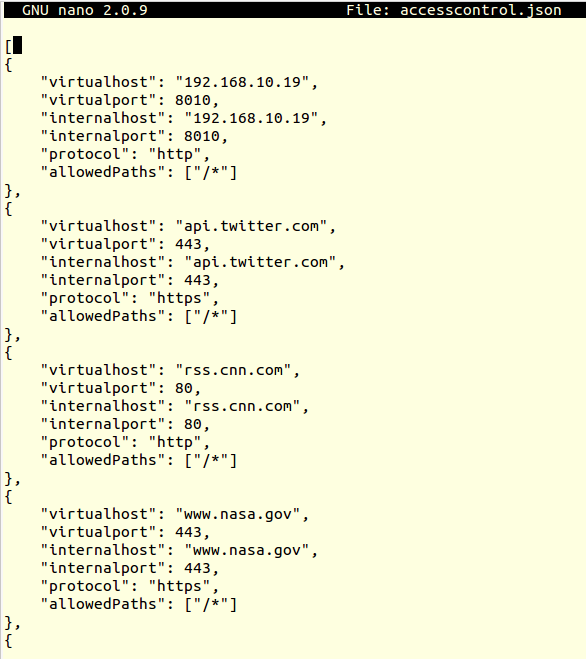
注意: コメントは設定ファイルでは使用できません。

起動

このセクションでは、Windows または Linux オペレーティング システム上で Kore.ai コネクタ エージェントを起動または停止する方法を説明します。Linux/Unix オペレーティング システム Linux オペレーティング システムでは、Kore.ai コネクタ エージェントを手動で 起動したり、自動起動するように設定したりできます。Linux でKore.ai コネクタを手動で起動/停止する Linux/Unit アプリケーション サーバ上のKore.ai コネクタ エージェントを、Kore.ai コネクタのインストール ディレクトリで以下のコマンドを実行して手動で起動または停止し、以下のようにステータスを確認します。

./koreconnector.sh start ./koreconnector.sh stop ./koreconnector.sh ステータス

以下のイメージは、Kore.ai コネクタの正常な起動に対する応答または、ステータス チェックを示したものです。BotsAdminSecurityKore.aiConnectorAStartStatus Linux 上での自動起動の Kore.ai コネクタの設定 このセクションでは、Linux サーバーが起動または再起動したときに、Kore.ai コネクタ エージェントが自動起動されるように設定する方法を説明します。

  • Kore.ai コネクタ エージェントの自動起動を設定するには、アプリケーション サーバーの/etc/rc.local ファイルに、以下のコマンドを追加します。
    cd <Kore.ai Connector&nbsp;Installation Root> ; ./koreconnector.sh start

    例:

    cd /home/CompanyAdmin/kore-connector ; ./koreconnector.sh start

Windows オペレーティング システム Windows オペレーティング システム上で、Kore.ai コネクタ エージェントを手動で起動または停止でき、Kore.ai コネクタ エージェントのステータスをチェックできます。Windows でKore.ai コネクタを手動で 起動/停止する Windows アプリケーション サーバ上のKore.ai コネクタ エージェントを、Kore.ai コネクタのインストール ディレクトリで以下のコマンドを実行して手動で起動または停止し、以下のようにステータスを確認します。

.\koreconnector.cmd start .\koreconnector.cmd stop .\koreconnector.cmd ステータス

ボット の有効化 

このセクションでは、ボット 管理者コンソールで Kore.ai コネクタ エージェントへの接続を検証し、その接続を有効にします。接続が有効になると、ボット ビルダー ツールでカスタム ボット をKore.ai コネクタを使用するように変更し、それらのBotを公開し、ボット 管理者コンソールで公開済みの ボット をデプロイして、社内のユーザーに ボット を割り当てることができます。

  1. ボット 管理者コンソールの[セキュリティおよび管理]モジュールの [Kore.ai コネクタ] ページで、Kore.ai コネクタrのステータスがCONNECTEDであることを確認し、[省略記号] アイコンをクリックし、下図のように[アクション] メニューで[有効化]をクリックします。 BotsAdminSecurityKore.aiConnectorEnable
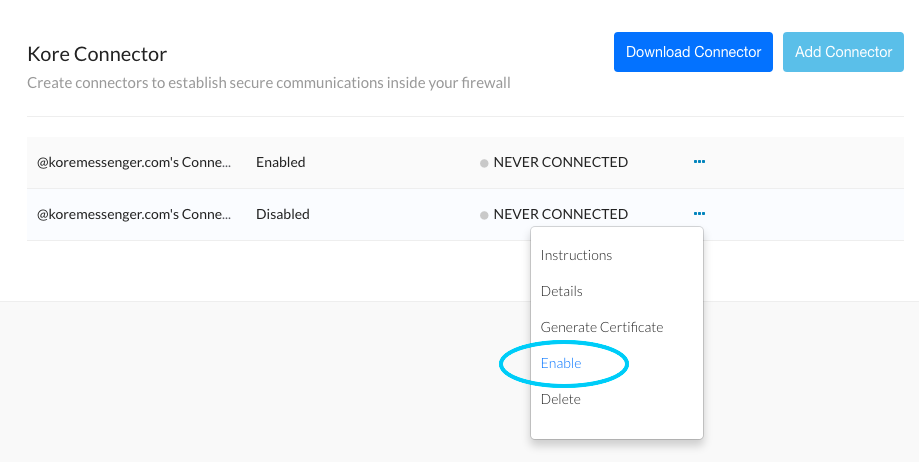
  2. ボット ビルダーで、 Kore.ai コネクタを使用して実行する各 ボット タスクのために、各 ボット のクローンを作成またはアップグレードします。
    1. [リクエスト チェーン オブジェクトのセットアップ] ダイアログで、[コネクタを使用してアクセス]を選択し、変更を保存してから、ボット を公開します。リクエスト オブジェクトの設定の詳細については、ボット ビルダー ツール ドキュメントで、リクエスト オブジェクトの通知タスクの設定またはアクションタスクのリクエスト オブジェクトの設定を参照してください。

      注意: [リクエスト チェーン オブジェクトのセットアップ] ダイアログでの[コネクタを使用してアクセス]のオプションは、ボット 管理者コンソールでKore.ai コネクタが有効になっている場合のみ利用できます。

  3. ボット 管理者コンソールで、公開済みの ボット をデプロイし、エンタープライズで ボット タスクを使用できるユーザーを割り当てます。詳細については、ボット 管理を参照してください。

アプリケーションサーバー上に Kore.ai コネクタをインストールし、ボット 管理者コンソールで有効にし、コネクタを使用するように ボット をカスタマイズした後は、ボット 管理者コンソールでコネクタのステータスを監視するだけです。Kore.ai コネクタを起動できない場合や、顧客からエラーが報告される場合は、Kore.ai コネクタの設定を再設定する必要があるかもしれません。

トラブルシューティング

Kore.ai コネクタ エージェントのインストールおよび設定には、多くのステップがあります。設定後でも、Kore.ai ボット とオンプレミス アプリケーション間の接続を維持するために追加設定を行う必要があります 。このトピックでは、発生する可能性がある典型的な問題とその処理方法を説明します。Kore.ai コネクト エージェント サーバーの問題 Kore.a コネクタの起動に失敗する ログ エラー メッセージ: TypeError: Object #<Object> has no method ‘parse’ ソリューション: サーバーにはバージョンが異なる複数の node.js がインストールされている可能性があります。どの node.js バージョンを実行するかを指定する必要があります。バージョンをチェックするには、以下のコマンドを実行します。nvm list このコマンドは、以下を返します。v0.10.29 v0.10.30 v0.10.31 v0.10.35 v0.10.36 v0.11.13 v0.12.2 v0.12.4 v4.0.0 使用するバージョンを設定するには、以下のコマンドを実行します。nvm use v4.0.0 このコマンドは、以下を返します。 Now using node v4.0.0 クライアントの問題 組織内のユーザーがKore.ai コネクターに接続できない場合があります。

  • エラー メッセージ: 「< エンタープライズ アプリケーション >」にアクセスできません。コネクタと通信できません。再試行してください。
    • ソリューション: <Kore.ai Connector Install Dir >/config/configs/accesscontrol.json ファイルに、「virtualhost」 エントリが定義されていないか、正しく設定されていません。エントリを検証します。
  • エラー メッセージ: サーバーがエラーを返しました。後で、再試行してください。(404 – システムにアクセスできません) 
    • ソリューション: アプリケーション サーバー上の Kore.ai コネクタと Kore.ai ゲートウェイ間の接続が破損しています。Kore.ai コネクタ エージェントの実行が停止された可能性があります。アプリケーション サーバー上の Kore.ai コネクタを再起動する必要がある場合があります。

問題を解決できない場合は、Kore.ai サポートに連絡してください。

Kore.ai Connector

On the Kore.ai Connector page, in the Security & Control module of the Bots Admin Console, you can download and configure the Kore.ai Connector Agent for Bots within your secure company intranet to provide secure communications between the Kore.ai Bots platform in the cloud and your network.

Why Kore.ai Connector?

Kore.ai Bots are designed to make updates, provide notifications to users, and perform tasks. The tasks to perform are received from or performed on third-party applications available over the Internet as web-based applications or on-premises bots applications.

In a Kore.ai bots on-premises system, communications security is maintained by restricting users and systems within the company intranet or by configuring specific channels for specific data exchange. On the contrary, Kore.ai Bots reside and process data in the cloud environment and cannot directly connect to your bots premises applications.

You can use the Kore.ai Connector Agent to establish and maintain secure data connectivity between Kore.ai and your on-premises applications within your intranet.

The Kore.ai Connector is a stand-alone application that is installed and configured within your company intranet configured with restricted and secure connectivity to specified bots applications. The Kore.ai Connector Agent is designed to pass requests for data access between your on-premises applications and Kore.ai to process the specific Bot tasks configured by an end-user with rights and privileges for those applications.

The following illustration shows the Kore.ai Connector page in the Bots Admin Console Security & Control module.

Kore.ai Connector Page Controls

The following controls are available on the Kore.ai Connector page in the Bots Admin Console.

Download Connector – Click the Download Connector drop-down arrow in and then select one of the following operating systems:

  • Windows Based
  • Unix/Linux Based

Download the Kore.ai Connector Agent to your default browser downloads directory. Install the agent in your DMZ or Intranet. For more information, see Installing the Kore.ai Connector Agent.

Add Connector – Click to add up to two connectors. After a connector is added, you should install and configure the Kore.ai Connector Agent.

Actions Menu – On the Kore.ai Connector page, against each added connector, click the Ellipsis  icon to display the Actions menu to run the following commands:

  • Instructions – Displays the Connector Instructions dialog that describes the overall steps to install and configure the Kore.ai Connector Agent.
  • Edit – Displays the Connector Details dialog that shows the Kore.ai Connector name, description, ID, status as CONNECTED or DISCONNECTED, and Last Connected date.
  • Generate Certificate – Displays the Generate Signed Certificate dialog used to create a .pem file for security along with instructions on how to create the file. For more information, see Installing the Kore.ai Connector Agent.
  • Enable/Disable – Click to show the Are you sure you want to enable this connector? dialog. Click Continue to enable the connector. When enabling a connector, any other enabled instances of the Kore.ai Connector Agent are disabled.
  • Delete – Click to display the Delete Connector dialog. To permanently delete the connector, click Confirm.

About

The Kore.ai Connector is an agent that runs behind your bots firewall within your company Intranet or perimeter network (DMZ) to provide secure data exchange between Kore.ai which operates in the cloud and your on-premises applications.

In the following diagram, end-users configure a Kore.ai Bot that connects to Kore.ai in the cloud. The Kore.ai Bot servers (5) contact the Kore.ai Connector Gateway (2) with the Bot request. The Kore.ai Connector Gateway relays the request to the Kore.ai Connector (3) installed and securely configured in your on-premises Intranet or DMZ to interact with your bots applications. The response from your applications is sent through the Kore.ai Connector back out to the Kore.ai cloud and processed. Optionally, you can enable your on-premises applications to push data, for example, alert messages, to the Kore.ai cloud using webhooks.
BotsAdminKore.aiConnectorOverview


How it Works

After you install the Kore.ai Connector in your network, you configure the agent with details to specifically access, communicate, and request or post data to the bots application you define.

When started, the Kore.ai Connector Agent initiates a persistent SSL connection with Kore.ai and monitors requests for data transfer to or from your bots applications and Kore.ai. If the persistent connection is broken, the Kore.ai Connector automatically attempts to reestablish communication. You can monitor connectivity directly in the Bots Admin console.

Installing

This topic describes how to install and configure the Kore.ai Connector Agent for Kore.ai Bots that you can use to securely connect the cloud-based Kore.ai Bots platform to your on-premises applications in your company Intranet.

Prerequisites

To install the Kore.ai Connector, you should review the following hardware and software requirements.

Hardware Requirements

The server hosting the Kore.ai Connector Agent should have:
RAM: 4 GB
Hard disk space: 10 GB – To support the following:

  • Kore.ai Connector download – 10MB
  • Installation Files – 20MB
  • Logging and Configuration Files – < 5GB

Software Requirements

The Kore.ai Connector supports both Windows and Linux operating systems as follows:

Linux/Unix

The following Red Hat® Enterprise Linux® versions are supported:

  • RHEL 5 (32-bit and 64-bit)
  • RHEL 6 (32-bit and 64-bit)
  • RHEL 7 (64-bit)

The following CentOS versions are supported:

  • CentOS 5 (32-bit and 64-bit)
  • CentOS 6 (32-bit and 64-bit)
  • CentOS 7 (64-bit)

Node.js – Required to run the Kore.ai Connector Agent. Download and install from https://nodejs.org/en/download/ on the server where the Kore.ai Connector Agent is installed.

Windows

The following Microsoft Windows 64-bit operating systems are supported:

  • Windows 7 (64-bit)
  • Windows 8.1 (64-bit)
  • Windows 10 (64-bit)
  • Windows Server 2008 R2 (64-bit)
  • Windows Server 2012 (64-bit)
  • Windows Server 2012 R2 (64-bit)

Node.js – Required to run the Kore.ai Connector Agent. Download and install from https://nodejs.org/en/download/ on the server where the Kore.ai Connector Agent is installed. In addition, you must also install the forever module. After node.js is installed, run the following command to install the forever module.
npm  install forever -g

Installation Process

This section describes the installation and configuration of your application server where the Kore.ai Connector Agent is installed, the configuration required in the Bots Admin Console, and finally, enabling enterprise Bots for the Kore.ai Connector Agent and deploying the upgraded Bots for enterprise users.

Adding

In the Bots Admin Console, you begin by adding a connector. When you add a connection, a unique ID is created for your company and your unique Kore.ai Connector.

  1. In the Bots Admin Console, in the Security & Control module, on the Kore.ai Connector page, click Add Connector. The Add Connector dialog is displayed.
  2. Optionally, in the first field, edit the name of the connector, and then enter a Description for the connector in the second field.
  3. Click Add. The Connector Instructions dialog is displayed as shown in the following illustration.
    Bots Admin Security Module Kore.ai Connector Instructions Dialog
  4. In the Connector Instructions dialog, click OK. The Kore.ai Connector page is displayed.
  5. In the Download Connector drop-down list, select you operating system and download the Kore.ai Connector Agent compressed file, one of:
    1. Linux/Unix – kore-connector-1.0.0.tar.gz
    2. Windows – kore-connector-1.0.0.zip
  6. Copy, and then uncompress the file to your application server.
    1. For Linux, use the following command:
      tar -xvf kore-connector-X.X.X.tar.gz
    2. For Windows, in File Explorer, right-click the file and select Extract to on the command menu.

The Kore.ai Connector Agent file is uncompressed into the following directory structure.
Kore.ai Connector Directories

Generating a Signed Security Certificate

For secure data exchange between the Kore.ai servers in the cloud and your intranet, you need to generate a signed security certificate. First, create a .csr file on your application server using the command displayed in the Bots Admin Console, and then paste the content of the .csr file into the Generate Signed Certificate dialog. The .csr content is used to generate and download the .pem file. You will then copy the .pem file back to the Kore.ai Connector Agent installed on your application server.

  1. In the Bots Admin Console, in the Security & Control module, on the Kore.ai Connector page, click the Ellipsis  icon.
  2. On the Actions menu, click Generate Certificate. The Generate Signed Certificate dialog is displayed as shown in the following illustration.
    BotsAdminSecurityKore.aiConnectorGenerate
  3. Review the instructions, and then copy your custom command displayed after step 6 in the instructions as shown in the following illustration.
    BotsAdminSecurityKoreConnectorCommand
  4. Paste and run the command on your application server within your company intranet in the /Credentials directory created when you installed the Kore.ai Connector Agent.
  5. In the /Credentials directory, the Kore.aiConnector.csr file is created, along with the Kore.aiConnector.key file. Open the Kore.aiConnector.csr file using a text editor, and copy the entire contents of the file, and then paste the contents into the Certificate signing request field in the Generate Signed Certificate dialog as shown in the following illustration.
    BotsAdminSecurityKore.aiConnectorCert
  6. Click Generate. The Download Certificate and View Certificate buttons are displayed.
  7. Click Download Certificate. The Kore.aiConnectorCert.pem file is downloaded to your local computer browser default downloads folder.
  8. Copy the Kore.aiConnectorCert.pem file to the /Credentials folder created when you installed the Kore.ai Connector on your application server.

Your security files are in-place on the application server.

Configuring 

After you install the Kore.ai Connector Agent software, you must verify or set the properties for:

  • Certificate Information – See credentials in the connectorconfig.json file.
  • Log Directories – See logger in the connectorconfig.json file.
  • Cluster Environment – See cluster in the connectorconfig.json file.
  • Proxy Control for Outbound Connections – See tunnel in the connectorconfig.json file.
  • Access Control for Enterprise Applications – See the accesscontrol.json file.

Default Configuration Settings – connectorconfig.json

This section shows the default configuration settings for certificate information, logging, and cluster mode settings in the < Kore.ai Connector agent Installation Path >/config/connectorconfig.json file:

{
   "credentials":{
      "key":"./credentials/Kore.aiConnector.key",
      "cert":"./credentials/Kore.aiConnectorCert.pem",
      "ca":"./credentials/ca.crt"
   },
   "logger":{
      "applogs":{
         "path":"./logs",
         "level":"info"
      },
      "auditlogs":{
         "path":"./audits",
         "level":"info"
      }
   },
   "cluster":{
      "enabled":true,
      "workers":2
   }
}

Certificate Information

You may want to store the security keys for the Kore.ai Connector Agent in another location other than the installation directory for the Kore.ai Connector Agent. You can move the credential files to another directory on the application server or another server in the network and specify the relative or absolute path in the credentials section in the connectorconfig.json file that contains the following parameters:

  • key – The client certificate. Default setting is:
    ./credentials/Kore.aiConnector.key
  • cert – The .pem file generated in the Bots Admin Console. Default setting is:
    ./credentials/Kore.aiConnectorCert.pem
  • ca –  Installed as part of the Kore.ai Connector Agent. Default setting is:
    ./credentials/ca.crt

Logging Configuration

The Kore.ai Connector Agent generates two logging files at runtime:

  • kore-connector.log.< dd-MM-yyyy > – Application logging events to include:
    • Connector status – Any change in status such as agent start or stop is added as a log entry.
    • Errors – Any error message for the agent is captured in the app.log file.
  • kore-connector-audit.log.< dd-MM-yyyy > – Audit logging events.
    • Configuration changes – Any changes in connectorconfig.json file and accesscontrol.json file. The original file is backed up automatically and a log entry is made.
    • Requested URLs – All requested URLs coming into the Kore.ai Connector are captured as a log entry.

By default, logging files for the application and auditing logs are created and stored in the default installation pat in the < Kore.ai Connector Agent Installation Path >/logs and < Kore.ai Connector Agent Installation Path >/audits. You can specify another directory on the application server or another server in the network and specify the full path.
You can also increase or decrease the logging levels as needed for either logging file as:

  • fatal – Any error that is forcing a shutdown of the service or application to prevent data loss or further data loss. Occurs only once in a process and is usually the last entry in a log.
  • critical – An error which requires immediate investigation that has not yet shut down a service or application, but is likely to do so.
  • error – Any error which is fatal to the current operation but not fatal to the service or application, for example, cannot open a file, missing file, or missing data. This type of errors usually requires administrator intervention.
  • warn – Anything that can potentially cause application abnormalities with the ability to recover, for example, switching from a primary to backup server, retrying, or missing secondary data.
  • info – General information about normal application operations such as start and planning stopping of service, configuration assumptions, and so forth. This is the default setting for the Kore.ai Connector Agent.
  • debug – Diagnostic information, usually for system administrators and IT personnel.
  • trace – All operational information, for example, parts of a function.

Each log level below fatal includes the information from any logging level above. For example, the default level as info includes all the information for fatal, critical, error, warn, and info in the log file.

Scalability and Cluster Configuration

The Kore.ai Connector Agent is scalable to handle the request load as required. When you install the Kore.ai Connector Agent, cluster mode settings are enabled by default, with 2 workers, or CPUs, set for use.

For increased load handling for requests by the Kore.ai Connector Agent, you may want to enable more workers. If you do not want to use cluster mode, set the “enabled” property to false.

You can also run cloud connectors in more than one server to meet failover as well as scalability requirements. Certificate and other configurations will remain same. Cloud Connector is a client which makes outboud connection to Kore.ai Cloud Gateway. When more than one connectors are connected, Cloud Gateway will distribute the load to the connectors.

Proxy Control for Outbound Connections

You can configure outbound proxy settings for the Kore.ai Connector Agent in the < Kore.ai Connector agent Installation Path >/config/connectorconfig.json file. This configuration is optional unless all of your outbound data is routed through a proxy server.
To configure outbound proxy settings, add the following configuration shown as the entry labeled tunnel in the following configuration sample:

{
   "credentials":{
      "key":"./credentials/Kore.aiConnector.key",
      "cert":"./credentials/Kore.aiConnectorCert.pem",
      "ca":"./credentials/ca.crt"
   },
   "logger":{
      "applogs":{
         "path":"./logs",
         "level":"info"
      },
      "auditlogs":{
         "path":"./audits",
         "level":"info"
      }
   },
   "cluster":{
      "enabled":true,
      "workers":2
   },
   "tunnel":{
      "proxyHost":"hostname",
      "proxyPort":"portnumber"
   }
}

Access Control for Applications

The Kore.ai Connector Agent requires an explicit set of white-listed URLs to access specific applications on your company intranet. Any other HTTP requests are denied by the Kore.ai Connector.
You must configure access control for each bot application that will use the Kore.ai Connector Agent in the accesscontrol.json file in the Kore.ai Connector installation directory in the …/config/configs directory with the following parameters:

  • virtualhost – Specify the virtual host name exactly as specified in the Request URL property in the Set Up Request Chain dialog while configuring on-premises bots in the Bot Builder tool. For more information, see Defining a Request Chain Object in the Bot Builder documentation.
  • virtualport – Specify the virtual port exactly as specified in the Request URL property in the Set Up Request Chain dialog while configuring on-premises bots in the Bot Builder tool. For more information, see Defining a Request Chain Object in the Bot Builder documentation.
  • internalhost – Specify the actual host name of the on-premises enterprise application used for data exchange with your Bots.
  • internalport – Specify the actual port of the on-premises enterprise application used for data exchange with your Bots.
  • protocol – Specify HTTP or HTTPS for the connection to on-premises enterprise applications.
  • allowedPaths – Specify all paths as “/*” or a specific array of paths for the host, not to include any parameters. The Kore.ai Connector checks the path up to, but not including parameters beginning with ” ?

The following image is an example of a configured accesscontrol.json file with four Bot configurations.
BotsAdminSecurityKore.aiConnectorAccessFile

Note: Comments cannot be used in configuration files.

Starting

This section describes how to start or stop the Kore.ai Connector Agent on Windows or Linux operating systems.

Linux/Unix Operating Systems

On Linux operating systems, you can manually start the Kore.ai Connector Agent, or configure the Kore.ai Connector Agent to autostart on boot.

Manually Starting/Stopping the Kore.ai Connector on Linux

Manually start or stop the Kore.ai Connector Agent on the Linux/Unit application server by running the following commands in the Kore.ai Connector installation directory, and check the status as follows:

./koreconnector.sh start
./koreconnector.sh stop    
./koreconnector.sh status

The following image shows the response for a successful start and status check of the Kore.ai Connector.
BotsAdminSecurityKore.aiConnectorAStartStatus

Configuring Kore.ai Connector for Autostart on Linux

This section describes how to set the Kore.ai Connector Agent to automatically start when the Linux server is started or rebooted.

  • To configure the autostart for the Kore.ai Connector Agent, on the application server, in the /etc/rc.local file, add the following command:
    cd <Kore.ai Connector&nbsp;Installation Root> ; ./koreconnector.sh start

    For example:

    cd /home/CompanyAdmin/kore-connector ; ./koreconnector.sh start

Windows Operating Systems

On Windows operating systems, you can manually start or stop the Kore.ai Connector Agent, and check the status of the Kore.ai Connector Agent.

Manually Starting/Stopping the Kore.ai Connector on Windows

Manually start or stop the Kore.ai Connector Agent on the Windows application server by running the following commands in the Kore.ai Connector installation directory, and check the status as follows:

.\koreconnector.cmd start
.\koreconnector.cmd stop    
.\koreconnector.cmd status

Enabling Bots 

In this section, you can verify the connection to the Kore.ai Connector Agent in the Bots Admin Console, and then enable the connection. When the connection is enabled, you can modify your custom Bots in the Bot Builder tool to use the Kore.ai Connector, publish those Bots, and then in the Bots Admin Console, deploy the published Bots and assign the Bots to users in your company.

  1. In the Bots Admin Console, in the Security & Control module, on the Kore.ai Connector page, verify the Kore.ai Connector status as CONNECTED, click the Ellipsis icon, and then on the Actions menu, click Enable as shown in the following illustration.
    BotsAdminSecurityKore.aiConnectorEnable
  2. In Bot Builder, for each Bot task that you want to run using the Kore.ai Connector, clone or upgrade each Bot.
    1. In the Set up Request Chain Object dialog, select Access using connector, save the changes, and then publish the Bot. For more information about configuring the request object, see Configuring an Alert Task Request Object or  Configuring an Action Task Request Object in the Bot Builder tool documentation.

      Note: The option in the Set up Request Chain Object dialog for Access using connector is only available after the Kore.ai connector is enabled in the Bots Admin Console.

  3. In the Bots Admin Console, deploy the published Bot and assign the users that can use the Bot tasks in your enterprise. For more information, see Bot Management.

After the Kore.ai Connector is installed on your application server, enabled in Bots Admin Console, and your Bots customized to use the connector, you only need to monitor the status of your connector in the Bots Admin Console.
If you cannot start the Kore.ai Connector, or customers are reporting errors, you may need to reconfigure Kore.ai Connector settings.

Troubleshooting

Installing and configuring the Kore.ai Connector Agent involves many steps. And even after installation, you may need additional configuration to maintain connectivity between Kore.ai Bots and your on-premises applications. This topic describes some of the typical issues that may arise, and how to handle those issues.

Kore.ai Connect Agent Server Issues

Kore.ai Connector Fails to Start

Log Error Message: TypeError: Object #<Object> has no method ‘parse’
Solution: The server may have multiple node.js installations with different versions. You may need to specify which node.js version to run.
To check for versions, run the following command:
nvm list
This command may return:
v0.10.29
v0.10.30
v0.10.31
v0.10.35
v0.10.36
v0.11.13
v0.12.2
v0.12.4
v4.0.0

To set the version to use, run the following command:
nvm use v4.0.0
The command should return:
Now using node v4.0.0

Client Issues

Users in your organization may experience connectivity issues with the Kore.ai Connector.

  • Error Message: “< Enterprise application >” is not reachable. Unable to communicate with the connector. Please try again.
    • Solution: The “virtualhost” entry in the Kore.ai Connector Install Dir >/config/configs/accesscontrol.json file is not defined, or is incorrectly configured. Verify the entry.
  • Error Message: The server returned an error. Try again later. (404 – System not reachable). 
    • Solution: Connectivity between the Kore.ai Connector on your application server and the Kore.ai Gateway is broken. The Kore.ai Connector Agent may have stopped running. You may need to restart the Kore.ai Connector on the application server.

If you cannot resolve your issue, contact Kore.ai Support.