OVERVIEW
Virtual Assistants
Kore.ai Platform
Key Concepts
Natural Language Processing (NLP)
Accessing Platform
VIRTUAL ASSISTANTS
Virtual Assistant Builder
Virtual Assistant Types
Getting Started
Create a Simple Bot
SKILLS
Storyboard
Dialog Tasks
Introduction
Dialog Builder (New)
Dialog Builder (Legacy)
User Intent Node
Dialog Node
Entity Node
Supported Entity Types
Composite Entities
Supported Colors
Supported Company Names
Form Node
Logic Node
Message Nodes
Confirmation Nodes
Bot Action Node
Service Node
Custom Authentication
2-way SSL for Service nodes
Script Node
Agent Transfer Node
WebHook Node
Grouping Nodes
Connections & Transitions
Manage Dialogs
User Prompts
Knowledge Graph
Terminology
Building
Generation
Importing and Exporting
Analysis
Knowledge Extraction
Train
Build
Alert Tasks
Introduction
Ignore Words and Field Memory
How to Schedule a Smart Alert
Small Talk
Digital Views
Introduction
How to Configure Digital Views
Digital Forms
Overview
How to Configure Digital Forms
NATURAL LANGUAGE
Overview
Machine Learning
Introduction
Model Validation
Fundamental Meaning
Introduction
NLP Guidelines
Knowledge Graph
Traits
Introduction
How to Use Traits
Ranking and Resolver
Advanced NLP Configurations
INTELLIGENCE
Overview
Context Management
Overview
Session and Context Variables
Context Object
How to Manage Context Switching
Manage Interruptions
Dialog Management
Sub Intents & Follow-up Intents
Amend Entity
Multi-Intent Detection
Sentiment Management
Tone Analysis
Sentiment Management
Event Based Bot Actions
Default Conversations
Default Standard Responses
TEST & DEBUG
Talk to Bot
Utterance Testing
Batch Testing
Record Conversations
Conversation Testing
CHANNELS
PUBLISH
ANALYZE
Overview
Dashboard
Custom Dashboard
Overview
How to Create Custom Dashboard
Conversation Flows
NLP Metrics
ADVANCED TOPICS
Universal Bots
Overview
Defining
Creating
Training
Customizing
Enabling Languages
Store
Smart Bots
Defining
koreUtil Libraries
SETTINGS
Authorization
Language Management
PII Settings
Variables
Functions
IVR Integration
General Settings
Management
Import & Export
Delete
Bot Versioning
Collaborative Development
Plan Management
API GUIDE
API Overview
API List
API Collection
SDKs
SDK Overview
SDK Security
SDK App Registration
Web SDK Tutorial
Message Formatting and Templates
Mobile SDK Push Notification
Widget SDK Tutorial
Widget SDK – Message Formatting and Templates
Web Socket Connect & RTM
Using the BotKit SDK
Installing
Configuring
Events
Functions
BotKit SDK Tutorial – Agent Transfer
BotKit SDK Tutorial – Flight Search Sample Bot
Using an External NLP Engine
ADMINISTRATION
HOW TOs
Create a Simple Bot
Create a Banking Bot
Transfer Funds Task
Update Balance Task
Context Switching
Using Traits
Schedule a Smart Alert
Configure UI Forms
Add Form Data into Data Tables
Configuring Digital Views
Add Data to Data Tables
Update Data in Data Tables
Custom Dashboard
Custom Tags to filter Bot Metrics
Patterns for Intents & Entities
Build Knowledge Graph
Global Variables
Content Variables
Using Bot Functions
Configure Agent Transfer
RELEASE NOTES

BotKit SDK チュートリアル ー フライト検索サンプル ボット6

これは、Kore.ai BotKit SDK のインスタンスを設定して実行するためのエンド ツー エンドのチュートリアルです。この SDK は、Kore.ai ボットのメッセージと Webhook イベントを Web サービスで制御するために使用できるライブラリのコレクションです。このチュートリアルでは、フライト検索サンプルというサンプル ボットを使用します。このサンプル ボットは、新規ボットとしてインストールし、認証トークンを生成した後、テスト コールバック サーバーとして ngrok を使用してボットをテストします。

必要条件

このチュートリアルを完了するには、以下の必要条件をセットアップし、構成する必要があります:

  • テスト用コールバック サーバーとして ngrok をインストールおよび実行します。テスト用コールバック サーバー アプリケーション ngrok は、コールバック サーバー アプリケーションのシミュレーションに使用します。
  • node.jsをコンピュータにインストール ー BotKit SDK はサーバーと Kore.ai ボット プラットフォームとの通信には、Node.js が必要です。

ngrok のインストールと実行

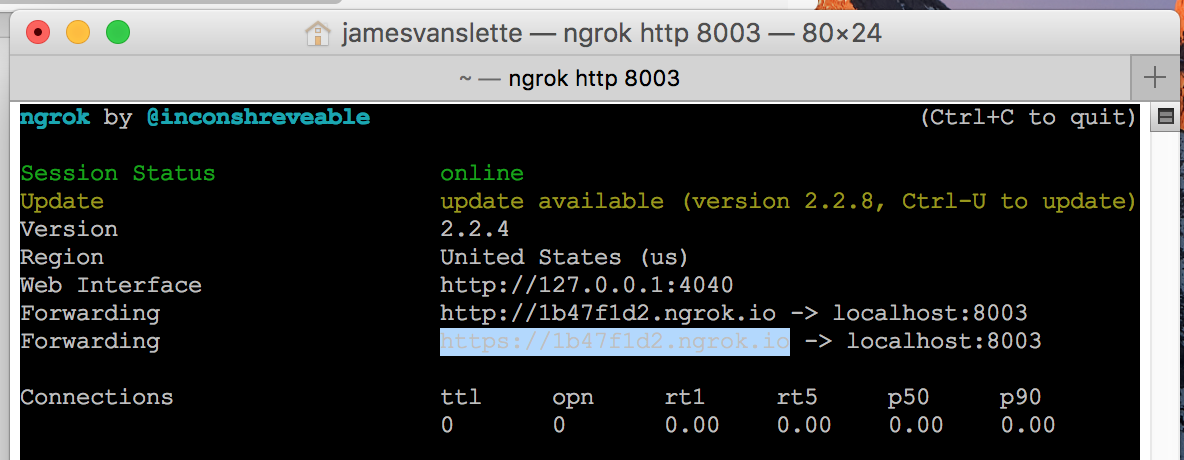
テスト用コールバック サーバー アプリケーションをダウンロードするには、https://ngrok.com/download をクリックして、お使いのオペレーティング システム用の ngrok ファイルをダウンロードしてインストールします。ターミナル ウィンドウで ngrok を起動し、以下のコマンドでポート 8003 監視します: ngrok http 8003 前図で示されるように、https 転送 URL をコピーします。例: https://1b47f1d2.ngrok.ioターミナル ウィンドウを開いたまま、ngrok を起動します。
Node.js のインストール

BotKit SDK は、SDK がインストールされているサーバー上で Node.js が動作している必要があります。https://nodejs.org/en/download/にアクセスし、Mac の場合は .pkg ファイル タイプで、Windows の場合は .msi ファイル タイプで、お使いのOSを選びます。ターミナル ウィンドウで、以下の図に示すようにコマンド node -v を実行して、インストールとバージョンを確認します。例: v6.10.2

ボットのインストールと設定

必要条件をインストールして実行すると、フライト検索サンプル ボットをインストールする準備が整います。このセクションでは、以下を実行します:

  • フライト検索サンプル ボットのインストール
  • アプリ登録の作成
  • セキュリティ資格情報の生成
  • BotKit SDK のインストールと設定 ー config.json および FindAFlight.js ファイル

フライト検索サンプル ボット

Kore.ai には、すぐに使えるサンプル ボットが用意されており、ボットビルダーのインスタンスにインストールすることができます。このチュートリアルでは、フライト検索サンプル ボットをインストールする必要があります。フライト検索サンプル ボットをインストールするには

  1. ボットビルダーにログオンして、[新規ボット] > [サンプル ボットのインストール]をクリックします。
  2. フライト検索サンプルをポイントして、[インストール] をクリックします。フライト検索サンプル_XXXX_X で [手順] タブが開きます。
  3. 手順を確認し、[設定] タブをクリックして、サンプル ボットの名前を「フライト検索サンプル チュートリアル」に変更します。
  4. フライト検索サンプル_NAME_Instance# は正常にインストールされました」というメッセージが表示されます。

フライト検索サンプルボットは、ボットビルダーでのみ利用可能であり、新規ボットとして追加する必要があります。詳細については、フライト検索サンプル ボットをご参照ください。

アプリの登録とクライアント資格情報の生成

BotKit SDK を Kore.ai ボット プラットフォームに登録するには、アプリの登録を行い、サーバープラットフォームにインストールされた SDK と Kore.ai ボット プラットフォームとの安全な通信のためのセキュリティ資格情報を生成する必要があります。アプリ登録の作成

  1. ボットのサイド ナビゲーション パネルにカーソルを合わせ、[API Extensions] をクリックします。
  2. 「API 拡張機能」ページで [BotKit SDK] タブをクリックします。
  3. アプリ名」ドロップダウン リストの隣にある [追加] をクリックします。
  4. アプリ名を入力して、[次へ]をクリックします。
  5. クライアント ID とクライアント シークレットの詳細が表示されます。[完了] をクリックします。
  6. [コールバック URL] フィールドには、必要条件の一部としてインストールして実行した ngrok アプリケーションの [転送 URL] からコピーしたアプリケーションの URL を入力します。例: https://1b47f1d2.ngrok.io

    メモ: ngrok の各実行インスタンスは、セッション固有の URL を生成します。ngrok を停止して再起動する場合は、"コールバック URL" フィールドを更新する必要があります。

  7. [イベント] セクションで OnHookNode を選択 ー ダイアログ タスク フロー内で Webhook ノードが検出されると、イベントがトリガーされます。
  8. [保存] をクリックします。「サブスクライブが正常に実行されました」と表示されます。

BotKit SDK の設定には、以下が必要です:

  • クライアント ID をコピーします。例: cs-6e5eb411-e592-50d9-9ba2-ccc748d4f719
  • クライアント シークレットを表示して、コピーします。例: dTTmuTOgs8SOCwF/tFizouE0EPy28fXojOJWedOEF6s=

ボットの公開

開発者は、インストールされたボットをすぐにテストに使用できます。ボットは、所有者が保存すると利用できるようになります。このチュートリアルのためにこのボットを実行してテストする場合は、次のセクション [BotKit SDK のインストールと設定] にスキップできます。他のユーザーがボットを使用できるようにするには、他のユーザーのエンタープライズ管理者がエンタープライズ内のユーザーにボットを承認してデプロイできるように、ボットを公開する必要があります。詳しくは、「タスクの公開」をご覧ください。ボットビルダーでボットを公開した後、そのボットのエンタープライズ管理者は、ボットの対象ユーザーエンタープライズ ユーザー (管理対象ユーザー) または一般ユーザー (非管理対象ユーザー) のどちらに設定されているかに応じて、ボット管理コンソールで以下のいずれか 1 つのボットのデプロイメントを実行する必要があります。

  • エンタープライズ ユーザー向け
    1. ボット管理者コンソールで、ボット管理 モジュールで、エンタープライズ ボット ページでデプロイしたいエージェント転送ボットの省略記号アイコンをクリックし、さらにボット タスクの管理をクリックします。"ボットタスクの管理" ダイアログが表示されます。
    2. "ボット タスク フィールド" を展開すると、デプロイされた使用可能なタスクが表示されます。
    3. ボットのタスクをすべて選択して、[確認] をクリックします。
    4. "ボット タスクの管理" ダイアログで [確認] をクリックします。「ボットのステータスが正常に変更されました」というメッセージが表示されます。
    5. エンタープライズ ボット」ページで、エンタープライズ ユーザーを割り当てたいエージェント転送ボットの [省略記号] のアイコンをクリックし、[ボットとタスクの割り当て] をクリックします。"ボットとタスクの割り当て" ダイアログが表示されます。
    6. エンタープライズ内の選択されたユーザーにボットを割り当てます。

 ー または ー

  • 一般パブリック ユーザー向け
    1. ボット管理者コンソールのボット管理モジュールで、消費者ボットページでデプロイしたいエージェント転送ボットの [省略記号] アイコンをクリックし、さらに [ボット タスクの管理] をクリックします。"ボットタスクの管理" ダイアログが表示されます。
    2. "ボット タスク" フィールドを展開すると、デプロイされた使用可能なタスクが表示されます。
    3. ボットのタスクをすべて選択して、[確認] をクリックします。「ボットのステータスは正常に変更されました」というメッセージが表示されます。

BotKit SDK のインストールと設定

https://github.com/Koredotcom/BotKitから Kore.ai BotKit SDK をダウンロードして解凍する必要があります。必ず LiveChat.js ファイルを含む最新版をダウンロードしてください。

config.json

BotKit SDK フォルダ内で、コールバック サーバーへの接続情報を含む config.json ファイルを編集する必要があります。このチュートリアルでは、ngrokと、フライト検索サンプル ボットのアプリ登録を行った際に生成されたセキュリティ資格情報を使用して、LiveChat エージェント アプリケーションのライセンスキーを含む新しい行を config.json ファイルに追加します。デフォルトの config.json ファイルのパラメータを以下のように変更します:

  • urlngrokの “転送 URL” フィールドの値を使用してこのパラメータを追加します
  • apikeyクライアント シークレットを使用してパラメータを更新します
  • appIdクライアント IDを使用してパラメータを更新します
{ "server": { "port": 8003 }, "app": { "apiPrefix" : "", "url": "< ngrok Forwarding URL >" }, "credentials": { "apikey": "< Client Secret from Bot Builder >", "appId": "< Client ID from Bot Builder >" }, "redis": { "options": { "host": "localhost", "port": 6379 }, "available": false }, "examples" : { "mockServicesHost" : "http://localhost:8004" } }

以下のコードは、完全に定義されたサンプル config.json ファイルの例です:

{ "server": { "port": 8003 }, "app": { "apiPrefix" : "", "url": "https://1b47f1d2.ngrok.io" }, "credentials": { "apikey": "dTTmuTOgs8SOCwXXXXXXXXE0EPy28fXojOJWedOEF6s=", "appId": "cs-6e5eb411-XXXX-XXXX-9ba2-ccc748d4f719" }, "redis": { "options": { "host": "localhost", "port": 6379 }, "available": false }, "examples" : { "mockServicesHost" : "http://localhost:8004" } }

FindAFlight.js

BotKit SDK内の FindAFlight.js ファイルには、フライト情報の Webhook 呼び出しを処理する JavaScript が含まれています。このチュートリアルでは、以下の内容で Webhook の設定を行います: ボットビルダーでフライト検索サンプルのボットを選択し、[設定 > 構成設定] で [一般設定] を選択します。「一般設定」ページが表示されます。以下をコピーします:

  • ボット名 ー ボット プラットフォーム上のボットの名前。例: フライト検索サンプル チュートリアル
  • ボット ID ー ボットの用にボット プラットフォーム システムに一意の ID。例: st-26cfae3a-XXXX-XXXX-991a-376b7fe579d5

FindAFlight.js ファイル内で、以下の大文字と小文字を区別する変数を更新し、ボット インスタンスの設定で保存します。 var botId = "<Bot ID>"; var botName = "<Bot Name >"; 例: var botId = "st-26cfae3a-XXXX-XXXX-991a-376b7fe579d5"; var botName = "Flight Search Sample Tutorial";

BotKit SDK アプリケーションの起動

BotKit SDK を使用してフライト検索サンプル ボットの使用を開始するには、 Node.js がインストールされ、 ngrok がポート 8003で待ち受けていることが必要です。BotKit SDK を起動するには ターミナル ウィンドウで、BotKit SDK のフォルダに移動し、以下のコマンドを入力します: node app.js Node.js が動作していれば、以下のようなレスポンスが得られるはずです: app listening at http://:::8003

BotKit SDK ボットのテスト

作成したボットをテストするには、以下が必要です:

  • ngrok running – Command = ngrok http 8003
  • node.js running – Command = node app.js
  • ボットビルダー ー ボットビルダー ページの右下隅にある次のアイコンをクリックして、ボットとの対話を開始します:

"フライト検索サンプル" ダイアログが起動すると、Web サービスとしてのサード パーティの Webhook と BotKit SDK の間でメッセージがやり取りされます。

次のステップ

Kore.ai ボットをアプリケーションで使用するには、BotKit SDK を設定し、コールバック URLngrok ではなく自社のアプリケーション サーバーを指すようにアプリケーションを登録する必要があります。もちろん、他のユーザーとボットを共有するには、所属する会社のエンタープライズ管理者がボットを承認し、ボットを公開した後、それらのユーザーにボットをデプロイする必要があります。

OVERVIEW
Virtual Assistants
Kore.ai Platform
Key Concepts
Natural Language Processing (NLP)
Accessing Platform
VIRTUAL ASSISTANTS
Virtual Assistant Builder
Virtual Assistant Types
Getting Started
Create a Simple Bot
SKILLS
Storyboard
Dialog Tasks
Introduction
Dialog Builder (New)
Dialog Builder (Legacy)
User Intent Node
Dialog Node
Entity Node
Supported Entity Types
Composite Entities
Supported Colors
Supported Company Names
Form Node
Logic Node
Message Nodes
Confirmation Nodes
Bot Action Node
Service Node
Custom Authentication
2-way SSL for Service nodes
Script Node
Agent Transfer Node
WebHook Node
Grouping Nodes
Connections & Transitions
Manage Dialogs
User Prompts
Knowledge Graph
Terminology
Building
Generation
Importing and Exporting
Analysis
Knowledge Extraction
Train
Build
Alert Tasks
Introduction
Ignore Words and Field Memory
How to Schedule a Smart Alert
Small Talk
Digital Views
Introduction
How to Configure Digital Views
Digital Forms
Overview
How to Configure Digital Forms
NATURAL LANGUAGE
Overview
Machine Learning
Introduction
Model Validation
Fundamental Meaning
Introduction
NLP Guidelines
Knowledge Graph
Traits
Introduction
How to Use Traits
Ranking and Resolver
Advanced NLP Configurations
INTELLIGENCE
Overview
Context Management
Overview
Session and Context Variables
Context Object
How to Manage Context Switching
Manage Interruptions
Dialog Management
Sub Intents & Follow-up Intents
Amend Entity
Multi-Intent Detection
Sentiment Management
Tone Analysis
Sentiment Management
Event Based Bot Actions
Default Conversations
Default Standard Responses
TEST & DEBUG
Talk to Bot
Utterance Testing
Batch Testing
Record Conversations
Conversation Testing
CHANNELS
PUBLISH
ANALYZE
Overview
Dashboard
Custom Dashboard
Overview
How to Create Custom Dashboard
Conversation Flows
NLP Metrics
ADVANCED TOPICS
Universal Bots
Overview
Defining
Creating
Training
Customizing
Enabling Languages
Store
Smart Bots
Defining
koreUtil Libraries
SETTINGS
Authorization
Language Management
PII Settings
Variables
Functions
IVR Integration
General Settings
Management
Import & Export
Delete
Bot Versioning
Collaborative Development
Plan Management
API GUIDE
API Overview
API List
API Collection
SDKs
SDK Overview
SDK Security
SDK App Registration
Web SDK Tutorial
Message Formatting and Templates
Mobile SDK Push Notification
Widget SDK Tutorial
Widget SDK – Message Formatting and Templates
Web Socket Connect & RTM
Using the BotKit SDK
Installing
Configuring
Events
Functions
BotKit SDK Tutorial – Agent Transfer
BotKit SDK Tutorial – Flight Search Sample Bot
Using an External NLP Engine
ADMINISTRATION
HOW TOs
Create a Simple Bot
Create a Banking Bot
Transfer Funds Task
Update Balance Task
Context Switching
Using Traits
Schedule a Smart Alert
Configure UI Forms
Add Form Data into Data Tables
Configuring Digital Views
Add Data to Data Tables
Update Data in Data Tables
Custom Dashboard
Custom Tags to filter Bot Metrics
Patterns for Intents & Entities
Build Knowledge Graph
Global Variables
Content Variables
Using Bot Functions
Configure Agent Transfer
RELEASE NOTES

BotKit SDK Tutorial – Flight Search Sample Bot

This tutorial is an end-to-end walkthrough for setting up and running an instance of the Kore.ai BotKit SDK which is a collection of libraries that you can use for more control of the messages and webhook events for Kore.ai bots for your web service. For this tutorial, you will use the sample bot called Flight Search Sample that you can install as a new bot, generate authentication tokens, and then test the bot using ngrok as a test callback server.

Prerequisites

To complete this tutorial, you will have to setup and configure the following prerequisites:

  • Install and run ngrok as your test callback server. The test callback server application, ngrok, is used to simulate your callback server application.
  • Install node.js on your computer – The BotKit SDK requires node.js to communicate between your server and the Kore.ai Bots Platform.

Installing and running ngrok

To download the test callback server application, click https://ngrok.com/download, and then download and install the ngrok file for your operating system.
In a Terminal Window, start ngrok to monitor port 8003 using the following command:
ngrok http 8003

Copy the https Forwarding URL as shown in the previous illustration, for example, https://1b47f1d2.ngrok.io. Leave the terminal window open and ngrok running.

Installing node.js

The BotKit SDK requires node.js to run on the same server where the SDK is installed. Go to https://nodejs.org/en/download/, and then select your OS as a .pkg file type for Mac, and .msi file type for Windows.
In a Terminal window, run the node -v command to verify installation and version, for example, v6.10.2as shown in the following illustration.

Installing and Configuring Your Bot

With the prerequisites installed and running, you are ready to install the Flight Search Sample bot. In this section, you will:

  • Install the Flight Search Sample Bot
  • Create an App Registration
  • Generate Security Credentials
  • Install and Configure the BotKit SDK – config.json and FindAFlight.js files

Installing the Flight Search Sample Bot

Kore.ai provides ready to use sample bots that you can install into your instance of Bot Builder. For this tutorial, you will need to install the Flight Search Sample bot.
To install the Flight Search Sample bot

  1. Log on to Bot Builder, and then click New Bot > Install Sample Bot.
  2. Point to Flight Search Sample, and then click Install. The Instructions tab on the Flight Search Sample_XXXX_X opens.
  3. Review the instructions, click the Configuration tab, and then rename your sample bot to Flight Search Sample Tutorial.
  4. The Flight Search Sample_NAME_Instance# installed successfully message appears.

The Flight Search Sample bot is only available in Bot Builder and must be added as a new bot. For more information, see Flight Search Sample Bot.

Registering Your App and Generating Client Credentials

To register your BotKit SDK with the Kore.ai Bots platform, you will need to create an app registration, and then generate security credentials used to securely communicate between the SDK installed on your server platform and the Kore.ai Bots Platform.
Creating an App Registration

  1. Hover over the side-navigation panel of the bot and click API Extensions.
  2. On the API Extensions page, click the BotKit SDK tab.
  3. Next to the App name drop-down list, click Add.
  4. Enter a name for the app and then click Next.
  5. The Client ID and Client Secret details appear. Click Done.
  6. In the Callback URL field, enter the URL for your application that you copied from the Forwarding URL from the ngrok application that you installed and ran as part of the prerequisites, for example,  https://1b47f1d2.ngrok.io.

    Note: Each running instance of ngrok will generate a session unique URL. You will need to update the Callback URL field if you stop and restart ngrok.

  7. In the Events section, select OnHookNode – An event is triggered when a Webhook node is encountered in the dialog task flow.
  8. Click Save. The Successfully subscribed message is displayed.

To configure the BotKit SDK settings, you will need to:

  • Copy the Client ID, for example, cs-6e5eb411-e592-50d9-9ba2-ccc748d4f719.
  • View, and then copy the Client Secret, for example, dTTmuTOgs8SOCwF/tFizouE0EPy28fXojOJWedOEF6s=.

Publishing the Bot

A developer can use any installed bot immediately for testing as bots are available to the owner on save. If you only want to run and test this bot for this tutorial, you can skip to the next section, Installing and Configuring the BotKit SDK.
To enable the bot for other users, you must publish the bot so the Enterprise Admin for other users can approve and deploy the bot for users in their enterprise. For more information, see Publishing Tasks.
After you publish a bot in Bot Builder, an Enterprise Admin for your bot must complete one of the following bot deployments in the Bots Admin Console depending if your bot Target Audience is set to Enterprise Users (managed users) or General Public (unmanaged users):

  • For Enterprise Users
    1. In the Bots Admin Console, in the Bots Management module, on the Enterprise Bots page, click the Ellipses icon for the Agent Transfer bot that you want to deploy, and then click Manage bot tasks. The Manage Bot Tasks dialog is displayed.
    2. Expand the Bot Tasks field to view the available and deployed tasks.
    3. Select all tasks of the bot and then click Confirm.
    4. In the Manage bots tasks dialog, click Confirm. The Bot status changed successfully message is displayed.
    5. On the Enterprise Bots page, click the Ellipses icon for the Agent Transfer bot that you want to assign enterprise users to, and then click Bot & task assignments. The Bot & task assignments dialog is displayed.
    6. Assign the bot to the selected users in the enterprise.

 – or –

  • For General Public Users
    1. In the Bots Admin Console, in the Bots Management module, on the Consumer Bots page, click the Ellipses icon for the Agent Transfer bot that you want to deploy, and then click Manage bot tasks. The Manage Bot Tasks dialog is displayed.
    2. Expand the Bot Tasks field to view the available and deployed tasks.
    3. Select all tasks of the bot and then click Confirm. The Bot status changed successfully message is displayed.

Installing and Configuring the BotKit SDK

You will need to download and then uncompress the Kore.ai BotKit SDK from https://github.com/Koredotcom/BotKit. Be sure to download the latest version that contains the LiveChat.js files.

config.json

In your BotKit SDK folder, you will need to edit the config.json file that contains the connection information to your callback server. For this tutorial, you are using ngrok, along with the security credentials generated when you created the app registration for the Flight Search Sample bot, and adding a new line to config.json file that contains the license key for your LiveChat agent application.
Modify the default config.json file for the following parameters as follows:

  • url – Add this parameter with the Forwarding URL field from ngrok
  • apikey – Update parameter using Client Secret
  • appId – Update parameter using Client ID
{
    "server": {
        "port": 8003
    },
    "app": {
        "apiPrefix" : "",
        "url": "< ngrok Forwarding URL >"
    },
    "credentials": {
        "apikey": "< Client Secret from Bot Builder >",
        "appId": "< Client ID from Bot Builder >"
    },
    "redis": {
        "options": {
            "host": "localhost",
            "port": 6379
        },
        "available": false
    },
    "examples" : {
        "mockServicesHost"  : "http://localhost:8004"
    }
}

The following code is an example of a fully defined sample config.json file:

{
    "server": {
        "port": 8003
    },
    "app": {
        "apiPrefix" : "",
        "url": "https://1b47f1d2.ngrok.io"
    },
    "credentials": {
        "apikey": "dTTmuTOgs8SOCwXXXXXXXXE0EPy28fXojOJWedOEF6s=",
        "appId": "cs-6e5eb411-XXXX-XXXX-9ba2-ccc748d4f719"
    },
    "redis": {
        "options": {
            "host": "localhost",
            "port": 6379
        },
        "available": false
    },
    "examples" : {
        "mockServicesHost"  : "http://localhost:8004"
    }
}

FindAFlight.js

The FindAFlight.js file in the BotKit SDK contains the JavaScript that handles the webhook call for flight information. For this tutorial, you will configure the webhook settings with the following information:
In Bot Builder, select the Flight Search Sample bot, and then on the Settings -> Config Settings section, select the General Settings section. The General Settings page is displayed. Copy the:

  • Bot Name – The name of the bot on the Bots Platform, for example, Flight Search Sample Tutorial.
  • Bot ID – The Bots Platform system unique ID for the Bot, for example, st-26cfae3a-XXXX-XXXX-991a-376b7fe579d5.

In the FindAFlight.js file, update and save the following case-sensitive variables with the settings from your bot instance:
var botId = "< Bot ID >";
var botName = "< Bot Name >";

For example:
var botId = "st-26cfae3a-XXXX-XXXX-991a-376b7fe579d5";
var botName = "Flight Search Sample Tutorial";

Starting the BotKit SDK Application

To start using the Flight Search Sample bot using the BotKit SDK, node.js must be installed and ngrok running listening on port 8003.
To start BotKit SDK
In a Terminal window, navigate to your BotKit SDK folder, and then enter the following command:
node app.js
When node.js is running, you should get the following response:
app listening at http://:::8003

Testing the BotKit SDK Bot

To test your bot, you need the following:

  • ngrok running – Command = ngrok http 8003
  • node.js running – Command = node app.js
  • Bot Builder – Start Talk to the Bot by clicking the following icon on the bottom right corner of any Bot Builder page:

After the Flight Search Sample dialog is started, messages are exchanged between the third-party webhook as a web service and the BotKit SDK.

Next Steps

To use the Kore.ai bot in your application, you would need to configure the BotKit SDK and register your application with CallBack URL to point to your company application server instead of ngrok. And of course, to share the bot with other users, the Enterprise Admin for your company would need to approve the bot, and deploy the bot to those users after you publish the bot.