OVERVIEW
Virtual Assistants
Kore.ai Platform
Key Concepts
Natural Language Processing (NLP)
Accessing Platform
VIRTUAL ASSISTANTS
Virtual Assistant Builder
Virtual Assistant Types
Getting Started
Create a Simple Bot
SKILLS
Storyboard
Dialog Tasks
Introduction
Dialog Builder (New)
Dialog Builder (Legacy)
User Intent Node
Dialog Node
Entity Node
Supported Entity Types
Composite Entities
Supported Colors
Supported Company Names
Form Node
Logic Node
Message Nodes
Confirmation Nodes
Bot Action Node
Service Node
Custom Authentication
2-way SSL for Service nodes
Script Node
Agent Transfer Node
WebHook Node
Grouping Nodes
Connections & Transitions
Manage Dialogs
User Prompts
Knowledge Graph
Terminology
Building
Generation
Importing and Exporting
Analysis
Knowledge Extraction
Train
Build
Alert Tasks
Introduction
Ignore Words and Field Memory
How to Schedule a Smart Alert
Small Talk
Digital Views
Introduction
How to Configure Digital Views
Digital Forms
Overview
How to Configure Digital Forms
NATURAL LANGUAGE
Overview
Machine Learning
Introduction
Model Validation
Fundamental Meaning
Introduction
NLP Guidelines
Knowledge Graph
Traits
Introduction
How to Use Traits
Ranking and Resolver
Advanced NLP Configurations
INTELLIGENCE
Overview
Context Management
Overview
Session and Context Variables
Context Object
How to Manage Context Switching
Manage Interruptions
Dialog Management
Sub Intents & Follow-up Intents
Amend Entity
Multi-Intent Detection
Sentiment Management
Tone Analysis
Sentiment Management
Event Based Bot Actions
Default Conversations
Default Standard Responses
TEST & DEBUG
Talk to Bot
Utterance Testing
Batch Testing
Record Conversations
Conversation Testing
CHANNELS
PUBLISH
ANALYZE
Overview
Dashboard
Custom Dashboard
Overview
How to Create Custom Dashboard
Conversation Flows
NLP Metrics
ADVANCED TOPICS
Universal Bots
Overview
Defining
Creating
Training
Customizing
Enabling Languages
Store
Smart Bots
Defining
koreUtil Libraries
SETTINGS
Authorization
Language Management
PII Settings
Variables
Functions
IVR Integration
General Settings
Management
Import & Export
Delete
Bot Versioning
Collaborative Development
Plan Management
API GUIDE
API Overview
API List
API Collection
SDKs
SDK Overview
SDK Security
SDK App Registration
Web SDK Tutorial
Message Formatting and Templates
Mobile SDK Push Notification
Widget SDK Tutorial
Widget SDK – Message Formatting and Templates
Web Socket Connect & RTM
Using the BotKit SDK
Installing
Configuring
Events
Functions
BotKit SDK Tutorial – Agent Transfer
BotKit SDK Tutorial – Flight Search Sample Bot
Using an External NLP Engine
ADMINISTRATION
HOW TOs
Create a Simple Bot
Create a Banking Bot
Transfer Funds Task
Update Balance Task
Context Switching
Using Traits
Schedule a Smart Alert
Configure UI Forms
Add Form Data into Data Tables
Configuring Digital Views
Add Data to Data Tables
Update Data in Data Tables
Custom Dashboard
Custom Tags to filter Bot Metrics
Patterns for Intents & Entities
Build Knowledge Graph
Global Variables
Content Variables
Using Bot Functions
Configure Agent Transfer
RELEASE NOTES

エラーメッセージのカスタマイズ

ボットビルダーでは、それぞれのボットやタスクに、HTTPリクエストメソッドで返される標準的なHTTPステータスコードに対するアクションと一緒に、あらかじめ定義されたエラーメッセージが含まれています。ほとんどの場合、デフォルトの応答およびアクションは、エンドユーザーの応答に対しては十分ですが、デフォルトで定義されていない他のHTTPステータスコードを処理したり、エラーメッセージ自体をカスタマイズしたり、エラーが発生した場合にKore.aiが行うデフォルトの応答を変更する必要がある場合があります。このトピックでは、Kore.aiのボットやタスクのエラーメッセージをカスタマイズして作成する方法について説明します。ボットやタスクを作成する際、ボットやタスクの設定のエラーメッセージセクションで、HTTPステータスコードのエラーメッセージを追加またはカスタマイズすることができます。 エラーメッセージセクション
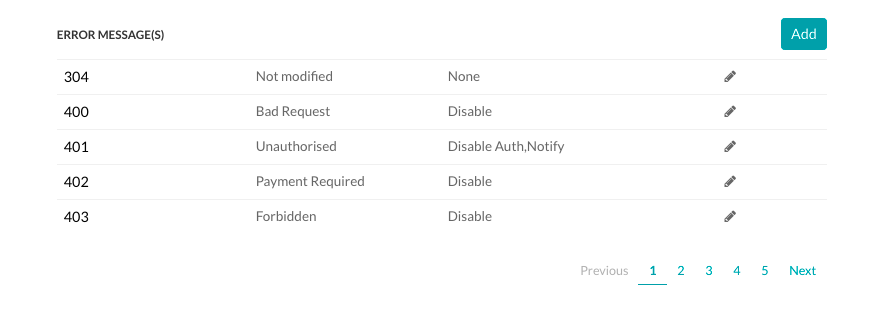
カスタムステータスコード

ボットやタスクには、デフォルトで約25種類のHTTPステータスコードが定義されています。HTTPステータスコードをカスタマイズするには、

  1. ボットビルダーでボットまたはタスクを開きます。
  2. ボットのサイドナビゲーションパネルにカーソルを合わせ、設定 > 環境設定をクリックします
  3. 下にスクロールしてエラーメッセージセクションを探します。
  4. カスタマイズするコードの編集Edit Iconアイコンをクリックして、エラーメッセージの設定ダイアログを開きます。
  5. メッセージタイプフィールドで、以下のいずれかを選択します。
    • カスタム – エンドユーザー向けのエラー固有のメッセージを定義するためのカスタムメッセージフィールドを表示します。
    • ソース – 2XX範囲のHTTPステータスコード(成功メッセージ)以外のHTTPステータスコードに対するJSON応答のペイロードからのJSONパスを定義することができる、エラーパスフィールドを表示します。
  6. アクションフィールドでは、エラーの再発生フィールドで定義した継続的なエラーの回数に達した際に取るべきアクションを指定します。次のいずれかを選択します。 Select one of:
    • 無効 – エラーが発生すると、タスクは非アクティブに設定されます。エンドユーザーは、必要に応じてタスクを有効にすることができます。
    • 再スケジュール – エラーが発生したときにタスクを再試行するまでの経過時間を分単位で定義するための再試行の間隔フィールドを表示します。
    • 認証の無効化 – エラーが発生した場合、そのタスクに定義されている認証メカニズムが無効になります。同じ認証メカニズムを使用している他のタスクも無効になります。
    • 通知 – エラーメッセージをエンドユーザーインターフェイスに表示します。
  7. メッセージフィールド(デフォルトのメッセージでのみ利用可能)に、エンドユーザーに表示するテキストメッセージを入力します。
  8. エラーの再発生フィールドに、アクションが実行されるまでに返す必要がある連続したエラーコードの数を指定します。デフォルトでは、エラーの再発生フィールドは「1」に設定されています。
  9. 追加をクリックし、カスタムエラーメッセージを保存してエラーメッセージを設定ダイアログを閉じます。

新しいHTTPステータスコードを作成するには、エラーメッセージを追加をクリックして、前のセクションで説明したように新しいコードのフィールドを定義してから追加をクリックします。

OVERVIEW
Virtual Assistants
Kore.ai Platform
Key Concepts
Natural Language Processing (NLP)
Accessing Platform
VIRTUAL ASSISTANTS
Virtual Assistant Builder
Virtual Assistant Types
Getting Started
Create a Simple Bot
SKILLS
Storyboard
Dialog Tasks
Introduction
Dialog Builder (New)
Dialog Builder (Legacy)
User Intent Node
Dialog Node
Entity Node
Supported Entity Types
Composite Entities
Supported Colors
Supported Company Names
Form Node
Logic Node
Message Nodes
Confirmation Nodes
Bot Action Node
Service Node
Custom Authentication
2-way SSL for Service nodes
Script Node
Agent Transfer Node
WebHook Node
Grouping Nodes
Connections & Transitions
Manage Dialogs
User Prompts
Knowledge Graph
Terminology
Building
Generation
Importing and Exporting
Analysis
Knowledge Extraction
Train
Build
Alert Tasks
Introduction
Ignore Words and Field Memory
How to Schedule a Smart Alert
Small Talk
Digital Views
Introduction
How to Configure Digital Views
Digital Forms
Overview
How to Configure Digital Forms
NATURAL LANGUAGE
Overview
Machine Learning
Introduction
Model Validation
Fundamental Meaning
Introduction
NLP Guidelines
Knowledge Graph
Traits
Introduction
How to Use Traits
Ranking and Resolver
Advanced NLP Configurations
INTELLIGENCE
Overview
Context Management
Overview
Session and Context Variables
Context Object
How to Manage Context Switching
Manage Interruptions
Dialog Management
Sub Intents & Follow-up Intents
Amend Entity
Multi-Intent Detection
Sentiment Management
Tone Analysis
Sentiment Management
Event Based Bot Actions
Default Conversations
Default Standard Responses
TEST & DEBUG
Talk to Bot
Utterance Testing
Batch Testing
Record Conversations
Conversation Testing
CHANNELS
PUBLISH
ANALYZE
Overview
Dashboard
Custom Dashboard
Overview
How to Create Custom Dashboard
Conversation Flows
NLP Metrics
ADVANCED TOPICS
Universal Bots
Overview
Defining
Creating
Training
Customizing
Enabling Languages
Store
Smart Bots
Defining
koreUtil Libraries
SETTINGS
Authorization
Language Management
PII Settings
Variables
Functions
IVR Integration
General Settings
Management
Import & Export
Delete
Bot Versioning
Collaborative Development
Plan Management
API GUIDE
API Overview
API List
API Collection
SDKs
SDK Overview
SDK Security
SDK App Registration
Web SDK Tutorial
Message Formatting and Templates
Mobile SDK Push Notification
Widget SDK Tutorial
Widget SDK – Message Formatting and Templates
Web Socket Connect & RTM
Using the BotKit SDK
Installing
Configuring
Events
Functions
BotKit SDK Tutorial – Agent Transfer
BotKit SDK Tutorial – Flight Search Sample Bot
Using an External NLP Engine
ADMINISTRATION
HOW TOs
Create a Simple Bot
Create a Banking Bot
Transfer Funds Task
Update Balance Task
Context Switching
Using Traits
Schedule a Smart Alert
Configure UI Forms
Add Form Data into Data Tables
Configuring Digital Views
Add Data to Data Tables
Update Data in Data Tables
Custom Dashboard
Custom Tags to filter Bot Metrics
Patterns for Intents & Entities
Build Knowledge Graph
Global Variables
Content Variables
Using Bot Functions
Configure Agent Transfer
RELEASE NOTES

Customizing Error Messages

In Bot Builder, each Bot and task contains a set of predefined error messages along with actions for standard HTTP Status codes returned for an HTTP Request method.

In most cases, the default response and action are sufficient for an end-user response, however, you may need to handle other HTTP Status codes not defined by default, or customize the error message itself, or change the default response by Kore.ai in the event of an error.

This topic describes how to customize and create error messages for Kore.ai Bots and tasks.

When you create a Bot or a task, you can add or customize error messages for HTTP Status codes in the Error Messages section of the Bot or task settings.

Custom Status Codes

There are approximately 25 HTTP Status codes defined by default for a Bot or task.

To customize an HTTP Status code

  1. Open the Bot or task in Bot Builder
  2. Select Build tab from top menu
  3. From the left menu click Configurations -> General Settings
  4. Scroll down to locate the Error Messages section.
  5. Click the Edit Edit Icon icon for the code that you want to customize to open the Setup Error Message dialog.
  6. In the Message Type field, select one of:
    • Custom – Displays a Custom Message field to define an error-specific message for the end-user.
    • Source – Displays the Error Paths field where you can define the JSON path from the JSON response payload for HTTP Status codes other than those in the 2XX range (success messages).
  7. In the Action field, specify the action to take when the number of consecutive errors defined in the Error Recurrence field is reached. Select one of:
    • Disable – The task is set to Inactive when the error occurs. The end-user can activate the task when needed.
    • Reschedule – Displays the Retry Interval field used to define the elapsed time in minutes after which to retry the task when the error occurs.
    • Disable Auth – When the error occurs, the authorization mechanism defined for the task is disabled. Any other task that uses the same authorization mechanism is also disabled.
    • Notify – Displays the error message in the end-user interface.

  8. In the Message field (available only for the default messages), enter the text message displayed to the end-user.
  9. In the Error Recurrence field, specify the number of consecutive error codes must be returned before the action is executed. By default, the Error Recurrence field is set to ” 1 “.
  10. Click Add to save and close the Setup Error Message dialog for your custom error message.

To create a new HTTP Status code, click Add Error Message, define the fields for your new code as described in the preceding section, and then click Add.

On this Page