このセクションでは、ボットのインポートとエクスポート、ボットの削除、ボットの変更履歴の確認などについて説明します。
ボット変数とそれらの管理方法を参照することができます。詳細はこちらを参照してください。
ボットのインポートとエクスポート
Kore.aiでは、ボットのタスクや関連する設定をエクスポートしたり、別のボットにインポートしたりすることができます。この機能は、ボットの定義の移行、ボットの複製、またはボットの定義の定期的なバックアップの保持などに役立ちます。特に、ボットがエンドユーザー向けにリリースされる前に、さまざまな開発プロセスの段階でさまざまなバージョンのボットをテストする際に役立ちます。このセクションの記事では、エクスポートおよびインポート機能の仕組みとその実行方法について理解することができます。
注意:バージョン8.0リリース以降は、エクスポートおよびインポートされたボット定義の「NLPデータ」の「NLP設定」にenableNegativePatternsフラグが含まれます。このフラグは、ボットでネガティブパターンが有効/無効になっているかどうかを確認するために使用されます。このパッチの前は、このフラグはインポートされたボットの定義の「NLPデータ」にある「NLP設定」、およびエクスポートされたボットの定義の「設定」にある「ボットの設定」の一部でした。この変更は、機能の合理化を目的としており、バージョン8.0より前に生成されたエクスポートファイルからのボットの増分インポートに失敗する場合があります。
ボットのエクスポート
エクスポートオプションを使用して、ボットの定義や設定をエクスポートすることができます。ボットをエクスポートすると、以下のZIPファイルがダウンロードされます。
- botDefinition.json:ボットのメタデータ、タスク、ボットおよびタスクレベルの同義語、発話、パターン、ナレッジグラフ、標準応答、フロー、IDPが含まれます。ボットのエクスポートの際に、ボットのタスク、NLPデータ(NLP設定、発話、標準応答)、設定(ボットの設定、変数、IVR設定)の中からエクスポートするアイテムを選択することができます。
- config.json:ボットの設定、ボット変数、IVRの設定が含まれます。
- Icon.png:ボットアイコンが含まれます。
- <Custom ScriptFile Name.js>(利用可能な場合):JavaScriptの関数を含むスクリプトファイルが含まれます。このファイルをボットにアップロードすると、ボット内のどこからでもファイル内の関数にアクセスすることができるようになります。
エクスポートのモード
ボットのエクスポートには、公開と最新バージョン2つのモードがあります。選択されたモードに応じて、ボットタスクの対応するバージョンがエクスポートされます。どちらのモードでも、ボットタスク、NLPデータ、ボットの設定など、エクスポートするボットのコンポーネントを選択することができます。また、個々のボットタスクを選択することもできます。
公開モード
公開モードでボットをエクスポートした場合、既存のバージョンに関わらず、ボットタスクの公開バージョンのみがエクスポートされます。例えば、ボットが公開バージョンのタスクと、アップグレード中のバージョンで構成されている場合、公開バージョンのみがエクスポートされます。
以下の表を参照して、どのバージョンのタスクが公開モードでエクスポートされるかをご確認ください。
| タスク | ステータス |
|---|---|
| 進行中 | エクスポートなし 開発中のタスクの場合、公開モードではエクスポートされません。 |
| 設定済み | エクスポートなし タスクの設定は完了しているが、使用のために公開されていない場合、公開モードではエクスポートされません。 |
| 公開済み | エクスポート済み 公開済みのボットタスクはすべてエクスポートされます。 |
| アップグレード中 | エクスポートなし 進行中のタスクのアップグレード設定はエクスポートされません。公開済みの設定のみがエクスポートされます。 |
| 拒否 | エクスポートなし 管理者によって拒否されたタスク設定は、エクスポートされません。 |
| 一時停止 | エクスポートなし 一時停止されたタスクはエクスポートされません。 |
最新バージョン
最新モードでボットをエクスポートした場合、公開ステータスに関わらず、ボットタスクの最新バージョンのみがエクスポートされます。例えば、ボットが公開バージョンのタスクとアップグレード中のバージョンで構成されている場合にはアップグレード中のバージョンがエクスポートされますが、設定済みのバージョンのみで構成されている場合は設定済みのバージョンがエクスポートされます。
以下の表を参照して、どのバージョンのタスクが最新モードでエクスポートされるかをご確認ください。
| タスク | ステータス |
|---|---|
| 進行中 | 利用可能な唯一のバージョンであればエクスポートされます。 後続のバージョンが存在する場合はエクスポートされません。 |
| 設定済み | 利用可能な唯一のバージョンであればエクスポートされます。 後続のバージョンが存在する場合はエクスポートされません。 |
| 公開済み | 利用可能な唯一のバージョンであればエクスポートされます。 後続のバージョンが存在する場合はエクスポートされません。 |
| アップグレード中 | ボット内の他のタスクのバージョンに関係なくエクスポートされます。 |
| 拒否 | Not exported Task configurations rejected by admins do not get exported |
| 一時停止 | エクスポートなし 一時停止されたタスクはエクスポートされません。 |
ボットをエクスポートする手順
- エクスポートするボットを開き、左のナビゲーションメニューで設定 > ボット管理を選択します。
- ボットをエクスポートをクリックします。
- 「ボットをエクスポート」のウィンドウでは、公開または最新バージョンのいずれかのエクスポートモードを選択します。
- デフォルトでは、エクスポート用にすべてのボットアイテムが選択されています。エクスポートしたくないアイテムの選択は解除します。
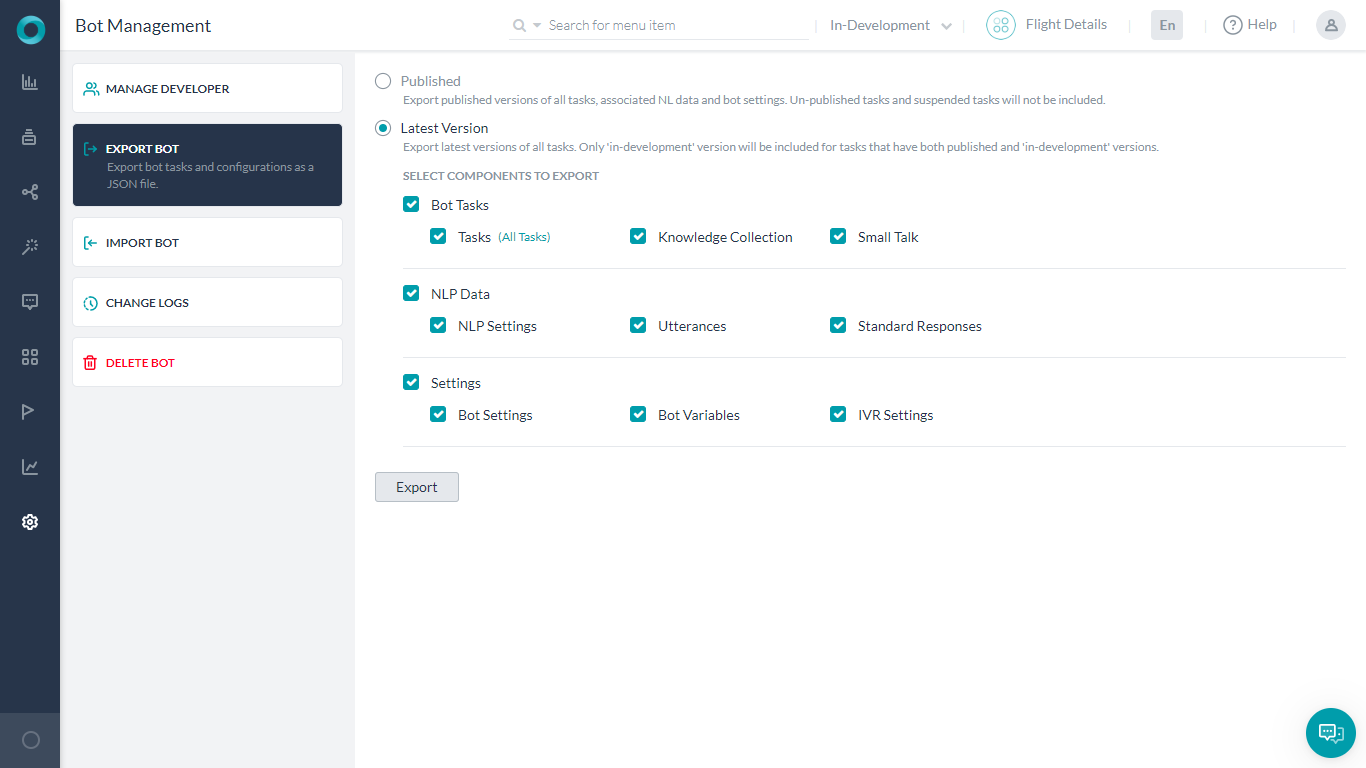
- タスクについては、さらに選択したタスクのみをエクスポートするように選択することができます。デフォルトでは、すべてのタスクが選択されています。すべてのタスクリンクをクリックしてタスクを選択ダイアログを開き、エクスポートするタスクを選択します。
- また、エクスポート時に依存タスクを含めるかどうかを選択することもできます。インポート前にこれらのタスクが存在するか確認され、依存タスクがない場合はインポートは失敗となります。これらの依存タスクには以下のものが含まれます。
- リンクされたダイアログ(例:別のダイアログの定義に存在するダイアログノード)
- ダイアログの任意のノードのIVRプロパティの「再試行回数超過時の動作」を定義する際にリンクされたダイアログ
- サブインテント/一時停止設定の一部としてリンクされたダイアログ
- 依存するタスクが含まれていない場合にダイアログの実行が失敗する可能性がある、その他のシナリオ

- エクスポートをクリックします。エクスポートはバックグラウンドで行われ、完了するとダウンロードボタンが有効になります。ダウンロードをクリックして、ファイルをローカルPCにダウンロードします。


エクスポートされたボットコンポーネント
ボットをエクスポートすると、最新モードまたは公開モードの選択に応じて、以下のボットコンポーネントがエクスポートされます。
| ボットのタスク | |
|---|---|
| タスクのみ |
|
| 知識グラフ | ナレッジグラフの定義と、それに関連する同義語およびクラス |
| NLPデータ | |
| NLP 設定 | 「NLPの詳細設定」と「除外ワードおよびフィールドメモリ」NLPの詳細設定(自然言語 > 詳細設定)には、以下が含まれます。
|
| アタランス | すべての有効な言語のボットによるすべての発話 |
| 標準レスポンス | すべての有効な言語でのボットによるすべての標準応答 |
| 設定 | |
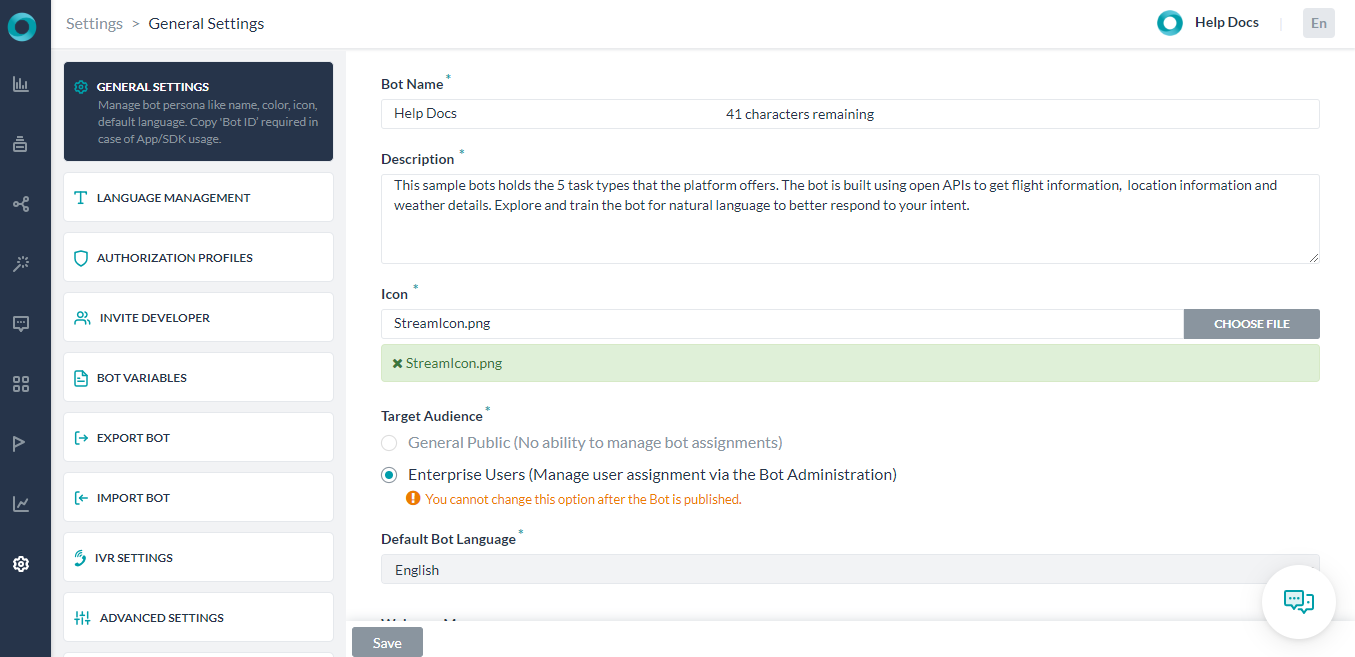
| ボットの設定 |
ボットの設定画面から以下の情報を確認することができます。
|
| ボット変数 | ボットに存在するすべてのグローバル変数とコンテンツ変数、およびその値 |
| IVR設定 | ボットのすべてのIVR設定(ボットの設定 > IVR設定) |
ボットのインポート
以下のインポートタイプのいずれかを使用して、ボットのタスクや設定を新規または既存のボットにインポートすることができます。
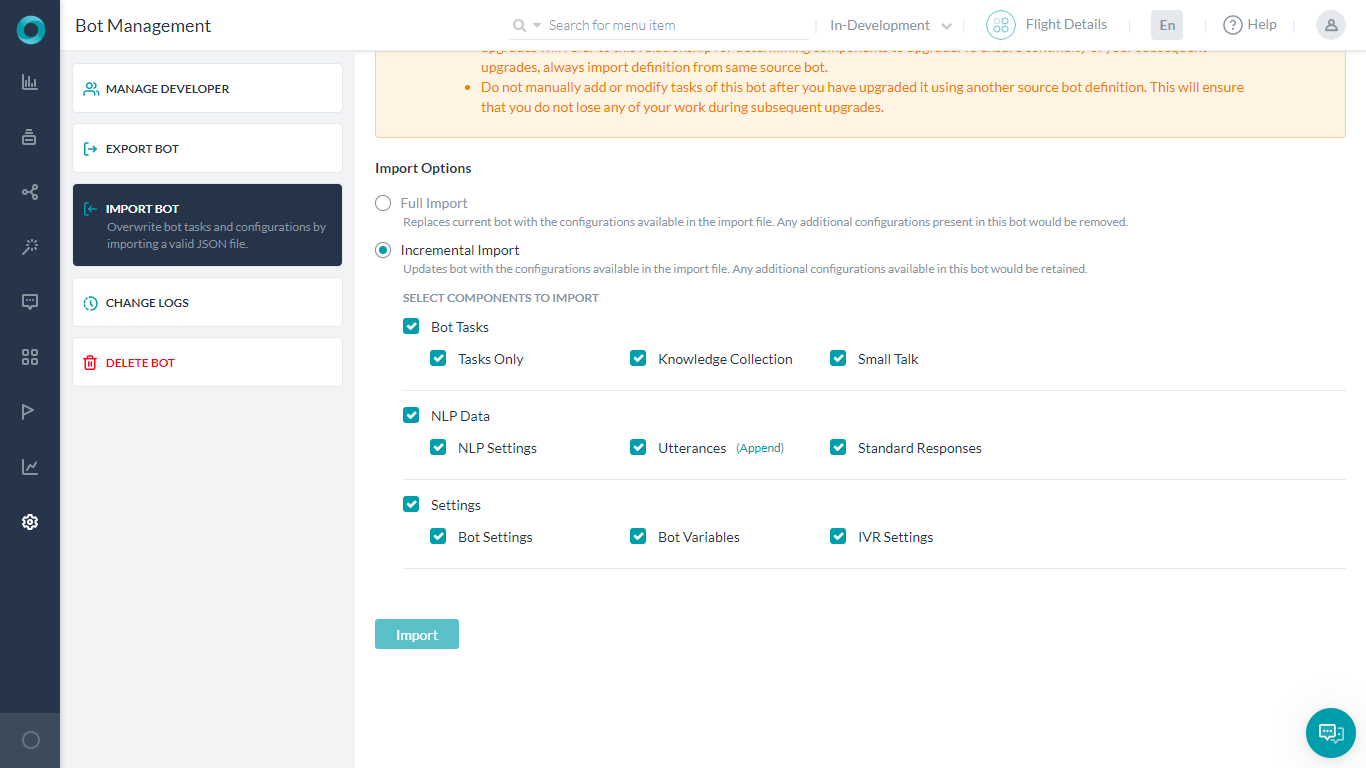
- 完全インポート:既存のボットを、インポートされたボットの設定に置き換えます。インポート定義に存在しない、ターゲットボットの追加設定は、すべて削除されます。ただし、Webhookチャネルは例外であり、インポートしたボットの定義に存在しなくても保持されます。
注意:このオプションを使用してボットをインポートする前に、用心してターゲットボットのバックアップを取ることを強くお勧めします。
- 増分インポート:インポートファイルで利用可能な設定により、現在のボットをアップグレードします。ターゲットボットまたはインポートされたボットで利用可能な追加の設定は、すべて保持されます。インポートするボットのコンポーネントは、ボットタスク、NLPデータ、ボットの設定から選択することができます。インポートされたボットのアイテムが増分インポートでターゲットボットのアイテムをどのように置き換えるかについては、記事の最後にある「増分インポートのボットのアイテム」の表を参照してください。
開始前
config.jsonファイルは、ターゲットボットに必要な値を含むボット変数で構成されています。ボット定義を新しいボットにインポートする前に、関連する開発者とこのファイルを共有するか、自分で変数に適切な値を入力します。
既存のボットへのインポートの手順
ボットをインポートするには、以下の手順に従います。
- エクスポートするボットを開き、左のナビゲーションメニューで設定 > ボット管理を選択します。
- ボットをインポートをクリックします。
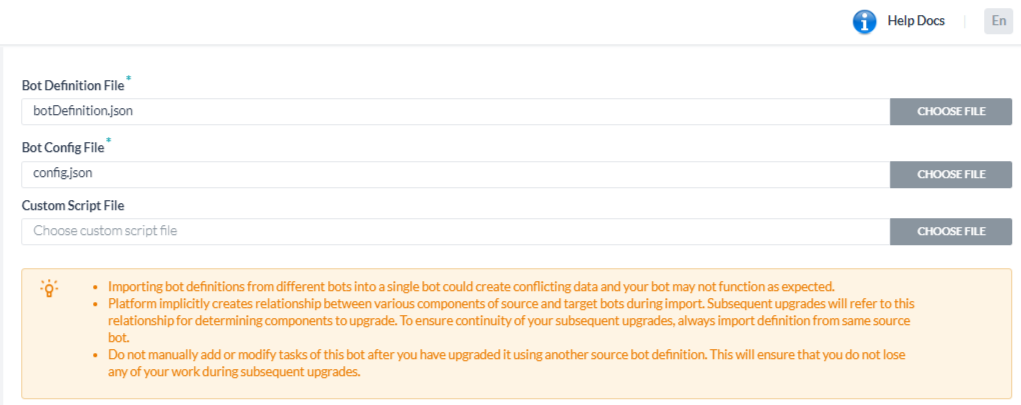
- ボット定義ファイルとボット設定ファイルの横にあるファイルを選択ボタンをクリックして、それぞれbotDefinition.jsonファイルとconfig.jsonファイルをアップロードします。
- インポートされたボットのカスタムスクリプトファイルがあれば、任意でそれをアップロードします。
- 完全インポートまたは増分インポートのいずれかのインポートオプションを選択します。
- 完全インポートを選択した場合、開発中のコピーにあるボットの定義は、インポートファイルにある定義で上書きされます。
- ボットに1つ以上の追加のタスクまたは言語があり、それらがインポート定義に存在しない場合、これらのタスクは削除済みとしてマークされ、ボットが公開されると削除されます。
- インポート後にボットを自動公開するかどうかを選択することができます。

- 増分インポートを選択した場合、インポートするボットアイテムを選択することもできます。
- MLの発話は、追加したり置き換えたりすることができます。
- 追加オプションは、ファイルに含まれる発話をボットにインポートする際に使用され、ボット内に存在する追加の発話は保持されます(これはデフォルトの動作です)。
- 置換オプションは、ファイルに含まれる発話をボットにインポートする際に使用します。ボット内に存在する追加の発話は削除されます。
- タスクもインポートしている場合は、インポートされているタスクに関連する追加の発話は削除されます。

- 表示された確認ダイアログで、バックアップをクリックして既存のボットの設定をダウンロードします。
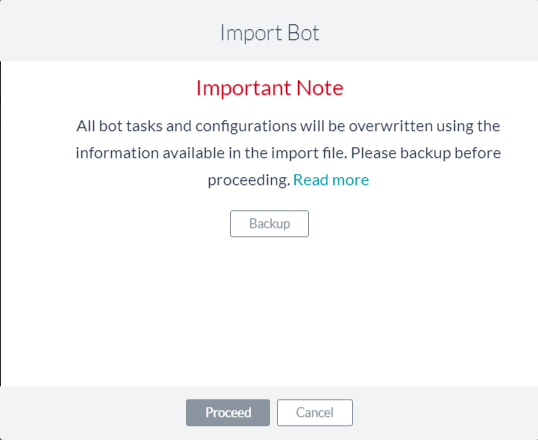 注意:バックアップは任意で選択することができますが、特に完全インポートを選択した場合は、インポートされたボットがボットの設定を置き換えた後では設定を復元することができないため、バックアップを行っておくことを強くお勧めします。
 - 続行をクリックしてインポートを開始します。
- インポートが完了すると、次のようなメッセージが表示されます。完了をクリックします。

- MLの発話は、追加したり置き換えたりすることができます。

注意:ボットが復元されたが、復元後に公開されていない場合、ボットのインポートは失敗します。
インポートオプションによる新規ボットの作成
ボットの作成中にボットをインポートするには、以下の手順に従います。
- ボットビルダーのホームページの右上にある新規ボット > ボットをインポートをクリックします。
- ボットの名前、ターゲットオーディエンス、色を入力します。詳細は「新規ボットの作成」を参照してください。
- ボット定義ファイルとボット設定ファイルの横にあるファイルを選択ボタンをクリックして、それぞれbotDefinition.jsonファイルとconfig.jsonファイルをアップロードします。
- ソースボットのカスタムスクリプトファイルがあれば、任意でそれをアップロードし、インポートをクリックします。
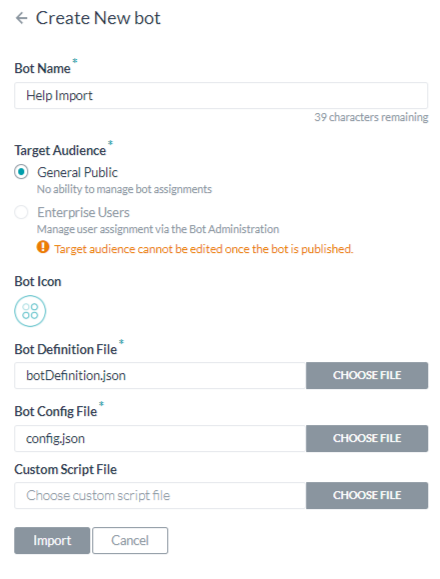
- インポート終了後の完了メッセージで、完了をクリックしてボットタスクのページに進みます。
増分インポートのボットアイテム
| コンポーネント | 説明 |
|---|---|
| 同じ参照IDを持つタスク | インポートされたタスクは、ターゲットボットのタスクを置き換え、現在のステータス(一時停止および拒否されたタスクなど)に関わらず、ステータスが「設定済み」に変更されます。 |
| 異なる参照IDを持つソースボットのタスク | これらのタスクは、同じ参照IDを持つターゲットボットで作成されます。 |
| 異なる参照IDを持つターゲットボットのタスク | これらのタスクはそのままです。 |
| 発話、パターン、タスクレベルの同義語 | インポートされた発話、パターン、タスクレベルの同義語は、ターゲットボットにあるものと置き換えられ、インポートされたタスクに適用されます。ターゲットボットで公開されたモデルはそのまま維持されます。 |
| ナレッジグラフ、ボットの同義語、標準応答 | ターゲットボットの既存のナレッジグラフ、ボットの同義語、標準応答は、インポートされたものに置き換えられます。 |
ボットの削除
ボットタスクのいずれかが公開されている場合、ボットを削除することはできません。タスクを公開した場合、ボット管理者がそのタスクを承認してユーザーに割り当てる必要があります。開発者は、割り当てられたタスクを削除することはできません。公開済みのタスクを削除するには、ボット管理者がタスクを一時停止する必要があります。
また、ボットが公開済みのフローの一部である場合、ボットを削除することはできません。フローを削除するか、フローからボットを削除してから削除を行う必要があります。
ボットを削除する手順
- 削除するボットの左側のナビゲーションパネルにカーソルを合わせて、設定タブのボットを削除をクリックします。
ボットの変更履歴の確認
ボットの作成後、設定の変更、タスクの追加、チャネルの有効化、フローの追加など、様々な理由で編集が必要になることがあります。
変更履歴を確認して、ボットに加えられたすべての変更を追跡することができます。これは、ボットが最初に保存されてから直近の更新までのすべての変更で構成されています。
ボットの変更履歴を表示するには、以下の手順に従います。
- 変更履歴を確認したいボットの左側のナビゲーションパネルにカーソルを合わせます。
- 設定 > ボット管理を選択します。
- 変更履歴をクリックします。

- 逆の時系列順で並べられた変更内容一覧で構成されています。
- 各ページには、直近10件の変更内容と、変更を行ったユーザー名が表示され、続いて変更の概要、および適用された変更のタイムスタンプが表示されます。
- 公開イベントのログは、選択したすべてのタスク用に統合され、すべてのタスクが公開コメントとともに公開するように選択されていない場合に備えて、タスクがリストアップされます。
プラットフォームのリリース8.0以降、変更履歴の検索、フィルタリング、エクスポートが可能になりました。
-
- 検索テキストボックスを使用して、任意のテキストを入力することができます。プラットフォームは変更内容の説明でそのテキストを検索し、検索条件を満たすログが表示されます。
- フィルタオプションを使用して、以下の項目に基づいてフィルタリングすることができます。
- ボットを共同開発している開発者名
- 日付の範囲は、過去24時間、過去7日間、または開始日と終了日を指定したカスタム日付のいずれかです。デフォルトでは、過去24時間以内に行われたすべての開発者の変更内容が表示されます。
- エクスポートアイコンを使用して、変更履歴をCSV形式で出力することができます。検索条件やフィルタリング条件を適用して表示されたログがダウンロードされます。


