OVERVIEW
Virtual Assistants
Kore.ai Platform
Key Concepts
Natural Language Processing (NLP)
Accessing Platform
VIRTUAL ASSISTANTS
Virtual Assistant Builder
Virtual Assistant Types
Getting Started
Create a Simple Bot
SKILLS
Storyboard
Dialog Tasks
Introduction
Dialog Builder (New)
Dialog Builder (Legacy)
User Intent Node
Dialog Node
Entity Node
Supported Entity Types
Composite Entities
Supported Colors
Supported Company Names
Form Node
Logic Node
Message Nodes
Confirmation Nodes
Bot Action Node
Service Node
Custom Authentication
2-way SSL for Service nodes
Script Node
Agent Transfer Node
WebHook Node
Grouping Nodes
Connections & Transitions
Manage Dialogs
User Prompts
Knowledge Graph
Terminology
Building
Generation
Importing and Exporting
Analysis
Knowledge Extraction
Train
Build
Alert Tasks
Introduction
Ignore Words and Field Memory
How to Schedule a Smart Alert
Small Talk
Digital Views
Introduction
How to Configure Digital Views
Digital Forms
Overview
How to Configure Digital Forms
NATURAL LANGUAGE
Overview
Machine Learning
Introduction
Model Validation
Fundamental Meaning
Introduction
NLP Guidelines
Knowledge Graph
Traits
Introduction
How to Use Traits
Ranking and Resolver
Advanced NLP Configurations
INTELLIGENCE
Overview
Context Management
Overview
Session and Context Variables
Context Object
How to Manage Context Switching
Manage Interruptions
Dialog Management
Sub Intents & Follow-up Intents
Amend Entity
Multi-Intent Detection
Sentiment Management
Tone Analysis
Sentiment Management
Event Based Bot Actions
Default Conversations
Default Standard Responses
TEST & DEBUG
Talk to Bot
Utterance Testing
Batch Testing
Record Conversations
Conversation Testing
CHANNELS
PUBLISH
ANALYZE
Overview
Dashboard
Custom Dashboard
Overview
How to Create Custom Dashboard
Conversation Flows
NLP Metrics
ADVANCED TOPICS
Universal Bots
Overview
Defining
Creating
Training
Customizing
Enabling Languages
Store
Smart Bots
Defining
koreUtil Libraries
SETTINGS
Authorization
Language Management
PII Settings
Variables
Functions
IVR Integration
General Settings
Management
Import & Export
Delete
Bot Versioning
Collaborative Development
Plan Management
API GUIDE
API Overview
API List
API Collection
SDKs
SDK Overview
SDK Security
SDK App Registration
Web SDK Tutorial
Message Formatting and Templates
Mobile SDK Push Notification
Widget SDK Tutorial
Widget SDK – Message Formatting and Templates
Web Socket Connect & RTM
Using the BotKit SDK
Installing
Configuring
Events
Functions
BotKit SDK Tutorial – Agent Transfer
BotKit SDK Tutorial – Flight Search Sample Bot
Using an External NLP Engine
ADMINISTRATION
HOW TOs
Create a Simple Bot
Create a Banking Bot
Transfer Funds Task
Update Balance Task
Context Switching
Using Traits
Schedule a Smart Alert
Configure UI Forms
Add Form Data into Data Tables
Configuring Digital Views
Add Data to Data Tables
Update Data in Data Tables
Custom Dashboard
Custom Tags to filter Bot Metrics
Patterns for Intents & Entities
Build Knowledge Graph
Global Variables
Content Variables
Using Bot Functions
Configure Agent Transfer
RELEASE NOTES

バンキングBot-資金の移動

これからサンプルのバンキングBotを作成するステップを詳しく説明しています。このBotは開発者向けドキュメントのハウツーセクションで紹介されているさまざまな使用事例のシナリオで使用されます。前提条件

Botの概要

構築するBotは基本的な銀行取引を実行します。このBotは次のことを行います。

資金の移動タスクを追加しましょう。

資金の移動のインテント

  • 資金の移動タスクでは、受取人と支払人の口座番号を入力することが求められます。
  • 次に、送金する金額の入力を求められます。
  • 次に、サービスコールを行って口座を適切に更新します。
  • 成功または失敗を示すメッセージが表示されます。

ステップ1:ダイアログタスク

Botの最初のステップとして、インテントダイアログを追加する必要があります。インテントダイアログは、ユーザーとBotの会話フローの最初のステップとなります。

  • 残高取得および残高確認の2つの事前設定されたタスクでバンキングBotを開きます。
  • 左側のナビゲーションメニューからBotタスクを選択します。
  • ダイアログタスクの横にある+をクリックしてください。
  • Botタスクページが開きます。
  • 次の詳細事項を入力します。
    • インテント名-インテント名を入力します。これはダイアログをトリガーするフレーズとなります。インテント名は3〜4語以内のシンプルなものにしてください(「資金の移動」など)。
    • 詳細オプションで、説明およびその他のダイアログ関連の詳細を追加することができます。デフォルト設定を保持しておきましょう。
  • 作成して続行をクリックします。
  • ユーザーインテントのプロパティパネルが表示されます。デフォルトのプロパティを保持しておきます。
  • ユーザーインテントのプロパティパネルを閉じます。

ステップ2:エンティティノード

エンティティノードは通常、ユーザーから情報を収集するために使用されます。ここでは、受取人と支払人の口座番号および送金額に対するユーザー入力を取得するために使用します。

  • ユーザーインテントノードの横にある+をクリックします。
  • エンティティオプションを選択します
  • 新しいエンティティノード+をクリックします。
  • エンティティノードのプロパティパネルが表示されます。
  • 次の詳細事項を入力します。
    • 名前PayerAccount
    • 表示名支払人口座 
    • タイプ
    • ユーザープロンプト:次のテキストを入力し、Enterキーを押して保存します。 Enter the Account from where you want to transfer funds.
  • PayerAccountエンティティのプロパティパネルを閉じます。
  • 上記のステップを繰り返して、次の詳細で別のエンティティを追加します。
    • 名前PayeeAccount
    • 表示名受取人 口座 
    • タイプ
    • ユーザープロンプト:次のテキストを入力し、Enterキーを押して保存します。 Enter the Account to which you want to transfer funds.
  • PayeeAccountエンティティのプロパティパネルを閉じます。
  • 上記のステップを繰り返して、次の詳細で別のエンティティを追加します。
    • 名前金額
    • 表示名金額 
    • タイプ
    • ユーザープロンプト:次のテキストを入力し、Enterキーを押して保存します。 Enter the amount to transfer.
  • 金額エンティティのプロパティパネルを閉じます。

次のステップでは、支払人と受取人の両方の口座残高を更新します。すでに残高確認タスクがあるので、現在のタスクから実行する方法を見ていきます。

ステップ3:ダイアログタスクの実行

事前定義されたダイアログタスクは、別のタスク内からトリガーできます。その方法を見ていきましょう。

  • 金額エンティティノードの横の+をクリックします
  • ダイアログタスクを選択します
  • 指定されたタスクリストから、必要なタスクであるUpdateBalanceを選択します
  • ダイアログノードのプロパティパネルが表示されます
  • インスタンスプロパティタブに移動して、次の詳細事項を入力します。
  • エンティティの事前割り当てセクション-ダイアログタスクに必要なエンティティ値ですが、ここに入力されていない場合、ユーザーは同じ値を入力するように求められます。前のステップで定義したエンティティを介して情報をすでに収集しているため、ユーザーが入力した値をUpdateBalanceタスクに渡します。
    • AccountNumber: context.entities.PayerAccount
    • 金額context.entities.Amount
    • DBorCR: デビット(支払人の口座から送金金額を差し引く必要があります)
  • UpdateBalanceダイアログのプロパティパネルを閉じます
  • 同じステップを繰り返して、受取人口座を次の値で更新します
  • エンティティの事前割り当てセクション
    • AccountNumber: context.entities.PayeeAccount
    • 金額context.entities.Amount
    • DBorCR: クレジット
  • UpdateBalanceダイアログのプロパティパネルを閉じます

ステップ4:メッセージノード

メッセージノードは、Botからユーザーへメッセージを表示するために使用されます。ここでは、メッセージノードを使用して残高を表示します。

  • UpdateBalance [2] サービスノードの横の+をクリックします
  • メッセージを選択し、新しいメッセージノード+をクリックします。
  • メッセージノードのプロパティパネルが表示されます。
  • 次の詳細事項を入力します。
      • 名前FinalMessage
      • 表示名最終メッセージ
      • Botの応答:
  • Botの応答プロパティパネルで、接続アイコンをクリックして接続タブを開きます。
    • デフォルトの接続を接続なしからダイアログの終了に変更します。
    • 保存をクリックします
  • プロパティパネルを閉じます。

テスト

ダイアログタスクをテストするには、右下隅にある「Botとの会話」を使用できます。次の発話(インテント名)を入力してください「資金の移動」次のBotの指示に従ってください。

  • 支払人口座を入力してください-02929664
  • 受取人口座を入力してください-44994354
  • 送金金額を入力してください-200
  • 成功メッセージを参照してください。
OVERVIEW
Virtual Assistants
Kore.ai Platform
Key Concepts
Natural Language Processing (NLP)
Accessing Platform
VIRTUAL ASSISTANTS
Virtual Assistant Builder
Virtual Assistant Types
Getting Started
Create a Simple Bot
SKILLS
Storyboard
Dialog Tasks
Introduction
Dialog Builder (New)
Dialog Builder (Legacy)
User Intent Node
Dialog Node
Entity Node
Supported Entity Types
Composite Entities
Supported Colors
Supported Company Names
Form Node
Logic Node
Message Nodes
Confirmation Nodes
Bot Action Node
Service Node
Custom Authentication
2-way SSL for Service nodes
Script Node
Agent Transfer Node
WebHook Node
Grouping Nodes
Connections & Transitions
Manage Dialogs
User Prompts
Knowledge Graph
Terminology
Building
Generation
Importing and Exporting
Analysis
Knowledge Extraction
Train
Build
Alert Tasks
Introduction
Ignore Words and Field Memory
How to Schedule a Smart Alert
Small Talk
Digital Views
Introduction
How to Configure Digital Views
Digital Forms
Overview
How to Configure Digital Forms
NATURAL LANGUAGE
Overview
Machine Learning
Introduction
Model Validation
Fundamental Meaning
Introduction
NLP Guidelines
Knowledge Graph
Traits
Introduction
How to Use Traits
Ranking and Resolver
Advanced NLP Configurations
INTELLIGENCE
Overview
Context Management
Overview
Session and Context Variables
Context Object
How to Manage Context Switching
Manage Interruptions
Dialog Management
Sub Intents & Follow-up Intents
Amend Entity
Multi-Intent Detection
Sentiment Management
Tone Analysis
Sentiment Management
Event Based Bot Actions
Default Conversations
Default Standard Responses
TEST & DEBUG
Talk to Bot
Utterance Testing
Batch Testing
Record Conversations
Conversation Testing
CHANNELS
PUBLISH
ANALYZE
Overview
Dashboard
Custom Dashboard
Overview
How to Create Custom Dashboard
Conversation Flows
NLP Metrics
ADVANCED TOPICS
Universal Bots
Overview
Defining
Creating
Training
Customizing
Enabling Languages
Store
Smart Bots
Defining
koreUtil Libraries
SETTINGS
Authorization
Language Management
PII Settings
Variables
Functions
IVR Integration
General Settings
Management
Import & Export
Delete
Bot Versioning
Collaborative Development
Plan Management
API GUIDE
API Overview
API List
API Collection
SDKs
SDK Overview
SDK Security
SDK App Registration
Web SDK Tutorial
Message Formatting and Templates
Mobile SDK Push Notification
Widget SDK Tutorial
Widget SDK – Message Formatting and Templates
Web Socket Connect & RTM
Using the BotKit SDK
Installing
Configuring
Events
Functions
BotKit SDK Tutorial – Agent Transfer
BotKit SDK Tutorial – Flight Search Sample Bot
Using an External NLP Engine
ADMINISTRATION
HOW TOs
Create a Simple Bot
Create a Banking Bot
Transfer Funds Task
Update Balance Task
Context Switching
Using Traits
Schedule a Smart Alert
Configure UI Forms
Add Form Data into Data Tables
Configuring Digital Views
Add Data to Data Tables
Update Data in Data Tables
Custom Dashboard
Custom Tags to filter Bot Metrics
Patterns for Intents & Entities
Build Knowledge Graph
Global Variables
Content Variables
Using Bot Functions
Configure Agent Transfer
RELEASE NOTES

Banking Bot – Transfer Funds

This is document details steps in creating a sample banking bot. This bot is used in various use case scenarios presented in the How-Tos section of the developer documentation.

Prerequisites:

  • You must have signed up with the Kore.ai Bots Platform
  • You must be aware of the basics of Bot building (refer to this link)
  • You must have created a simple bot (refer here for an example)
  • You must have created a Banking Bot (refer here for example)

Bot Overview

The Bot we will be building will be performing the basic banking transactions.
This Bot will:

  • Get account balance based on the Account Number and Account Type entered by the user, as seen here.
  • Update accounts with the balance, as seen here.
  • Transfer a specified amount from the user account to a payee account.

Let us add the Transfer Funds task.

Transfer Funds Intent

  • The Transfer Funds task will prompt the user to enter Payee and Payer account number.
  • Next it would prompt for the amount to be transferred.
  • It will then make a service call to update the accounts appropriately.
  • The message indicating success or failure is displayed.

Step 1: Dialog Task

We need to add an Intent Dialog as the first step in the Bot. Intent Dialog is the first step in the user-bot conversation flow.

  • Open the Banking Bot with the two pre-configured tasks – Get Balance and Update Balance.
  • Ensure that the Build tab is selected from the top menu.
  • Navigate to the Conversational Skills -> Dialog Task page from the left menu.
  • Click Create Dialog from the top right.
  • Create Dialog screen will open.
  • Enter the following details:
    • Intent Name – Enter the Intent name, this is the phrase that triggers the dialog. The intent name should be simple and not more than 3-4 words. For example, ‘Transfer Funds’
    • Under More Options, you can add a description and other dialog-related details. Let’s retain the default settings.
    • You can also include utterances to train this intent.
    • Select Try Conversation Driven Dialog Builder option.
  • Click Proceed.
  • Property Panel for User Intent will be displayed. We will retain the default properties.
  • Note: For instructions with the older Dialog Builder, refer here
  • Close the User Intent Property Panel.

Step 2: Entity nodes

Entity Node is typically used to gather information from the user.
Here we will be using it to capture the user input for the Payee and Payer Account Number and amount to be transferred.

  • Click the + below to the User Intent node
  • Select the Entity option
  • Click the + New entity 
  • Property Panel for the Entity Node is displayed. If not click on the newly added entity node to open
  • Enter the following details:
    • Name: PayerAccount
    • Display Name: Payer Account 
    • TypeNumber
    • User Prompts: Enter the following text:
      Enter the Account from where you want to transfer funds.
  • Close the PayerAccount Entity Property Panel.
  • Repeat the above steps to add another entity with the following details:
    • Name: PayeeAccount
    • Display Name: Payee Account 
    • TypeNumber
    • User Prompts: Enter the following text
      Enter the Account to which you want to transfer funds.
  • Close the PayeeAccount Entity Property Panel.
  • Repeat the above steps to add another entity with the following details:
    • Name: AmountToTransfer
    • Display Name: Amount To Transfer 
    • TypeNumber
    • User Prompts: Enter the following text and hit enter to save:
      Enter the amount to transfer.
  • Close the Amount Entity Property Panel.

The next steps would update the balance in both the Payer and Payee accounts. Since we already have Update Balance task, we will see how to run it from the current task.

Step 3: Run Dialog Task

Pre-defined dialog tasks can be triggered from within another task. Let us see how.

  • Click the + below to the Amount Entity node
  • Select Dialog Task
  • From the given task list, select the required task – UpdateBalance
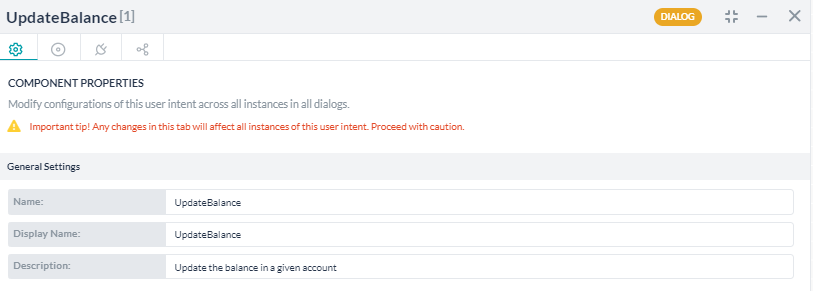
  • Property Panel for the Dialog Node is displayed. If not click on the newly added dialog node to open
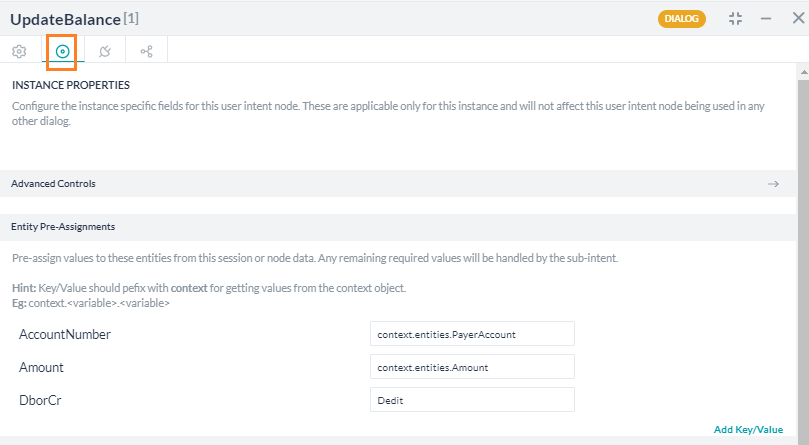
  • Navigate to the Instance Properties tab and enter the following details:
  • Entity Pre-Assignments section – these are the entity values required by the Dialog Task if they are not populated here the user will be prompted to enter the same. Since we have already collected the information through the entities defined in the previous step we will be passing those user-entered values to the UpdateBalance task
    • AccountType: savings
    • AccountNumber: context.entities.PayerAccount
    • Amount: context.entities.Amount
    • TransactionType: Debit (payer account needs to be deducted of the transferred amount)
  • Close the UpdateBalance Dialog Properties panel.
  • Repeat the same steps to Update the Payee Account with the following values
  • Entity Pre-Assignments section
    • AccountType: savings
    • AccountNumber: context.entities.PayeeAccount
    • Amount: context.entities.Amount
    • TransactionType: Credit
  • Close the UpdateBalance Dialog Properties panel.

Step 4: Message Node

A Message Node is used to display a message from the Bot to the user.
Here we will be using the Message node to show the balance.

  • Click the + below the UpdateBalance [2] Service node
  • Select Message and click the ‘+ New message
  • Property Panel for the Message Node is displayed. If not click on the newly added dialog node to open
  • Enter the following details:
      • Name: FinalMessage
      • Display Name: Final Message
      • Bot Responses: The amount {{context.entities.AmountToTransfer}} has been transferred from {{context.entities.PayerAccount}} to {{context.entities.PayeeAccount}}
  • On the Bot Response Property Panel, open the connections tab by clicking the ‘Connections‘ icon.
    • Change the Default connection from ‘Not Connected‘ to ‘End of Dialog‘.
    • Click Save.
  • Close the Property Panel.

Test

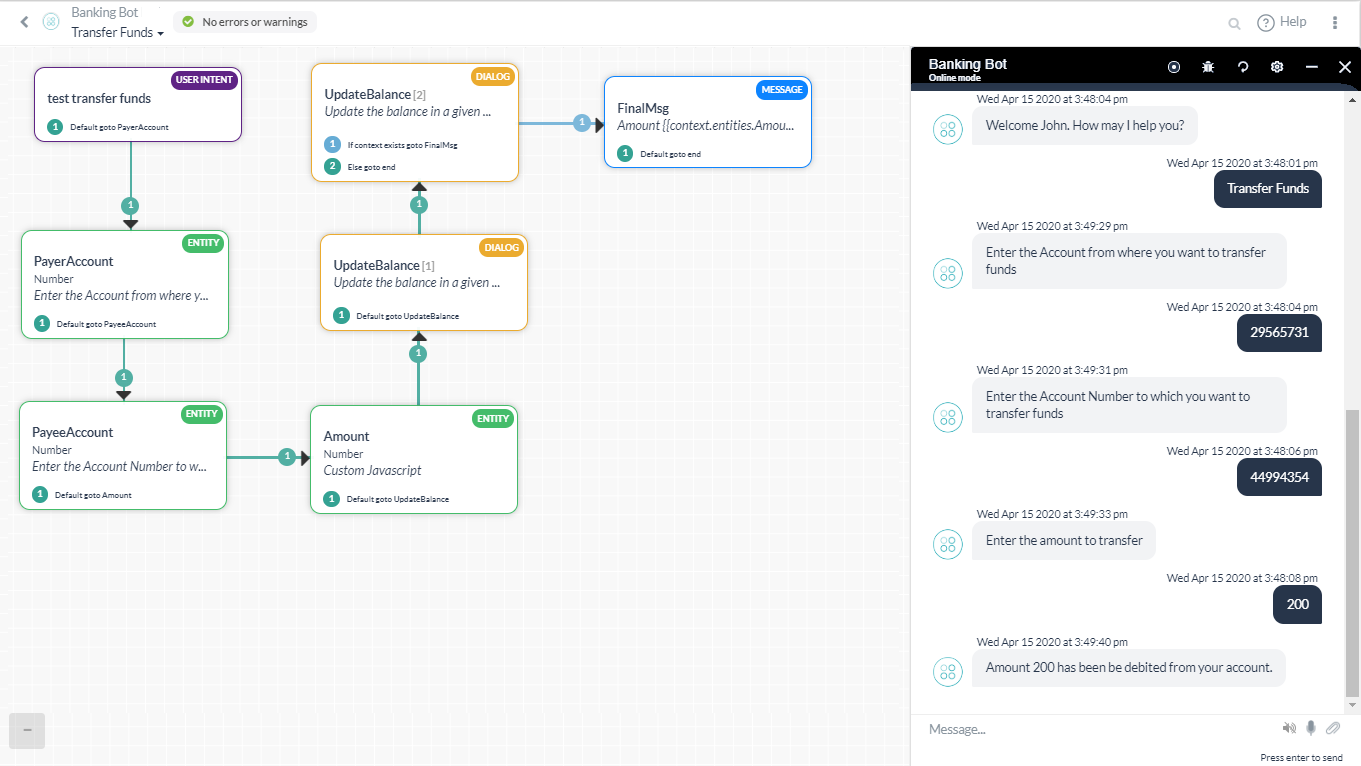
To test the Dialog task, you can use the ‘Talk to bot’ at the bottom right corner.
Enter the following utterance (intent name)
Transfer Funds
Follow the Bot instructions:

  • Enter Payer Account – 02929664;
  • Enter Payee Account – 44994354;
  • Enter Transfer Amount – 200
  • See the success message.