OVERVIEW
Virtual Assistants
Kore.ai Platform
Key Concepts
Natural Language Processing (NLP)
Accessing Platform
VIRTUAL ASSISTANTS
Virtual Assistant Builder
Virtual Assistant Types
Getting Started
Create a Simple Bot
SKILLS
Storyboard
Dialog Tasks
Introduction
Dialog Builder (New)
Dialog Builder (Legacy)
User Intent Node
Dialog Node
Entity Node
Supported Entity Types
Composite Entities
Supported Colors
Supported Company Names
Form Node
Logic Node
Message Nodes
Confirmation Nodes
Bot Action Node
Service Node
Custom Authentication
2-way SSL for Service nodes
Script Node
Agent Transfer Node
WebHook Node
Grouping Nodes
Connections & Transitions
Manage Dialogs
User Prompts
Knowledge Graph
Terminology
Building
Generation
Importing and Exporting
Analysis
Knowledge Extraction
Train
Build
Alert Tasks
Introduction
Ignore Words and Field Memory
How to Schedule a Smart Alert
Small Talk
Digital Views
Introduction
How to Configure Digital Views
Digital Forms
Overview
How to Configure Digital Forms
NATURAL LANGUAGE
Overview
Machine Learning
Introduction
Model Validation
Fundamental Meaning
Introduction
NLP Guidelines
Knowledge Graph
Traits
Introduction
How to Use Traits
Ranking and Resolver
Advanced NLP Configurations
INTELLIGENCE
Overview
Context Management
Overview
Session and Context Variables
Context Object
How to Manage Context Switching
Manage Interruptions
Dialog Management
Sub Intents & Follow-up Intents
Amend Entity
Multi-Intent Detection
Sentiment Management
Tone Analysis
Sentiment Management
Event Based Bot Actions
Default Conversations
Default Standard Responses
TEST & DEBUG
Talk to Bot
Utterance Testing
Batch Testing
Record Conversations
Conversation Testing
CHANNELS
PUBLISH
ANALYZE
Overview
Dashboard
Custom Dashboard
Overview
How to Create Custom Dashboard
Conversation Flows
NLP Metrics
ADVANCED TOPICS
Universal Bots
Overview
Defining
Creating
Training
Customizing
Enabling Languages
Store
Smart Bots
Defining
koreUtil Libraries
SETTINGS
Authorization
Language Management
PII Settings
Variables
Functions
IVR Integration
General Settings
Management
Import & Export
Delete
Bot Versioning
Collaborative Development
Plan Management
API GUIDE
API Overview
API List
API Collection
SDKs
SDK Overview
SDK Security
SDK App Registration
Web SDK Tutorial
Message Formatting and Templates
Mobile SDK Push Notification
Widget SDK Tutorial
Widget SDK – Message Formatting and Templates
Web Socket Connect & RTM
Using the BotKit SDK
Installing
Configuring
Events
Functions
BotKit SDK Tutorial – Agent Transfer
BotKit SDK Tutorial – Flight Search Sample Bot
Using an External NLP Engine
ADMINISTRATION
HOW TOs
Create a Simple Bot
Create a Banking Bot
Transfer Funds Task
Update Balance Task
Context Switching
Using Traits
Schedule a Smart Alert
Configure UI Forms
Add Form Data into Data Tables
Configuring Digital Views
Add Data to Data Tables
Update Data in Data Tables
Custom Dashboard
Custom Tags to filter Bot Metrics
Patterns for Intents & Entities
Build Knowledge Graph
Global Variables
Content Variables
Using Bot Functions
Configure Agent Transfer
RELEASE NOTES

スマートアラートのスケジュール方法

このハウツーでは、Bot内のシナリオ、たとえば、好みの場所の毎日の天気更新をユーザーに提供するシナリオを調査します。アラートタスクを使用してそれを達成します。このアラートタスクで自動サブスクリプションを有効化し、スマートにできる方法も確認します。アラートタスクとは何か、およびKore.ai Botプラットフォームでの実装方法の詳細については、こちらを参照してください

例題

Botの登録ユーザーは、あらかじめ指定した一日の時間および/または指定した時間間隔でアラートのフォームで天気更新を送信する必要があります。

この文書では、アラートタスクをどのように使用し、そのような状況を満たし、適切なアクションを取れるかを示します。

Pre-requisites

  • 基本的なBotビルドナレッジ。
  • 作業Botとして、バンキングBot を使用しています。
  • 天気更新をするウェブサービスへアクセスします。以下でホストされているRESTサービスを使用しています。 http://api.openweathermap.org. このサービスを使用する場合は、APIへのアクセスにAPIキーを使用しているため、無料アラートサービスに登録する必要があります。

導入

アラートタスクの設定

関連サービスをリアルタイムで、またはユーザーが定義したスケジュールに従って、通知タスクを使用して関連およびパーソナライズした情報を企業システムから顧客および従業員にタイムリーに提供できます。ステップ

  1. Botタスクから、アラートタスクを追加します(アラートタスクカードの + をクリック)。タスク詳細ページで、以下の手順に従います。
    1. タスク名、たとえば 毎日の天気を取得を入力します。
    2. 接続タイプを選択し、Webサービスへ移動します。
    3. 接続モードを選択し、REST を使用します。
    4. 作成および続行をクリックします。
  2. アラート設定ページへ転送されます。
    1. 必要に応じて、基本設定をレビューおよび変更します。この使用ケースでは、ここでは設定を変更する必要はありません。
    2. APIリクエストタブを選択します。
      1. コンテンツタイプJSON に設定されていることを確認します。
      2. この使用ケースでは、認証プロバイダーを設定する必要はありません。使用中のAPIに認証要件がある場合は、認証プロバイダーを設定します。
      3. パラメーターを設定し、ユーザーからお好みの都市を集めます。必須フィールドとして設定されていることを確認します。これがAPI要件です。
      4. この使用ケースでは、イニシャライザ要件は不要です。リクエストが送信される前にJavaScriptを実行する必要がある場合は、これを使用します。
      5. リクエストで、 API を追加をクリックして呼び出す必要があるサービスAPIを追加します。以下のAPIから、GET メソッドを使用します。 http://api.openweathermap.org/data/2.5/weather?q={cityname}&APPID=<your-app-id>
        • 上記のurlの APPID は、サインアップすると OpenWeatherによって割り当てられます。アカウントにログインすると、APIキーセクションにあります。
        • パラメータリストは、前に入力したパラメータで自動入力されます。
        • APIを保存します。
        • APIをテストし、設定が適切であることを確認します。プロンプト表示されたら、同じ都市名を入力し、成功メッセージと適切な応答を受けることを確認します。
      6. 応答を保存します。
    3. 次に、Botの応答をフォーマット化する必要があります。この使用ケースでは、APIコールによってユーザーに返された天気の説明、気温および湿度詳細を構文解析します。それを達成するために、以下のリッチテキストを使用します。
      本日の天気詳細:<%=weather[0].description%> 気温:<%=main.temp%> 湿度: <%=main.humidity%>

      APIコールで返された値は、変数キーオプションからアクセスできます。変数キーをクリックすると、リクエスト/応答キーウィンドウが開きます。使用可能なさまざまな変数がカテゴリー化されます。応答キーセクションを拡張し、APIコールから応答にアクセスし、表示する値のキーを選択し、OKをクリックすると、キーが適切なフォーマットでエディタに挿入されます。たとえば、以下の選択で、<%=weather[0].description%>

    4. 設定タブを選択し、スケジュールセクションを拡張します。このセクションを使用して、初期スケジュールを設定します。これらは初期セットアップから選択するためにユーザーに提供されるオプションです。たとえば、この例では、スケジュールを毎日午前10:30と、その後4時間ごとに更新されるように設定します。ユーザーは午前10:30に1回のみ選択し、その後は更新しないように設定することもできます。
    5. セットアップ終了

実行

Botをユーザーに公表および共有する前に、Bot に話す機能からテストできます。

  1. Botに話すを起動します。
  2. スケジュールタスク、 毎日天気を取得(設定したアラートタスクの名前)を開始します。
  3. 都市名を入力するよう促されます。
  4. 次に、特定の時間の入力が促され、時間または「x 分ごと」 を入力できます。
  5. 入力する時間が設定したスケジュール時間に一致するかどうかを確認できるため、近似時間が表示されます。頻度設定の場合も同じです。
  6. これはワンタイムセットアップです。この時点以降は、このBotに「ボットに話す」を起動する場合は、常に指定した時間に天気アラートが出されます。
  7. ユーザーは、その他のダイアログタスクと同じように、アラートタスク名を使用してタスクをトリガーし、通知を自動的にセットアップできます。Botを使用して起動する場合のユーザー体験は、上で説明したフローに似ています。

スマートアラート

アラートサブスクリプションサービスタイプのサービスノードを、たとえば、ようこそダイアログタスクに追加することで、ユーザーのアラートを自動的に設定できます。

  1. アラートタスクのトリガーとして機能するダイアログに、サービスノードを追加します。
  2. サービスタイプアラートサブスクリプションサービスに設定します。
  3. リクエストの編集をクリックし、すでに設定されているアラートタスク、このケースでは天気を毎日取得を選択します。
  4. スマート/自動アラートウィンドウにナビゲートにナビゲートされます。
  5. 必要に応じて、アラートパラメータをセットアップします。
  6. アラート頻度を設定します。
  7. サブスクリプション期間または送信通知数に基づきアラートの有効期限値を設定でき、サービスのサブスクリプションが制限されている場合は役に立ちます。ここで、通知回数最大値に設定しました。
  8. アラートタスクが更新および公表されている場合は、通知のアプグレード動作も定義できます。
  9. 保存
  10. セットアップし、最初にこのサービスノードがヒットされると、サブスクリプションはユーザー介入なしで有効となります。

注意:公開済み通知タスクのみを通知サブスクリプションに使用できます。

OVERVIEW
Virtual Assistants
Kore.ai Platform
Key Concepts
Natural Language Processing (NLP)
Accessing Platform
VIRTUAL ASSISTANTS
Virtual Assistant Builder
Virtual Assistant Types
Getting Started
Create a Simple Bot
SKILLS
Storyboard
Dialog Tasks
Introduction
Dialog Builder (New)
Dialog Builder (Legacy)
User Intent Node
Dialog Node
Entity Node
Supported Entity Types
Composite Entities
Supported Colors
Supported Company Names
Form Node
Logic Node
Message Nodes
Confirmation Nodes
Bot Action Node
Service Node
Custom Authentication
2-way SSL for Service nodes
Script Node
Agent Transfer Node
WebHook Node
Grouping Nodes
Connections & Transitions
Manage Dialogs
User Prompts
Knowledge Graph
Terminology
Building
Generation
Importing and Exporting
Analysis
Knowledge Extraction
Train
Build
Alert Tasks
Introduction
Ignore Words and Field Memory
How to Schedule a Smart Alert
Small Talk
Digital Views
Introduction
How to Configure Digital Views
Digital Forms
Overview
How to Configure Digital Forms
NATURAL LANGUAGE
Overview
Machine Learning
Introduction
Model Validation
Fundamental Meaning
Introduction
NLP Guidelines
Knowledge Graph
Traits
Introduction
How to Use Traits
Ranking and Resolver
Advanced NLP Configurations
INTELLIGENCE
Overview
Context Management
Overview
Session and Context Variables
Context Object
How to Manage Context Switching
Manage Interruptions
Dialog Management
Sub Intents & Follow-up Intents
Amend Entity
Multi-Intent Detection
Sentiment Management
Tone Analysis
Sentiment Management
Event Based Bot Actions
Default Conversations
Default Standard Responses
TEST & DEBUG
Talk to Bot
Utterance Testing
Batch Testing
Record Conversations
Conversation Testing
CHANNELS
PUBLISH
ANALYZE
Overview
Dashboard
Custom Dashboard
Overview
How to Create Custom Dashboard
Conversation Flows
NLP Metrics
ADVANCED TOPICS
Universal Bots
Overview
Defining
Creating
Training
Customizing
Enabling Languages
Store
Smart Bots
Defining
koreUtil Libraries
SETTINGS
Authorization
Language Management
PII Settings
Variables
Functions
IVR Integration
General Settings
Management
Import & Export
Delete
Bot Versioning
Collaborative Development
Plan Management
API GUIDE
API Overview
API List
API Collection
SDKs
SDK Overview
SDK Security
SDK App Registration
Web SDK Tutorial
Message Formatting and Templates
Mobile SDK Push Notification
Widget SDK Tutorial
Widget SDK – Message Formatting and Templates
Web Socket Connect & RTM
Using the BotKit SDK
Installing
Configuring
Events
Functions
BotKit SDK Tutorial – Agent Transfer
BotKit SDK Tutorial – Flight Search Sample Bot
Using an External NLP Engine
ADMINISTRATION
HOW TOs
Create a Simple Bot
Create a Banking Bot
Transfer Funds Task
Update Balance Task
Context Switching
Using Traits
Schedule a Smart Alert
Configure UI Forms
Add Form Data into Data Tables
Configuring Digital Views
Add Data to Data Tables
Update Data in Data Tables
Custom Dashboard
Custom Tags to filter Bot Metrics
Patterns for Intents & Entities
Build Knowledge Graph
Global Variables
Content Variables
Using Bot Functions
Configure Agent Transfer
RELEASE NOTES

How to Schedule a Smart Alert

In this How-To, we will explore a scenario in a Bot, say traveling Bot, where the user needs to be provided with weather updates daily for a preferred location. We will be using an Alert task to achieve the same. We will also see how auto subscription can be enabled on this Alert task, making it smart.

For details on what Alert task is and how it is implemented in the Kore.ai Bots platform, refer here.

Problem Statement

A registered user of a Bot needs to be sent a weather update in the form of an alert, on a pre-specified time of the day and/or at a specified interval of time.
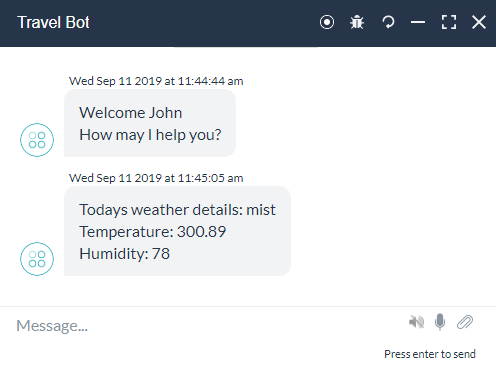
In this document, we will show how an Alert Task can be used to cater to such situations and take appropriate action.

Pre-requisites

  • Basic Bot building knowledge.
  • A working Bot, we are using a Banking Bot.
  • Access to a web service that gives a weather updates. We are using a REST service hosted at: http://api.openweathermap.org. If you want to use this service, you need register to their free alert service as we will be using the API key to access their APIs.

Implementation

Setting Alert Task

Alert tasks can be used to deliver timely, relevant, and personalized information from enterprise systems to customers and employees by polling the relevant service in real-time or according to a user-defined schedule.

Steps:

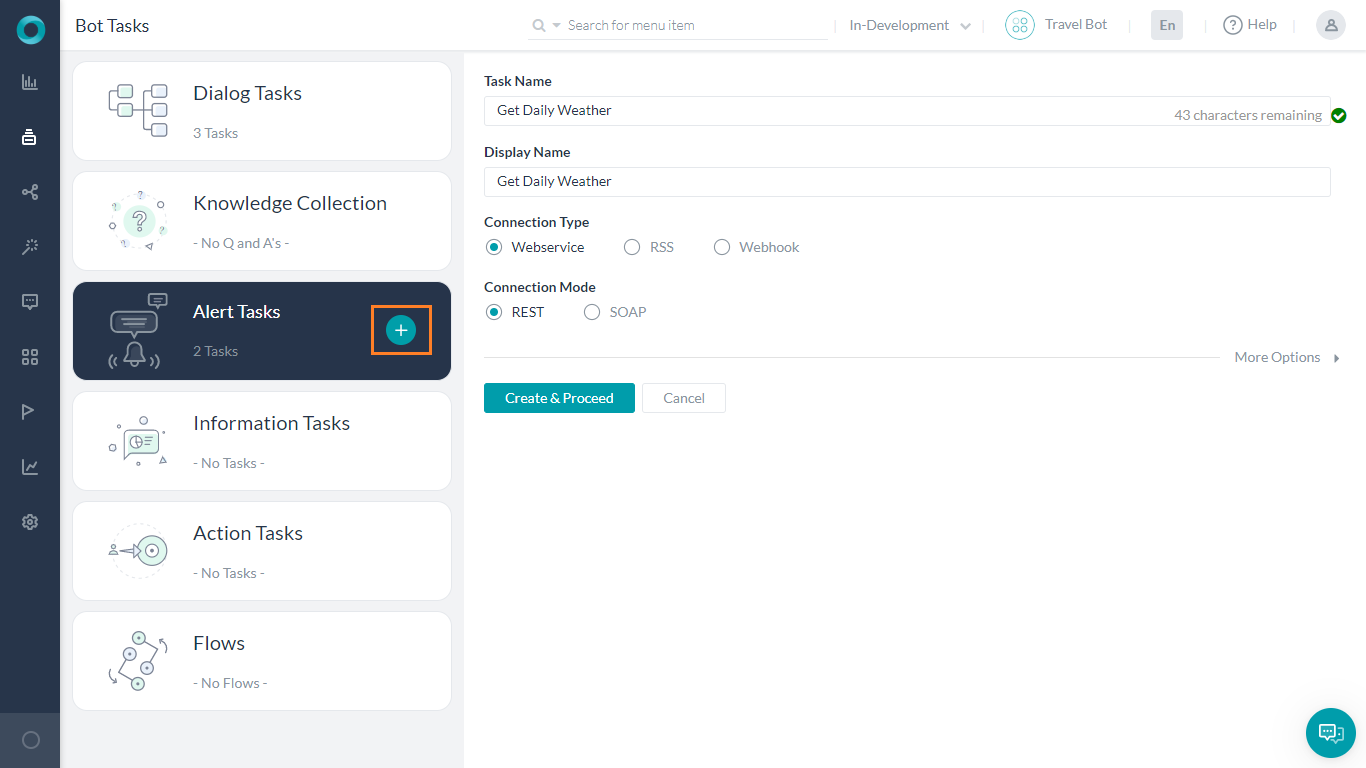
  1. From Build -> Conversational Skills add an Alert Task.
  2. On the task details page:
    1. Enter a Task Name, say Get Daily Weather
    2. Choose the Connection Type, we will go with Webservice
    3. Choose the Connection Mode, we will be using REST
    4. Click Create & Proceed
  3. You will be directed to the Alert Settings page
    1. Review and modify the General Settings if needed. For our use case, we do not need to modify any settings here.
    2. Select the API Request tab
      1. Ensure that the Content Type is set to JSON
      2. We do not need to set Authorization Provider for our use case. Configure the same if the API you are using has any authorization requirements.
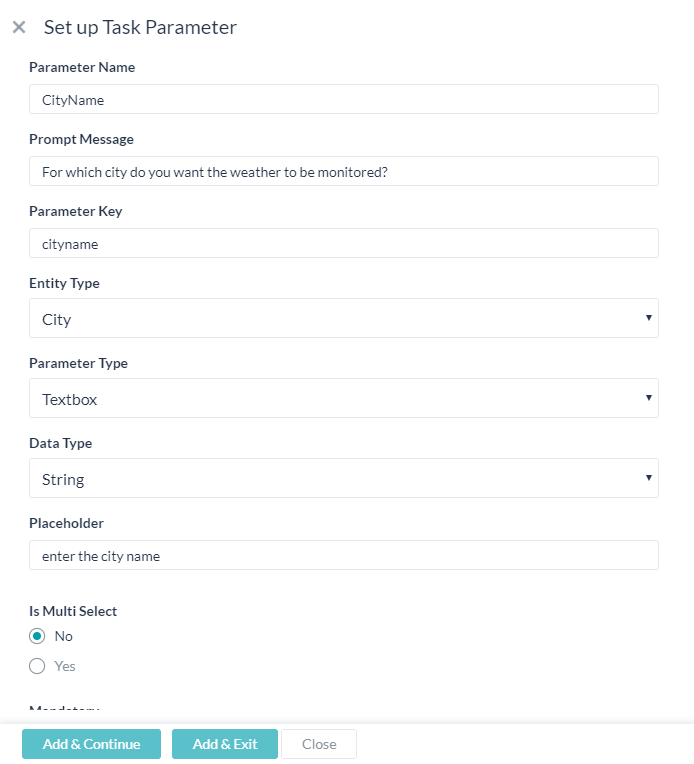
      3. Set Parameter to gather the preferred City from the User. Ensure that it is set as a Mandatory field. This is the API requirement.
      4. We will not need any Initializer requirements for our use case. Use this in case any JavaScript needs to be executed before the request is sent.
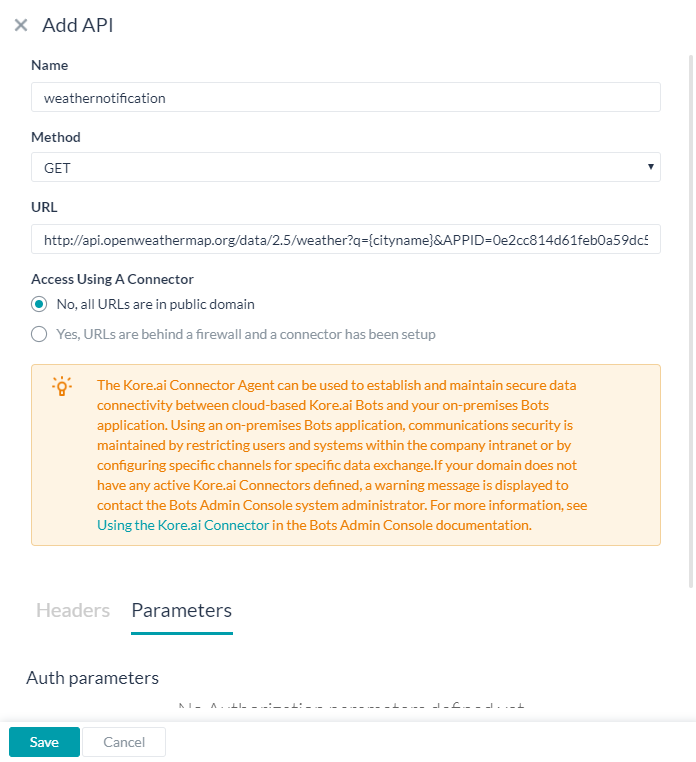
      5. Under Request click Add API to add the service API that needs to be invoked. We are using a GET method from the following API: http://api.openweathermap.org/data/2.5/weather?q={cityname}&APPID=<your-app-id>
        • The APPID in the above url is assigned to you by OpenWeather when you sign up. You can find it from the API keys section after you login to your account.
        • Notice that the Parameters list is populated automatically with the parameters entered earlier.
        • Save the API.
        • Test the API to ensure that the configuration is proper. Enter a sample city name, when prompted and ensure you get a success message and a proper Response.
      6. Save the response.
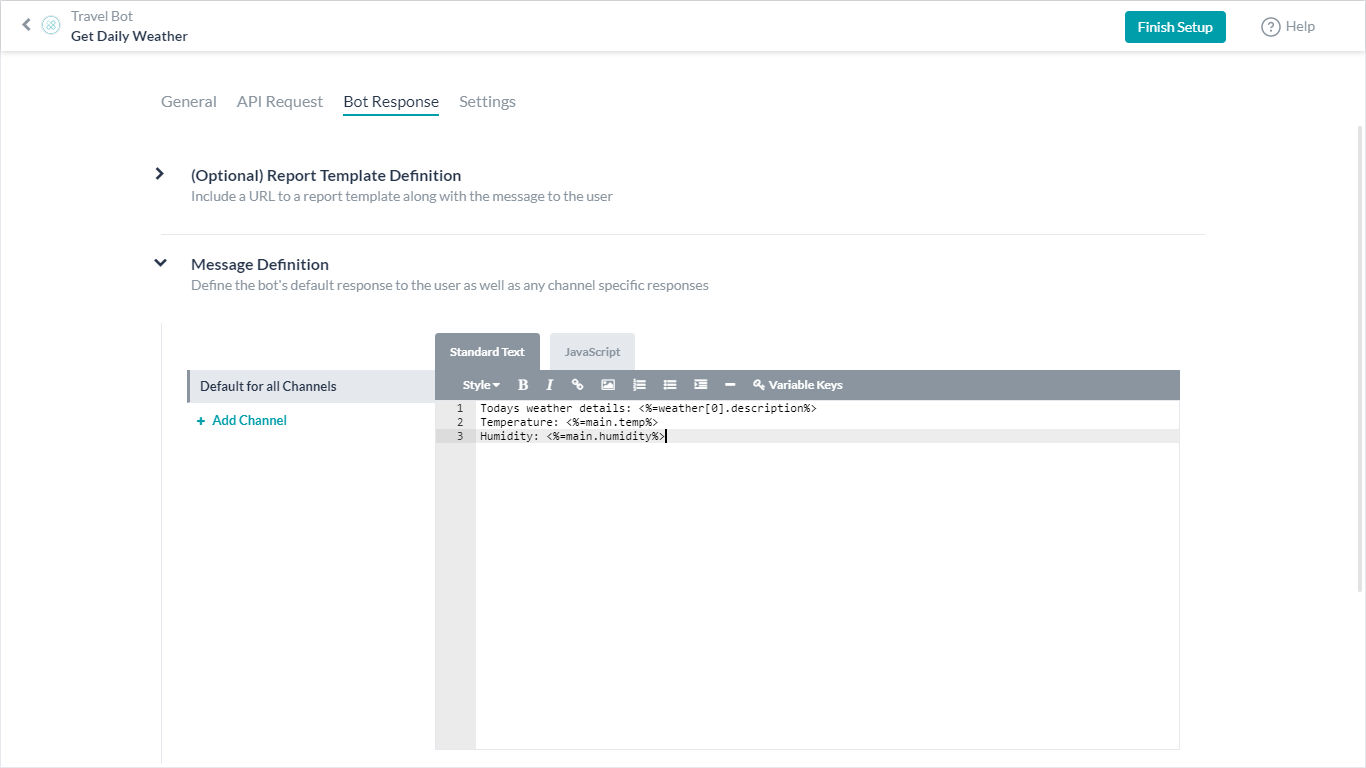
    3. Next we need to format the Bot Response. For our use case, we will be parsing the weather description, temperature and humidity details returned by the API call to be presented to the user.
      We are using the following rich text to achieve the same:

      Todays weather details: <%=weather[0].description%>
      Temperature: <%=main.temp%>
      Humidity: <%=main.humidity%>


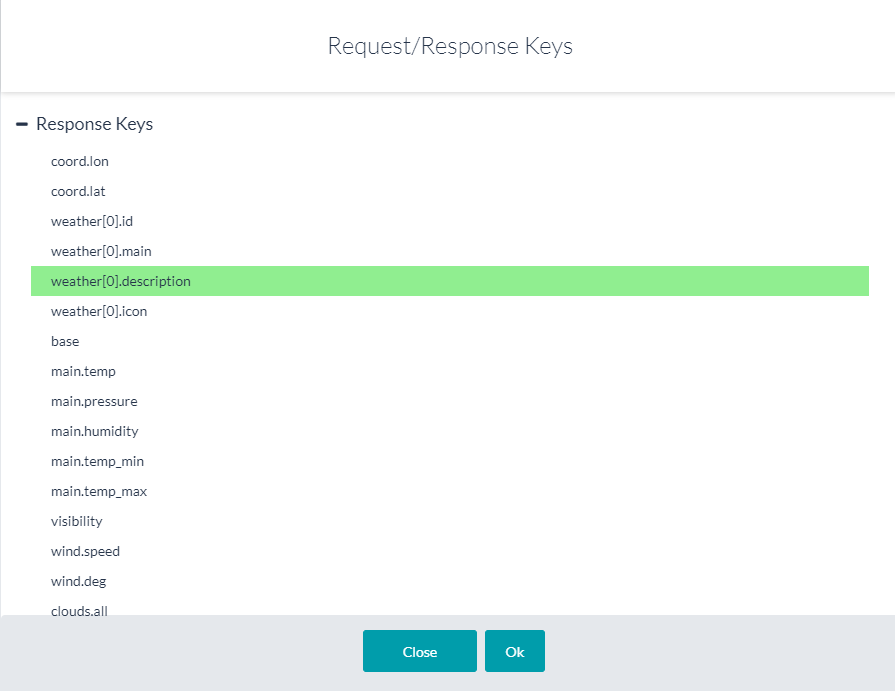
      The values returned by the API call can be accessed from the Variable Keys option. Clicking Variable Keys opens the Request/Response Keys window. The various variables available are categorized. Expand Response Keys section to access the response from API call and select the key for the value you want to display and click OK, the key will be inserted in the editor in the appropriate format, for example for the following selection –<%=weather[0].description%>

    4. Save the Message Definition.
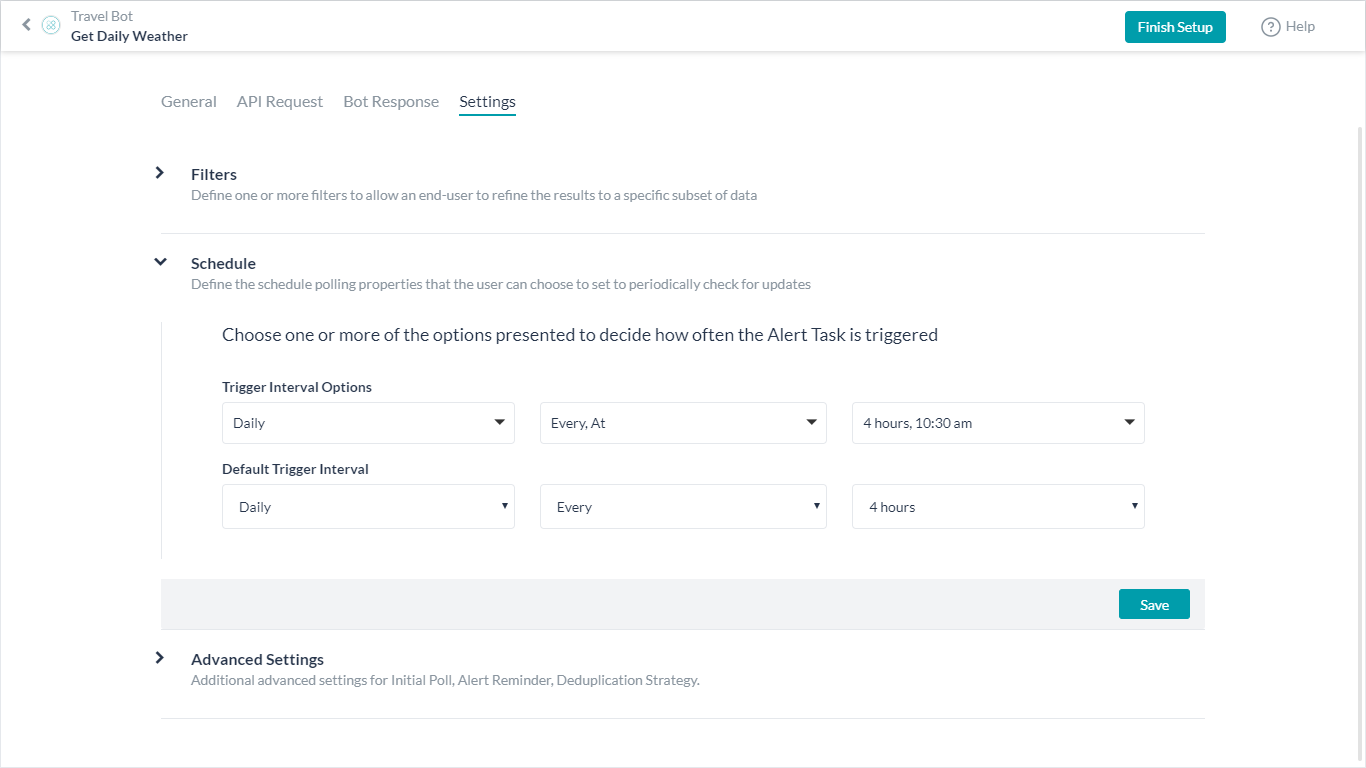
    5. Select Setttings tab and expand the Schedule section. Use this section to configure an initial schedule, these are the options that are provided to the user to choose from for the initial setup.
      For example, in this example, we have set the schedule to be at 10:30 am daily followed by an update every 4 hrs. The user may choose just once at 10:30 am and not get the further updates.
    6. Finish Setup

Execution

Before publishing and sharing the Bot with a user, you can test it from the Talk to bot feature.

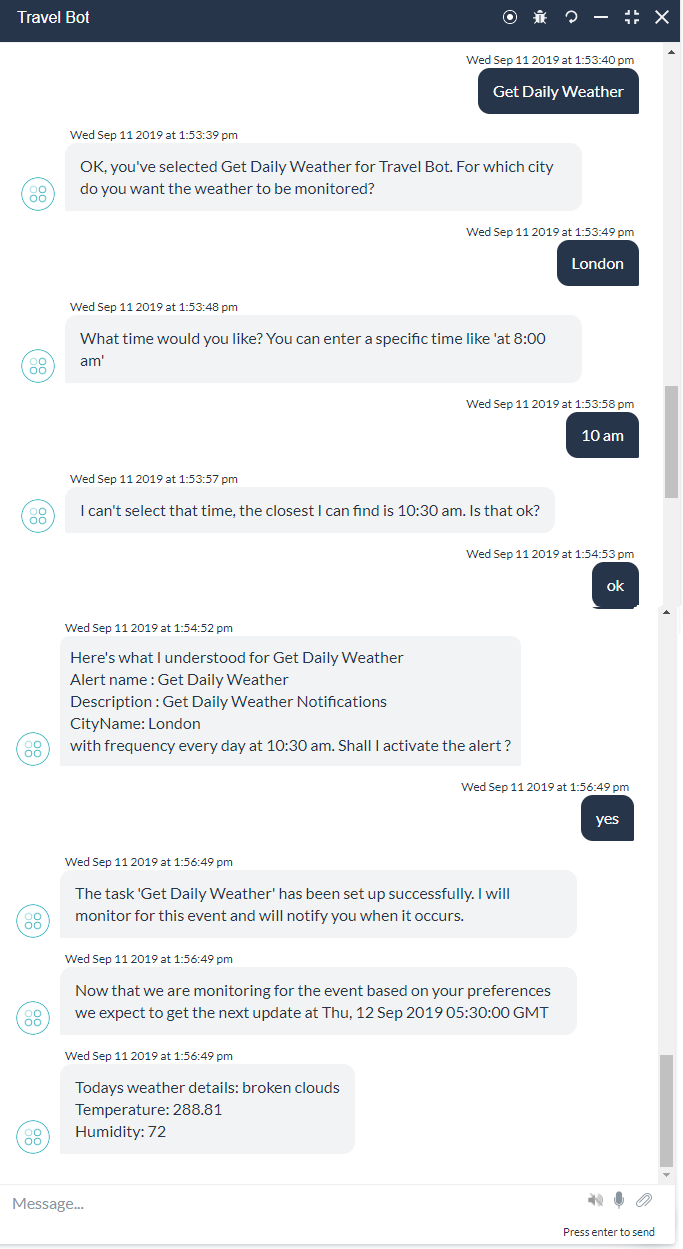
  1. Launch Talk to bot.
  2. Initiate the schedule task, Get Daily Weather (name of the Alert Task we configured).
  3. You will be prompted to enter city name.
  4. Next you will be prompted to enter a specific time, you can enter a time or enter “every x minutes”.
  5. As you can see if the time you enter does no match the scheduled time configured, the nearest time will be presented. Same is the case with the frequency setting.
  6. This is a one-time setup. From this point onwards whenever you launch Talk to Bot for this Bot, you will be given the Weather Alert at the specified time.
  7. The user can trigger the task using the Alert Task name, just like any other Dialog Task and set up the alert manually. The experience User will have when they start using your Bot will be similar to the above-mentioned flow.

Smart Alert

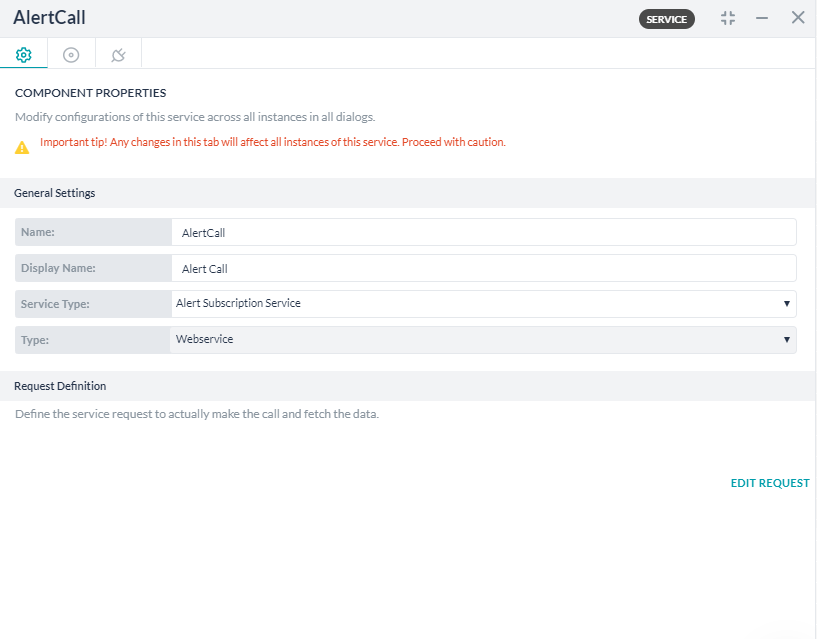
You can set the alert for the user automatically by adding the Alert Subscription Service type Service node in, say, a welcome dialog task. NOTE: Only published Alert Tasks are available for Alert subscription.

  1. Add a Service Node in the Dialog which will act as the trigger for the Alert Task.
  2. Set the Service Type to be Alert Subscription Service.
  3. Click Define Request and select the already configured Alert Task, in this case, Get Daily Weather.
    NOTE: Only published Alert Tasks are available for Alert subscription.
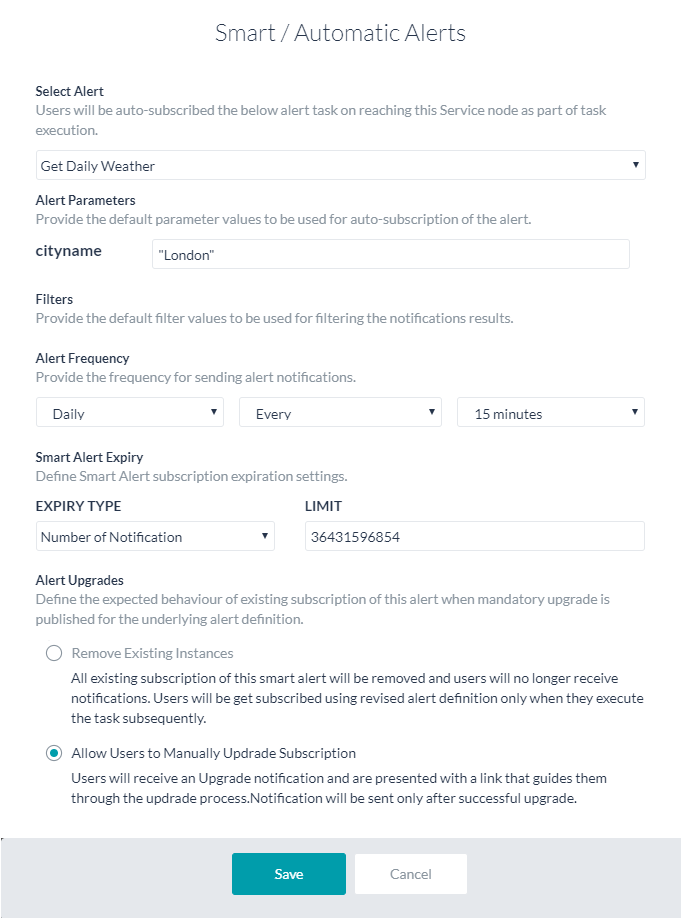
  4. You will be navigated to the Smart/Automatic Alerts window
  5. Set up the Alert Parameters as required.
  6. Set the Alert Frequency
  7. You can set the Alert Expiry values based upon either the duration of the subscription or the number of notifications sent, these will come in handy in case your subscription to the service is limited. Here we have set the Number of Notification to a maximum value.
  8. You can also define the Alert Upgrade behavior in case the Alert task is updated and published.
  9. Save
  10. You can trigger this task from Welcome or onConnect Event, so the user can enter their preferred city and time.
  11. On setup, the first time this service node is hit the subscription will be in effect without user intervention.