OVERVIEW
Virtual Assistants
Kore.ai Platform
Key Concepts
Natural Language Processing (NLP)
Accessing Platform
VIRTUAL ASSISTANTS
Virtual Assistant Builder
Virtual Assistant Types
Getting Started
Create a Simple Bot
SKILLS
Storyboard
Dialog Tasks
Introduction
Dialog Builder (New)
Dialog Builder (Legacy)
User Intent Node
Dialog Node
Entity Node
Supported Entity Types
Composite Entities
Supported Colors
Supported Company Names
Form Node
Logic Node
Message Nodes
Confirmation Nodes
Bot Action Node
Service Node
Custom Authentication
2-way SSL for Service nodes
Script Node
Agent Transfer Node
WebHook Node
Grouping Nodes
Connections & Transitions
Manage Dialogs
User Prompts
Knowledge Graph
Terminology
Building
Generation
Importing and Exporting
Analysis
Knowledge Extraction
Train
Build
Alert Tasks
Introduction
Ignore Words and Field Memory
How to Schedule a Smart Alert
Small Talk
Digital Views
Introduction
How to Configure Digital Views
Digital Forms
Overview
How to Configure Digital Forms
NATURAL LANGUAGE
Overview
Machine Learning
Introduction
Model Validation
Fundamental Meaning
Introduction
NLP Guidelines
Knowledge Graph
Traits
Introduction
How to Use Traits
Ranking and Resolver
Advanced NLP Configurations
INTELLIGENCE
Overview
Context Management
Overview
Session and Context Variables
Context Object
How to Manage Context Switching
Manage Interruptions
Dialog Management
Sub Intents & Follow-up Intents
Amend Entity
Multi-Intent Detection
Sentiment Management
Tone Analysis
Sentiment Management
Event Based Bot Actions
Default Conversations
Default Standard Responses
TEST & DEBUG
Talk to Bot
Utterance Testing
Batch Testing
Record Conversations
Conversation Testing
CHANNELS
PUBLISH
ANALYZE
Overview
Dashboard
Custom Dashboard
Overview
How to Create Custom Dashboard
Conversation Flows
NLP Metrics
ADVANCED TOPICS
Universal Bots
Overview
Defining
Creating
Training
Customizing
Enabling Languages
Store
Smart Bots
Defining
koreUtil Libraries
SETTINGS
Authorization
Language Management
PII Settings
Variables
Functions
IVR Integration
General Settings
Management
Import & Export
Delete
Bot Versioning
Collaborative Development
Plan Management
API GUIDE
API Overview
API List
API Collection
SDKs
SDK Overview
SDK Security
SDK App Registration
Web SDK Tutorial
Message Formatting and Templates
Mobile SDK Push Notification
Widget SDK Tutorial
Widget SDK – Message Formatting and Templates
Web Socket Connect & RTM
Using the BotKit SDK
Installing
Configuring
Events
Functions
BotKit SDK Tutorial – Agent Transfer
BotKit SDK Tutorial – Flight Search Sample Bot
Using an External NLP Engine
ADMINISTRATION
HOW TOs
Create a Simple Bot
Create a Banking Bot
Transfer Funds Task
Update Balance Task
Context Switching
Using Traits
Schedule a Smart Alert
Configure UI Forms
Add Form Data into Data Tables
Configuring Digital Views
Add Data to Data Tables
Update Data in Data Tables
Custom Dashboard
Custom Tags to filter Bot Metrics
Patterns for Intents & Entities
Build Knowledge Graph
Global Variables
Content Variables
Using Bot Functions
Configure Agent Transfer
RELEASE NOTES

エージェント転送の設定方法

よくある質問の1つは、チャットをBotからヒューマンエージェントに転送する方法です。これは、Botがカスタマーサービス期間にある場合は特に必要です。チャットBotが完全に人間に置き変わることはありません。多くの場合、チャットBotが満足に答えられない、または最初からユーザーが人間と話したい/チャットしたい場合があります。この場合、チャットBotはチャットをヒューマンエージェントまたはカスタマーケア担当者へ転送する必要があります。どのようにそれを達成するのでしょうか? この記事では、Kore.aiエージェント転送を使用してライブチャットをBotに連携する方法の概要を説明します。エージェント転送のソースコードは、以下のKore.ai githubリポジトリにあります。https://github.com/Koredotcom/BotKit

概要

当社のBotはソリューション全体の中心部分です。通常のすべての機能の実行の他に、当社のBotはユーザーとエージェント間のプロキシとしても機能します。

  • Bot: ユーザーがインタラクトするチャットBot。
  • ユーザー:ユーザーとは このBotを使用する顧客です。
  • エージェント:エージェントとはユーザーとチャットする人間です。エージェントにもチャットウィンドウが必要です。このために、当社はliveperson/livechatソフトウェアを使用します。

Prerequisites

  • 完全機能Bot(当社はバンキングBotを使用)。
  • Koreのgithub からBotKit SDKをダウンロードします。
  • Node.jsをダウンロードし、インストールします。BotKit SDKをSDKがインストールされている同じサーバー内で実行するにはnode.jsが必要です。
    1. https://nodejs.org/en/download/ へ移動し、Macの場合は.pkgファイルタイプとして、Windowsの場合は.msiファイルタイプとしてOSを選択します。
    2. 端末ウィンドウで、node -v コマンドを実行して、インストールとバージョン、たとえばv6.10.2を検証します。
  • テストコールバックサーバーアプリケーション。https://dl.equinox.io/ngrok/ngrok/stable からの NGROKを使用して、コールバックサーバーアプリケーションをシミュレーションします。以下は、NGROKをインストールするステップです。
    1. https://dl.equinox.io/ngrok/ngrok/stable を開きます。
    2. オペレーティングシステムのngrokファイルをダウンロードおよびインストールします。
      • WindowsへのNGROKのダウンロード:
        1. Windowsマシン32-ビットまたは64-ビット用のzipファイルをダウンロードします。
        2. 解凍して、ngrok.exe ファイルを実行し、ngrokをインストールします。
      • MacへのNGROKのダウンロード:
        1. Command+Space を押し、端末を入力し、Enter/Returnキーを押します。
        2. 以下の端末アプリをruby -e "$(curl -fsSL https://raw.githubusercontent.com/Homebrew/install/master/install)" < /dev/null 2> /dev/null 実行し、Enter/Returnキーを押します。画面でパスワードの入力を促されたら、Macのユーザーパスワードを入力して、続行してください。パスワードを入力しても画面上には表示されませんが、システムは承認しています。したがって、パスワードを入力して、ENTER/RETURNキーを押します。コマンドが終了するのを待機します。
        3. ライブエージェントソフトウェアを brew cask install ngrok
  • 実行します。LiveChatInc.com を使用します。独自のLiveChatサブスクリプションを使用、または LiveChatを今すぐ始める!にビジネスeメールを入力して、 LiveChatInc.comで30日間の無償試用アカウントをセットアップできます。サインアップして、アカウントを作成します。

設計および設定

  1. Bot開発者として、Kore.ai Botビルダー – https://bots.kore.ai/botbuilder を開きます。
  2. エージェント転送を設定する必要があるBotを選択します。
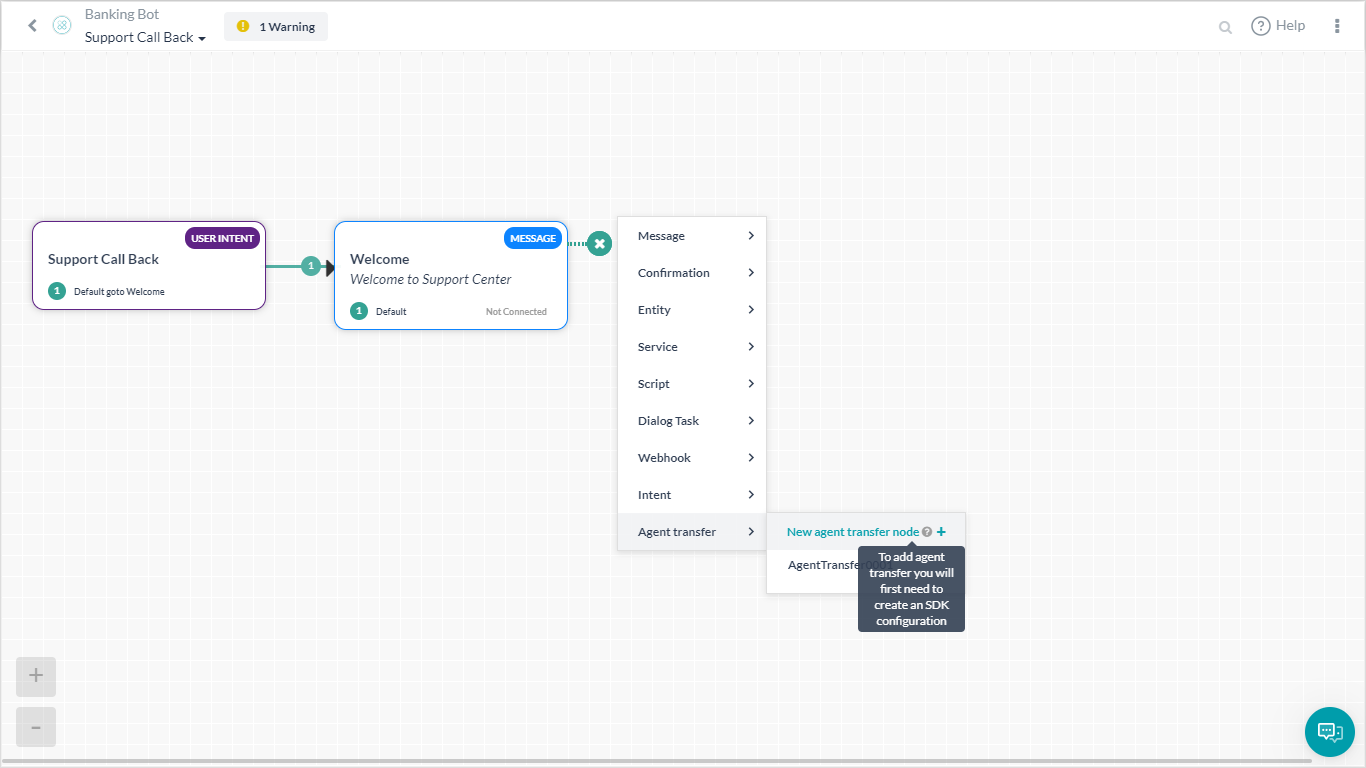
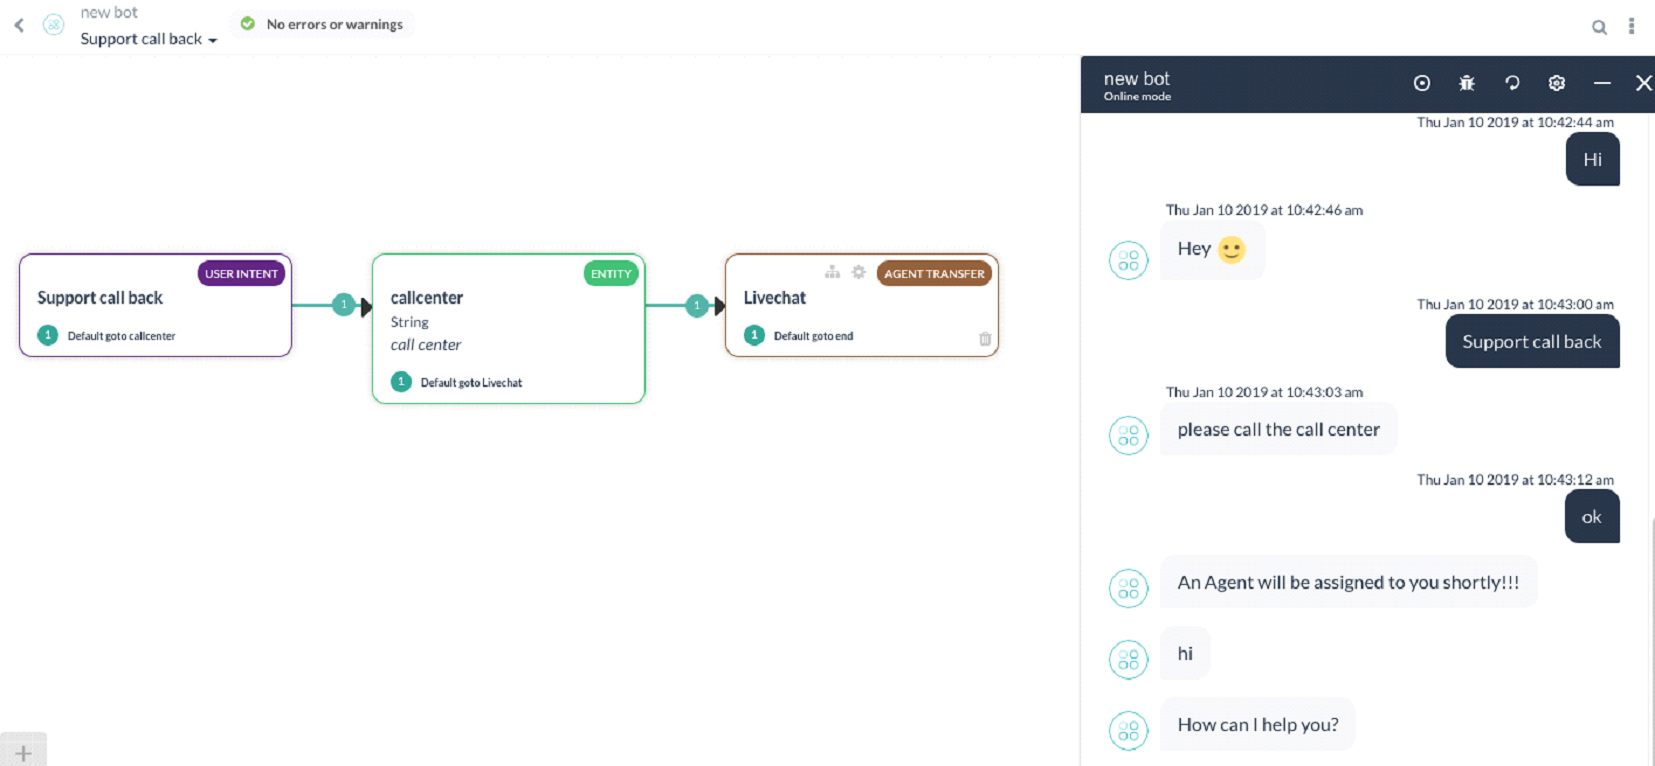
  3. ダイアログタスク(サポートコールバック)開くまたは作成し、 エージェント転送ノードを追加します。
  4. 名前(LiveChat)説明を入力し、保存します。
  5. メッセージ「SDKは現在設定/サブスクリプションされていません。APIの拡張へ移動して、SDKを設定してください」が表示されます。この記事の後半でSDKの設定方法を示しますので、現在はこのメッセージは無視してください。
  6. Botビルダー画面から、API拡張 -> エージェント転送へ移動します。
  7. アプリ名セクションで、リストから既存のアプリを選択、またはアプリ作成オプションを使用して新しいアプリを作成します。
  8. BotIDクライアントID および クライアントシークレットキーを書き留めます。
  9. BotKIt SDKイベントが呼び出すアプリケーションのコールバックURLを入力します。NGROKを使用しているため、コールバックURLの取得方法を示します。
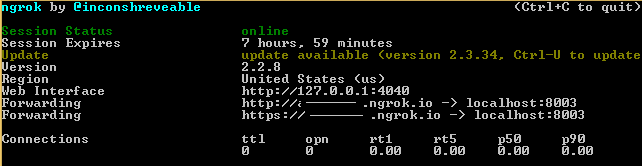
    1. 端末Windowで、ngrok を起動し、以下のコマンドを使用してポート8003を監視します。ngrok http 8003.
    2. ngrokを転送するURLをコピーします。以下のフォーマットとなります。 http://XXXXXXaa.ngrok.io
    3. コールバックURLとしてこの転送URLを使用し、保存します。注意:ngrokが再起動されると、常に転送URLが変更されます。ngrokが再起動されるたびに、コールバックURLが変更されていることを確認してください。
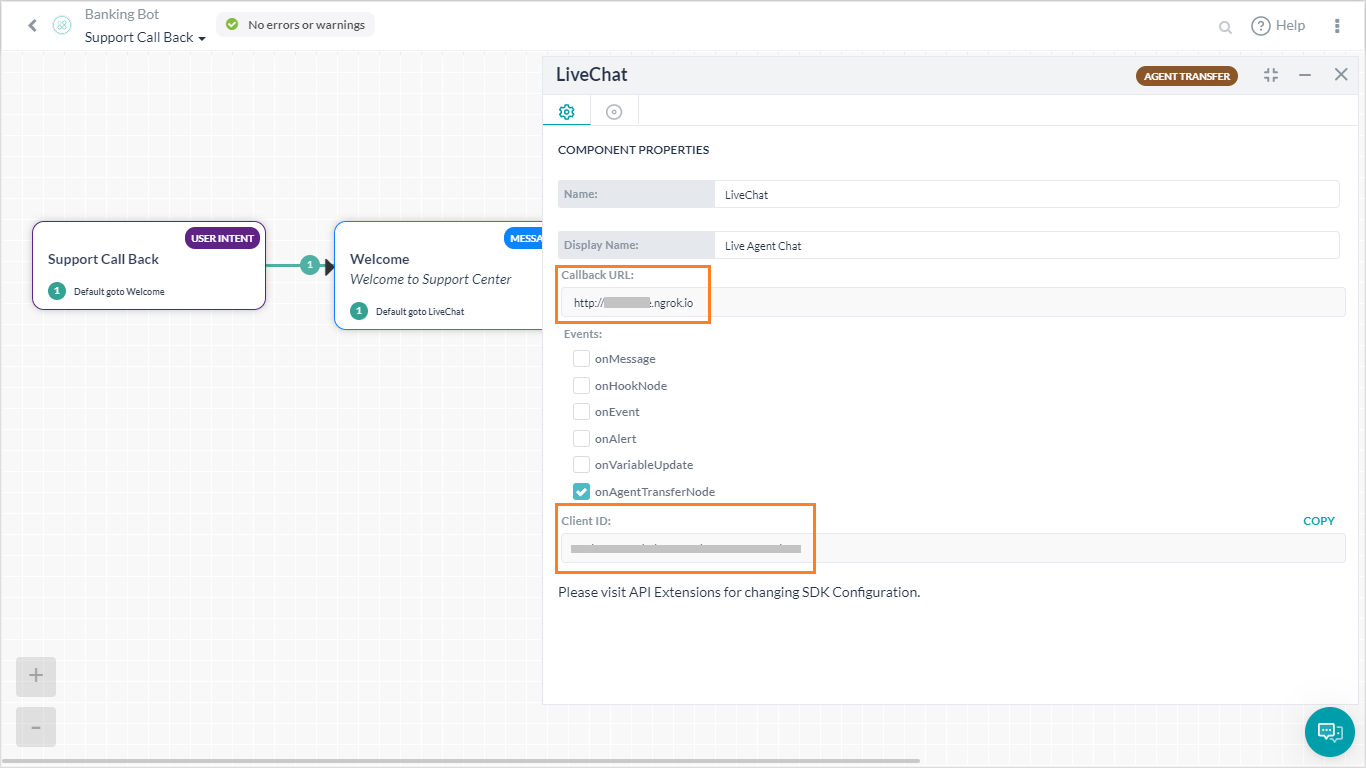
  10. エージェント転送はダイアログレベルで設定されます。ダイアログタスクを開き、エージェント転送ノードを開き、以下に示すように設定が保存されていることを確認できます。必須イベントは選択できます(詳細は以下を参照)。
  11. エンタープライズ要件およびライセンスの可用性に応じて、Livechat、Liveperson、Concentrix、Vayusphere などのライブエージェントソフトウェアをインストールします。LiveChatを使用しているため、エージェント転送に必要なライセンスの取得方法を知る必要があります。
    1. LiveChatアカウントにサインインします。
    2. 左のナビゲーションから設定へ移動し、チャットリンクを選択します。
    3. URLをコピーし、ライセンスコードを書き留めます。URLが https://lc.chat/now/104xx297/ の場合、ライセンスコードは 104xx297
  12. ダウンロードした BotKit SDKフォルダを開き、以下を行います。
    • 編集 livechatapi.js:
      1. 前にコピーしたBotのそれぞれのbotIdとbotNameを指定します。
      2. このJSファイルには、3つのKoreのAPI – 初期化、メッセージ送信、メッセージ取得が含まれます。必要に応じて、ヒューマンエージェント転送に記述された新しい APIは、ここに配置する必要があります。例:接続を終了する必要がある場合は、記述した終了接続 apiはlivechatapi.jsに入る必要があります。
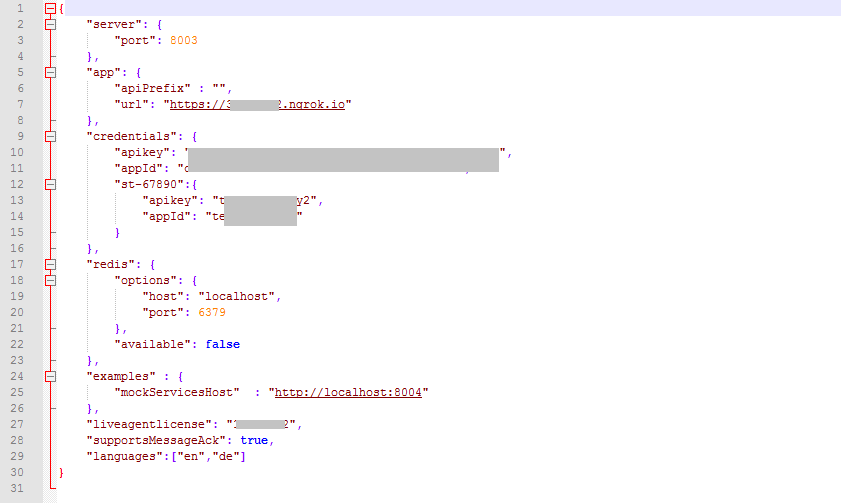
    • 編集 config.json
      1. クライアントID、クライアントシークレットキー、実行中のそれぞれのサーバーポート、およびサードパーティのliveagentライセンスがここに入ります。
      2. クライアントId、クライアントシークレットは、イベントおよび拡張 – エージェントへの転送からコピーできます。
      3. Ngrok転送urlはインスタンスを実行中のngrokからコピーできます。コールバックurlです。これがURLエントリです。
      4. Liveagentlicenseは、Livechatのチャットリンクで指定されるコードです。

    • 編集 LiveChat.js
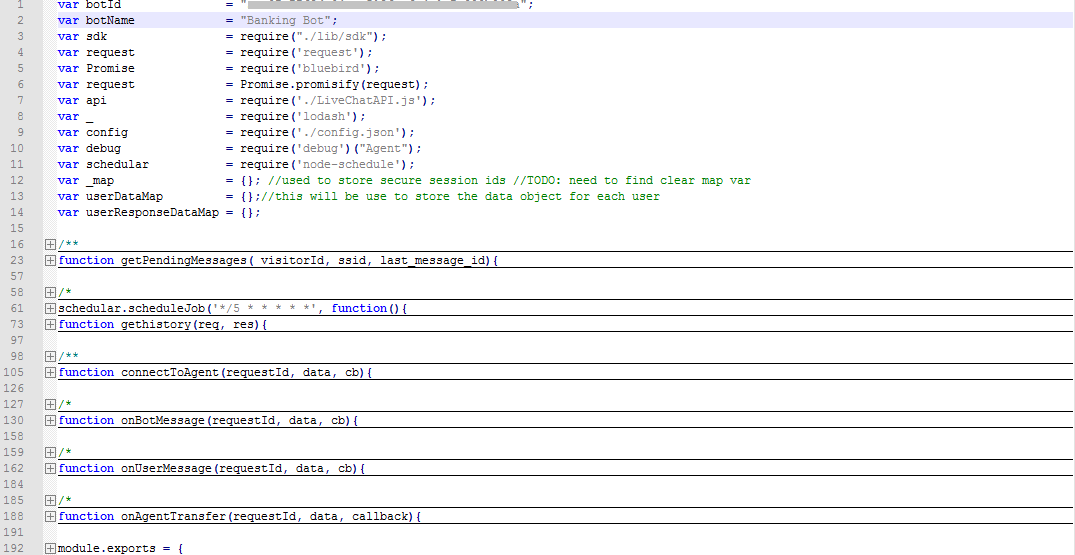
      • 前にコピーしたBotのそれぞれのbotIdとbotNameを指定し、保存します。
    • app.jsを編集します。
      1. 以下の行を追加します。 sdk.registerBot(require('./LiveChat.js'))
      2. サポートされていない場合は、既存のsdk.registerBotステートメントを削除します。
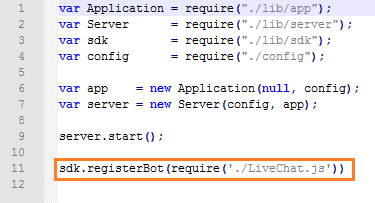
実行

  1. 端末ウィンドウを開き、以下のコマンドを入力してBotKit SDK を実行します。 node app.js
  2. 以下に示すように、エラーなしでサーバーを正常に実行するために欠落しているモジュールがすべてインストールされていることを確認してください。例、エラー「メソッド url-template、node-scheduleが欠落しています」が表示される場合は、Windowsの場合はコマンド npm install <module-name> 、Macの場合は sudo npm install <module-name> を使用して、上のモジュールをインストールします。
  3. ngrokおよびnode.jsサーバーが別の端末で実行されます。
  4. ユーザーがBotからチャットを始める場合、Botはコールをエージェントに転送し、メッセージをユーザーに送信します。
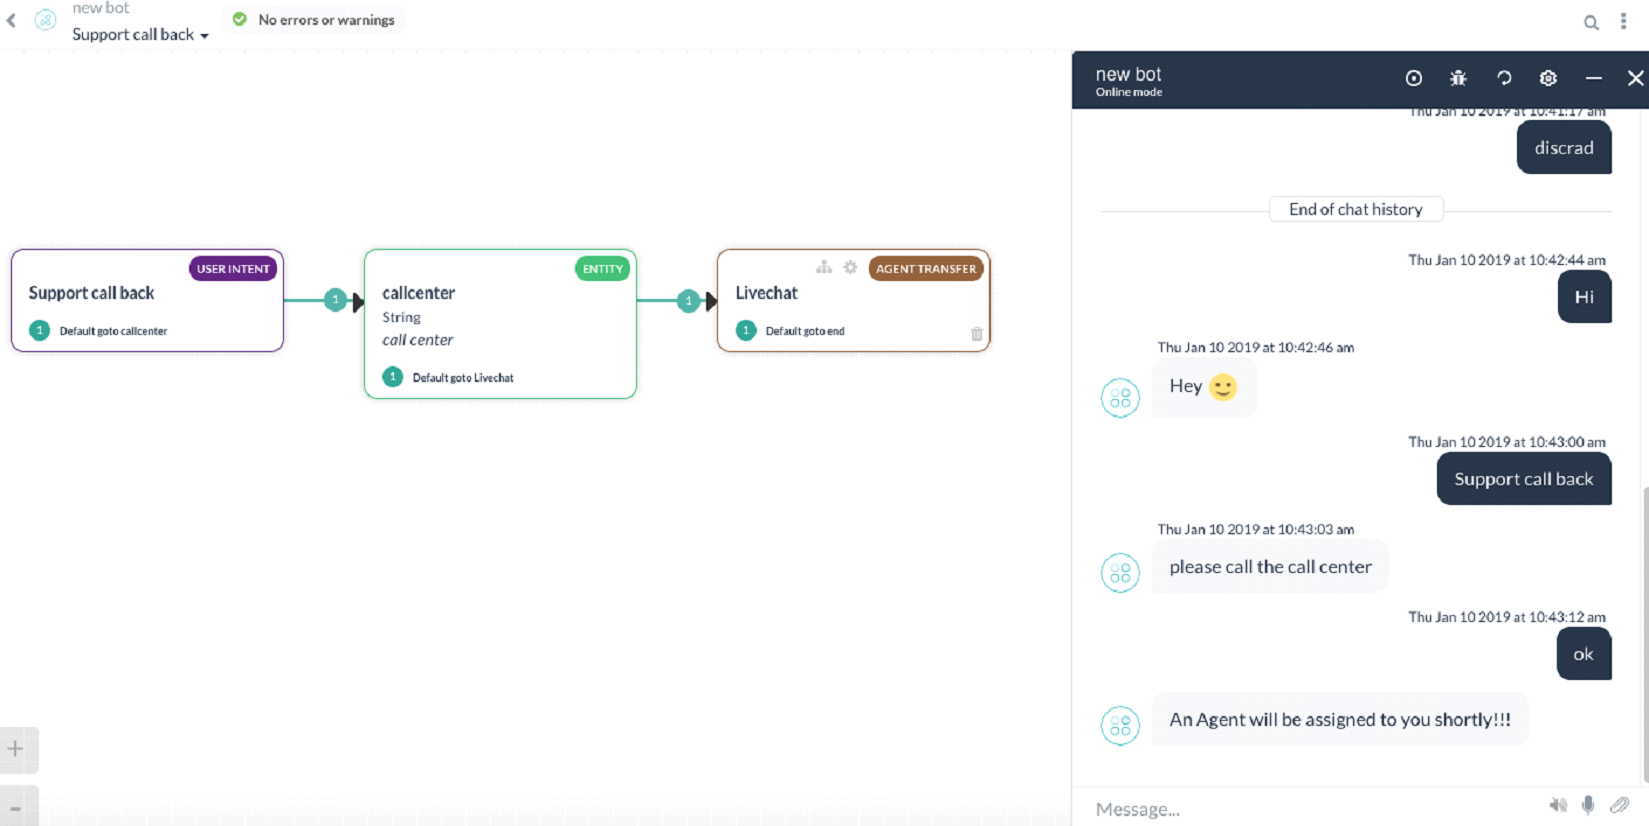
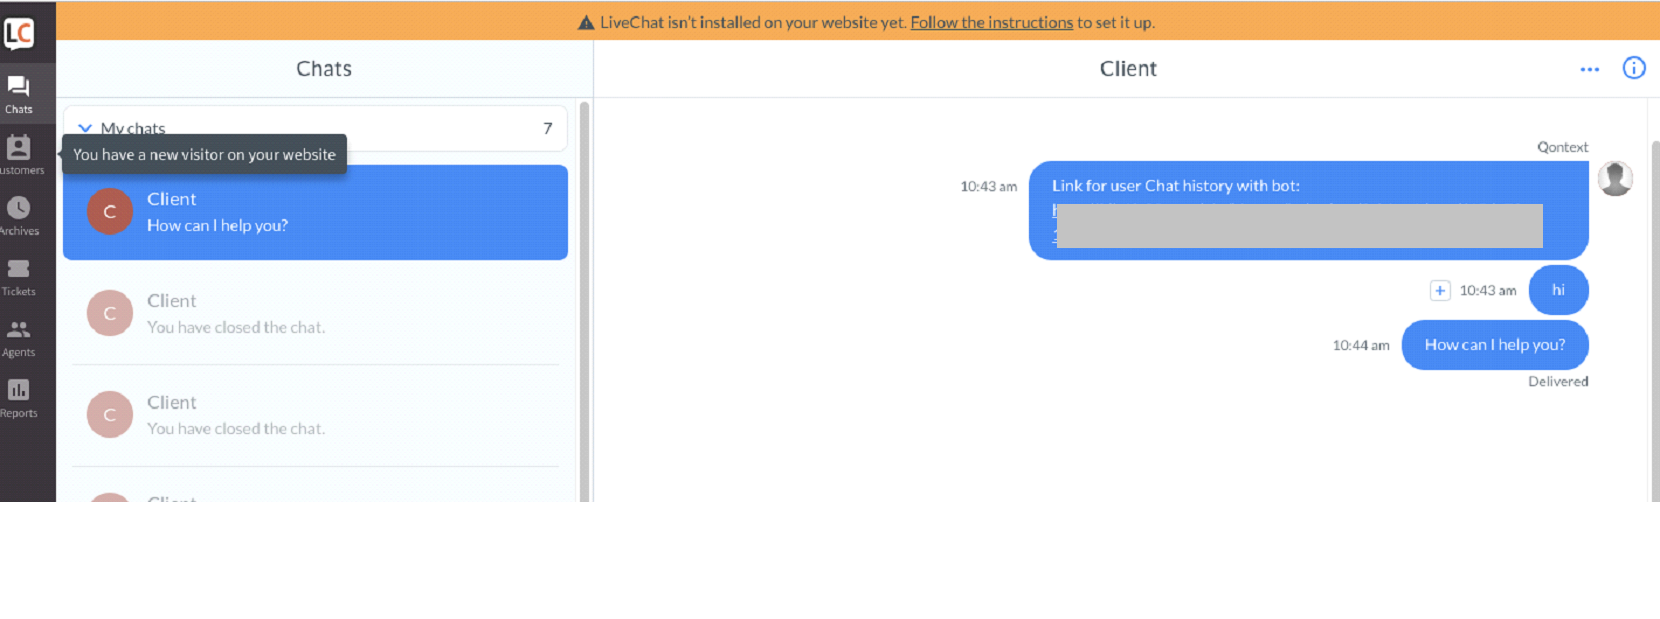
  5. エージェントはlivechat上でこれに関する通知を受け取ります。
  6. これで、エージェントとユーザー間の接続が確立され、会話が続行します。

イベント

注意:ユーザー、Botからメッセージを送信、エージェントに転送するために必要なイベントとメソッドは、LiveChat.JSに概要説明されています。

  1. ユーザーがメッセージを送信すると、on_user_message イベントがトリガーされ、このメッセージはsendBotMessageメソッドを使用してBotへ送信されます。
  2. Botがメッセージを送信すると on_bot_message がトリガーされ、このメッセージはSendUserMessageメソッドを使用してユーザーへ送信されます。
  3. サービスagentTransferノードがBotでトリガーされると、on_agent_transfer イベントがトリガーされます。このイベントは内部でinitChat APIをコールするconnectToAgentメソッドを使用してエージェントに接続されます。
  4. gethistory メソッド、ユーザーのBotとのチャット履歴を転送されたエージェントに送信します。
  5. scheduleJob は5秒ごとに実行され、内部で getPendingMessagesをコールするエージェントからの保留メッセージをポーリングします。
  6. getPendingMessages はエージェントからのすべての保留メッセージを取得し、ユーザーに配信します。
  7. エージェントがユーザーとのチャットをクローズすると、chat_closed がトリガーされます。
OVERVIEW
Virtual Assistants
Kore.ai Platform
Key Concepts
Natural Language Processing (NLP)
Accessing Platform
VIRTUAL ASSISTANTS
Virtual Assistant Builder
Virtual Assistant Types
Getting Started
Create a Simple Bot
SKILLS
Storyboard
Dialog Tasks
Introduction
Dialog Builder (New)
Dialog Builder (Legacy)
User Intent Node
Dialog Node
Entity Node
Supported Entity Types
Composite Entities
Supported Colors
Supported Company Names
Form Node
Logic Node
Message Nodes
Confirmation Nodes
Bot Action Node
Service Node
Custom Authentication
2-way SSL for Service nodes
Script Node
Agent Transfer Node
WebHook Node
Grouping Nodes
Connections & Transitions
Manage Dialogs
User Prompts
Knowledge Graph
Terminology
Building
Generation
Importing and Exporting
Analysis
Knowledge Extraction
Train
Build
Alert Tasks
Introduction
Ignore Words and Field Memory
How to Schedule a Smart Alert
Small Talk
Digital Views
Introduction
How to Configure Digital Views
Digital Forms
Overview
How to Configure Digital Forms
NATURAL LANGUAGE
Overview
Machine Learning
Introduction
Model Validation
Fundamental Meaning
Introduction
NLP Guidelines
Knowledge Graph
Traits
Introduction
How to Use Traits
Ranking and Resolver
Advanced NLP Configurations
INTELLIGENCE
Overview
Context Management
Overview
Session and Context Variables
Context Object
How to Manage Context Switching
Manage Interruptions
Dialog Management
Sub Intents & Follow-up Intents
Amend Entity
Multi-Intent Detection
Sentiment Management
Tone Analysis
Sentiment Management
Event Based Bot Actions
Default Conversations
Default Standard Responses
TEST & DEBUG
Talk to Bot
Utterance Testing
Batch Testing
Record Conversations
Conversation Testing
CHANNELS
PUBLISH
ANALYZE
Overview
Dashboard
Custom Dashboard
Overview
How to Create Custom Dashboard
Conversation Flows
NLP Metrics
ADVANCED TOPICS
Universal Bots
Overview
Defining
Creating
Training
Customizing
Enabling Languages
Store
Smart Bots
Defining
koreUtil Libraries
SETTINGS
Authorization
Language Management
PII Settings
Variables
Functions
IVR Integration
General Settings
Management
Import & Export
Delete
Bot Versioning
Collaborative Development
Plan Management
API GUIDE
API Overview
API List
API Collection
SDKs
SDK Overview
SDK Security
SDK App Registration
Web SDK Tutorial
Message Formatting and Templates
Mobile SDK Push Notification
Widget SDK Tutorial
Widget SDK – Message Formatting and Templates
Web Socket Connect & RTM
Using the BotKit SDK
Installing
Configuring
Events
Functions
BotKit SDK Tutorial – Agent Transfer
BotKit SDK Tutorial – Flight Search Sample Bot
Using an External NLP Engine
ADMINISTRATION
HOW TOs
Create a Simple Bot
Create a Banking Bot
Transfer Funds Task
Update Balance Task
Context Switching
Using Traits
Schedule a Smart Alert
Configure UI Forms
Add Form Data into Data Tables
Configuring Digital Views
Add Data to Data Tables
Update Data in Data Tables
Custom Dashboard
Custom Tags to filter Bot Metrics
Patterns for Intents & Entities
Build Knowledge Graph
Global Variables
Content Variables
Using Bot Functions
Configure Agent Transfer
RELEASE NOTES

How To Configure Agent Transfer

One of the frequently asked questions is how to transfer a chat to a human agent from the Bot. This is especially necessary if your bot is in the space of customer service. Chatbots are not meant to completely replace humans. Many times chatbot will fail to answer satisfactorily or user would just want to talk/chat to a human from the beginning. When this happens the chatbot should transfer the chats to a human agent or a customer care representative. But how to achieve that?

In this article, we will give an overview of how we can integrate a live chat into our bot using Kore.ai Agent Transfer. The source code for the Agent Transfer is available at Kore.ai github repo: https://github.com/Koredotcom/BotKit

Overview

Our Bot would be the central piece to the entire solution. Apart from performing all its normal functionality, our bot would also act as a proxy between user and agent.

  • Bot: Chat Bot that the Users interact.
  • Users: Users are the customers who would be using this Bot.
  • Agent: Agents are humans who would chat with the users. Agent will also need a chat window. For this we will use liveperson/livechat software.

Prerequisites

  • A fully functional Bot (we will be using a Banking Bot).
  • Download BotKit SDK from Kore’s github
  • Download and Install the Node.js. The BotKit SDK requires node.js to run on the same server where the SDK is installed.
    1. Go to https://nodejs.org/en/download/ and select your OS as a .pkg file type for Mac and .msi file type for Windows.
    2. In a Terminal window, run the node -v command to verify installation and version, for example, v6.10.2.
  • A test callback server application. We will be using NGROK from https://dl.equinox.io/ngrok/ngrok/stable to simulate the callback server application. Following are the steps to install NGROK:
    1. Open https://dl.equinox.io/ngrok/ngrok/stable.
    2. Download and install the ngrok file for your operating system.
      • Downloading NGROK on Windows:
        1. Download the zip file for your Windows machine 32-bit or 64-bit
        2. Unzip and run the ngrok.exe file to install ngrok.
      • Downloading NGROK on mac:
        1. Press Command+Space and type Terminal and press enter/return key.
        2. Run in Terminal app:
          ruby -e "$(curl -fsSL https://raw.githubusercontent.com/Homebrew/install/master/install)" < /dev/null 2> /dev/null and press enter/return key.
          If the screen prompts you to enter a password, please enter your Mac’s user password to continue. When you type the password, it won’t be displayed on the screen, but the system would accept it. So just type your password and press ENTER/RETURN key. Then wait for the command to finish.
        3. Run brew cask install ngrok
  • A live agent software. We will be using LiveChatInc.com. You can use your own LiveChat subscription or set up a free 30-day trial account at LiveChatInc.com by entering your business email in the Start using LiveChat now!. Sign up and create an account.

Design and Configuration

  1. As a Bot developer, open Kore.ai Bot Builder – https://bots.kore.ai/botbuilder
  2. Select the Bot for which Agent Transfer needs to be configured.
  3. Open or create a dialog task (Support Call Back) and add an Agent transfer node.
  4. Enter a Name (LiveChat) and Description and Save.
  5. You will see a message ‘SDK is not currently configured/Subscribed. Please go to API Extensions to configure the SDK.’. For now ignore this message as we will be showing how to configure SDK, later in this article.
  6. From the Bot Builder screen traverse to API Extensions -> Agent Transfer
  7. In the App Name section, select an existing app from the list or use the Create App option to create a new app.
  8. Make a note of the Bot ID, Client ID and Client Secret keys.
  9. Enter the Callback URL of your application, to be invoked by BotKIt SDK events. Since we are using NGROK, we will show how to obtain the callback URL:
    1. In a Terminal Window, start ngrok to monitor port 8003 using the following command: ngrok http 8003.
    2. Copy ngrok forwarding URL. It will be in the format – http://XXXXXXaa.ngrok.io
    3. Use this forwarding URL as the call back URL and save.
      Note: The forwarding URL changes whenever the ngrok is restarted. Make sure you make the changes to the callback URL every time ngrok is restarted.
  10. The agent transfer is configured at the dialog level. You can open the dialog task, and open agent transfer node to see that the configuration is saved as shown below. You can select the Events required (see below for details)
  11. Install any live agent software eg Livechat, Liveperson, Concentrix, Vayusphere etc depending on your enterprise requirement and license availability. Since we are using LiveChat, we will should you how to obtain the license details needed for Agent Transfer:
    1. Sign in to your LiveChat account.
    2. Go to Settings from the left navigation and select chat link.
    3. Copy the URL and note the license code. If the URL is https://lc.chat/now/104xx297/ and then the license code is 104xx297
  12. Open the downloaded BotKit SDK folder and do the following:
    • Edit livechatapi.js:
      1. Give the respective botId and botName of your bot, which you have copied earlier.
      2. This JS file contains 3 API’s of Kore – Initialization, Send Message, Get Message. If required, any new API’s written for human agent transfer should be put in here.
        Example: If closing connection is required, then close connection api written needs to go into livechatapi.js
    • Edit config.json
      1. Client ID, Client Secret key, respective server ports running and liveagent license of the third-party server goes here.
      2. Client Id, Client Secret can be copied from Events and Extensions – Agent Transfer.
      3. ngrok forwarding url can be copied from ngrok running instance. It is the call back url. This should be the URL entry.
      4. Liveagentlicense is the code given in the chatlink of livechat

    • Edit LiveChat.js
      • Give the respective botId and botName of your bot, which you have copied earlier and save
    • Edit app.js
      1. Add the following line sdk.registerBot(require('./LiveChat.js'))
      2. Delete any existing sdk.registerBot statements, if not needed

Execution

  1. Open a terminal window and run the BotKit SDK by entering the command:
    node app.js
  2. Please make sure to install all the missing modules for running the server successfully without any errors as shown below.
    Example, if error “method url-template, node-schedule are missing” is shown, then install the above modules using command
    npm install <module-name> for windows, sudo npm install <module-name> for mac
  3. ngrok and node.js server will be running in different terminals.
  4. When user initiates the chat from the bot, bot transfers the call to an agent and sends a message to the user
  5. Agent receives a notification about this on the livechat
  6. Now connection between agent and the user has been established and the conversation continues.

Events

Note: The events and methods required for sending messages from User, bot and transferring to Agent are outlined in LiveChat.JS

  1. on_user_message event is triggered when a user sends a message and this message is sent to the bot using sendBotMessage method.
  2. on_bot_message is triggered when bot sends a message and this message is sent to the user using SendUserMessage method.
  3. on_agent_transfer event is triggered when the service agentTransfer node is triggered in bot. And this event connects to the agent using connectToAgent method, which internally calls initChat API
  4. gethistory method, gives the chat history of the user with the bot to the transferred agent
  5. scheduleJob is run for every 5 secs and it polls for the pending messages from the Agent, which internally calls getPendingMessages
  6. getPendingMessages gets all the pending messages from Agent and delivers it to the User
  7. chat_closed gets triggered when the agent closes the chat with the user.