OVERVIEW
Virtual Assistants
Kore.ai Platform
Key Concepts
Natural Language Processing (NLP)
Accessing Platform
VIRTUAL ASSISTANTS
Virtual Assistant Builder
Virtual Assistant Types
Getting Started
Create a Simple Bot
SKILLS
Storyboard
Dialog Tasks
Introduction
Dialog Builder (New)
Dialog Builder (Legacy)
User Intent Node
Dialog Node
Entity Node
Supported Entity Types
Composite Entities
Supported Colors
Supported Company Names
Form Node
Logic Node
Message Nodes
Confirmation Nodes
Bot Action Node
Service Node
Custom Authentication
2-way SSL for Service nodes
Script Node
Agent Transfer Node
WebHook Node
Grouping Nodes
Connections & Transitions
Manage Dialogs
User Prompts
Knowledge Graph
Terminology
Building
Generation
Importing and Exporting
Analysis
Knowledge Extraction
Train
Build
Alert Tasks
Introduction
Ignore Words and Field Memory
How to Schedule a Smart Alert
Small Talk
Digital Views
Introduction
How to Configure Digital Views
Digital Forms
Overview
How to Configure Digital Forms
NATURAL LANGUAGE
Overview
Machine Learning
Introduction
Model Validation
Fundamental Meaning
Introduction
NLP Guidelines
Knowledge Graph
Traits
Introduction
How to Use Traits
Ranking and Resolver
Advanced NLP Configurations
INTELLIGENCE
Overview
Context Management
Overview
Session and Context Variables
Context Object
How to Manage Context Switching
Manage Interruptions
Dialog Management
Sub Intents & Follow-up Intents
Amend Entity
Multi-Intent Detection
Sentiment Management
Tone Analysis
Sentiment Management
Event Based Bot Actions
Default Conversations
Default Standard Responses
TEST & DEBUG
Talk to Bot
Utterance Testing
Batch Testing
Record Conversations
Conversation Testing
CHANNELS
PUBLISH
ANALYZE
Overview
Dashboard
Custom Dashboard
Overview
How to Create Custom Dashboard
Conversation Flows
NLP Metrics
ADVANCED TOPICS
Universal Bots
Overview
Defining
Creating
Training
Customizing
Enabling Languages
Store
Smart Bots
Defining
koreUtil Libraries
SETTINGS
Authorization
Language Management
PII Settings
Variables
Functions
IVR Integration
General Settings
Management
Import & Export
Delete
Bot Versioning
Collaborative Development
Plan Management
API GUIDE
API Overview
API List
API Collection
SDKs
SDK Overview
SDK Security
SDK App Registration
Web SDK Tutorial
Message Formatting and Templates
Mobile SDK Push Notification
Widget SDK Tutorial
Widget SDK – Message Formatting and Templates
Web Socket Connect & RTM
Using the BotKit SDK
Installing
Configuring
Events
Functions
BotKit SDK Tutorial – Agent Transfer
BotKit SDK Tutorial – Flight Search Sample Bot
Using an External NLP Engine
ADMINISTRATION
HOW TOs
Create a Simple Bot
Create a Banking Bot
Transfer Funds Task
Update Balance Task
Context Switching
Using Traits
Schedule a Smart Alert
Configure UI Forms
Add Form Data into Data Tables
Configuring Digital Views
Add Data to Data Tables
Update Data in Data Tables
Custom Dashboard
Custom Tags to filter Bot Metrics
Patterns for Intents & Entities
Build Knowledge Graph
Global Variables
Content Variables
Using Bot Functions
Configure Agent Transfer
RELEASE NOTES

UIフォームからデータテーブルにデータを追加する方法

このハウツーでは、ユーザーが追加の口座を作成できるバンキングBotのシナリオについてご説明します。UIフォームから収集されたデータをどのように使用してデータテーブルに口座を作成できるかを確認します。どのUIフォームがKore.ai Botプラットフォームでどのように導入されているかの詳細については、こちらを参照してください。どのデータテーブルがKore.ai Botプラットフォームでどのように導入されているかの詳細については、こちらを参照してください

例題

以下のシナリオに取り組むバンキングBotを検討します。

  1. すでに登録済みのユーザーが追加の口座を開設したいと考えています。
  2. 利用可能な口座には3つのタイプがあり、それぞれに追加のオプションがあります。
    • 普通預金口座
    • キャッシュカードを選択して最小残高を設定するオプションを備えた当座預金口座
    • プラチナ、ゴールド、シルバー、ベーシックからいずれかを選択できるクレジットカード
  3. 上記データはUIフォームを使用するユーザーから収集されます。
  4. このデータはデータテーブルに更新する必要があります。

Pre-requisites

  • Botビルドナレッジ
  • アクセス権付きバンキングBot
    • ここで作成された顧客詳細テーブル
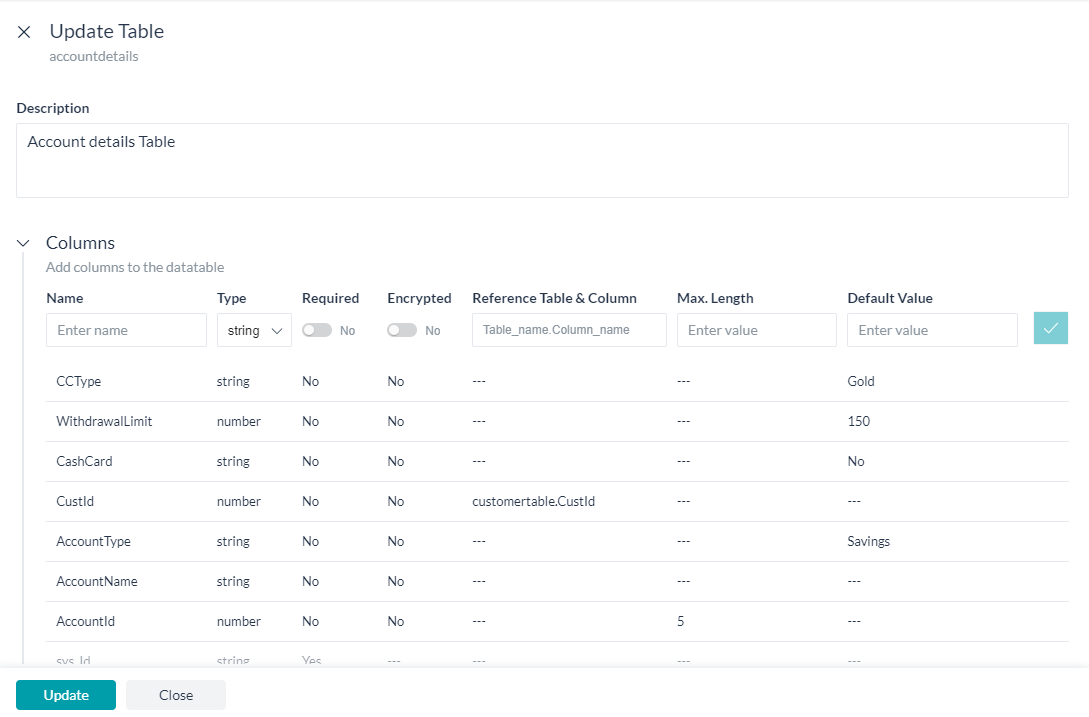
    • 口座詳細テーブル、上のリンクで表示される同じステップを使用して、以下のデータテーブルを作成します。
      1. 名前、たとえばaccountdetails
      2. 説明、たとえば口座詳細テーブル
      3. セクションに、以下の詳細を追加します。
        列名 タイプ 必須 追加設定
        AccountId あり 暗号化および最大長5
        AccountName 文字列 あり
        AccountType 文字列 なし
        CustId あり customertable.CustIdとしての参照テーブルおよび列
        CashCard 文字列 なし
        WithdrawalLimit なし
        CCType 文字列 なし

    • UIフォーム、 ここに示すように設定されたUIフォームを使用します。

設定

次の各シナリオを1つずつ考えてみましょう。

  1. ダイアログタスク:
    1. 顧客IDを取得
    2. UIフォームをトリガーして口座詳細を収集、および
    3. サービスノードを呼び出し、口座データを追加します。

ダイアログタスクの設定

ダイアログタスクを作成し、フォームノードを追加して上のステップで作成したUIフォームをトリガーし、サービスノードを使用してサービスコールし、フォームデータから新しい口座を追加します。

ダイアログタスクの作成

  1. 左のナビゲーションメニューからBotタスク -> ダイアログタスクを選択します。
  2. ダイアログタスクに対して+をクリックして、新しいタスクを作成します。
    • IntentName、たとえばAddAccountを入力します。
    • 作成および続行して、ダイアログビルダーページを開きます。
  3. インテントノードのデフォルト設定を保持し、インテントノードを閉じます。
  4. インテントノードの隣の+をクリックし、エンティティノードを選択します。これは顧客IDの取得に使用されます。
    1. 名前、たとえばCustIdを入力します。
    2. としてタイプを選択します。
    3. 顧客IDの入力として、ユーザープロンプトを選択します。
    4. エンティティノードを閉じます。
  5. サービスノードを追加し、入力した顧客IDの有効期限をチェックします。
  6. 顧客IDが有効の場合は、ロジックノードを追加し、そうでない場合は、顧客IDをプロンプト表示します。
  7. InvalidCustId は、以下のJavaScriptがあるメッセージノードです。
    context.entities.CustId = null; print(「無効な顧客IDを入力しました。再試行してください」)
  8. 次に、フォームノードを追加し、ドロップダウンリストからフォームを選択します(OpenAccount)。
    • フォームエクスペリエンスを選択する画面が表示されます。Kore.aiのBotプラットフォームを使用することで、フォームからの入力およびチャネルに基づいた会話の両方を通じて、ユーザー入力を収集できます。
    • このユースケースでは、フォームUIのみエクスペリエンスを選択しましょう。
    • フォームノードが追加され、フォーム名などをカスタマイズできるようになります。
    • ここでは、名前OpenAccountFormに、表示名口座の開設へのフォームに変更します。
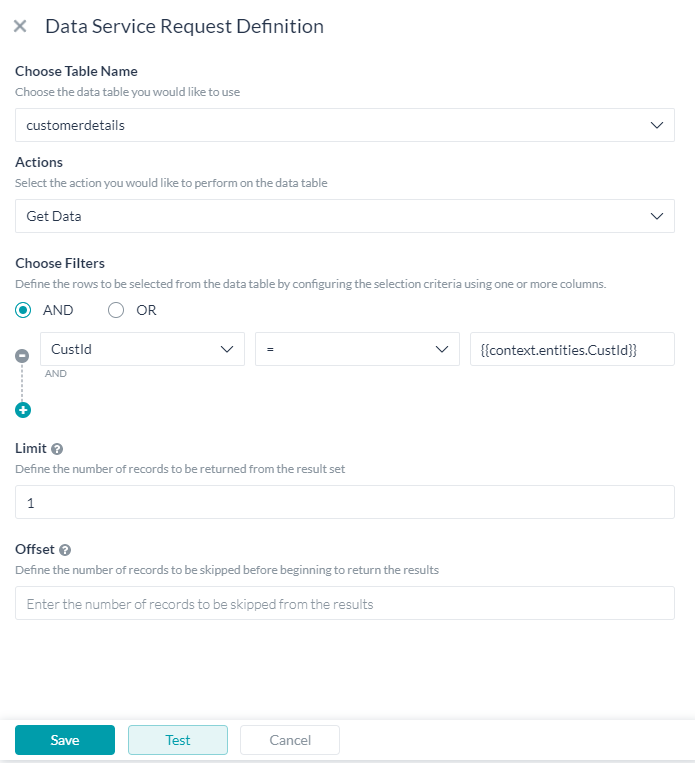
  9. サービスノードを使用して、顧客IDの既存の口座詳細を取得します。
  10. 次に、スクリプトノードを使用してフォームノードによって返された値を取得する方法を確認し、それを処理して次の口座IDを取得し、不要フィールドにnullを設定します。
    • 以下のスクリプトを使用します。
      //get the next account id var resultSet = context.GetAcctData.response.body.queryResult; var id = 0; if (!resultSet.length) { id=1; } else { for (var i=0; i<resultSet.length; i++) { if (id < resultSet[i].AccountId) { id = resultSet[i].AccountId; } } id++; } context.accountid = id; context.name=context.GetCustData.response.body.queryResult[0].CustName; //set unwanted fields to null if (context.forms.OpenAccount.accounttype == 'Savings') { context.cashcard = null; context.withdrawallimit = null; context.cardtype = null; context.type=context.forms.OpenAccount.accounttype; } if (context.forms.OpenAccount.accounttype == 'Checkings') { context.cardtype = null; context.cashcard = context.forms.OpenAccount.cashcard; context.withdrawallimit = context.forms.OpenAccount.withdrawallimit; context.type=context.forms.OpenAccount.accounttype; } if (context.forms.OpenAccount.accounttype == 'Credit Card') { context.cashcard = null; context.withdrawallimit = null; context.cardtype = context.forms.OpenAccount.cardtype; context.type=context.forms.OpenAccount.accounttype; }
  11. サービスノードを使用し、前のスクリプトノードで入力されたコンテキスト変数を使用して口座詳細を追加します。
  12. データテーブルを更新するフォームとサービスノードによるダイアログが準備できました。
  13. Botと話し、ステップに従って指定顧客IDに口座を追加します。

結論

この投稿では、以下を確認しました。

  • データテーブルからのデータの取得方法
  • ダイアログからフォームをトリガーする方法
  • フォームから取得したデータのデータテーブルへの追加方法
OVERVIEW
Virtual Assistants
Kore.ai Platform
Key Concepts
Natural Language Processing (NLP)
Accessing Platform
VIRTUAL ASSISTANTS
Virtual Assistant Builder
Virtual Assistant Types
Getting Started
Create a Simple Bot
SKILLS
Storyboard
Dialog Tasks
Introduction
Dialog Builder (New)
Dialog Builder (Legacy)
User Intent Node
Dialog Node
Entity Node
Supported Entity Types
Composite Entities
Supported Colors
Supported Company Names
Form Node
Logic Node
Message Nodes
Confirmation Nodes
Bot Action Node
Service Node
Custom Authentication
2-way SSL for Service nodes
Script Node
Agent Transfer Node
WebHook Node
Grouping Nodes
Connections & Transitions
Manage Dialogs
User Prompts
Knowledge Graph
Terminology
Building
Generation
Importing and Exporting
Analysis
Knowledge Extraction
Train
Build
Alert Tasks
Introduction
Ignore Words and Field Memory
How to Schedule a Smart Alert
Small Talk
Digital Views
Introduction
How to Configure Digital Views
Digital Forms
Overview
How to Configure Digital Forms
NATURAL LANGUAGE
Overview
Machine Learning
Introduction
Model Validation
Fundamental Meaning
Introduction
NLP Guidelines
Knowledge Graph
Traits
Introduction
How to Use Traits
Ranking and Resolver
Advanced NLP Configurations
INTELLIGENCE
Overview
Context Management
Overview
Session and Context Variables
Context Object
How to Manage Context Switching
Manage Interruptions
Dialog Management
Sub Intents & Follow-up Intents
Amend Entity
Multi-Intent Detection
Sentiment Management
Tone Analysis
Sentiment Management
Event Based Bot Actions
Default Conversations
Default Standard Responses
TEST & DEBUG
Talk to Bot
Utterance Testing
Batch Testing
Record Conversations
Conversation Testing
CHANNELS
PUBLISH
ANALYZE
Overview
Dashboard
Custom Dashboard
Overview
How to Create Custom Dashboard
Conversation Flows
NLP Metrics
ADVANCED TOPICS
Universal Bots
Overview
Defining
Creating
Training
Customizing
Enabling Languages
Store
Smart Bots
Defining
koreUtil Libraries
SETTINGS
Authorization
Language Management
PII Settings
Variables
Functions
IVR Integration
General Settings
Management
Import & Export
Delete
Bot Versioning
Collaborative Development
Plan Management
API GUIDE
API Overview
API List
API Collection
SDKs
SDK Overview
SDK Security
SDK App Registration
Web SDK Tutorial
Message Formatting and Templates
Mobile SDK Push Notification
Widget SDK Tutorial
Widget SDK – Message Formatting and Templates
Web Socket Connect & RTM
Using the BotKit SDK
Installing
Configuring
Events
Functions
BotKit SDK Tutorial – Agent Transfer
BotKit SDK Tutorial – Flight Search Sample Bot
Using an External NLP Engine
ADMINISTRATION
HOW TOs
Create a Simple Bot
Create a Banking Bot
Transfer Funds Task
Update Balance Task
Context Switching
Using Traits
Schedule a Smart Alert
Configure UI Forms
Add Form Data into Data Tables
Configuring Digital Views
Add Data to Data Tables
Update Data in Data Tables
Custom Dashboard
Custom Tags to filter Bot Metrics
Patterns for Intents & Entities
Build Knowledge Graph
Global Variables
Content Variables
Using Bot Functions
Configure Agent Transfer
RELEASE NOTES

How to Add Data into Data Tables from UI Forms

In this How-To, we will explore a scenario in a Banking Bot, where the user can create an additional account.

We will see how data collected from the UI Forms can be used to create the account in a Data Table.

For details on what UI Forms are and how it is implemented in the Kore.ai Bots platform, refer here.
For details on what Data Tables are and how it is implemented in the Kore.ai Bots platform, refer here.

Problem Statement

Consider a Banking Bot trying to address the following scenarios:

  1. An already registered user wants to open an additional account.
  2. There are three types of accounts that are available, each with further options:
    • Savings Account;
    • Checking Account with an option to opt for a Cash Card and set a Minumum Balance;
    • Credit Card with an option to choose the type of card to be Platinum, Gold, Silver or Basic
  3. The above data is collected from the user using a UI form.
  4. This data needs to be updated to the data table.

Pre-requisites

  • Bot building knowledge
  • A Banking Bot with access to
    • Customer details table as created here
    • Account details table, using the same steps shown in the above link create the following data table:
      1. Name, say accountdetails;
      2. Description, say Account details Table;
      3. Under the Column section add the following details:
        Column Name Type Required Additional Settings
        AccountId number Yes Encrypted & Max Length of 5
        AccountName string Yes
        AccountType string No
        CustId number Yes Reference table & column as
        customertable.CustId
        CashCard string No
        WithdrawalLimit number No
        CCType string No

    • UI Form, we will be using the UI Form configured as shown here.

Configurations

Let us consider each of the following scenarios one by one:

  1. Dialog Task to:
    1. capture the customer id;
    2. trigger the UI Form to gather account details; and
    3. invoke the service node to add the account data.

Dialog Task Configuration

We will be creating a dialog task and adding a form node to trigger the UI Form created in the above step and use a service node to make a service call to add the new account from the form data.

Create Dialog Task

  1. From the left navigation menu, select Bot Tasks -> Dialog Tasks.
  2. Click the + against the Dialog Tasks to create a new Task
    • Enter IntentName, say, AddAccount
    • Create & Proceed to open the dialog builder page.
  3. Retain the Intent Node default settings, and close the Intent Node.
  4. Click the + next to the intent node and select the Entity node. This will be used to capture the customer id
    1. Enter Name, say, CustId
    2. Select Type, as Number
    3. User Prompt, as Enter your Customer Id
    4. Close the entity node.
  5. Add a Service node to check for the validity of the customer id entered.
  6. Add a Logic node to proceed with the Form if the customer id is valid else prompt for the customer id.
  7. The InvalidCustId is a Message node with the following JavaScript:
    context.entities.CustId = null;
    print('You have entered an invalid customer id, try again');
  8. Next, add a Form node and from the dropdown list select the form (OpenAccount).
    • You will be prompted to select the Form Experience. Kore.ai Bots platform allows you to gather user input both from the form and through conversation based on the channel.
    • For this use case, let us select Only Form UI experience.
    • A Form Node would be added, you can customize the form name, etc.
    • We are changing the Name to OpenAccountForm and Display Name to Form to open account.
  9. Using a Service node, fetch any existing account details for the customer id.
  10. Next, we will see how to capture the values returned by the Form Node using a Script node and process the same to get the next account id value and set to null the unwanted fields.
    • Use the following script:
      //get the next account id
      var resultSet = context.GetAcctData.response.body.queryResult;
      var id = 0;
      
      if (!resultSet.length) {
          id=1;
      } else {
          for (var i=0; i<resultSet.length; i++) {
              if (id < resultSet[i].AccountId) {
                  id = resultSet[i].AccountId;
               }
              }
          id++;    
          }
      context.accountid = id;
      context.name=context.GetCustData.response.body.queryResult[0].CustName;
      
      //set unwanted fields to null
      if (context.forms.OpenAccount.accounttype == 'Savings')
      	{ context.cashcard = null;
      	  context.withdrawallimit = null;
      	  context.cardtype = null;
      	  context.type=context.forms.OpenAccount.accounttype;
      	  }
      	  
      if (context.forms.OpenAccount.accounttype == 'Checkings')
      	{ context.cardtype = null;
            context.cashcard = context.forms.OpenAccount.cashcard;
      	  context.withdrawallimit = context.forms.OpenAccount.withdrawallimit;
      	  context.type=context.forms.OpenAccount.accounttype;
      	  }
      	  
      if (context.forms.OpenAccount.accounttype == 'Credit Card')
      	{ context.cashcard = null;
      	  context.withdrawallimit = null;
      	  context.cardtype = context.forms.OpenAccount.cardtype;
      	  context.type=context.forms.OpenAccount.accounttype;
      	  }
  11. Use a Service node to add the account details using the context variables populated in the previous Script node.
  12. Your dialog with form and service nodes to update the data table is ready.
  13. Talk to bot and follow the steps to add an account to a given customer id.

Conclusion

In this post, we have seen:

  • How to fetch data from data tables;
  • How to trigger the From from a Dialog;
  • How to add the data captured from the form to a data table.