これからサンプルのバンキングBotを作成するステップを詳しく説明しています。このBotは開発者向けドキュメントのハウツーセクションで紹介されているさまざまな使用事例のシナリオで使用されます。前提条件:
- Kore.aiのBotプラットフォームへのサインアップが必須となります
- Bot構築の基本についておさえている必要があります(こちらのリンクを参照してください)
- 簡単なBotを作成している必要があります(例としてこちらを参照してください)
- 残高取得タスクを使用してバンキングBotを作成している必要があります(例としてこちらを参照してください)
Botの概要
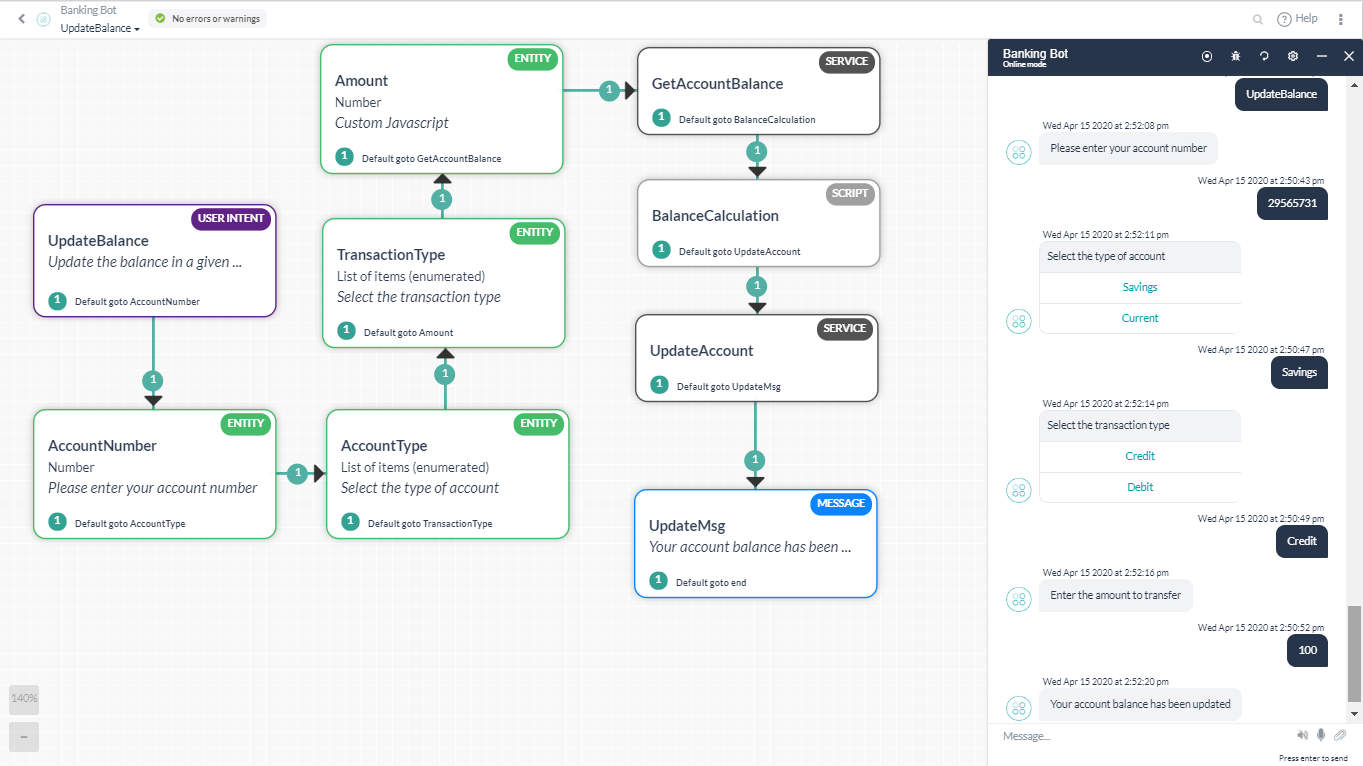
構築するBotは基本的な銀行取引を実行します。このBotは次のことを行います。
- ユーザーが入力した口座番号と口座タイプに基づいて口座残高を取得します(こちらをご覧ください)。
- 残高から口座を更新します。
- 指定した金額を支払人の口座から受取人口座に送金します。
残高確認タスクを追加しましょう。
残高インテントの確認
- 残高確認タスクでは、口座番号と口座タイプ(普通預金/当座預金)を入力するようにユーザーに促します。
- 次に、更新のタイプ(クレジットまたはデビット)、および更新する金額の入力を求められます。
- 詳細を取得し、残高を計算するためにサービスコールが行われ、次に別のサービスコールを行って残高を更新します。
- 成功/失敗を示すメッセージが表示されます。
ステップ1:ダイアログタスク
- 残高取得タスクがすでに設定されているバンキングBotを開きます。詳細はこちらをご覧ください。
- 左側のナビゲーションパネルにカーソルを合わせてBotタスクを選択すると、Botタスクページに移動します。
- ダイアログタスクセクションの+をクリックしてください。
- 新しいBotタスク画面が開きます。
- 次の詳細事項を入力します。
- インテント名-インテント名を入力します。これはダイアログをトリガーするフレーズとなります。インテント名は3〜4語以内のシンプルなものにしてください(残高確認など)。
- 詳細オプションで、説明およびその他のダイアログ関連の詳細を追加することができます。ここでは、デフォルト設定を変更せずに保持しておきましょう。
- 作成して続行をクリックします。
- ユーザーインテントのプロパティパネルが表示されます。デフォルトのプロパティを保持しておきます。
- ユーザーインテントのプロパティパネルを閉じます。
ステップ2:エンティティノード
エンティティノードは通常、ユーザーから情報を収集するために使用されます。ここでは、口座番号、口座タイプ、取引タイプおよび金額のユーザー入力を取得するために使用します。
- ユーザーインテントノードの横にある+をクリックします。
- エンティティオプションを選択します。
- 残高取得タスクの設定時に作成した口座番号エンティティを選択します。
- AccountNumberエンティティのプロパティパネルを閉じます。
- 口座番号ノードの横の+をクリックします。
- エンティティオプションを選択します。
- 残高取得タスクの設定時に作成した口座タイプエンティティを選択します。
- AccountTypeエンティティのプロパティパネルを閉じます。
- 口座タイプノードの横の+をクリックします。
- エンティティオプションを選択します。
- 新しいエンティティノード+をクリックします。
- エンティティノードのプロパティパネルが表示されます。
- 次の詳細事項を入力します。
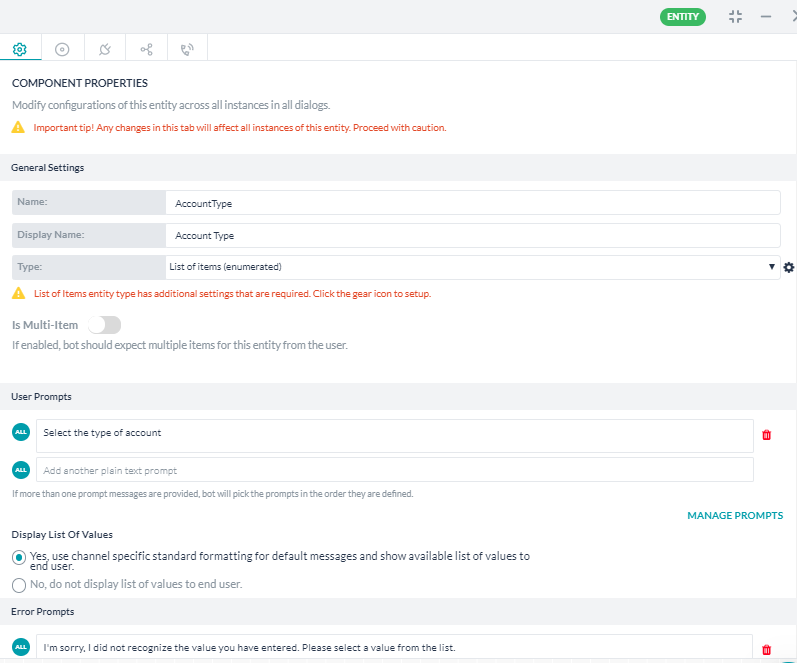
- 名前: TransactionType
- 表示名: Transaction Type
- タイプ:ドロップダウンから項目リスト(列挙)を選択します。ユーザーが選択可能な値のリストを用意する必要があります。
- フィールドの横に表示される設定アイコンをクリックします。
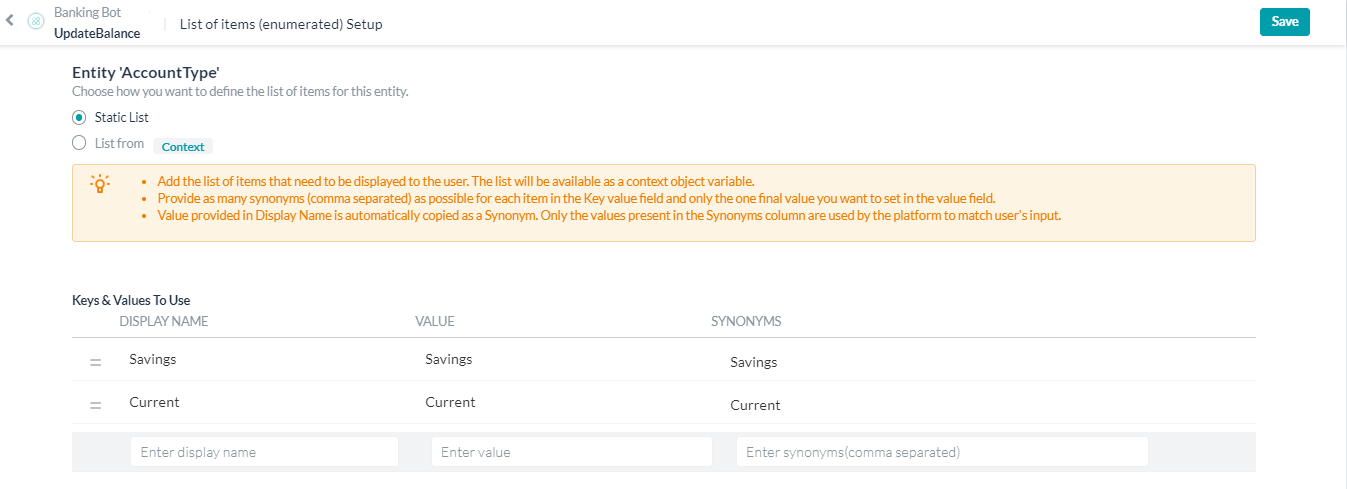
- 静的なリストを選択します。
- 表示名にクレジットおよびデビットのオプションを別々の行へ入力します。値列と同義語列は自動入力されますので、そのままにします。

- 保存をクリックします
- エンティティのプロパティパネルに戻ります。
- ユーザープロンプト:次のテキストを入力し、Enterキーを押して保存します。
Select the transaction type. - 値のリストの表示:はい、デフォルトのメッセージにチャネル固有の標準フォーマットを使用し、利用可能な値のリストをエンドユーザーに表示しますをマークします。これにより、サポートされているチャネルのボタンテンプレートに値のリストが表示されます。
- TransactionTypeエンティティのプロパティパネルを閉じます。
- 次の詳細事項を入力します。
- 取引タイプノードの横の+をクリックします。
- エンティティオプションを選択します。
- 新しいエンティティノード+をクリックします。
- エンティティノードのプロパティパネルが表示されます。
- 次の詳細事項を入力します。
- 名前:金額
- 表示名:金額
- タイプ:数
- ユーザープロンプト:次のテキストを入力し、Enterキーを押して保存します。
Enter the amount to transfer
- 金額エンティティのプロパティパネルを閉じます。

ステップ3:サービスノード-残高取得
サービスノードを使用することで、バックエンドのAPIコールを行うことができます。ここでは、サービスノードを使用してAPIを呼び出し、ユーザーが入力した口座番号の口座残高を取得します。このチュートリアルでは、仮のAPIセットアップを使用します。この目的のために特別に作成された模擬APIを、FirstName、LastName、Address、City、Country、ZipCode、AccountNumber、AccountType、Balance、のフィールドで使用します。
- 金額エンティティノードの横の+をクリックします
- サービスを選択します。サービスノードは、バックエンドAPIコールで口座残高情報を取得するために使用されます。
- 新しいサービスノード+をクリックします。
- サービスノードのプロパティパネルが表示されます。
- 次の詳細事項を入力します。
- 名前:GetAccountBalance
- 表示名:口座の残高取得
- サービスの種類:カスタムサービス
- タイプ:Webサービス
- サブタイプ:REST
- リクエストの定義をクリックします。
- リクエストページの定義では、次の詳細を入力します。
- リクエストのタイプ–取得
- リクエストURL–
https://5c3c633d29429300143fe4d2.mockapi.io/AccountDetails?filter={{context.entities.AccountNumber}}仮のAPIサービスの制限により、指定された口座番号の記録を取得する代わりに、必要な口座番号の応答をフィルタリングしています。 - このAPIでは、認証またはヘッダーパラメータは必要ありません。
- テストリクエストタブを選択します。
- サンプルコンテキスト値セクションに口座番号を入力します。これはAPIに必要なフィルターパラメータであり、02929664の口座番号を使用できます。
- テストボタンをクリックします。
- テストが完了するのを待ち、ステータスを取得します。200
- APIコールによってレコードの配列が返されるのが分かりますので、次のステップではJavaScriptを使用して値を解析します。
- サンプル応答として保存をクリックします。
- 保存をクリックします
- リクエストページの定義では、次の詳細を入力します。
- サービスプロパティパネルを閉じます。
ステップ4:スクリプトノード
スクリプトノードを使用することで、プログラミングロジックをBotに組み込むことができます。ここでは、スクリプトノードを使用して、ユーザーが指定した金額を口座にクレジット/デビット入力します。
- GetAccountBalanceノードの横の+をクリックします。
- スクリプトを選択します(スクリプトノードは更新する残高を計算するために使用されます)。
- 新しいスクリプトノード+をクリックします。
- スクリプトノードのプロパティパネルが表示されます
- 次の詳細事項を入力します。
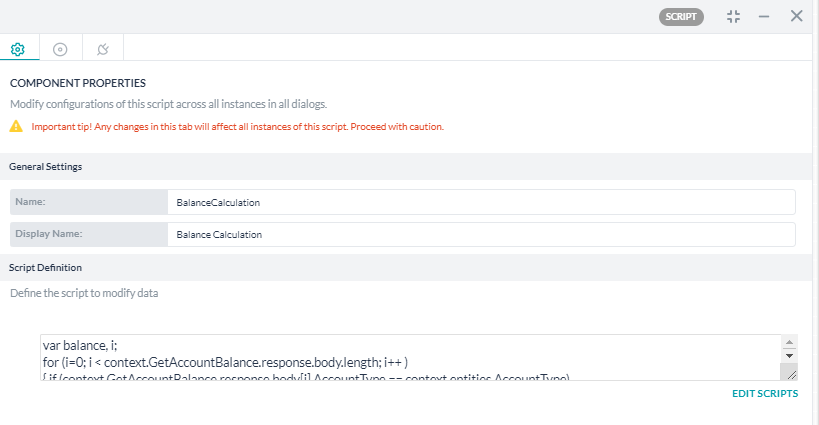
- 名前:BalanceCalculation
- 表示名:残高計算
- スクリプトを定義セクションからスクリプト定義リンクをクリックします。
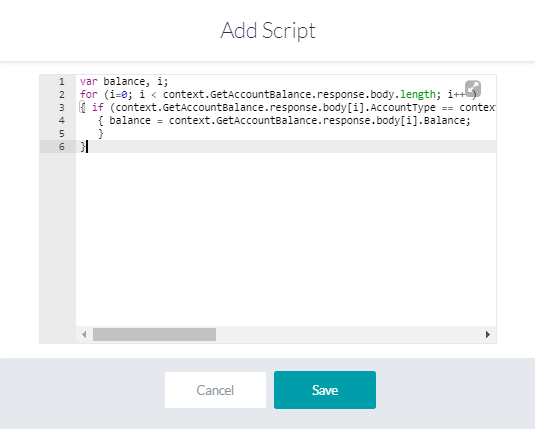
- スクリプトを追加ウィンドウに次のスクリプトを入力します。このスクリプトは、最初に口座タイプを確認してユーザーエントリと一致させ、次にそのレコードの残高を抽出します。
var balance, i;
for (i=0; i < context.GetAccountBalance.response.body.length; i++ )
{ if (context.GetAccountBalance.response.body[i].AccountType == context.entities.AccountType)
   { balance = parseFloat(context.GetAccountBalance.response.body[i].Balance);
   }
}
- 保存をクリックします
- スクリプトプロパティパネルを閉じます。
ステップ4:サービスノード-残高確認
ここでは、サービスノードを使用してAPIを呼び出し、ユーザーが入力した口座番号の口座残高を更新します。このチュートリアルでは、仮のAPIセットアップを使用します。
- BalanceCalculationスクリプトノードの横の+をクリックします。
- サービスを選択します。サービスノードは、バックエンドAPIコールで口座残高情報を更新するために使用されます。
- 新しいサービスノード+をクリックします。
- サービスノードのプロパティパネルが表示されます。
- 次の詳細事項を入力します。
- 名前:UpdateBalance
- 表示名:確認更新
- サービスの種類:カスタムサービス
- タイプ:Webサービス
- サブタイプ:REST
- リクエストの定義をクリックします。
- リクエストページの定義では、次の詳細を入力します。
- リクエストのタイプ–PUT
- リクエストURL–
https://5c3c633d29429300143fe4d2.mockapi.io/AccountDetails/{{context.entities.AccountNumber}} - このAPIでは、認証パラメータは必要ありません。
- Bodyタブで、タイプをアプリケーション/jsonとして選択します。
- テストリクエストタブを選択します。
- サンプルコンテキスト値セクションに口座番号および残高を入力します。
- テストボタンをクリックします。
- テストが完了するのを待ち、ステータスを取得します。200
- サンプル応答として保存をクリックします。
- 保存をクリックします
- リクエストページの定義では、次の詳細を入力します。
- サービスプロパティパネルを閉じます。
ステップ5:メッセージノード
メッセージノードは、Botからユーザーへメッセージを表示するために使用されます。ここでは、メッセージノードを使用して成功メッセージを表示します。
- GetAccountBalanceサービスノードの横の+をクリックします。
- メッセージを選択し、新しいメッセージノード+をクリックします。
- メッセージノードのプロパティパネルが表示されます。
- 次の詳細事項を入力します。
- 名前:UpdateMessage
- 表示名:メッセージの更新
- Botの応答:
Your account balance has been updatedと入力し、Enterを押して保存します。
- Botの応答プロパティパネルで、接続アイコンをクリックして接続タブを開きます。
- デフォルトの接続を接続なしからダイアログの終了に変更します。
- 保存をクリックします
- プロパティパネルを閉じます。
テスト
ダイアログタスクをテストするには、右下隅にある「Botとの会話」を使用できます。次の発話(インテント名)を入力してください-「残高取得」次のBotの指示に従ってください。
- 口座番号を入力してください-29565731
- 口座種類を選択してください-普通預金または当座預金
- 取引タイプを選択します(クレジットまたはデビット)
- 金額を入力します-100
- 成功メッセージを参照してください。
次のステップ
バンキングBot完成まであと少しです。Botに「残高取得」および「残高確認」ダイアログタスクが正常に追加されました。次のステップは、資金移動タスクの追加です。こちらをクリックして先に進みます。


