こちらで、Kore.aiのバーチャルアシスタントプラットフォームでの通知タスクの設定方法について確認しました。このセクションでは、RESTサービスのAPIリクエストを設定する方法について説明します。
以下の図は、一般タブで定義済みのウェブサービスとして指定された接続タイプおよびRESTに設定された接続モードの通知タスクの通知を編集―<タスク名>にあるAPIリクエストタブの一例です。
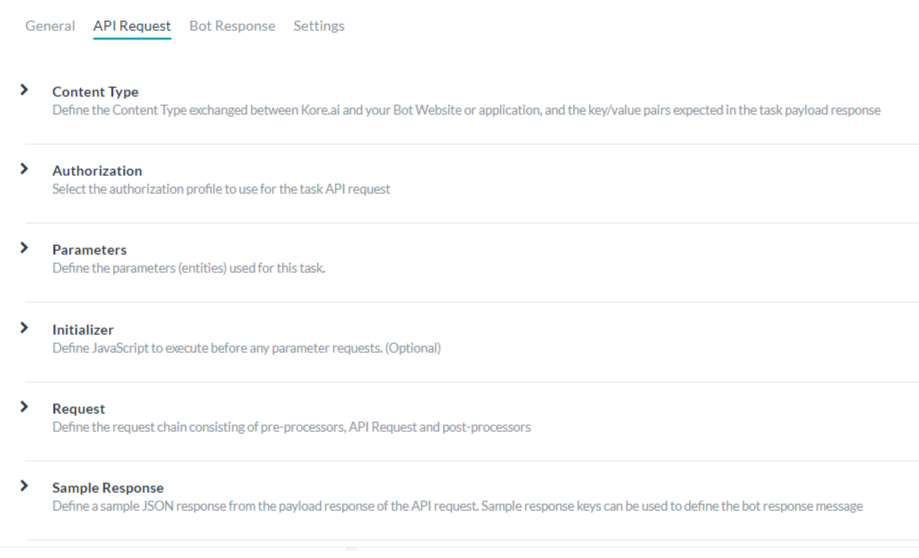 ウェブサービスとして指定された接続タイプおよびRESTに設定された接続モードには、以下を定義する必要があります。
- コンテンツタイプ―Kore.aiおよびご使用のウェブアプリケーションの間に交換されるデータのタイプ。詳細は以下をご確認ください。
- 認証―通知タスクが必要な場合、APIにアクセスするために認証を定義する必要があります(例:基本認証、OAuth、APIキーなどを使用する)。詳しくはこちらを参照してください。
- パラメータ―APIリクエストの処理に使用される1つ以上のパラメータを定義します。例えば、ユーザープロンプトからの入力、エンドユーザーによる選択肢のリストからの選択、URLなどです。詳細は以下をご確認ください。
- イニシャライザー―Webサービスがコードの実行やセッション変数の設定、APIリクエストの実行前にユーザーコンテキストの詳細を変更する必要がある場合、タスクインスタンスを作成する前に実行とするカスタムJavaScriptを指定してください。詳細は以下をご確認ください。
- リクエスト―Webサービスからボットプラットフォームへのデータペイロードの配信を開始するために、URLとボットへのパースを使用してタスクを開始するためにWebサービスへのAPIコールを行うために使用するリクエストチェーンを定義します。リクエストチェーンはプリプロセッサー、APIリクエスト、およびポストプロセッサーが含めます。詳細は以下をご確認ください。
- 応答 サンプル – タスクのペイロードで受け取ることが求められるキー/値のペアを定義します。ご提供のキーは、エンドユーザーに表示するデータを処理するためのドロップダウンの選択肢として利用できます。詳細については、以下後ご確認ください。
- 投稿でウェブサイトのリンクコンテンツをプレビュー―タスク注意メッセージにあるウェブサイトのプレビューコンテンツを表示します。詳細は以下をご確認ください。
保存をクリックしてAPIリクエストの設定を保存します。
コンテンツタイプの定義
コンテンツタイプは、Kore.aiとBotのウェブサイトやアプリケーションとの間で交換されるデータのタイプと、タスクのペイロード応答で予想されるキーと値のペアについて説明します。API リクエスト (REST) のコンテンツ タイプを定義するには、[コンテンツ タイプ] タブを開いて、次のオプションのうちの 1 つを選択します。 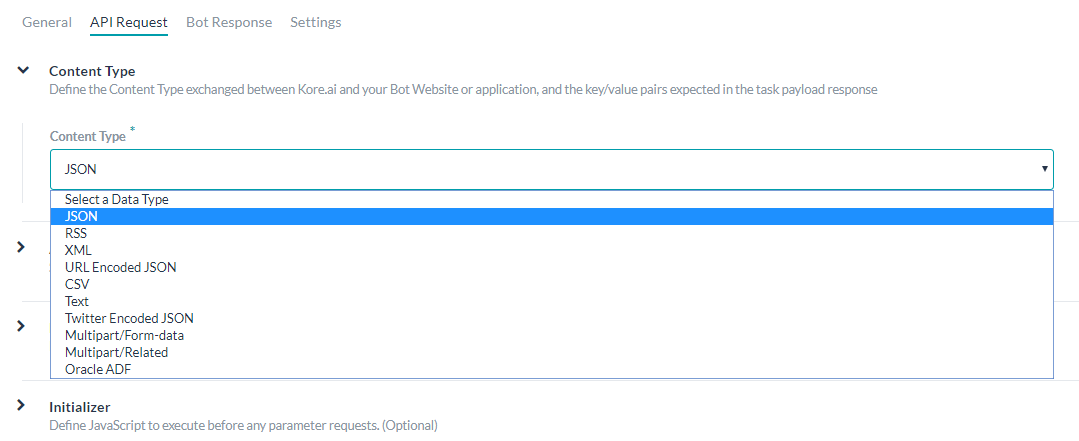
- JSON – JavaScript Object Notation は、人間が判読できるテキストでデータ オブジェクトを属性と値のペアで送信する、オープンな標準フォーマットです。JSON を使って、Kore.ai サーバーとボット Web アプリケーションの間でデータを伝送することができます。
- RSS―Rich Site SummaryやReally Simple Syndicationは、ブログのエントリー、ニュースの見出し、音声、動画など、頻繁に更新される情報を公開するために使用される標準化フォーマットの一群です。
- XML―拡張可能なマークアップ言語とは、人間が読める形式と機械が読める形式の両方でドキュメントをエンコードするためのルールを定義したマークアップ言語です。Web サービスが XML データを処理するのに、XML スキーマがよく使用されます。
- URL エンコードされた JSON – 予約文字のために JSON のエンコードを使った URL です。
- CSV – カンマ区切りの値のリストです。
- 文字―テキストベースのキー値ペア。
- Twitter エンコードされた JSON – 予約文字のために JSON のエンコードを使った Twitter の URL です。
- Multipart/Form-data – ユーザーがフォームからファイルをアップロードできるようにする場合に、HTTP POST リクエスト メソッドでファイル送信を可能にするエンコード タイプです。
- Multipart/Related – 同じ情報を、他のフォームの他のボディ パーツで表示する場合に使用します。ボディ パーツは複雑度の高い順に並べられています。
- Oracle ADF – Oracle Application Development Framework に使用します。
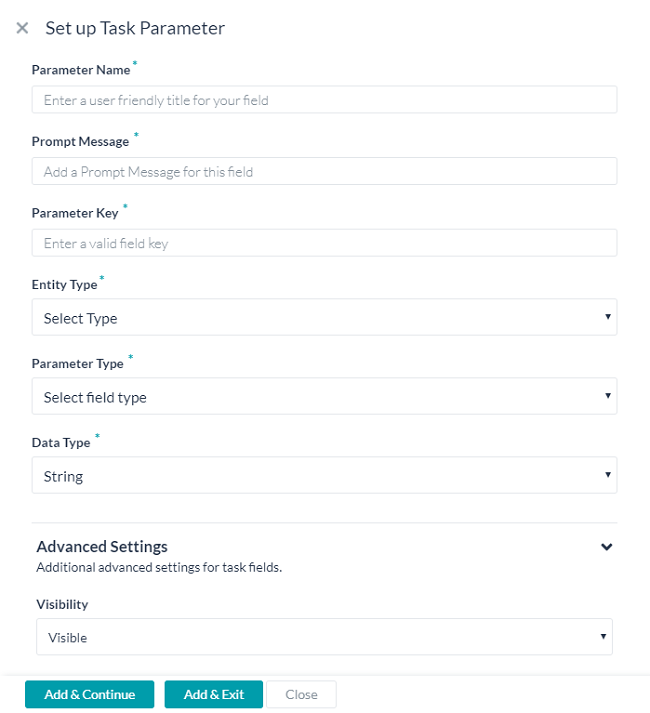
パラメータの定義
以下の手順で、APIリクエスト(REST)のパラメータを定義します。
- パラメータのセクションをクリックして、次に追加をクリックします。 タスクパラメータの設定ダイアログが開きます。

- ご選択の次第、下記のテーブルの説明の通りに関連のフィールド値を入力してください。
フィールド名 説明 タスク パラメーターのタイプ 次のうちの 1 つを指定します。 - ペイロード パラメーター – POST、PUT、GET、DELETE などの HTTP メソッドによるフィールド タイプでペイロード データを示します。例えば:
{ "taskId":"{payloadfield2}", "message":"{payloadfield1}" } - クエリ パラメーター – このフィールド タイプは URL パスの一部や URL にあるクエリとして使用されます。例えば:
http://app.asana.com/api/workspaces/{queryfield1}/project/{queryfield2}?userId={queryfield3}
パラメータ名 タスクのタイトルの入力フィールドはユーザーに表示します。例えば、アカウントを選択 プロンプトメッセージ パラメータ名の下に表示するヘルプ説明です。例えば、アクセスとするアカウントはどちらですか? パラメータキー タスクキーは収集とするエンドユーザーの入力の値を示します、例えば、アカウントタイプ。 パラメータタイプ 上級オプションが選択された場合、エンドユーザーインターフェイスに表示されるフィールドのタイプを指定して、リクエストオブジェクトへのユーザー入力の割り当てキー値として収集します。デフォルト設定はテキストボックスですが、以下のうちの一つにカスタムすることは可能です : - 日付 – [フォーマット] フィールドを表示します。ここでは、エンドユーザーが自分のアカウントにタスクが設定されている場合に定義する日付フォーマットの構文を選択できます。[日付フォーマット選択] のドロップダウン リストから、次のうちの 1 つを選択します。
- dd-MM-YYYY – 例:16-05-1999
- MM-dd-YYYY – 例:05-16-1999
- dd-MM-YY – 例:16-05-99
- YYYY-MM-dd – 例:1999-05-16
- URL – 正しい URL 構文のためのフィールド検証を含む、エンドユーザーによる URL 入力用のテキスト ボックスを表示します。[プレースホルダー] フィールドには、テキストボックスに表示されるヘルプヒントを入力します。たとえば、「こちらにウェブサイトのURLを入力してください」のようなものです。
- テキストボックス―エンドユーザーにタスクの入力フィールドとして文字入力のためのテキストボックスを表示します(通常は数語程度)。[プレースホルダー] フィールドには、テキストフィールドに表示されるヘルプヒントを入力します。たとえば、「追加する名前を入力してください」のようなものです。
- 静的ドロップダウン – エンドユーザーに選択肢のドロップダウン リストを表示します。オプションの追加をクリックして以下のパラメータでエンドユーザーに表示する項目リストの追加を始まります:
- オプション名 – エンドユーザーに表示されるオプションの名前です。
- オプション値―アプリケーションに返すオプション名という値と示します。
- デフォルト値 – 1 点以上のオプションが定義されている場合、オプションのデフォルト値を選択します。
- 検索可能―選択するとダイナミック検索、そしてこのフィールドにエンドユーザーが入力する文字の表示を可能にします、もし一致がない場合、フリーフォームのエントリが可能です。
[保存] をクリックします。項目を追加する場合、オプションを追加をもう一度クリックします。動作コラムのオプション編集または削除します。
- ダイナミックドロップダウン―BotのURLからの応答に基づいて、実行時に動的に生成されるドロップダウンリストを表示します(例:JIRA タスク通知用のプロジェクト一覧)。以下のダイナミックに配置されるドロップダウンへのプロパティを定義します。
- エンドポイント URL – BotのエンドポイントのURLです。例:https://app.asana.com/api/1.0/workspaces
- エンドポイントのコンテンツタイプ―指定されたエンドポイントURLから予想されるコンテンツタイプ。以下のうちの一つ:JSON、RSS、XML、URL エンコードされた JSON、CCV、文字、や Twitter エンコードされた JSON。
- エンドポイント メソッド – 次のうちの 1 つになります。
- GET– タスクフィールドのHTTPリクエストのGETメソッドを指定します。
- POST– タスク フィールドの HTTP リクエストの POST メソッドを指定します。
- 応答パース―希望するドロップダウンリストの値を含む応答内のパスです(例:データ)。
- ラベルキー – ドロップダウンオプションのラベルのキーです(例:名前)。
- オプション値キー – ドロップダウンオプションの値のキーです(例:ID)。
- idペイロード フィールドの追加 – 先行入力フィールドのオプションとして、 応答ペイロードから 1 つ以上のフィールドをクリックして追加します。各ペイロードフィルドについて、ペイロードフィールドのキーとペイロードフィールドの値を入力し、保存をクリックします。動作列でペイロードフィールドを編集または削除します。
- 検索可能―選択するとダイナミック検索、そしてこのフィールドにエンドユーザーが入力する文字の表示を可能にします、もし一致がない場合、フリーフォームのエントリが可能です。
- テキストエリア―エンドユーザーがタスク入力としていくつのテキストを入力するためのテキストエリアを表示します。[プレースホルダー] フィールドに、テキスト ボックス内にエンドユーザーに対して表示するヘルプ ヒントを入力します。
- 先行入力 – タスクに定義されたURLからの応答に基づく検索結果に一致する文字をユーザーが 3 文字以上入力すると、動的に入力されたドロップダウンリストの選択肢が実行時にエンドユーザーに表示されます。例えば、JIRAのタスク通知メッセージのプロジェクト一覧です。以下のダイナミックに配置されるドロップダウンへのプロパティを定義します。
- エンドポイント URL – BotのエンドポイントのURLです。例:https://app.asana.com/api/1.0/workspaces
- エンドポイントのコンテンツタイプ―指定されたエンドポイントURLから予想されるコンテンツタイプ。以下のうちの一つ:JSON、RSS、XML、URL エンコードされた JSON、CCV、テキスト、Twitter エンコードされた JSON、Multipart/Form-data または Multipart/Related。
- エンドポイント メソッド – 次のうちの 1 つになります。
- GET– タスクフィールドのHTTPリクエストのGETメソッドを指定します。
- POST– タスク フィールドの HTTP リクエストの POST メソッドを指定します。
- 応答パース―希望するドロップダウンリストの値を含む応答内のパスです(例:データ)。
- ラベルキー – ドロップダウンオプションのラベルのキーです(例:名前)。
- オプション値キー – ドロップダウンオプションの値のキーです(例:ID)。
- ペイロードフィールドの追加 先行入力フィールドのオプションとして、 応答ペイロードから 1 つ以上のフィールドをクリックして追加します。各先行入力のフィールドオプションについて、ペイロードフィールドのキーとペイロードフィールドの値を入力し、保存をクリックします。動作列でペイロードフィールドを編集または削除します。
- 編集可能―先行入力の検索結果が一致しない場合のオプションとして、エンドユーザーがフィールドに自由にテキストを入力できるようにします。
- メール―エンドユーザーのメールアドレスを入力するためのテキストボックスを表示します。プレースホルダフィールドには、エンドユーザーに表示するのに役立つヒントをテキストボックス内に入力します。
- 日付と時間―エンドユーザーの日付と時間を入力するためのテキストボックスを表示します。フォーマットフィールドに、エンドユーザーに表示される日付の文字枠に、予想の日付や時間のフォーマットを入力してください。日付フォーマットの選択ドロップダウンリストで、 時間付きの日付のフォーマットを選択してください。
- タイムゾーン―操作システムの設定に基づくタイムゾーンのドロップダウンリストを表示します。
- 位置―エンドユーザーが地理的位置を入力するための文字枠を表示します。例えば、Orlando, FLまたは32801。
- 入れ子フォーム – 親入力フィールドの下に、エンドユーザーの入力フィールドを入れ子形式で表示します。入力フィールドのネスト化済のフォームに以下のフィールドを指定してください:
- 配列要素型 – 親の入力形式要素のデータ型を選択します。
- 入れ子フォーム フィールドの追加 – 1 つ以上の入れ子のフォーム フィールドをクリックして追加します。
- ファイル アップロード – アップロードするファイルの検索や選択ができるエンドユーザー コントロールを表示します。クリックして、[ファイル アップロード ペイロード キー] を入力します。ファイルアップロードペイロードキーが定義済の場合、ファイルアップロードペイロードフィールド値のドロップダウンリストで以下のうちの一つを選択してください:
- ファイル名
- ファイルサイズ
- ファイルコンテンツタイプ
データタイプ ユーザー入力タイプのうちの 1 つを選択します。 - 文字列 – ユーザーは任意の一連の数字、文字や特殊文字を入力することができます。
- 数字 – ユーザーは数字を入力することができます。特殊文字は使用できません。
- ブール値 – ユーザーは true または false のブール値を入力できます。
- メール – ユーザーは有効なメール アドレスを入力できます。
- オブジェクト – データは、JSON オブジェクトとしてボットから受信できます。 “location” : { “lat” : 17.4374614, “lng” : 78.4482878 }ここでは、リクエストチェインやタスクリクエストのプロパティをlocation.lat、location.lngとして参照することができます。
- 配列 – ユーザーは、カンマで区切った値のリストをボットに渡すことができます。例えば、グーグルカレンダーでは、複数の参加者のデータのパスは: “attendees”: [“user1”, “user2”, “user3”] 選択した場合、エンドユーザーの入力の配列のタイプを以下のいずれかに指定します。
- ペイロード パラメーター – POST、PUT、GET、DELETE などの HTTP メソッドによるフィールド タイプでペイロード データを示します。例えば:
- 文字列
- 数字
- ブール値
- メール
- 配列
- 日付
- 日付―ユーザーは完全な日付を入力するか、日付の選択肢から選択することができます。
Is Multi Select ユーザーは 1 つ以上の選択や入力が可能になります。このフィールドは選択されたフィールドタイプに従って表示されます。
- [詳細設定] タブをクリックして、タスク フィールドの追加のオプション設定を定義します。

フィールド名 説明 可視性 タスク入力フィールドをエンドユーザーから見えるようにするあるいは隠すかどうかを指定します。可視性フィールドはカスタム設定することもできます。ここでは、データはユーザーから取得されますが、クエリパラメータやペイロードフィールドとしては使用されません。例えば、JIRA Botの場合、以下のように@mentionタグを使用してチケットにコメントを投稿します。「@Mike、こちらの問題について調べてください」 JIRA APIで「コメントを投稿する」には1つのクエリフィールドおよび1つのペイロードフィールドが必須です: - IDの発行
- コメント
可視性フィールドをカスタムに設定すると、JIRA APIを使用して
@Mikeと呼ばれるユーザーのユーザー情報をキャプチャし、データを取得してcommentフィールドの値に追加することができますが、ペイロードフィールドやクエリフィールドとしては使用できません。可視性フィールドのデフォルト設定は表示です。必須 エンドユーザーがこの設定を定義してタスクの設定を保存する必要があるかどうかを選択します。 キーの置き換え Kore.ai によるキーの転置を無効にするかどうかを選択します。デフォルトでは、Kore.ai はキーと値のペアを転置します。例えば、”parameter”:”value” は Kore.ai によって “parameter:{value:”actualValue”} に転置されます。選択すると、キーは置換されません。 セッションから取得 選択すると、このフィールドのユーザー入力値をセッション変数として格納します。選択すると、[セッションからのフィールド値] のフィールドを表示します。既存の変数や [新規のセッション変数を追加] を選択して新規の変数を定義します。新規のセッション変数を作成するには、変数のスコープを選択し、変数を格納するキーを定義する必要があります。[スコープ] フィールドでは、次のうちの 1 つを選択します。 - EnterpriseContext – 企業全体のユーザーに使用できるキー/値ペアを定義します。
- BotContext – このボットの全ユーザーに使用できるキー/値ペアを定義します。
- UserSession – 企業内のすべてのボットに対して、このユーザーが使用できるキー/値のペアを定義します。
- BotUserSession – ユーザーの入力に基づいて、ボットが使用できるキー/値のペアを定義します。
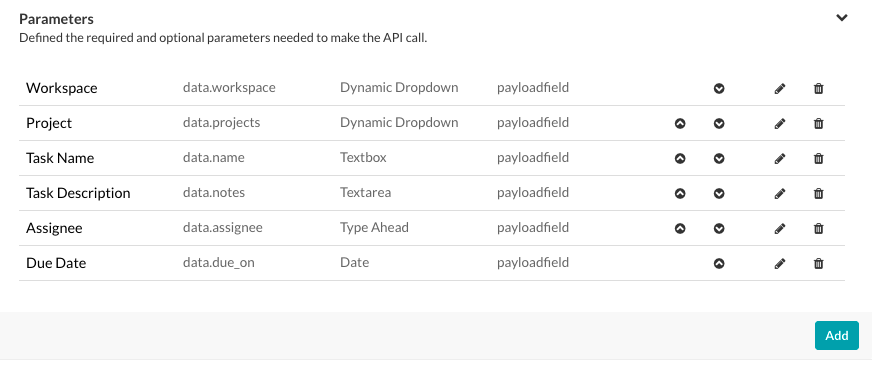
- タスク要求のパラメータを保存して別のパラメータを追加する場合は、追加して続行を、タスク要求のパラメータを保存してダイアログを閉じる場合は、追加して終了をクリックします。複数のパラメータを、ボットユーザーが入力を提供する順番で整理する必要があります。
 と
と アイコンを使用してパラメータを移動します。

初期化子の定義
タスクを実行するには、セッションの値をputやgetしてから、Kore.ai セッション固有の変数でタスクを実行とする場合があります。 詳細については、タスクのセッション変数とコンテキスト変数を使用を参照してください。あるウェブサービスはAPIリクエスト実行の前に、実行済のコード、セッション変数、またはユーザーのコンテキスト詳細の調整が必要です。例えば、ウェブサービスは、最初のステップとしてユーザーログインを行い、次にパートナー認証を行う、2段階のユーザー認証を必要とする場合があります。これらの両方のステップを検証してから、アクセストークンが付与され、そのウェブサービスへの後続のAPIコールのヘッダーで使用されます。イニシャライザーを使用すれば、パートナー認証の完成、そしてユーザーの認証への応答からのアクセストークンの取り戻すことができます。アクセストークンはカスタムセッション変数、そして後続のAPIコールのヘッダーとしての貯蔵が可能です。
タスク初期化子を定義する
タスクの初期化子を設定する場合、初期化子タブをクリックしてください。必須のコードを書き込むためのJavaScript編集器を開きます。 JavaScriptエディターで、以下のようにキーとスコープを定義します。
- EnterpriseContext – 企業の全ボットおよび全ユーザーが使用可能なキー/値ペアです。たとえば GitHub ボットでは、ユーザーが単一または複数の企業のリポジトリにアクセスする必要があります。初期化子では、以下のJavaScriptコードでリポジトリデータをGitrepository(エンタープライズコンテキスト)として保持することができます:
var userRepository = { "title": _labels_[repository], "value": repository }; EnterpriseContext.put('Gitrepository', userRepository, 200000); - BotContext – 当該ボットの全ユーザーが取得可能なキー/値のペアです。例えば、 ユーザーの場所に基づいて、セッション内の金融取引のデフォルト通貨を設定したい場合があります初期化子では、以下のJavaScriptコードでデフォルトの通過データをcurrency(Botコンテキスト)として保持することができます:
var defaultCurrency = { TODO Custom JavaScript for location-based currency } BotContext.put('currency', defaultCurrency, 200000); - UserContext – 企業の全ボットおよび全ユーザーが使用可能なキー/値ペアです。これらのキーは読み取り専用で、ユーザー データとしてシステムが提供します。
- _id – Kore.ai ユーザーの IDです。
- emailId – ユーザー IDと関連するメール アドレスです。
- lastName – ユーザーの姓です。
- firstName – ユーザーの名です。
- profImage – ユーザーの画像やアバター ファイル名です。
- profColour – ユーザーアカウントの色です。
- activationStatus – ユーザーのアカウント ステータスです。
- title – ユーザーのタイトルです。(定義されている場合)
- orgId – ユーザー アカウントの組織 ID です。(定義されている場合)
- UserSession – 企業内のすべてのボットに対して、特定ユーザーが利用できるキー/値のペアを定義します。たとえば、ユーザーの所在地を保存して全ボットで利用できるようにします。その例といえばユーザーの通勤、移動、および宅配便のサービスなどの住所位置です。初期化子では、以下のJavaScriptコードでデフォルト位置データをHomeLocation (UserSession)として保持することができます:
var location = { "title": labels[location], "value": { "latitude": location.latitude, "longitude": request.location.longitude } }; UserSession.put('HomeLocation', location, '20000'); - BotUserSession―ユーザーの入力に基づいてBotが利用できるキー/値のペアを定義します。例えば、 1つ以上のBotタスクのユーザー位置を保持したい場合があります。旅行ボットの場合、ユーザーは、同じホームと目的地の住所に基づいて航空便とホテルを予約することができます。初期化子では、以下のJavaScriptコードでデフォルトのホームおよび行先データをHomeLocation (BotUserSession)やDestinationLocation (BotUserSession)として保持することができます:
var homelocation = {
 "title": labels[request.sourceLocation],
 "value": {
 "latitude": request.sourceLocation.latitude,
 "longitude": request.sourceLocation.longitude
 }
};
BotUserSession.put('HomeLocation', homelocation, '20000');
var destlocation = {
 "title": labels[request.destLocation],
 "value": {
 "latitude": request.destLocation.latitude,
 "longitude": request.destLocation.longitude
 }
};
BotUserSession.put('DestinationLocation', destlocation, '20000’);
GET および PUT 構文
以下のコードの例とは各コンテキストタイプのキー値ペアをGETやPUTのシンタックスを表示します。
"EnterpriseContext" : {
       "get" : function(key){...},//get the specified key
       "put" : function(key, value, ttl){...} //put the value at the key for the specified ttl, ttl is in minutes
   },
   "BotContext" : {
       "get" : function(key){...},//get the specified key
       "put" : function(key, value, ttl){...} //put the value at the key for the specified ttl, ttl is in minutes
   },
   "UserContext" : {
       "get" : function(key){...},//get the specified key
   },
   "UserSession" : {
       "get" : function(key){...},//get the specified key
       "put" : function(key, value, ttl){...} //put the value at the key for the specified ttl, ttl is in minutes
   },
   "BotUserSession" : {
       "get" : function(key){...},//get the specified key
       "put" : function(key, value, ttl){...} //put the value at the key for the specified ttl, ttl is in minutes
   }
例えば:
    BotContext.put("topicSessionVariable","music",2000);
    UserSession.put("firstName","Mary",20000);
    UserContext.get("firstName");
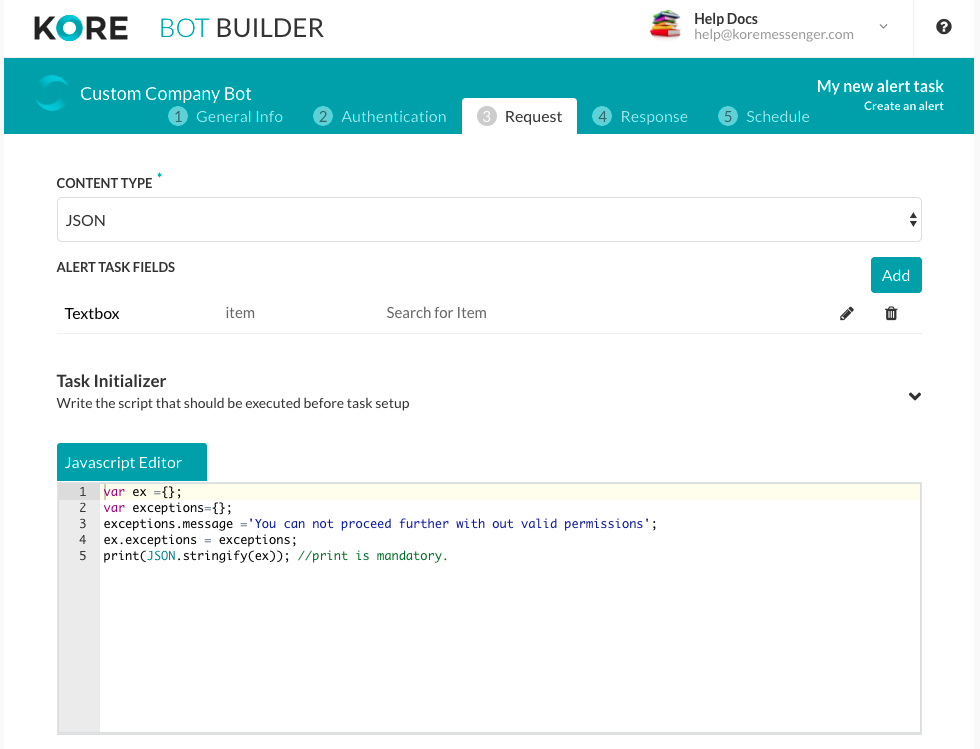
Exception Syntax
また、タスクを設定する前に、認証失敗などのエラーを捕捉するためのカスタムエラーメッセージを定義することもできます。例外を捕捉した場合、タスクの設置は中止します。以下のシンタックスを使用して例外を外せます:
{
    "exceptions": {
        "message": " Error Message"
    }
}
例えば、
var ex ={};
var exceptions={};
exceptions.message ='You can not proceed further with out valid permissions';
ex.exceptions = exceptions;
print(JSON.stringify(ex)); //print is mandatory.
初期化子セクションでは、セッションキーまたはその他のセッション変数を使用することができますが、値を設定したりアクセスしたりすることはできません。例えば、
var name = UserContext.get("firstName")+UserContext.get("lastName");
UserSession.put("fullName") = name;
先行コードの例では、タスクの詳細設定セクションのセッションから取得フィールドで定義されたタスクのパラメータを使用して、値をセッションに入力します。キーは、カスタム定義されたUserSessionコンテキスト変数のfullNameとして定義されます。
タスク初期化子の例
以下のコードは、タスクの初期化子でAPIリクエストに変数を先行発生するユーザーIDおよびメールのデータを取得する例です。
var x = UserContext.get("identities");
var isEmailFound = false;
for (var i = 0; i < x.length; i++) {
    if (x[i].type === "mapped") {
        var identity = x[i].val
        var arr = identity.split("/");
        var pattern = /^cs/i;
        var result = arr[0].match(pattern);
        if (result) {
            isEmailFound = true;
            UserSession.put("rtmEmail", arr[1], '20000');
        }
    }
}
if (!isEmailFound) {
    for (var j = 0; j < x.length; j++) {
        if (x[j].type === "email") {
            UserSession.put("rtmEmail", x[j].val, '20000');
        }
    }
}
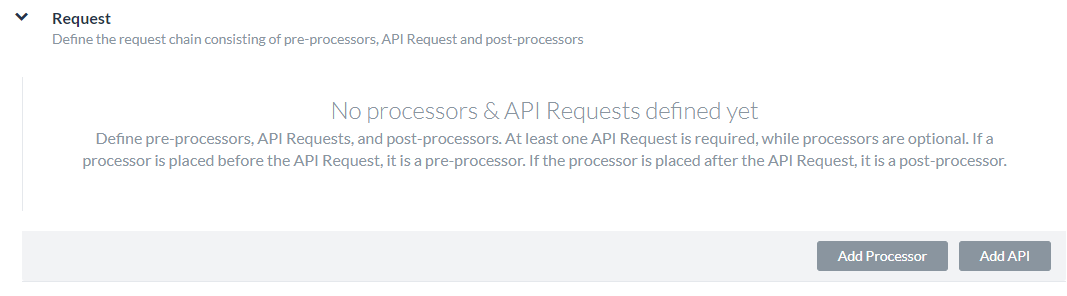
リクエストチェーンの定義
APIリクエストタブのリクエストセクションでは、プリプロセッサー、APIリクエスト、およびポストプロセッサーが含めるAPI リクエストチェーンの定義ができます。少なくとも一つのAPIリクエストが必須です。そしてプロセッサーは任意です。
APIリクエスト
あらゆるタスクにも、APIリクエストを定義してからウェブサービスへのコールでタスクを起始することができます。少なくとも各タスクに1点のAPIリクエストが必須です。各APIリクエストには、必ず単一や複数のリクエストURLsとパースをタスクに追加してからウェブサービスからのデータペイロード転送が始まります。
APIリクエストの設定
- APIリクエストタブで、リクエストタブを展開し、APIを追加をクリックします。
- 以下の処理の説明の通りに、APIの追加ダイアログでフィールドの値を指定します。
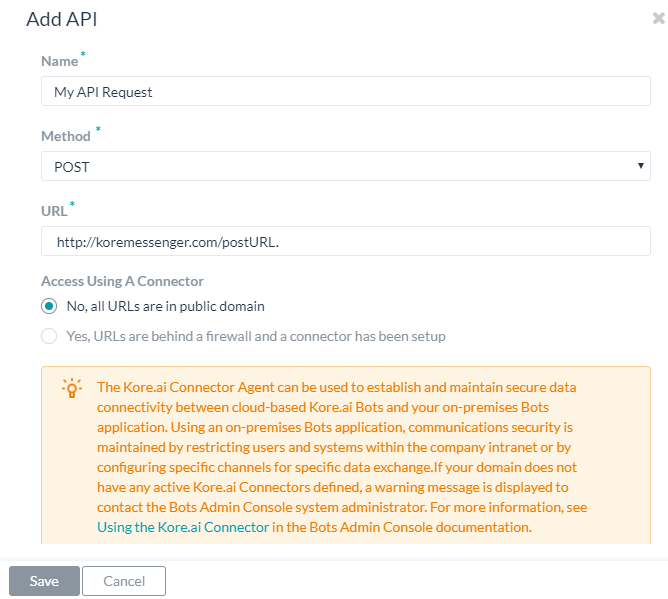
- 名前フィールドに、自分のAPIリクエストのように、APIリクエストの名前を入力します。
- [メソッド] ドロップダウン リストから、タスクに使用する HTTP メソッドを選択します。以下のうちの一つ:
- POST―顧客情報やファイルのアップロード、HTMLフォームの使用など、サーバーにデータを送信するために使用します。
- PUT ―対象となるリソースのコンテンツを、送信されたコンテンツに置き換えます。
- PATCH―対象となるリソースのコンテンツを、送信されたコンテンツに置き換えます。
- DELETE―既存のターゲットリソースのコンテンツを削除します。
- GET―既存のターゲットリソースのコンテンツを削除します。
- URLフィールドには、Botタスクがプロセスに応答するためのURLを指定します。例:http://koremessenger.com/postURL下記の例のようにセッション変数URLを使用することもできます:
https://mySite.crm.ondemand.com/sap/c4c/odata/v1/c4codata/ServiceRequestCollection?$filter=ID eq '{id}' and ReporterEmail eq '{userEmail}'&$expand=ServiceRequestHistoricalVersion,ServiceRequestDescription - コネクタを使用してアクセスのフィールドで、はいを選択してKore.ai Connectorエージェントを使用してKore.ai Botへのアクセスを有効にします。このオプションは、Kore.ai コネクタ エージェントが企業の社内ネットワークで構成、有効化されている場合に表示されます。詳細については、Kore.ai Connectorの使用をご覧ください。
- ヘッダータブのコンテンツタイプフィールドで、サンプル応答データに以下のサポートされているデータタイプのいずれかを選択します。
- JSON – JavaScript Object Notation は、人間が判読できるテキストでデータ オブジェクトを属性と値のペアで送信する、オープンな標準フォーマットです。JSON を使って、Kore.ai サーバーとボット Web アプリケーションの間でデータを伝送することができます。
- RSS―Rich Site SummaryやReally Simple Syndicationは、ブログのエントリー、ニュースの見出し、音声、動画など、頻繁に更新される情報を公開するために使用される標準化フォーマットの一群です。
- XML―拡張可能なマークアップ言語とは、人間が読める形式と機械が読める形式の両方でドキュメントをエンコードするためのルールを定義したマークアップ言語です。Web サービスが XML データを処理するのに、XML スキーマがよく使用されます。
- URL エンコードされた JSON – 予約文字のために JSON のエンコードを使った URL です。
- CSV – カンマ区切りの値のリストです。
- 文字―テキストベースのキー値ペア。
- Twitter エンコードされた JSON – 予約文字のために JSON のエンコードを使った Twitter の URL です。
- Multipart/Form-data – ユーザーがフォームからファイルをアップロードできるようにする場合に、HTTP POST リクエスト メソッドでファイル送信を可能にするエンコード タイプです。
- Multipart/Related – 同じ情報を、他のフォームの他のボディ パーツで表示する場合に使用します。ボディ パーツは複雑度の高い順に並べられています。
- Oracle ADF – Oracle Application Development Framework に使用します。
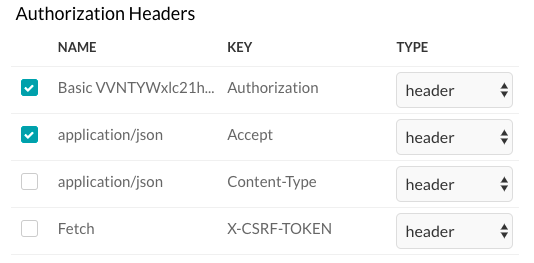
- [認証ヘッダー] セクションで、次の図に示すようにヘッダーのキーを有効化または無効化します。
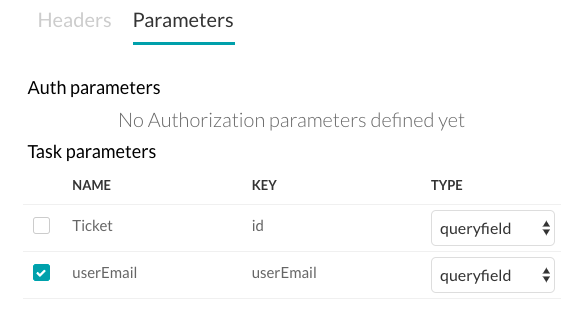
- パラメータタブで、下図のように認証パラメータまたはヘッダーに含めるパラメータを選択または削除します。

- 保存をクリックしてAPIリクエストの設定を保存して閉めます。


プロセッサー
プロセッサーでJavaScriptを使用してWebサービスへのAPIリクエストの前、途中、または後で、ユーザーセッションで収集されたデータの操作することができます。プロセッサーをAPIリクエストの前に定義し置ける場合、それはプリプロセッサーになります。プリプロセッサーはAPIリクエストの実行の前にセッションの変数から入力のパラメータと値の管理を可能にします。そのプロセッサーはAPIリクエストの後に順次配置とされた場合、ポストプロセッサーとなります。ポストプロセッサーを使用して、 APIリクエストからペイロード応答キーにアクセスできます。キーをアクセスするには、以下のうちの一つのポストプロセッサータイプを使用してください:
- 解決: キーにアクセスするには、次のうちの 1 つのポストプロセッサ タイプを使用します。解決:
- 展開 – ペイロードにあるデータ文字列を分けます。
- 抽出 – 複数のオブジェクトがあるペイロードの特定オブジェクトへのパスを指定します。
- 割り当て – ペイロード応答の変数名を指定します。
プリプロセッサ
プリプロセッサを使用すると、セッションの変数およびパラメーターで API リクエストの実行前にリクエスト パラメーターの管理ができます。プリプロセッサーを定義する場合、, 必ずプロセスのタイプをカスタムに設置し、次に表示するJavaScriptエディターでコードを入力します。プリプロセッサーは、カスタムタイプのみとなります。
プリプロセッサーの追加
- APIリクエストページで、リクエストタブを展開し、プロセッサーを追加をクリックします。

- 名前フィールドにプロセッサーの名前を入力します。
- プロセッサーのタイプドロップダウンリストで、プリプロセッサーにカスタムを選択する必要があります。
- 必要に応じて、以下の構文でリクエストパラメータを操作するコードを追加します。
{ "fields": { "payloadFields": { // to set value to a payload field "key1": "value1", // Payload fields are not applicable for Alert tasks. "key2": "value2".... }, "headerFields": { // to set value to a header field "key1": "value1", "key2": "value2".... }, "pathFields": { // to set value to a path field or query field. "key1": "value1", "key2": "value2".... } } }例えば、以下のコードスニペットはパースフィールド、またはAPIオブジェクトのクエリーフィールドの設置に使用することが可能です:
var fields= {}; var pathFields = {}; pathFields.fullName = UserContext.get("firstName")+UserContext.get("lastName") fields.pathFields = pathFields; var finalObject = {}; finalObject.fields = fields; print(JSON.stringify(finalObject));当該コードに、
firstNameおよびlastNameがセッション変数として保存されていてJohnおよびSmithがそれぞれに対応している場合、プリプロセッサからの JSON ペイロード応答は次のようになります。{ fields: { "pathFields": { "key": "fullName", "value": "John Smith" } } }下記のキー値ペアーの例では、実のAPIリクエストコールの先に変数はセッション変数に設定されます。
var fields = {}; var pathFields = {}; var UserEmailID = UserSession.get("rtmEmail"); pathFields.userEmail = UserEmailID; fields.pathFields = pathFields; var finalObject = {}; finalObject.fields = fields; print(JSON.stringify(finalObject)); - [保存] をクリックして、プロセッサーを追加ダイアログを保存して閉じます。
ポストプロセッサーの追加
ご使用のウェブサービスから1点以上のAPIリクエストで、Kore.ai ポストプロセッサーによりお望みのデータペイロードを取得する場合があります。
カスタムポストプロセッサーの定義
もしカスタムポストプロセッサーを作成とする場合、以下のシンタックスで前のAPIリクエストの応答キーをアクセスできます。
payload[0].{ key }
JSON Syntax
{
 "payload":
   {
    "key1" : "value1",
    "key2" : "value2"
   }
}
例
var final = {};
var data = payload[0]; //Accessing the response of the previous API object
data.title[0] = 'New value for key here';
final.payload = data;  // Updating the response of the API object
print(JSON.stringify(final));  // This step is mandatory
カスタムプロセッサーの場合、必ず最後の応答を示した先行コードのとして印刷出してください、そうでなければ、空の応答が返します。以下のシンタックスを使用します:
print(JSON.stringify( <<object>> ));
標準なポストプロセッサーの設定
以下のステップに従って標準のポストプロセッサーを追加してください:
- APIリクエストタブで、リクエストタブを展開し、プロセッサーを追加をクリックします。
- Kore.aiは、ポストプロセッサー用のカスタムコードを作成する代わりに使用できる標準ポストプロセッサーのセットを提供します。プロセスのタイプフィールドに、以下の4つの標準プロセッサーのタイプのうちの一つを選択します:
- 解決:1つのペイロード応答の結果を、2つ目のリクエストの入力として使用することができます。例えば、プロセッサーを追加をクリックして、プロセッサーの名前を入力し、プロセッサーのタイプを解決に、キーを変数の名前に設定し、最初のAPIリクエストからの変数を使用して投稿URLを定義します。 For example, https://app.asana.com/api/1.0/projects/{project_id} that returns the id field in the payload response as:
... "id":80468818418144, <br/> "created_at":"2016-01-14T05:34:35.848Z", "modified_at":"2016-01-20T04:29:52.505Z", "owner":{ "id":73114591129714, "name":"jaganmohan.evuri" }, ...それは次に変数入力として下記のPost URLのように: https://app.asana.com/api/1.0/projects/{id}/tasks?opt_fields=completed,modified_at You must also specify the HTML Content Type expected in the payload response as well as the HTML Request method. 詳細については、タスクのセッション変数とコンテキスト変数を使用を参照してください。
- 展開:分けとするデータが含む文字列のペイロードの場合。例えば、プロセッサーを追加をクリックし、プロセッサーの名前を入力し、キーフィールドをデータなどに設定し、プロセッサータイプを展開に設定して、以下のコード例で
data要素の内容を取り込み、配列の各項目を抽出します。{ "attribution": null, "tags": [], "type": "image", "location": null, "comments": { "count": 51, "data": [{ "created_time": "1453900980", "text": "43rd", "from": { "username": "kore_hyd", "profile_picture": "https://scontent.cdninstagram.com/t51.2885-19/11906329_960233084022564_1448528159_a.jpg", "id": "2056218675", "full_name": "Kore.ai Hyd" }, "id": "1171728804843572377" }, { "created_time": "1453901222", "text": "44th", "from": { "username": "kore_hyd", "profile_picture": "https://scontent.cdninstagram.com/t51.2885-19/11906329_960233084022564_1448528159_a.jpg", "id": "2056218675", "full_name": "Kore.ai Hyd" }, "id": "1171730841379491107" }, { "created_time": "1453901997", "text": "45th", "from": { "username": "kore_hyd", "profile_picture": "https://scontent.cdninstagram.com/t51.2885-19/11906329_960233084022564_1448528159_a.jpg", "id": "2056218675", "full_name": "Kore.ai Hyd" }, "id": "1171737339782450909" }, { "created_time": "1453902304", "text": "46th and 47th", "from": { "username": "kore_hyd", "profile_picture": "https://scontent.cdninstagram.com/t51.2885-19/11906329_960233084022564_1448528159_a.jpg", "id": "2056218675", "full_name": "Kore.ai Hyd" }, "id": "1171739915923967873" }, { "created_time": "1453902638", "text": "48th", "from": { "username": "kore_hyd", "profile_picture": "https://scontent.cdninstagram.com/t51.2885-19/11906329_960233084022564_1448528159_a.jpg", "id": "2056218675", "full_name": "Kore.ai Hyd" }, "id": "1171742713994497101" }, { "created_time": "1453964684", "text": "49th", "from": { "username": "venkataphani.ailavarapu", "profile_picture": "https://scontent.cdninstagram.com/t51.2885-19/11906329_960233084022564_1448528159_a.jpg", "id": "2679234818", "full_name": "Phani" }, "id": "1172263199715314941" }, { "created_time": "1453964710", "text": "50th", "from": { "username": "kore_hyd", "profile_picture": "https://scontent.cdninstagram.com/t51.2885-19/11906329_960233084022564_1448528159_a.jpg", "id": "2056218675", "full_name": "Kore.ai Hyd" }, "id": "1172263415747136776" }, { "created_time": "1453964717", "text": "51st", "from": { "username": "kore_hyd", "profile_picture": "https://scontent.cdninstagram.com/t51.2885-19/11906329_960233084022564_1448528159_a.jpg", "id": "2056218675", "full_name": "Kore.ai Hyd" }, "id": "1172263474056350986" }] ... - 抽出:複数オブジェクトが含むペイロードの場合、 s, 特定のオブジェクトにパースを指定することができます。例えば、プロセッサーを追加をクリックし、プロセッサーの名前を入力し、キーフィールドを
dataに設定し、抽出するプロセスのタイプを選択して、次のペイロード応答でオブジェクトデータを使用します。{ "user": { "full_name": "Kore.ai Hyd", "id": "2056218675", "profile_picture": "https://instagramimages-a.akamaihd.net/profiles/anonymousUser.jpg", "username": "kore_hyd" }, ... }, "likes": { "data": [{ "full_name": "kstream002", "id": "2100724876", "profile_picture": "https://instagramimages-a.akamaihd.net/profiles/anonymousUser.jpg", "username": "kstream002" } }, ... } - 割り当て: 割り当てプロセッサーを使用すれば、ペイロードの応答への変数名の指定が出来ます、もし必要な場合、例えば、ペイロードにペイロード応答データのキーが含まれていない場合。例えば、プロセスのタイプを割り当てに設置し、次に 出力変数フィールドに、3つのオブジェクトの文字列である次のペイロードの出力変数を定義することができます。
[ { "Cost": "$0.00", "Desc1": "$150 bonus after $500 of purchases in the first 3 months from account opening. ", "Desc2": "Earn unlimited cash back Earn unlimited 1.5% cash back on every purchase – it's automatic. Redeem for cash back – any amount, any time. ", "Keywords": "weekend dining,online,groceries,fuel,rewards,rebate,365,allaround", "OfferName": "Freedom Unlimited", "OfferType": "CreditCard", "Status": "1", "imageURL": "http://www.psdgraphics.com/file/credit-card.jpg", "id": "5b5195e264bbd800" }, { "Cost": "$95.00", "Desc1": "Pay 0 balance transfer fee when you transfer a balance during the first 60 days.", "Desc2": "Jumpstart your financial fitness Get an introductory fee for balance transfers, save on interest†, and get your free monthly credit score.", "Keywords": "privileges,rebate,health,wellness,great eastern,insurance,policy,installments,split,cashflo", "OfferName": "Premium Plus", "OfferType": "CreditCard", "Status": "1", "imageURL": "http://i.imgur.com/rMOXYql.jpg", "id": "5caf2155873f89c8" }, { "Cost": "$10.00", "Desc1": "Pay 0 balance transfer fee when you transfer a balance during the first 60 days.", "Desc2": "Jumpstart your financial fitness Get an introductory fee for balance transfers, save on interest†, and get your free monthly credit score.", "Keywords": "privileges,rebate,health,wellness,great eastern,insurance,policy,installments,split,cashflo", "OfferName": "Frequent Flyer", "OfferType": "CreditCard", "Status": "1", "imageURL": "http://www.moneychoice.org/wp-content/uploads/sites/22/2016/01/credit-card-calculator-image.png.jpeg", "id": "c0b05bc3062658ee" } ]出力変数フィールドで、配列を表す変数をとして指定します。
offers, 例えば、もしUXプレビュー機能を使用した場合、Kore.ai からの応答は以下の通りです。{ "response": { "offers": [ { "Cost": "$0.00", "Desc1": "$150 bonus after $500 of purchases in the first 3 months from account opening.", "Desc2": "Earn unlimited cash back Earn unlimited 1.5% cash back on every purchase – it's automatic.Redeem for cash back – any amount, any time.", "Keywords": "weekend dining,online,groceries,fuel,rewards,rebate,365,allaround", "OfferName": "Freedom Unlimited", "OfferType": "CreditCard", "Status": "1", "imageURL": "http://www.psdgraphics.com/file/credit-card.jpg", "id": "5b5195e264bbd800" }, { "Cost": "$95.00", "Desc1": "Pay 0 balance transfer fee when you transfer a balance during the first 60 days.", "Desc2": "Jumpstart your financial fitness Get an introductory fee for balance transfers, save on interest†, and get your free monthly credit score.", "Keywords": "privileges,rebate,health,wellness,great eastern,insurance,policy,installments,split,cashflo", "OfferName": "Premium Plus", "OfferType": "CreditCard", "Status": "1", "imageURL": "http://vignette3.wikia.nocookie.net/objectmayhem/images/5/52/Credit_card.png/revision/latest?cb=20130629150408", "id": "5caf2155873f89c8" } ] } }出力変数を
offersに設定すると、Botビルダーで変数をresponse.offersとして、例えば以下のようにタスク応答オブジェクトで使用することができます。print(JSON.stringify(response)); var data = response.offers for (i = 0; i < data.length; i++) { print('<a href="' + data[i].imageURL + '" target="_blank">' + data[i].OfferName + '</a><br>'); print(data[i].Desc1) print('<br>'); print('<br>'); print('Cost: ' + data[i].Cost) print('<br>'); if (i < data.length - 1) { print('<br>'); print('<br>'); } }
- 解決:1つのペイロード応答の結果を、2つ目のリクエストの入力として使用することができます。例えば、プロセッサーを追加をクリックして、プロセッサーの名前を入力し、プロセッサーのタイプを解決に、キーを変数の名前に設定し、最初のAPIリクエストからの変数を使用して投稿URLを定義します。 For example, https://app.asana.com/api/1.0/projects/{project_id} that returns the id field in the payload response as:
- 追加をクリックしてAPIリクエストを保存してから別のAPIリクエストを作成するか、追加と終了をクリックしてAPIリクエストを保存してからダイアログをクローズ閉じます。
複数のAPIリクエストの場合、リクエストをシーケンシャルの並べで並べ直してから全体のデータ応答を取得するようにしてください。例えば、ワークスペースのリスト、プロジェクトのリスト、そして最後にユーザーのリストを要求する場合があります上に移動![]() アイコンと下に移動
アイコンと下に移動![]() アイコンを使用して、APIリクエストの順番を入れ替えることができます。
アイコンを使用して、APIリクエストの順番を入れ替えることができます。
注意: APIリクエストを削除した場合、確認ダイアログは表示されません。続行または保存をクリックすると、削除操作は永続的に行われ、元に戻すことはできません。
応答サンプルの追加
応答サンプルセクションでは、タスクのペイロードで受け取ることが期待されるキーと値のペアの例を入力または貼り付けることができます。応答サンプルを定義する場合、出力データの処理に応答サンプルセクションで指定されたキーはドロップダウン選択肢として使用可能です。
サンプル応答の追加
- [API リクエスト] タブで、[サンプル応答] セクションを展開します。
- JSON応答のペイロードのキーと値の組み合わせを含む応答サンプルを入力してください。以下のうちの一つをしてください:
- 応答の様式をシリアルナンバーが付けられたコンパクトな形式で書式設定するには、下図の通りに書式設定済み
 アイコンをクリックします。
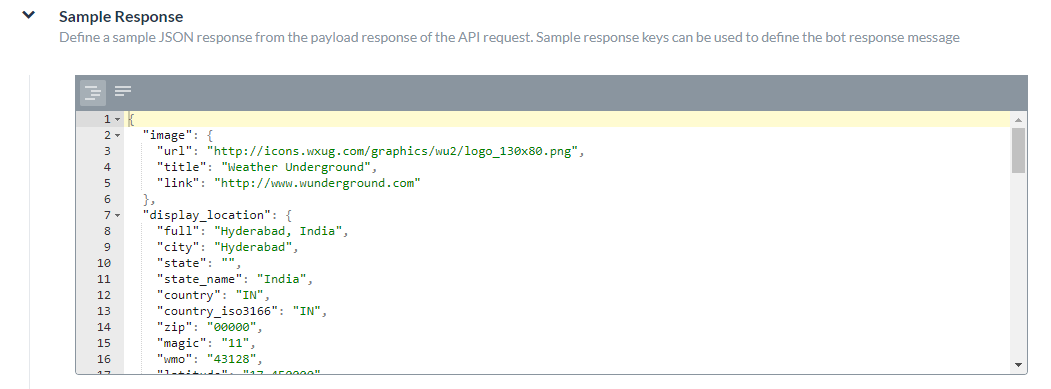
- 応答の様式を字下げ可能のJSON構造として書式設定するには、下図の通りに書式未設定
 アイコンをクリックします。
- 応答の様式をシリアルナンバーが付けられたコンパクトな形式で書式設定するには、下図の通りに書式設定済み

ウェブサイトのリンクコンテンツをプレビュー
あるウェブサービスはリンクを送りてペイロード応答の一部としてメディアをプレビューさせます。このセクションでは、プレビューリンクの有効や無効、そしてペイロードでパースからリンクの定義ができます。デフォルトでは、ウェブサイトプレビューリンクが無効されました。下図は、はいを選択した場合の投稿でウェブサイトのリンクコンテンツをプレビューセクションの例です。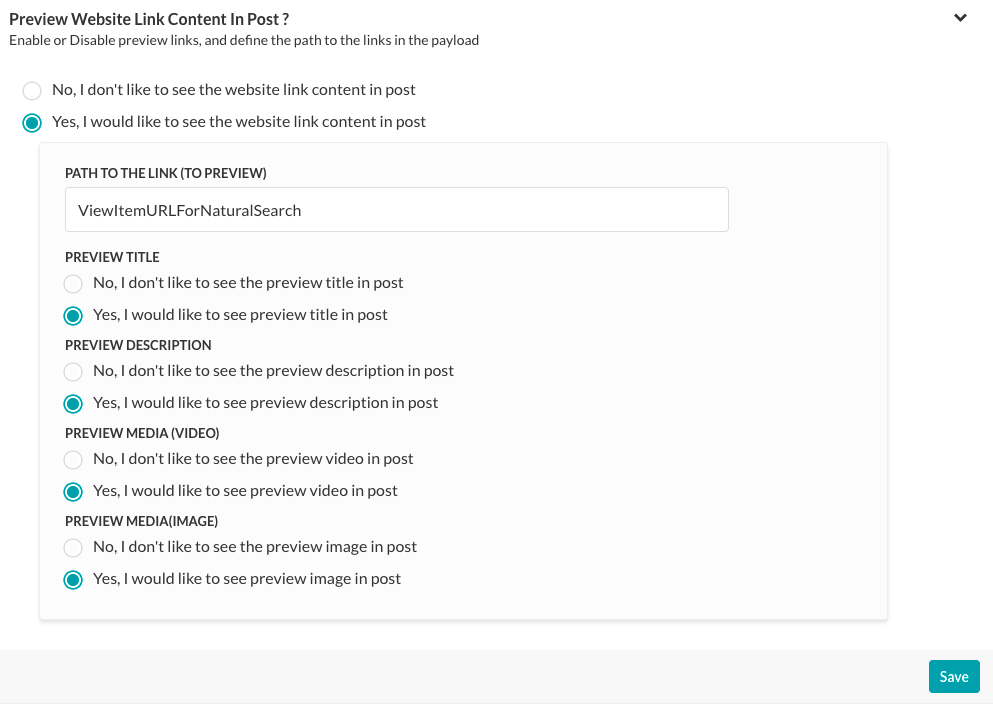 有効にした場合、ペイロード内のプレビューリンクへのパスがペイロードのルートにない場合、リンクへのパス(toPreview)フィールドで定義します。例えば、下記のコードの例はRSSペイロード、パースからプレビューへとは
...
"item": [
    {
        "title": "U.S. to Boost Refugee Intake by 30,000 by 2017",
        "guid": {
            "-isPermaLink": "false",
            "#text": "SB12418904751422433479504581245034032986752"
        },
        "link": "http://www.wsj.com/articles/john-kerry-says-u-s-to-admit-30-000-more-refugees-in-next-2-years-1442768498?mod=fox_australian",
        ...
投稿でウェブサイトのリンクコンテンツをプレビューが有効の場合、プレビューオブジェクトを選択します。たとえば、
- タイトルのプレビュー – Web サイト コンテンツのタイトルを表示します。
- 説明のプレビュー – Web サイト コンテンツ説明を表示します。
- メディア (動画) のプレビュー – Web サイト コンテンツからの動画のリンクを表示できるようにします。
- メディア (画像) のプレビュー – Web サイト コンテンツからの画像のリンクを表示できるようにします。