OVERVIEW
Virtual Assistants
Kore.ai Platform
Key Concepts
Natural Language Processing (NLP)
Accessing Platform
VIRTUAL ASSISTANTS
Virtual Assistant Builder
Virtual Assistant Types
Getting Started
Create a Simple Bot
SKILLS
Storyboard
Dialog Tasks
Introduction
Dialog Builder (New)
Dialog Builder (Legacy)
User Intent Node
Dialog Node
Entity Node
Supported Entity Types
Composite Entities
Supported Colors
Supported Company Names
Form Node
Logic Node
Message Nodes
Confirmation Nodes
Bot Action Node
Service Node
Custom Authentication
2-way SSL for Service nodes
Script Node
Agent Transfer Node
WebHook Node
Grouping Nodes
Connections & Transitions
Manage Dialogs
User Prompts
Knowledge Graph
Terminology
Building
Generation
Importing and Exporting
Analysis
Knowledge Extraction
Train
Build
Alert Tasks
Introduction
Ignore Words and Field Memory
How to Schedule a Smart Alert
Small Talk
Digital Views
Introduction
How to Configure Digital Views
Digital Forms
Overview
How to Configure Digital Forms
NATURAL LANGUAGE
Overview
Machine Learning
Introduction
Model Validation
Fundamental Meaning
Introduction
NLP Guidelines
Knowledge Graph
Traits
Introduction
How to Use Traits
Ranking and Resolver
Advanced NLP Configurations
INTELLIGENCE
Overview
Context Management
Overview
Session and Context Variables
Context Object
How to Manage Context Switching
Manage Interruptions
Dialog Management
Sub Intents & Follow-up Intents
Amend Entity
Multi-Intent Detection
Sentiment Management
Tone Analysis
Sentiment Management
Event Based Bot Actions
Default Conversations
Default Standard Responses
TEST & DEBUG
Talk to Bot
Utterance Testing
Batch Testing
Record Conversations
Conversation Testing
CHANNELS
PUBLISH
ANALYZE
Overview
Dashboard
Custom Dashboard
Overview
How to Create Custom Dashboard
Conversation Flows
NLP Metrics
ADVANCED TOPICS
Universal Bots
Overview
Defining
Creating
Training
Customizing
Enabling Languages
Store
Smart Bots
Defining
koreUtil Libraries
SETTINGS
Authorization
Language Management
PII Settings
Variables
Functions
IVR Integration
General Settings
Management
Import & Export
Delete
Bot Versioning
Collaborative Development
Plan Management
API GUIDE
API Overview
API List
API Collection
SDKs
SDK Overview
SDK Security
SDK App Registration
Web SDK Tutorial
Message Formatting and Templates
Mobile SDK Push Notification
Widget SDK Tutorial
Widget SDK – Message Formatting and Templates
Web Socket Connect & RTM
Using the BotKit SDK
Installing
Configuring
Events
Functions
BotKit SDK Tutorial – Agent Transfer
BotKit SDK Tutorial – Flight Search Sample Bot
Using an External NLP Engine
ADMINISTRATION
HOW TOs
Create a Simple Bot
Create a Banking Bot
Transfer Funds Task
Update Balance Task
Context Switching
Using Traits
Schedule a Smart Alert
Configure UI Forms
Add Form Data into Data Tables
Configuring Digital Views
Add Data to Data Tables
Update Data in Data Tables
Custom Dashboard
Custom Tags to filter Bot Metrics
Patterns for Intents & Entities
Build Knowledge Graph
Global Variables
Content Variables
Using Bot Functions
Configure Agent Transfer
RELEASE NOTES

通知タスク – メッセージの定義

いくつかの通知タスクでは、こちらでご覧いただいた通り、Webhookによって送信されたペイロードによって通知が表示された際に、エンドユーザーに表示されるデータの見え方を定義します。

メッセージ定義の定義

タスクに対してBotの応答を2種類定義することができます。

  • 全チャネルのデフォルト: API リクエストと定義済のプロセッサからのペイロード応答に基づいた全チャネルのデフォルト タイトルとメッセージ応答を作成します。応答オブジェクトや独自の入力、Kore.ai システムから派生した [変数キー] のセット、カスタム変数、応答サンプルを組み合わせたデータを作成することができます。メッセージは通常、整形された HTML メッセージとして表示され、リクエスト オブジェクト データからの ID 番号や件名の変数を 1 つ以上含んでいます。
  • チャネル固有の応答: Facebook Messenger、Skype、SMS、Web/モバイル SDK など、特定のチャネル用にボット応答メッセージをカスタマイズすることができ、選択したチャネルに事前定義したメッセージ テンプレート (テーブル、リスト、グラフなど) を適用することもできます。
メッセージ定義エディター機能

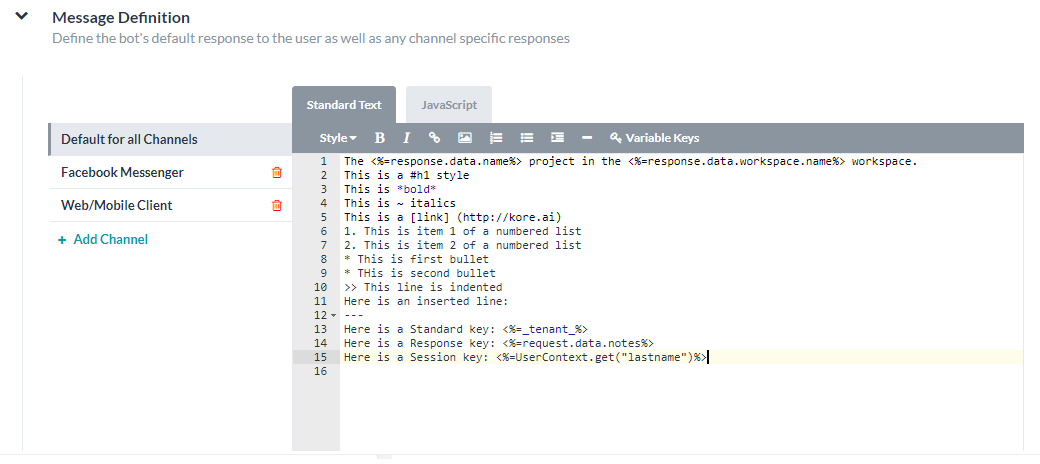
アクション タスクのエディターを開くには、[ボットの応答] > [メッセージ定義] に移動します。メッセージ定義編集器は3つのタブで以下の特性を提供します:

  • 標準文字: 基本編集器のコントロールおよびHTMLのmarkupに介して、変数キーで応答を定義およびフォーマット化ができます。文字を入力して、次に太字、斜体、見出しのスタイル、ハイパーリンク、 並び直しのリストや並び直しないのリスト、そして線の増加のボタンで、フォーマットの調整ができます。
  • JavaScript: エンドユーザーのタスク応答メッセージを処理するカスタム コードを追加して変数を宣言し、変数キーを使用して、サードパーティー アプリケーションと対話できるようにします。
  • プレビュー: ボットのユーザーが見る出力メッセージの表示サンプルを、マークアップ付きで表示します。
変数キーの追加

以下のステップに従って変数キーを追加してください:

  1. 標準テキストモードや JavaScript モードで変数キーを追加するには、変数を追加したい場所にカーソルを合わせて [変数キー] をクリックします。
  2. [リクエスト/応答キー] ダイアログで、挿入する変数を含むキー ノードのタイプを開きます。
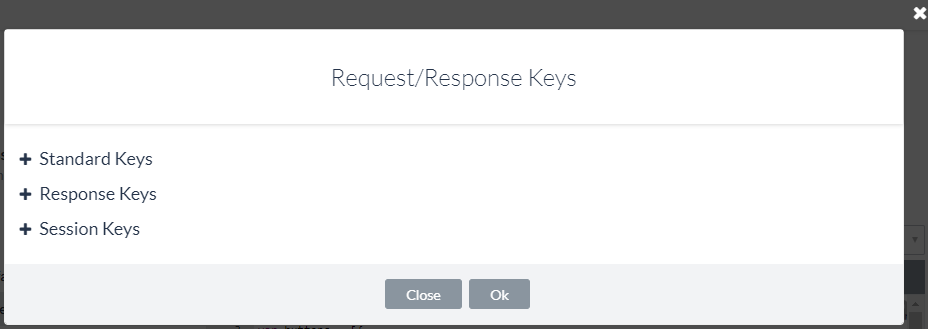
  3. のような、追加する変数を選択してresponse.data.id[OK]をクリックします。

Bot Response Tab Message Definition Keys

標準キー

[標準キー] は、以下の再利用可能なデータのための Kore.ai 変数のプレースホルダーです。

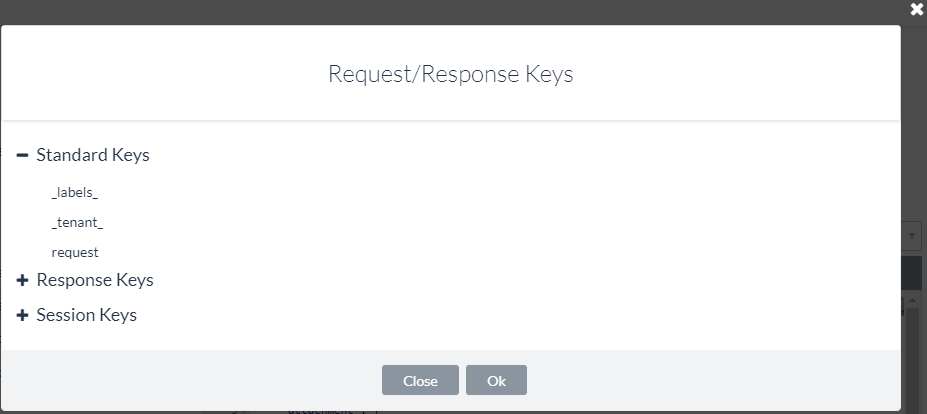
  • _labels_: GUID の代わりにフレンドリラベルを返します。例えば、WebサービスAPIからユーザデータを要求された場合、返されるプロジェクトやワークスペースのIDはGUIDとなります。_labels_ キーを使用して、GUID ではなく、ユーザー フレンドリーの GUID 名をエンドユーザーに表示することができます。Kore.ai では、次の例に示すようにドロップダウン コントロールが_labels_キー応答を格納します。
    { "_labels_": { "15379386734832": "roadlabs.com", "26377329985341": "Test Project", "workspace": "roadlabs.com", "project": "Test Project" }, "_fields_": { "workspace": "15379386734832", "project": "26377329985341" } }
  • _tenant_ – 定義済のエンタープライズ向けのテナントを返します。たとえば JIRA には、URL が https://koreteam.atlassian.net/browse/BBF-3265 となるよう、テナント koreteam が必要です。以下のように、_tenant_キーでタスク応答へのリンクを作成することができます。
  • _fields_ – エンドユーザーが提供する、ペイロードの応答の一部ではないタスク フィールドの入力を返すために使用します。たとえば JIRA タスクでは、エンドユーザーはワークスペース名を入力するように促されます。_fields_ キーを使用して、エンドユーザーの入力を格納します。
    _fields_["workspace"]
  • _last_run – 「2016-03-05T12:44:38+00:00」のような、ISO 8601 形式の Web サービスのポーリングの UTC 日付タイム スタンプを返すために使用します。たとえば、Web サービス リクエストがペイロード応答の全てのアクティビティを返す場合、_last_runキーを使用して_last_run値の前後に表示された結果を絞り込むことができます。_last_run
セッションキー

[セッション キー] は、単一セッション インスタンス におけるユーザー データ用の Kore.ai 変数プレースホルダーです。 セッションキー

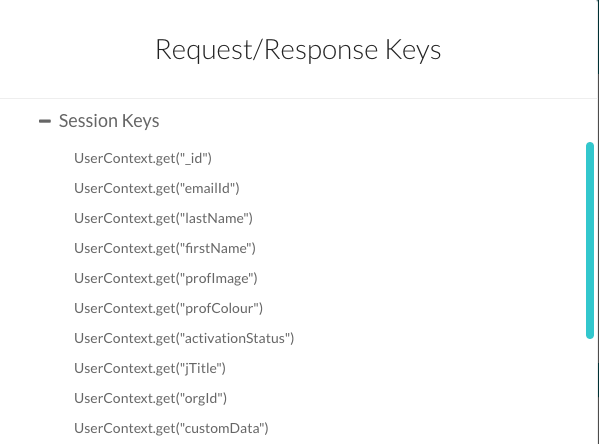
  • UserContext.get(“_id”) – Kore.ai の userId です。
  • UserContext.get(“emailId”) – userId に関連付けられたメール アドレスです。
  • UserContext.get(“lastName”) – ユーザーの姓です。
  • UserContext.get(“firstName”) – ユーザーの名です。
  • UserContext.get(“profImage”) – ユーザーの画像やアバターのファイル名です。
  • UserContext.get(“profColor”) – ユーザーアカウントの色です。
  • UserContext.get(“activationStatus”) – ユーザーのアカウント ステータスです。
  • UserContext.get(“jTitle”) – ユーザーの役職です (定義されている場合) 。
  • UserContext.get(“orgId”) – ユーザーアカウントの組織 ID です (定義されている場合) 。
  • UserContext.get(“customData”) – 開発者が定義したカスタム キーです。
  • UserContext.get(“identities”) – ユーザーの代替 ID です (定義されている場合) 。

追加のセッションキーはボットタスクの定義そしてそのタスクに使用可能のキーのコンテキストの次第に、使用可能になります。セッションとコンテキストキーについての詳細については、タスクのセッション変数とコンテキスト変数を使用を参照してください。
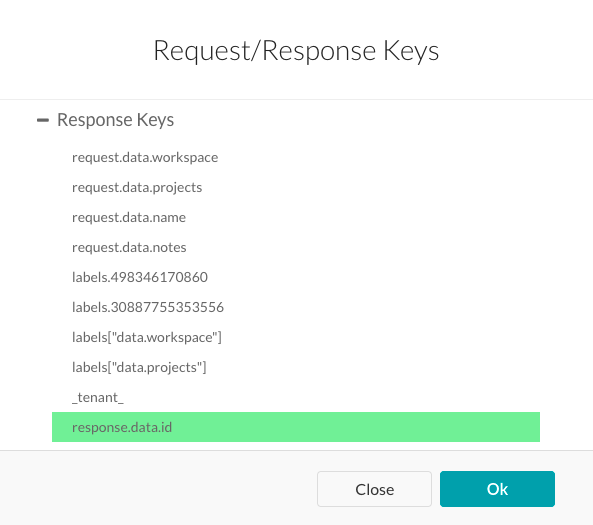
応答キー

応答キーは [API 応答] タブにある [応答サンプル] のテキストから直接解析されます。応答キーは定義済の応答サンプルの次第に変わります。応答キー 
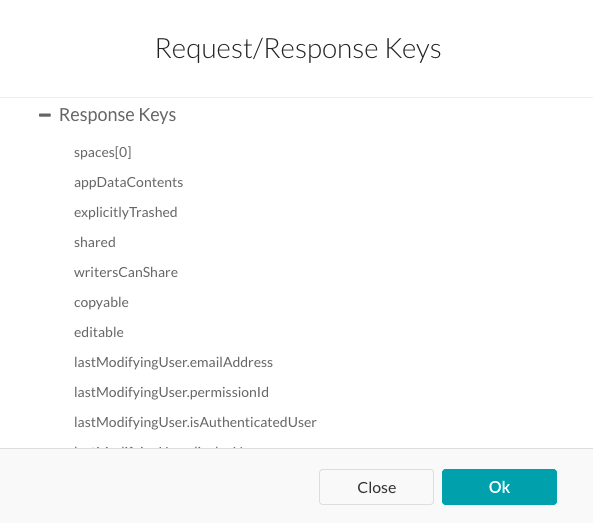
次のリストは、Asanaタスクで使用できる応答キーの例です。

request.data.workspace request.data.projects request.data.name request.data.notes labels.498346170860 labels.30887755353556 labels["data.workspace"] labels["data.projects"] _tenant_ response.data.id response.data.created_at response.data.modified_at response.data.name response.data.notes response.data.completed response.data.assignee_status response.data.completed_at response.data.due_on response.data.due_at response.data.workspace.id response.data.workspace.name response.data.num_hearts response.data.parent response.data.followers[0].id response.data.followers[0].name response.data.hearted response.data.assignee response.data.projects[0].id response.data.projects[0].name response.data.memberships[0].project.id response.data.memberships[0].project.name response.data.memberships[0].section
レポート キー

レポートキーとはKore.ai 変数プレースホルダーとして、レポートテンプレート定義およびボットの応答を使用してユーザーがクリックできるメッセージに追加の情報へのリンクを表示します。
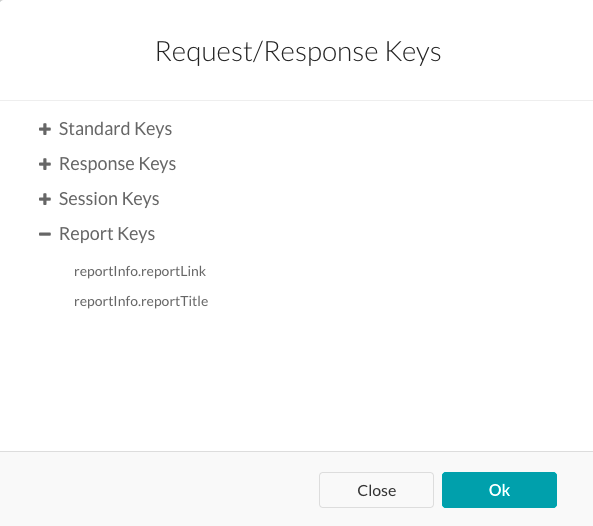
 レポート キー

  • reportInfo.reportLink[レポート テンプレートの定義] セクションで定義された、当該タスクのリンクです。
  • reportInfo.reportTitle[レポート テンプレートの定義] セクションで定義された、当該タスクのタイトルです。
応答のプレビュー

メッセージ エディターで [プレビュー] をクリックすると、以下のオプションのうちの 1 つを使用して、応答プレビューを生成します。

  • テストとプレビュー – ボットのタスク設定ページを開いてタスク設定と認証を定義し、Asana のようなサードパーティーの Web サービスにより生成された応答のプレビューを表示します。
  • サンプル応答のプレビュー – タスクの [API リクエスト] タブの [応答サンプル] セクションで、定義済のキー/値ペアで提供されたサンプル データを介してプレビューを生成します。

カスタム JavaScript の応答の例

以下の例では、JavaScriptを使用して、タスクの応答メッセージが送信されたときにエンドユーザーに出力メッセージを表示するタイトルを投稿説明を投稿セクションを定義する応答オブジェクトを示しています。以下の例では、descと書かれた変数は、JSON応答にキャプションの値が定義されている場合にのみ表示されます。

var desc = (caption !== "undefined" ? caption : "")

次の例では、タスクの [タイトル] を使用したクリック可能な URL が、タスクの応答メッセージに表示されます。

var tasklink = '' + title + '';

この最後の例では、リンク変数は、動画または写真のいずれかのタイプに依存します。タイプに応じて、適切なリンクが表示されます。

var link = ""; switch (type) { case "video": var video = (typeof(video_url) != "undefined") ? video_url : permalink_url; link = '<video controls><source src ="' + video + '" type="video/mp4"></video>'; break; case "photo": link = '<img src="' + image_permalink + '"></img>'; break; }

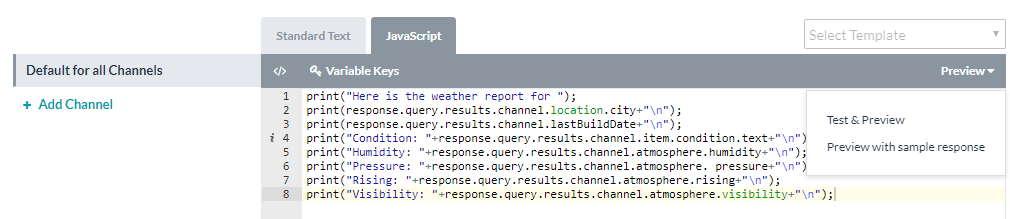
タスクのペイロード応答に基づいて、[JavaScript] タブでタスク固有の要件を処理するためのカスタム JavaScript を作成することができます。
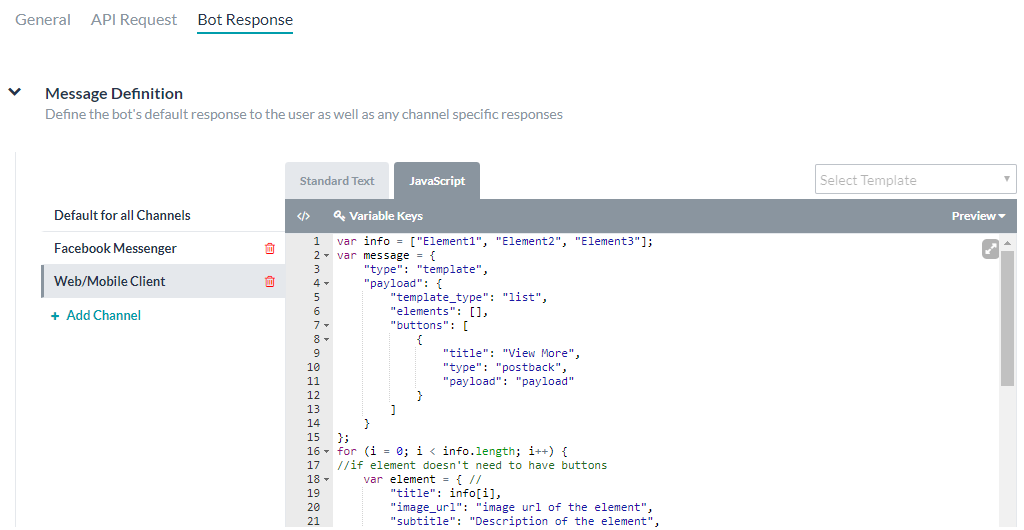
チャネル固有のボットの応答

タスク応答メッセージは、応答メッセージが表示されるチャンネル、例えばKore.ai Messengerクライアント、電子メール、テキストメッセージなどに依存している場合があります。デフォルトでは、すべてのチャンネルのデフォルトで設定した応答メッセージが、すべてのチャンネルに送信されます。ただし、デフォルトの応答ではなく、単一や複数の20+サポートチャンネルに対して、特定の応答を定義して、そのチャンネルのエンドユーザーに表示することができます。

  1. 特定のチャネルの応答メッセージを定義するには、+チャネルを追加をクリックして、チャネルを選択ドロップダウンリストを表示します。
  2. たとえば、[Kore.ai] などのチャネルを選択して、[JavaScript] タブでチャネルの応答を設定します 。

各チャンネルには一つの応答が定義可能です。以下のJavaScriptの例は各チャンネルのKore.aiのデフォルトフォーマットテンプレートをオーバーライドする方法。

注意: 以下のキーを使用して、response.message(デフォルトのメッセージを文字列として返す)、response.message.choices(オプションの選択または確認メッセージタイプを配列として返す)のデフォルト値を返します。

  • Slack チャネルの上書き例
    var message = {}; var attachments = []; var attachment = { 'text': "Exception occurred during API execution", 'color': '#FFCC00', 'attachment_type': 'default' }; attachments.push(attachment); message.attachments = attachments; print(JSON.stringify(message));
  • FaceBook チャネルの上書き例
    var message = { text: response.message }; var buttons = []; for (var i = 0; i < response.choices.length; i++) { var choiceItem = response.choices[i]; if (choiceItem.length > 20) { choiceItem = choiceItem.substring( 0, 18) + '..'; } var element = { content_type: 'text', title: choiceItem, payload: choiceItem }; buttons.push(element); } message.quick_replies = buttons; print(JSON.stringify(message));
  • メール チャネルの上書き例
    var message = {}; var text = response.message + ' <br> '; for (var i = 0; i < response.choices.length; i++) { text = text.concat( '<u> + response.choices[i] + ' < /u> <br>'); } message.text = text; print(JSON.stringify(message));
  • SMS チャネルの上書き例
    var message = {}; var indexArray = ['a', 'b', 'c', 'd', 'e', 'f', 'g', 'h', 'i', 'j', 'k', 'l', 'm', 'n', 'o', 'p', 'q', 'r', 's', 't', 'u', 'v', 'w', 'x', 'y', 'z' ]; var text = response.message + '\n'; for (var i = 0; i < response.choices .length; i++) { text = text.concat(indexArray[i] + ') ' + response.choices[ i] + '\n'); } message.text = text; print(JSON.stringify(message));
OVERVIEW
Virtual Assistants
Kore.ai Platform
Key Concepts
Natural Language Processing (NLP)
Accessing Platform
VIRTUAL ASSISTANTS
Virtual Assistant Builder
Virtual Assistant Types
Getting Started
Create a Simple Bot
SKILLS
Storyboard
Dialog Tasks
Introduction
Dialog Builder (New)
Dialog Builder (Legacy)
User Intent Node
Dialog Node
Entity Node
Supported Entity Types
Composite Entities
Supported Colors
Supported Company Names
Form Node
Logic Node
Message Nodes
Confirmation Nodes
Bot Action Node
Service Node
Custom Authentication
2-way SSL for Service nodes
Script Node
Agent Transfer Node
WebHook Node
Grouping Nodes
Connections & Transitions
Manage Dialogs
User Prompts
Knowledge Graph
Terminology
Building
Generation
Importing and Exporting
Analysis
Knowledge Extraction
Train
Build
Alert Tasks
Introduction
Ignore Words and Field Memory
How to Schedule a Smart Alert
Small Talk
Digital Views
Introduction
How to Configure Digital Views
Digital Forms
Overview
How to Configure Digital Forms
NATURAL LANGUAGE
Overview
Machine Learning
Introduction
Model Validation
Fundamental Meaning
Introduction
NLP Guidelines
Knowledge Graph
Traits
Introduction
How to Use Traits
Ranking and Resolver
Advanced NLP Configurations
INTELLIGENCE
Overview
Context Management
Overview
Session and Context Variables
Context Object
How to Manage Context Switching
Manage Interruptions
Dialog Management
Sub Intents & Follow-up Intents
Amend Entity
Multi-Intent Detection
Sentiment Management
Tone Analysis
Sentiment Management
Event Based Bot Actions
Default Conversations
Default Standard Responses
TEST & DEBUG
Talk to Bot
Utterance Testing
Batch Testing
Record Conversations
Conversation Testing
CHANNELS
PUBLISH
ANALYZE
Overview
Dashboard
Custom Dashboard
Overview
How to Create Custom Dashboard
Conversation Flows
NLP Metrics
ADVANCED TOPICS
Universal Bots
Overview
Defining
Creating
Training
Customizing
Enabling Languages
Store
Smart Bots
Defining
koreUtil Libraries
SETTINGS
Authorization
Language Management
PII Settings
Variables
Functions
IVR Integration
General Settings
Management
Import & Export
Delete
Bot Versioning
Collaborative Development
Plan Management
API GUIDE
API Overview
API List
API Collection
SDKs
SDK Overview
SDK Security
SDK App Registration
Web SDK Tutorial
Message Formatting and Templates
Mobile SDK Push Notification
Widget SDK Tutorial
Widget SDK – Message Formatting and Templates
Web Socket Connect & RTM
Using the BotKit SDK
Installing
Configuring
Events
Functions
BotKit SDK Tutorial – Agent Transfer
BotKit SDK Tutorial – Flight Search Sample Bot
Using an External NLP Engine
ADMINISTRATION
HOW TOs
Create a Simple Bot
Create a Banking Bot
Transfer Funds Task
Update Balance Task
Context Switching
Using Traits
Schedule a Smart Alert
Configure UI Forms
Add Form Data into Data Tables
Configuring Digital Views
Add Data to Data Tables
Update Data in Data Tables
Custom Dashboard
Custom Tags to filter Bot Metrics
Patterns for Intents & Entities
Build Knowledge Graph
Global Variables
Content Variables
Using Bot Functions
Configure Agent Transfer
RELEASE NOTES

Alert Task – Message Definition

For some Alert tasks, as seen here, you can define the look and feel of the data presented to the end-user when the alert is displayed based on the payload delivered by the webhook.

Defining the Message Definition

You can define two kinds of bot responses for a task:

  • The default for all channels: Author the default title and message response for all channels based on the payload response from the API request and any processors defined. You can create a mixture of data from the response object along with your own inputs, a set of Variable Keys derived from the Kore.ai system, custom variables, and the response sample. The message is displayed as a message, usually as a well-formed HTML message that contains one or more variables, such as the ID number or subject, from the request object data.
  • Channel-specific response: You can also customize a Bot response message for specific channels, for example, Facebook Messenger, Skype, SMS, or Web/Mobile SDK, along with applying predefined message templates (tables, lists, graphs, etc.) for selected channels.
Message Definition Editor Features

To open the editor for your Action task, go to Bot Response > Message Definition. The Message Definition editor uses three tabs to offer the following features:

  • Standard Text: Use basic editor controls and HTML markup, and variable keys to define and format the response. Enter text, and then format it using buttons for bold, italics, header styles, hyperlinks, ordered and unordered lists, and inserting lines.
  • JavaScript: Add custom code to handle the end-user task response message, declare variables, use variable keys, and interact with third-party applications.
  • Preview: View a sample of the rendered output message, with markup, as the bot users see it.
Adding Variable Keys

Follow these steps to add variable keys:

  1. Whether you are using Standard Text or JavaScript mode, to add a variable key, place the cursor where you want to add the variable and then click Variable Keys.
  2. In the Request/Response Keys dialog, expand the type of key node that contains the variable you want to insert.
  3. Select the variable that you want to add, for example, response.data.idand then click Ok,

Bot Response Tab Message Definition Keys

Standard Keys

Standard Keys are the following Kore.ai variable placeholders for reusable data.

  • _labels _: Returns the friendly label in place of a GUID. For example, when user data is requested from a web service API, the ID of a project or workspace returned is a GUID. You can use the _labels_ key to show the user-friendly name of the GUID to the end-user instead of the GUID. In Kore.ai, a drop-down control stores the response for the _labels_ key as, for example:
    {
        "_labels_": {
            "15379386734832": "roadlabs.com",
            "26377329985341": "Test Project",
            "workspace": "roadlabs.com",
            "project": "Test Project"
        },
        "_fields_": {
            "workspace": "15379386734832",
            "project": "26377329985341"
        }
    }
  • _tenant_ – Returns the tenant for the enterprise when defined. For example, JIRA requires a tenant for URLs, such as koreteam, in https://koreteam.atlassian.net/browse/BBF-3265. You can use the _tenant_ key to build a link in a task response such as:
  • _fields_ – Used to return a task field input provided by the end-user that is not part of a payload response. For example, in a JIRA task, the end-user is prompted to enter a workspace name. You can use the _fields_ key to store the end-user input as:
    _fields_["workspace"]
  • _last_run – Used to return the UTC date timestamp of a web service poll using ISO 8601 format, for example, 2016-03-05T12:44:38+00:00. For example, if a web service request returns all activity in a payload response, you can use the _last_run key to filter results displayed before or after the value for_last_run
Session Keys

Session Keys are Kore.ai variable placeholders for user data specific to a single session instance.
Session Keys

  • UserContext.get(“_id”) – The Kore.ai userId.
  • UserContext.get(“emailId”) – The email address associated with the userId.
  • UserContext.get(“lastName”) – The last name of the user.
  • UserContext.get(“firstName”) – The first name of the user.
  • UserContext.get(“profImage”) – The image or avatar filename of the user.
  • UserContext.get(“profColor”) – The account color for the user.
  • UserContext.get(“activationStatus”) – The account status of the user.
  • UserContext.get(“jTitle”) – The title of the user, if defined.
  • UserContext.get(“orgId”) – The organizational ID of the user account, if defined.
  • UserContext.get(“customData”) – A developer defined custom key.
  • UserContext.get(“identities”) – Alternate user IDs, if defined.

Additional session keys may be available depending on how the Bot task is defined and the context of keys available for that task. For more information about session and context keys, see Using Session and Context Variables in Tasks.

Response Keys

Response Keys are parsed directly from your Response Sample text in the API Response tab. Response Keys vary depending on the Response Sample defined.Response Keys
The following list is an example of Response Keys available for an Asana task.

request.data.workspace
request.data.projects
request.data.name
request.data.notes
labels.498346170860
labels.30887755353556
labels["data.workspace"]
labels["data.projects"]
_tenant_
response.data.id
response.data.created_at
response.data.modified_at
response.data.name
response.data.notes
response.data.completed
response.data.assignee_status
response.data.completed_at
response.data.due_on
response.data.due_at
response.data.workspace.id
response.data.workspace.name
response.data.num_hearts
response.data.parent
response.data.followers[0].id
response.data.followers[0].name
response.data.hearted
response.data.assignee
response.data.projects[0].id
response.data.projects[0].name
response.data.memberships[0].project.id
response.data.memberships[0].project.name
response.data.memberships[0].section
Report Keys

Report Keys are Kore.ai variable placeholders that you can use in Report Template Definitions and Bot Responses to show links for additional information in a message that a user can click.
Report Keys

  • reportInfo.reportLink – The link defined in the Report Template Definition section for this task.
  • reportInfo.reportTitle – The title defined in the Report Template Definition for this task.
Previewing the Response

On the message editor, click Preview to generate a preview of your response using one of the following options:

  • Test & Preview – Opens the task setup page for your Bot to define the task settings, authenticate, and then shows a preview of your response generated through your third-party web service, for example, Asana.
  • Preview with sample response – Generates the preview using the sample data provided with the key-value pairs defined in the Response Sample section on the API Request tab for the task.

Examples of Custom JavaScript Response

The following examples show response objects using JavaScript to define the Post Title and Post Description sections that display output messages to the end-user when the task response message is sent.
In the following example, the variable labeled desc is only displayed if the value for the caption is defined in the JSON response.

var desc = (caption !== "undefined" ? caption : "")

In the next example, a clickable URL using the task title is displayed in the task response message.

var tasklink = '' + title + '';

In this last example, the link variable depends on the type, either video or photo. Based on the type, the proper link is displayed.

var link = "";
switch (type) {
    case "video":
        var video = (typeof(video_url) != "undefined") ? video_url : permalink_url;
        link = '<video controls><source src ="' + video + '" type="video/mp4"></video>';
        break;
    case "photo":
        link = '<img src="' + image_permalink + '"></img>';
        break;
}

You can create custom JavaScript to handle task-specific requirements on the JavaScript tab based on the payload response for the task.

Channel-Specific Bot Response

A task response message may be dependent on the channel that the response message is displayed in, for example, in the Kore.ai Messenger client, an email, or in a text message. By default, the response message that you configure for Default for all Channels is sent to all channels. However, you can define a specific response for one or more of the 20+ supported channels to display to the end-user in that channel instead of the default response.

  1. To define the response message for a specific channel, click + Add Channel to display the Choose a Channel drop-down list.
  2. Select a channel, for example, Kore.ai, and then configure the response for that channel on the JavaScript tab.


Only one response can be defined for each channel. The following JavaScript examples show how you can override the Kore.ai default formatting template by channel.

Note: Use the following keys to return default values for:
response.message – Returns the default message as a string.
response.message.choices – Returns the options choice or confirmation message types as an array.

  • Slack Channel Override Example
    var message = {};
    var attachments = [];
    var attachment = {
        'text': "Exception occurred during API execution",
        'color': '#FFCC00',
        'attachment_type': 'default'
    };
    attachments.push(attachment);
    message.attachments = attachments;
    print(JSON.stringify(message));
  • FaceBook Channel Override Example
    var message = {
        text: response.message
    };
    var buttons = [];
    for (var i = 0; i < response.choices.length; i++) {
        var choiceItem = response.choices[i];
        if (choiceItem.length > 20) {
            choiceItem = choiceItem.substring(
                0, 18) + '..';
        }
        var element = {
            content_type: 'text',
            title: choiceItem,
            payload: choiceItem
        };
        buttons.push(element);
    }
    message.quick_replies = buttons;
    print(JSON.stringify(message));
  • Email Channel Override Example
    var message = {};
    var text = response.message + ' <br> ';
    for (var i = 0; i < response.choices.length; i++) {
        text = text.concat(
            '<u> + response.choices[i] + ' <
            /u> <br>');
        }
        message.text = text;
        print(JSON.stringify(message));
  • SMS Channel Override Example
    var message = {};
        var indexArray = ['a', 'b', 'c',
            'd', 'e',
            'f', 'g', 'h', 'i', 'j',
            'k', 'l', 'm', 'n', 'o',
            'p', 'q', 'r', 's', 't',
            'u', 'v', 'w', 'x', 'y',
            'z'
        ];
        var text = response.message + '\\n';
        for (var i = 0; i < response.choices
            .length; i++) {
            text = text.concat(indexArray[i] +
                ') ' + response.choices[
                    i] + '\\n');
        }
        message.text = text;
        print(JSON.stringify(message));