OVERVIEW
Virtual Assistants
Kore.ai Platform
Key Concepts
Natural Language Processing (NLP)
Accessing Platform
VIRTUAL ASSISTANTS
Virtual Assistant Builder
Virtual Assistant Types
Getting Started
Create a Simple Bot
SKILLS
Storyboard
Dialog Tasks
Introduction
Dialog Builder (New)
Dialog Builder (Legacy)
User Intent Node
Dialog Node
Entity Node
Supported Entity Types
Composite Entities
Supported Colors
Supported Company Names
Form Node
Logic Node
Message Nodes
Confirmation Nodes
Bot Action Node
Service Node
Custom Authentication
2-way SSL for Service nodes
Script Node
Agent Transfer Node
WebHook Node
Grouping Nodes
Connections & Transitions
Manage Dialogs
User Prompts
Knowledge Graph
Terminology
Building
Generation
Importing and Exporting
Analysis
Knowledge Extraction
Train
Build
Alert Tasks
Introduction
Ignore Words and Field Memory
How to Schedule a Smart Alert
Small Talk
Digital Views
Introduction
How to Configure Digital Views
Digital Forms
Overview
How to Configure Digital Forms
NATURAL LANGUAGE
Overview
Machine Learning
Introduction
Model Validation
Fundamental Meaning
Introduction
NLP Guidelines
Knowledge Graph
Traits
Introduction
How to Use Traits
Ranking and Resolver
Advanced NLP Configurations
INTELLIGENCE
Overview
Context Management
Overview
Session and Context Variables
Context Object
How to Manage Context Switching
Manage Interruptions
Dialog Management
Sub Intents & Follow-up Intents
Amend Entity
Multi-Intent Detection
Sentiment Management
Tone Analysis
Sentiment Management
Event Based Bot Actions
Default Conversations
Default Standard Responses
TEST & DEBUG
Talk to Bot
Utterance Testing
Batch Testing
Record Conversations
Conversation Testing
CHANNELS
PUBLISH
ANALYZE
Overview
Dashboard
Custom Dashboard
Overview
How to Create Custom Dashboard
Conversation Flows
NLP Metrics
ADVANCED TOPICS
Universal Bots
Overview
Defining
Creating
Training
Customizing
Enabling Languages
Store
Smart Bots
Defining
koreUtil Libraries
SETTINGS
Authorization
Language Management
PII Settings
Variables
Functions
IVR Integration
General Settings
Management
Import & Export
Delete
Bot Versioning
Collaborative Development
Plan Management
API GUIDE
API Overview
API List
API Collection
SDKs
SDK Overview
SDK Security
SDK App Registration
Web SDK Tutorial
Message Formatting and Templates
Mobile SDK Push Notification
Widget SDK Tutorial
Widget SDK – Message Formatting and Templates
Web Socket Connect & RTM
Using the BotKit SDK
Installing
Configuring
Events
Functions
BotKit SDK Tutorial – Agent Transfer
BotKit SDK Tutorial – Flight Search Sample Bot
Using an External NLP Engine
ADMINISTRATION
HOW TOs
Create a Simple Bot
Create a Banking Bot
Transfer Funds Task
Update Balance Task
Context Switching
Using Traits
Schedule a Smart Alert
Configure UI Forms
Add Form Data into Data Tables
Configuring Digital Views
Add Data to Data Tables
Update Data in Data Tables
Custom Dashboard
Custom Tags to filter Bot Metrics
Patterns for Intents & Entities
Build Knowledge Graph
Global Variables
Content Variables
Using Bot Functions
Configure Agent Transfer
RELEASE NOTES

通知タスク – フィルターの定義

こちらでご覧いただいた通り、通知タスクの結果をエンドユーザーが必要とする結果に制限するよう、エンドユーザー用のフィルターを定義することができます。たとえば、名前やアカウント、ビジネスなどのフィルターを定義できます。エンド ユーザーごとに通知がセットアップされ、フィルターが適用されると、フィルターの条件を満たす通知メッセージのみがエンド ユーザーに表示されます。

フィルターの定義

タスクのフィルターの定義を開始するには、下図のように、設定タブでフィルターセクションの展開アイコンをクリックしてから追加をクリックします。通知タスク - タブの設定 - フィルターセクション 
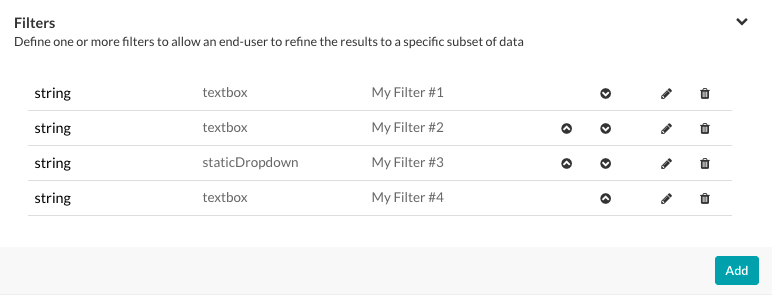
追加をクリックすると、下図のように通知タスクフィルターダイアログが表示されます。Alert Task Filter Dialog 
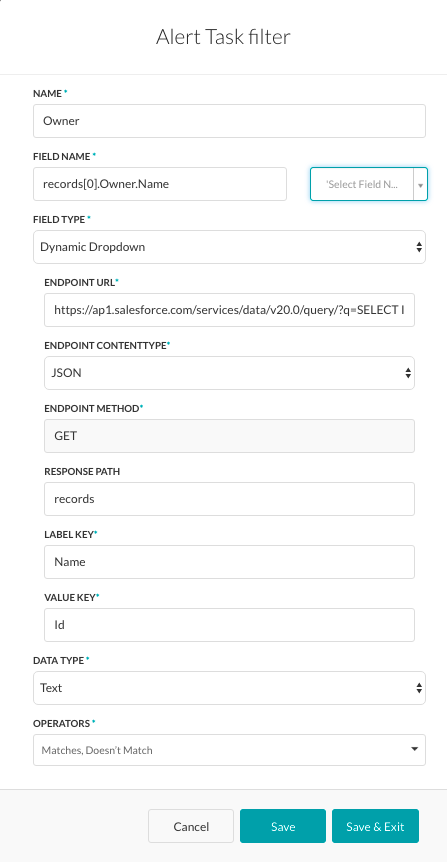
前述の図で定義されたフィルターは、所有者というラベルのついたフィルターとしてエンドユーザーに表示されます。フィールドタイプダイナミックドロップダウンに設定され、エンドユーザーは応答のペイロードで定義された、動的に入力された所有者一覧から名前を選択することができます。下記のテーブルの説明の通りにタスクに新規のフィルターの作成フィールドを定義してください。

パラメータ名 説明
名前 タスクの設定時にフィルターセクションでエンドユーザーに表示されるフィルターの名前を指定します。例えば、「以下のユーザーがツイートしたときのみ通知する」などです。
フィールド名 タスクを絞り込むフィールド名を入力して、[フィールドを選択] をクリックすると、タスク内の [API リクエスト] タブに定義された [応答サンプル] から解析済みのフィールド名がドロップダウン リストに表示されます。
フィールドタイプ ユーザー入力を収集するために入力フィールド タイプを選択します。

  • テキスト ボックス – ユーザーにテキスト ボックスを表示します。[プレースホルダー] フィールドには、フィールドの説明を入力します。たとえば、「追加する名前を入力してください」のようなものです。
  • テキスト ボックス – 長い文章を入力できる、テキスト ボックスをユーザーに表示します。[プレースホルダー] フィールドに、テキスト 領域の説明を入力します。
  • 静的ドロップダウン – ユーザーに選択肢のドロップダウン リストを表示します。[オプションの追加] をクリックして、以下のパラメーターで項目リストの追加を始めます。
    • オプション名 – ユーザーに表示されるオプションの名称です。
    • オプション値 – オプションに関連付けられた値です。
    • デフォルト値 – オプションが 1 つ以上定義されている場合、リストのデフォルト値を選択します。
    • 検索可能 – 選択すると、ユーザーの入力に先行してリストから一致する候補を表示します。

    [保存] をクリックします。項目を追加する場合、オプションを追加をもう一度クリックします。動作コラムのオプション編集または削除します。

  • ダイナミックドロップダウン – BotのURLからの応答に基づいて、実行時に動的に生成されるドロップダウンリストを表示します(例:JIRAタスク通知用のプロジェクト一覧)。以下のダイナミックに配置されるドロップダウンへのプロパティを定義します。
    • エンドポイント URL – BotのエンドポイントのURLです。例:https://app.asana.com/api/1.0/workspaces
    • エンドポイントのコンテンツタイプ―指定されたエンドポイントURLから予想されるコンテンツタイプの一つ。JSON、RSS、XML、URL にエンコードされた JSON、CSV やテキスト。
    • エンドポイント メソッド – 次のうち 1 つを選択します。
      • GET– タスクフィールドのHTTPリクエストのGETメソッドを指定します。
      • POST– タスク フィールドの HTTP リクエストの POST メソッドを指定します。
    • 応答パス – 希望するドロップダウンリストの値を含む応答内のパスです(例:データ)。
    • ラベルキー – ドロップダウンオプションのラベルのキーです(例:名前)。
    • オプション値キー – ドロップダウン オプション値のキーです。例:id
    • ペイロードフィールドの追加 – 先行入力フィールドのオプションとして、 応答ペイロードから 1 つ以上のフィールドをクリックして追加します。各先行入力のフィールドオプションについて、ペイロードフィールドのキーペイロードフィールドの値を入力し、保存をクリックします。動作列でペイロードフィールドを編集または削除します。
  • チェック ボックス – ユーザーが選択できる 1 つ以上の選択肢のリストを表示します。[オプションを追加] をクリックして、以下のパラメーターで表示する項目リストの追加を始めます。
    • オプション名 – エンドユーザーに表示されるオプションの名前です。
    • オプション値 – オプション名に対応する値です。
  • 先行入力 – タスクに定義されたURLからの応答に基づく検索結果に一致する文字をユーザーが 3 文字以上入力すると、動的に入力されたドロップダウンリストの選択肢が実行時にユーザーに表示されます。
    例えば、JIRAのタスク通知メッセージのプロジェクト一覧です。以下のダイナミックに配置されるドロップダウンへのプロパティを定義します。

    • エンドポイント URL – BotのエンドポイントのURLです。例:https://app.asana.com/api/1.0/workspaces
    • エンドポイントのコンテンツタイプ―指定されたエンドポイントURLから予想されるコンテンツタイプ。以下のうちの一つ:JSON、RSS、XML、URL エンコードされた JSON、CCV、テキスト、Twitter エンコードされた JSON、Multipart/Form-data または Multipart/Related。
    • エンドポイント メソッド – 次のうち 1 つを選択します。
      • GET– タスクフィールドのHTTPリクエストのGETメソッドを指定します。
      • POST– タスク フィールドの HTTP リクエストの POST メソッドを指定します。
    • 応答パス – 希望するドロップダウンリストの値を含む応答内のパスです(例:データ)。
    • ラベルキー – ドロップダウンオプションのラベルのキーです(例:名前)。
    • オプション値キー – ドロップダウンオプションの値のキーです(例:ID)。
    • ペイロードフィールドの追加 – 先行入力フィールドのオプションとして、 応答ペイロードから 1 つ以上のフィールドをクリックして追加します。各先行入力のフィールドオプションについて、ペイロードフィールドのキーペイロードフィールドの値を入力し、保存をクリックします。動作列でペイロードフィールドを編集または削除します。
    • 編集可能―先行入力の検索結果が一致しない場合のオプションとして、エンドユーザーがフィールドに自由にテキストを入力できるようにします。
  • 動的チェック ボックス – ボットの URL からの応答に基づいて、実行時に動的に生成され、1 つ以上の選択ができる選択肢のリストです。たとえば、JIRA のタスク通知のプロジェクト リストのようなものです。以下のダイナミックに配置されるチェックボックスの選択のリストへのプロパティを定義します。
    • エンドポイント URL – BotのエンドポイントのURLです。例:https://app.asana.com/api/1.0/workspaces
    • エンドポイントのコンテンツタイプ―指定されたエンドポイントURLから予想されるコンテンツタイプ。以下のうちの一つ:JSON、RSS、XML、URL にエンコードされた JSON、CSV やテキスト。
    • エンドポイント メソッド – 次のうち 1 つを選択します。
      • GET– タスクフィールドのHTTPリクエストのGETメソッドを指定します。
      • POST– タスク フィールドの HTTP リクエストの POST メソッドを指定します。
    • 応答パス – 希望するドロップダウンリストの値を含む応答内のパスです(例:データ)。
    • ラベルキー – ドロップダウンオプションのラベルのキーです(例:名前)。
    • ボックス値キー – ドロップダウン オプション値のキーです。例:id
データタイプ エンドポイントURLから受信したコンテンツのデータタイプです。以下のうちの一つ:

  • テキスト – このフィルタのユーザー入力にはテキストが求められます。
  • 数字 – このフィルターのユーザー入力には整数が求められます。
  • 日付 – このフィルターのユーザー入力は日付です。
  • リスト – このフィルターのユーザー入力はコンマ区切りのリストです。
オペレーター エンドユーザーがフィルターに適用できる、 1 つ以上のフィルター操作を選択します。選択したデータ型によって、次のオプションのうち 1 つ以上をエンドユーザーに表示するよう選択することができます。

  • すべてを含む – 応答オブジェクトでフィルターをかけた文字は、指定された値をすべて含みます。
  • すべてを含まない – 応答オブジェクトでフィルターをかけた文字は、指定された値のすべてを含みません。
  • 完全一致 – 応答オブジェクトでフィルターをかけた文字は、指定された値のみを含みます。
  • 完全一致ではない – 応答 でフィルターをかけた文字オブジェクトは、指定された値を含みません。
  • 含む – 応答オブジェクトでフィルターをかけた文字は、指定された値を含みます。
  • 含まない – 応答オブジェクトでフィルターをかけた文字は、指定された値をどれも含みません。
  • から始まる – 応答オブジェクトでフィルターをかけた文字は、指定された値で始まります。
  • から始まらない – 応答オブジェクトでフィルターをかけた文字は、指定された値で始まりません。
  • で終わる – 応答オブジェクトでフィルターをかけた文字は、指定された値で終わります。
  • で終わらない応答オブジェクトでフィルターをかけた文字は、指定された値で終わりません。
  • 等しい – 応答オブジェクトでフィルターをかけた数字や日付は、指定された値と等しくなっています。
  • より大きい – 応答オブジェクトでフィルターをかけた数字や日付は、指定された値を超えています。
  • より小さい – 応答オブジェクトでフィルターをかけた数字や日付は、指定された値未満です。
  • 存在する – 応答オブジェクトでフィルターをかけたリストは、指定された値を含みます。
  • 存在しない – 応答オブジェクトでフィルターをかけたリストは、指定された値を含みません。

複数のフィルターには、フィルターをエンドユーザーの予想の順番と並び直すことができます、下記の図の数目順の通りに表示します。通知タスク - タブの設定 - フィルターセクション 必要に応じて、フィルターセクションの動作列にある上へ移動アイコンと下へ移動アイコンを使用して、フィルターの順序を変更します。編集アイコンをクリックして既存のフィルターの設定を変更します。削除アイコンをクリックして既存のフィルターを削除します。警告:この操作は永久的で、元に戻すことはできません。

OVERVIEW
Virtual Assistants
Kore.ai Platform
Key Concepts
Natural Language Processing (NLP)
Accessing Platform
VIRTUAL ASSISTANTS
Virtual Assistant Builder
Virtual Assistant Types
Getting Started
Create a Simple Bot
SKILLS
Storyboard
Dialog Tasks
Introduction
Dialog Builder (New)
Dialog Builder (Legacy)
User Intent Node
Dialog Node
Entity Node
Supported Entity Types
Composite Entities
Supported Colors
Supported Company Names
Form Node
Logic Node
Message Nodes
Confirmation Nodes
Bot Action Node
Service Node
Custom Authentication
2-way SSL for Service nodes
Script Node
Agent Transfer Node
WebHook Node
Grouping Nodes
Connections & Transitions
Manage Dialogs
User Prompts
Knowledge Graph
Terminology
Building
Generation
Importing and Exporting
Analysis
Knowledge Extraction
Train
Build
Alert Tasks
Introduction
Ignore Words and Field Memory
How to Schedule a Smart Alert
Small Talk
Digital Views
Introduction
How to Configure Digital Views
Digital Forms
Overview
How to Configure Digital Forms
NATURAL LANGUAGE
Overview
Machine Learning
Introduction
Model Validation
Fundamental Meaning
Introduction
NLP Guidelines
Knowledge Graph
Traits
Introduction
How to Use Traits
Ranking and Resolver
Advanced NLP Configurations
INTELLIGENCE
Overview
Context Management
Overview
Session and Context Variables
Context Object
How to Manage Context Switching
Manage Interruptions
Dialog Management
Sub Intents & Follow-up Intents
Amend Entity
Multi-Intent Detection
Sentiment Management
Tone Analysis
Sentiment Management
Event Based Bot Actions
Default Conversations
Default Standard Responses
TEST & DEBUG
Talk to Bot
Utterance Testing
Batch Testing
Record Conversations
Conversation Testing
CHANNELS
PUBLISH
ANALYZE
Overview
Dashboard
Custom Dashboard
Overview
How to Create Custom Dashboard
Conversation Flows
NLP Metrics
ADVANCED TOPICS
Universal Bots
Overview
Defining
Creating
Training
Customizing
Enabling Languages
Store
Smart Bots
Defining
koreUtil Libraries
SETTINGS
Authorization
Language Management
PII Settings
Variables
Functions
IVR Integration
General Settings
Management
Import & Export
Delete
Bot Versioning
Collaborative Development
Plan Management
API GUIDE
API Overview
API List
API Collection
SDKs
SDK Overview
SDK Security
SDK App Registration
Web SDK Tutorial
Message Formatting and Templates
Mobile SDK Push Notification
Widget SDK Tutorial
Widget SDK – Message Formatting and Templates
Web Socket Connect & RTM
Using the BotKit SDK
Installing
Configuring
Events
Functions
BotKit SDK Tutorial – Agent Transfer
BotKit SDK Tutorial – Flight Search Sample Bot
Using an External NLP Engine
ADMINISTRATION
HOW TOs
Create a Simple Bot
Create a Banking Bot
Transfer Funds Task
Update Balance Task
Context Switching
Using Traits
Schedule a Smart Alert
Configure UI Forms
Add Form Data into Data Tables
Configuring Digital Views
Add Data to Data Tables
Update Data in Data Tables
Custom Dashboard
Custom Tags to filter Bot Metrics
Patterns for Intents & Entities
Build Knowledge Graph
Global Variables
Content Variables
Using Bot Functions
Configure Agent Transfer
RELEASE NOTES

Alert Task – Defining Filters

As we have seen here, you can define filters for end-users to limits the results of an alert task to the results an end-user needs. For example, you can define a filter for the name, or account, or business. When the alert is set up by the end-user, and the filter applied, only alert messages that meet the filter specifications are displayed to the end-user.

Defining Filters

To get started with defining filters for a task, on the Settings tab, click the Expand icon in the Filters section, and then click Add as shown in the following illustration.
Alert Task - Settings Tab - Filters Section
When you click Add, the Alert Task Filter dialog is displayed as shown in the following illustration.
Alert Task Filter Dialog
The Filter defined in the previous illustration is displayed to the end-user as a filter labeled Owner, with the Field Type set to Dynamic Dropdown to enable the end-user to select a name from a dynamically populated list of owners defined in the response payload.
Define the fields described in the following table to create a new filter for a task.

PARAMETER NAME DESCRIPTION
Name Specify the name of the Filter displayed to the end-user in the Filters section when configuring the task, for example, Notify me only when the below user tweets.
Field Name Enter the name of the field to filter the task on, or click Select Field to display a drop-down list of field names parsed from the Response Sample defined on the task API Request tab.
Field Type Select the type of input field to collect the user input.

  • Textbox – Displays a text box to the user. In the Placeholder field, enter a description for the field, for example, Type in the name you want to embroider.
  • Textarea – Displays a text area box to the user, typically allowing to enter several sentences. In the Placeholder field, enter a description for the text area.
  • Static Dropdown – Displays a drop-down list of choices to the user. Click Add Option to begin adding the list of items, with the following parameters:
    • Option Name – The name of the option displayed to the user.
    • Option Value – The value associated with the option.
    • Default Value – Select the default value for the list when more than one option is defined.
    • Searchable – Select to enable type-ahead suggestions from the list matching the user’s typing.

    Click Save. To add additional items, click Add Option again. Edit or remove options in the Actions column for options.

  • Dynamic Dropdown – Displays a drop-down list dynamically populated at runtime based on the response from a URL for your Bot, for example, a list of projects for a JIRA task notification. Define the following properties for a dynamically populated drop-down.
    • Endpoint URL – The Bot endpoint URL, for example, https://app.asana.com/api/1.0/workspaces.
    • Endpoint Content Type – One of these content types expected from the specified endpoint URL: JSON, RSS, XML, Encoded JSON, CSV, or Text.
    • Endpoint Method – Select one of the following:
      • GET – Specifies an HTTP Request GET method for the task field.
      • POST – Specifies an HTTP Request POST method for the task field.
    • Response Path – The path in the response that contains the desired drop-down list values, for example, data.
    • Label Key – The key for the label of the drop-down option, for example, name.
    • Optional Value Key – The key for the value of the drop-down option, for example, id.
    • Add Payload Field – Click to add one or more fields from the response payload as options for the type-ahead field. For each type ahead field option, enter the Payload field key and the Payload field value, and then click Save. Edit or delete payload fields in the Actions column.
  • Check Box – Displays a list of choices that the user can select from – one or more. Click Add Option to begin adding the list of items to display, with the following parameters:
    • Option Name – The name of the option displayed to the end-user.
    • Option Value – The corresponding value for the option name.
  • Type Ahead – Displays a dynamically populated drop-down list of choices to the user at runtime when the user enters three or more characters that match the search results based on the response from the URL defined for the task. For example, a list of projects for a JIRA task notification message. Define the following properties for a dynamically populated drop-down.
    • Endpoint URL – The Bot endpoint URL, for example, https://app.asana.com/api/1.0/workspaces.
    • Endpoint Content Type – The content type expected from the specified endpoint URL. One of: JSON, RSS, XML, URL Encoded JSON, CCV, Text, Twitter Encoded JSON, Multipart/Form-data, or Multipart/Related.
    • Endpoint Method – Select one of the following:
      • GET – Specifies an HTTP Request GET method for the task field.
      • POST – Specifies an HTTP Request POST method for the task field.
    • Response Path – The path in the response that contains the desired drop-down list values, for example, data.
    • Label Key – The key for the label of the drop-down option, for example, name.
    • Option Value Key – The key for the value of the drop-down option, for example, id.
    • Add Payload Field – Click to add one or more fields from the response payload as options for the type-ahead field. For each type ahead field option, enter the Payload field key and the Payload field value, and then click Save. Edit or delete payload fields in the Actions column.
    • Editable – Enables the end-user to enter text free-from in the field as an option when type-ahead search results do not match.
  • Dynamic Check Box – Displays a list of choices that the end-user can select one or more from, which are dynamically populated at runtime based on the response from a URL for your Bot, for example, a list of projects for a JIRA task notification. Define the following properties for a dynamically populated list of choices as checkboxes.
    • Endpoint URL – The Bot endpoint URL, for example, https://app.asana.com/api/1.0/workspaces.
    • Endpoint Content Type – The content type expected from the specified endpoint URL. One of: JSON, RSS, XML, Encoded JSON, CSV, or Text.
    • Endpoint Method – Select one of the following:
      • GET – Specifies an HTTP Request GET method for the task field.
      • POST – Specifies an HTTP Request POST method for the task field.
    • Response Path – The path in the response that contains the desired drop-down list values, for example, data.
    • Label Key – The key for the label of the drop-down option, for example, name.
    • Box Value Key – The key for the value of the drop-down option, for example, id.
Data Type The data type for the content received from the endpoint URL. One of:

  • Text – The user input for this filter is expected as text.
  • Number – The user input for this filter is expected as an integer.
  • Date – The user input for this filter is a date.
  • List – The user input for this filter is a comma-separated list.
Operators Select one or more filter operations that the end-user can select to apply to the filter. Depending on the Data Type selected, one or more of the following options are available to select to display to the end-user in the filter.

  • Contains – The response object filtered text contains all of the specified values.
  • Doesn’t Contain – The response object filtered text does not contain all of the specified values.
  • Exact Match – The response object filtered text only contains the specified values.
  • Not an exact match – The response filtered text object does not contain the specified value.
  • Included – The response object filtered text contains any of the specified values.
  • Not Included – The response object filtered text does not contain any of the specified values.
  • Starts with – The response object filtered text begins with the specified value.
  • Doesn’t start with – The response object filtered text does not begin with the specified value.
  • Ends with – The response object filtered text ends with the specified value.
  • Doesn’t end with – The response object filtered text does not end with the specified value.
  • Equal to – The response object filtered numbers or dates are equal to the specified value.
  • Greater than – The response object filtered numbers or dates are greater than the specified value.
  • Less than – The response object filtered numbers or dates are less than the specified value.
  • Exists – The response object filtered list contains the specified value.
  • Doesn’t exist – The response object filter list does not contain the specified value.

For multiple filters, you can order the filters in an order the end-user expects, shown in numerical order in the following illustration.
Alert Task - Settings Tab - Filters Section
Use the Move Up  icon and the Move Down  icon in the Actions column in the Filters section to reorder the filters if needed.
Click the Edit  icon to modify the settings for an existing filter.
Click the Delete  icon to delete an existing filter.
Warning: This operation is permanent and cannot be undone.

On this Page