OVERVIEW
Virtual Assistants
Kore.ai Platform
Key Concepts
Natural Language Processing (NLP)
Accessing Platform
VIRTUAL ASSISTANTS
Virtual Assistant Builder
Virtual Assistant Types
Getting Started
Create a Simple Bot
SKILLS
Storyboard
Dialog Tasks
Introduction
Dialog Builder (New)
Dialog Builder (Legacy)
User Intent Node
Dialog Node
Entity Node
Supported Entity Types
Composite Entities
Supported Colors
Supported Company Names
Form Node
Logic Node
Message Nodes
Confirmation Nodes
Bot Action Node
Service Node
Custom Authentication
2-way SSL for Service nodes
Script Node
Agent Transfer Node
WebHook Node
Grouping Nodes
Connections & Transitions
Manage Dialogs
User Prompts
Knowledge Graph
Terminology
Building
Generation
Importing and Exporting
Analysis
Knowledge Extraction
Train
Build
Alert Tasks
Introduction
Ignore Words and Field Memory
How to Schedule a Smart Alert
Small Talk
Digital Views
Introduction
How to Configure Digital Views
Digital Forms
Overview
How to Configure Digital Forms
NATURAL LANGUAGE
Overview
Machine Learning
Introduction
Model Validation
Fundamental Meaning
Introduction
NLP Guidelines
Knowledge Graph
Traits
Introduction
How to Use Traits
Ranking and Resolver
Advanced NLP Configurations
INTELLIGENCE
Overview
Context Management
Overview
Session and Context Variables
Context Object
How to Manage Context Switching
Manage Interruptions
Dialog Management
Sub Intents & Follow-up Intents
Amend Entity
Multi-Intent Detection
Sentiment Management
Tone Analysis
Sentiment Management
Event Based Bot Actions
Default Conversations
Default Standard Responses
TEST & DEBUG
Talk to Bot
Utterance Testing
Batch Testing
Record Conversations
Conversation Testing
CHANNELS
PUBLISH
ANALYZE
Overview
Dashboard
Custom Dashboard
Overview
How to Create Custom Dashboard
Conversation Flows
NLP Metrics
ADVANCED TOPICS
Universal Bots
Overview
Defining
Creating
Training
Customizing
Enabling Languages
Store
Smart Bots
Defining
koreUtil Libraries
SETTINGS
Authorization
Language Management
PII Settings
Variables
Functions
IVR Integration
General Settings
Management
Import & Export
Delete
Bot Versioning
Collaborative Development
Plan Management
API GUIDE
API Overview
API List
API Collection
SDKs
SDK Overview
SDK Security
SDK App Registration
Web SDK Tutorial
Message Formatting and Templates
Mobile SDK Push Notification
Widget SDK Tutorial
Widget SDK – Message Formatting and Templates
Web Socket Connect & RTM
Using the BotKit SDK
Installing
Configuring
Events
Functions
BotKit SDK Tutorial – Agent Transfer
BotKit SDK Tutorial – Flight Search Sample Bot
Using an External NLP Engine
ADMINISTRATION
HOW TOs
Create a Simple Bot
Create a Banking Bot
Transfer Funds Task
Update Balance Task
Context Switching
Using Traits
Schedule a Smart Alert
Configure UI Forms
Add Form Data into Data Tables
Configuring Digital Views
Add Data to Data Tables
Update Data in Data Tables
Custom Dashboard
Custom Tags to filter Bot Metrics
Patterns for Intents & Entities
Build Knowledge Graph
Global Variables
Content Variables
Using Bot Functions
Configure Agent Transfer
RELEASE NOTES

通知タスク – スケジュールの設定

こちらでご覧いただいた通り、通知タスクは、ボットがリクエストを行った場合にのみ、データを取得するために Web サービスにアクセスします。いつ、どのくらいの頻度で Web サービスに通知メッセージのデータを照会するかを、各タスクに対して定義する必要があります。タスクがセットアップされたときにエンド ユーザーに表示される予約設定、およびタスクのデフォルトの予約設定を定義できます。

タスクのスケジュール設定

ウェブサービスからデータをリクエストするためにタスクが実行される頻度のデフォルト設定を設定する必要があります。このトッピングはタスクの再発の調整の説明です。タスク実行のスケジュールの定義を開始するには、下図のように、設定タブでスケジュールセクションの展開アイコンをクリックします。通知タスク - タブの設定 - スケジュールセクション 
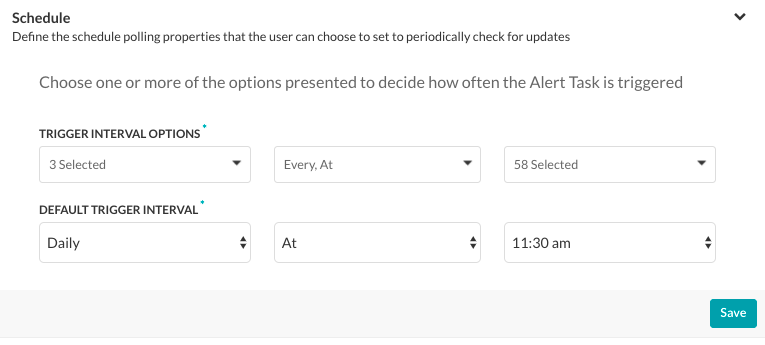
タスクのスケジュールを設定するには、トリガーの間隔オプションを定義してからデフォルトのトリガー間隔を定義する必要があります。デフォルトのトリガー間隔とは、最後のタスクリクエストから次の自動タスクリクエストまでの時間を指します。エンドユーザーに表示されるオプションを設定するには、トリガーの間隔オプションセクションで次のことを行います。
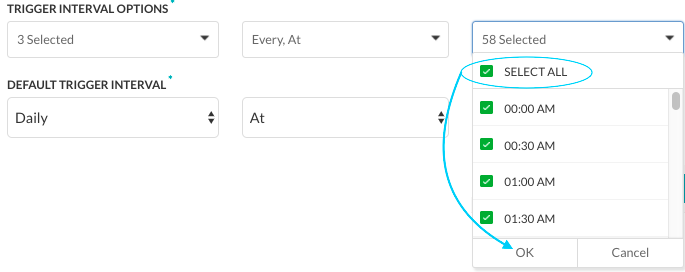
  • 最初 のフィールドで、[毎日] [平日] [週末] 、個別の [曜日] [すべてを選択] のうちから 1 つ以上を選択して、 [OK] をクリックします。
  • 2 番目のフィールドで、[ごと]、[時点] [すべてを選択] のうちから 1 つ以上を選択して、[OK] をクリックします。
  • 3つ目のフィールドで、5分間隔または30分の時間枠(2番目のフィールドが「ごと」か「時点」かに応じる)から1つ以上選択して、あるいはすべて選択を選択肢てOKをクリックします。

下図では、デフォルトのトリガー間隔の設定は<30分間隔>毎日となっています。 通知タスク - タブの設定 - スケジュールセクション - トリガーの間隔

OVERVIEW
Virtual Assistants
Kore.ai Platform
Key Concepts
Natural Language Processing (NLP)
Accessing Platform
VIRTUAL ASSISTANTS
Virtual Assistant Builder
Virtual Assistant Types
Getting Started
Create a Simple Bot
SKILLS
Storyboard
Dialog Tasks
Introduction
Dialog Builder (New)
Dialog Builder (Legacy)
User Intent Node
Dialog Node
Entity Node
Supported Entity Types
Composite Entities
Supported Colors
Supported Company Names
Form Node
Logic Node
Message Nodes
Confirmation Nodes
Bot Action Node
Service Node
Custom Authentication
2-way SSL for Service nodes
Script Node
Agent Transfer Node
WebHook Node
Grouping Nodes
Connections & Transitions
Manage Dialogs
User Prompts
Knowledge Graph
Terminology
Building
Generation
Importing and Exporting
Analysis
Knowledge Extraction
Train
Build
Alert Tasks
Introduction
Ignore Words and Field Memory
How to Schedule a Smart Alert
Small Talk
Digital Views
Introduction
How to Configure Digital Views
Digital Forms
Overview
How to Configure Digital Forms
NATURAL LANGUAGE
Overview
Machine Learning
Introduction
Model Validation
Fundamental Meaning
Introduction
NLP Guidelines
Knowledge Graph
Traits
Introduction
How to Use Traits
Ranking and Resolver
Advanced NLP Configurations
INTELLIGENCE
Overview
Context Management
Overview
Session and Context Variables
Context Object
How to Manage Context Switching
Manage Interruptions
Dialog Management
Sub Intents & Follow-up Intents
Amend Entity
Multi-Intent Detection
Sentiment Management
Tone Analysis
Sentiment Management
Event Based Bot Actions
Default Conversations
Default Standard Responses
TEST & DEBUG
Talk to Bot
Utterance Testing
Batch Testing
Record Conversations
Conversation Testing
CHANNELS
PUBLISH
ANALYZE
Overview
Dashboard
Custom Dashboard
Overview
How to Create Custom Dashboard
Conversation Flows
NLP Metrics
ADVANCED TOPICS
Universal Bots
Overview
Defining
Creating
Training
Customizing
Enabling Languages
Store
Smart Bots
Defining
koreUtil Libraries
SETTINGS
Authorization
Language Management
PII Settings
Variables
Functions
IVR Integration
General Settings
Management
Import & Export
Delete
Bot Versioning
Collaborative Development
Plan Management
API GUIDE
API Overview
API List
API Collection
SDKs
SDK Overview
SDK Security
SDK App Registration
Web SDK Tutorial
Message Formatting and Templates
Mobile SDK Push Notification
Widget SDK Tutorial
Widget SDK – Message Formatting and Templates
Web Socket Connect & RTM
Using the BotKit SDK
Installing
Configuring
Events
Functions
BotKit SDK Tutorial – Agent Transfer
BotKit SDK Tutorial – Flight Search Sample Bot
Using an External NLP Engine
ADMINISTRATION
HOW TOs
Create a Simple Bot
Create a Banking Bot
Transfer Funds Task
Update Balance Task
Context Switching
Using Traits
Schedule a Smart Alert
Configure UI Forms
Add Form Data into Data Tables
Configuring Digital Views
Add Data to Data Tables
Update Data in Data Tables
Custom Dashboard
Custom Tags to filter Bot Metrics
Patterns for Intents & Entities
Build Knowledge Graph
Global Variables
Content Variables
Using Bot Functions
Configure Agent Transfer
RELEASE NOTES

Alert Task – Configuring the Schedule

As seen here, alert tasks only reach out to a web service for data when the Bot makes a request. For each task, you need to define when, and how often the web service is queried for data for an alert message. You can define the scheduling options presented to the end-user when the task is set up, as well as the default schedule for the task.

Configuring the Schedule for a Task

You need to configure the default settings for how often the task runs to request data from your web service. This topic describes how to configure the recurrence for a task.
To get started with defining the schedule to run a task, on the Settings tab, click the Expand icon in the Schedule section as shown in the following illustration.
Alert Task - Settings Tab - Schedule Section
To configure the schedule for your task, you must define the Trigger Interval Options, and then the Default Trigger Interval. The Default Trigger Interval is the elapsed time between the last task request and the next automated task request.
To set the options displayed to the end-user, in the Trigger Interval Options section:

  • In the first field, select one or more of Daily, Weekday, Weekend, individual days of the week or Select All, and then click OK.
  • In the second field, select one or more of Every, At, or Select All, and then click OK.
  • In the third field, select one or more of the available 5-minute intervals or 30-minute time slots (based on whether the second field is Every or At), or Select All, and then click OK.

In the following illustration, the Default Trigger Interval settings of  Daily At < any 30-minute interval >.
Alert Task - Settings Tab - Schedule Section - Trigger Interval