OVERVIEW
Virtual Assistants
Kore.ai Platform
Key Concepts
Natural Language Processing (NLP)
Accessing Platform
VIRTUAL ASSISTANTS
Virtual Assistant Builder
Virtual Assistant Types
Getting Started
Create a Simple Bot
SKILLS
Storyboard
Dialog Tasks
Introduction
Dialog Builder (New)
Dialog Builder (Legacy)
User Intent Node
Dialog Node
Entity Node
Supported Entity Types
Composite Entities
Supported Colors
Supported Company Names
Form Node
Logic Node
Message Nodes
Confirmation Nodes
Bot Action Node
Service Node
Custom Authentication
2-way SSL for Service nodes
Script Node
Agent Transfer Node
WebHook Node
Grouping Nodes
Connections & Transitions
Manage Dialogs
User Prompts
Knowledge Graph
Terminology
Building
Generation
Importing and Exporting
Analysis
Knowledge Extraction
Train
Build
Alert Tasks
Introduction
Ignore Words and Field Memory
How to Schedule a Smart Alert
Small Talk
Digital Views
Introduction
How to Configure Digital Views
Digital Forms
Overview
How to Configure Digital Forms
NATURAL LANGUAGE
Overview
Machine Learning
Introduction
Model Validation
Fundamental Meaning
Introduction
NLP Guidelines
Knowledge Graph
Traits
Introduction
How to Use Traits
Ranking and Resolver
Advanced NLP Configurations
INTELLIGENCE
Overview
Context Management
Overview
Session and Context Variables
Context Object
How to Manage Context Switching
Manage Interruptions
Dialog Management
Sub Intents & Follow-up Intents
Amend Entity
Multi-Intent Detection
Sentiment Management
Tone Analysis
Sentiment Management
Event Based Bot Actions
Default Conversations
Default Standard Responses
TEST & DEBUG
Talk to Bot
Utterance Testing
Batch Testing
Record Conversations
Conversation Testing
CHANNELS
PUBLISH
ANALYZE
Overview
Dashboard
Custom Dashboard
Overview
How to Create Custom Dashboard
Conversation Flows
NLP Metrics
ADVANCED TOPICS
Universal Bots
Overview
Defining
Creating
Training
Customizing
Enabling Languages
Store
Smart Bots
Defining
koreUtil Libraries
SETTINGS
Authorization
Language Management
PII Settings
Variables
Functions
IVR Integration
General Settings
Management
Import & Export
Delete
Bot Versioning
Collaborative Development
Plan Management
API GUIDE
API Overview
API List
API Collection
SDKs
SDK Overview
SDK Security
SDK App Registration
Web SDK Tutorial
Message Formatting and Templates
Mobile SDK Push Notification
Widget SDK Tutorial
Widget SDK – Message Formatting and Templates
Web Socket Connect & RTM
Using the BotKit SDK
Installing
Configuring
Events
Functions
BotKit SDK Tutorial – Agent Transfer
BotKit SDK Tutorial – Flight Search Sample Bot
Using an External NLP Engine
ADMINISTRATION
HOW TOs
Create a Simple Bot
Create a Banking Bot
Transfer Funds Task
Update Balance Task
Context Switching
Using Traits
Schedule a Smart Alert
Configure UI Forms
Add Form Data into Data Tables
Configuring Digital Views
Add Data to Data Tables
Update Data in Data Tables
Custom Dashboard
Custom Tags to filter Bot Metrics
Patterns for Intents & Entities
Build Knowledge Graph
Global Variables
Content Variables
Using Bot Functions
Configure Agent Transfer
RELEASE NOTES

通知タスク – 詳細設定

こちらでご覧いただいた通り、[詳細設定] セクションでは、タスクがセットアップされたときにエンド ユーザーに表示される通知メッセージの初期設定を有効にしたり制限したりするための通知タスクの設定や、通知メッセージのリマインダーを定義できます。また必要に応じて、ユーザーに送信されるメッセージの重複を防止することもできます。

Defined Advanced Settings

詳細設定セクションでは、タスクの最初のポーリング結果を定義したり、通知のリマインダーを定義したり、TwitterFacebookのフィードなどで通知メッセージが重複しないようにBotプラットフォームが使用するキーを指定したりすることができます。タスクの詳細設定を開始するには、下図のように、設定タブで詳細設定セクションの展開アイコンをクリックします。 通知タスク - 設定タブ - 詳細設定セクション

初期ポーリング設定

起始ボーリングは、タスクを設定した直後にエンドユーザーにイベントを表示できるようにするために定義できるオプションです。たとえば、CNN ニュース ボットの場合、初期ポーリングを有効にして、エンドユーザーが当該アプリケーションにタスクを追加するとすぐに、最新 10 件のニュース記事を表示します。最初のポーリングが定義されていない場合、タスクのポーリングは、指定されたトリガー間隔が経過した後に開始されます。最初のポーリングを有効にして設定するには、最初のポーリングを実行セクションではいを選択します。[投稿件数] フィールドに、次の図に示すように、エンドユーザーのアプリケーションに即時に掲載する過去の投稿の件数を入力します。 タスクの最初のポーリング

通知リマインダーの設定

Googleカレンダーイベント更新タスクなどの一部のタスクでは、タスクにリマインダーを追加することができます。リマインダーは、元のタスクメッセージを受け取ると、エンドユーザーにリマインダー メッセージを送信します。例えば、エンドユーザーはイベントの前にタスクメッセージ付くの30分間および15分間のリマインダー を設置とする場合があります。リマインダーを設定するには、通知のリマインダーを有効化セクションではいを選択します。リマインダー調整セクションは下記の図の通りに表示します。通知のリマインダー 通知のリマインダー パート2 通知のリマインダーを設定するには:
  1. [通知リマインダーの有効化] セクションで、[はい] をクリックして通知リマインダーの設定を表示します。
  2. [リマインダーの頻度] セクションでは、テキスト ボックスをクリックして 5 分ごとから 7 日ごとの間隔を 1 つ以上選択します。
  3. [リマインダー メッセージ] テキスト ボックスで、エンドユーザーに表示するイベント リマインダーのメッセージを入力します。例:print('Event starts in '+__frequency__); システムで生成されたキーを使用するには、任意のキーを選択をクリックして、ドロップダウンリストからキーを選択します。
  4. [識別イベントの変更] セクションで、新規イベントの認識に使用するコンマ区切りリストから 1 つ以上のキーを入力します。たとえば、id, LastModifiedDateTime, subject のようになります。
  5. [イベント開始時間] セクションで、イベントの開始時間を含む通知タスクの ペイロード フィールドを使用して、エンドユーザーにイベントの開始日時を表示するメッセージを入力します。例えば、
    if (due_at) { print(due_at); } else if (due_on) { var dt = new Date(created_at); var dtt = new Date(due_on); dt.setYear(dtt.getFullYear()); dt.setMonth(dtt.getMonth()); dt.setDate(dtt.getDate()); dt.setHours(00); dt.setMinutes(00); dt.setSeconds(00) print(dt.toISOString()); }
  6. [繰り返し識別フォーマット] セクションで、ペイロードで使う [RRule] [Cron] のいずれかを繰り返しパターン形式のタイプとして選択します。
    • RRule – カレンダーの日付の繰り返し規則を扱うための JavaScript ライブラリです。これをiCalendarのイベントに使用しましょう。詳細については、繰り返し規則をご覧ください。
    • Cron – 将来のタスクの予定を組み込むために使用します。詳細については、Cron 式をご覧ください。
  7. [繰り返しのパターン] セクションでは、たとえば毎週の定例会議のような、繰り返しが予定されているイベントの頻度としてエンドユーザーに表示する文字列を定義します。例えば、
    if (typeof(Recurrence) !== 'undefined' && Recurrence) { var map = new Object(); map['Daily'] = "DAILY"; map['Weekly'] = "WEEKLY"; map['AbsoluteMonthly'] = "MONTHLY"; map['RelativeMonthly'] = "MONTHLY"; map['AbsoluteYearly'] = "YEARLY"; map['AbsoluteYearly'] = "YEARLY"; map['First'] = 1 map['Second'] = 2 map['Third'] = 3 map['Fourth'] = 4 map['Last'] = -1 map['Sunday'] = 'SU' map['Monday'] = 'MO' map['Tuesday'] = 'TU' map['Wednesday'] = 'WE' map['Thursday'] = 'TH' map['Friday'] = 'FR' map['Saturday'] = 'SA' var rrule = ''; if (typeof(Recurrence.Pattern.Type) !== 'undefined') { var freq = map[Recurrence.Pattern.Type]; rrule = rrule + 'FREQ=' + freq + ';'; } if (typeof(Recurrence.Range.StartDate) !== 'undefined') { var stDate = new Date(Recurrence.Range.StartDate).toISOString(); rrule = rrule + 'DTSTART=' + stDate + ';'; } if (typeof(Recurrence.Pattern.Interval) !== 'undefined') { var interval = Recurrence.Pattern.Interval rrule = rrule + 'INTERVAL=' + interval + ';'; } if (typeof(Recurrence.Range.EndDate) !== 'undefined' && Recurrence.Range.Type !== 'NoEnd') { var edDate = new Date(Recurrence.Range.EndDate).toISOString(); rrule = rrule + 'UNTIL=' + edDate + ';'; } if (typeof(Recurrence.Pattern.Month) !== 'undefined' && Recurrence.Pattern.Month !== 0) { rrule = rrule + 'BYMONTH=' + Recurrence.Pattern.Month + ';'; } if (typeof(Recurrence.Pattern.DayOfMonth) !== 'undefined' && Recurrence.Pattern.DayOfMonth !== 0) { rrule = rrule + 'BYMONTHDAY=' + Recurrence.Pattern.DayOfMonth + ';'; } if (typeof(Recurrence.Pattern.Index) !== 'undefined') { var wno = map[Recurrence.Pattern.Index]; rrule = rrule + 'BYSETPOS=' + wno + ';'; } if (typeof(Recurrence.Pattern.DaysOfWeek) !== 'undefined') { var arr = []; for (var i = 0; i < Recurrence.Pattern.DaysOfWeek.length; i++) { arr.push(map[Recurrence.Pattern.DaysOfWeek[i]]) } rrule = rrule + 'BYDAY=' + arr.join(',') + ';'; } print(rrule); }
  8. [繰り返し識別フォーマット] フィールドが [Cron] に設定されている場合、[イベント終了] セクションを定義して、直近の繰り返しイベントの終了日時をエンドユーザーに表示する文字列を定義します。

[保存] をクリックして設定を保存します。

重複メッセージの防止通知

レスポンスオブジェクトのフィルタを追加した後、エンドユーザーに重複したメッセージが表示されないようにするために戦略を適用する必要があるかどうかを判断する必要があります。例えば、RSSタスクを設定する場合、同じ件名のメッセージが重複しないようにしたり、Facebookの場合には、投稿にコメントが追加されるたびにメッセージが重複しないようにしたりすることができます。Kore.aiでは、重複戦略に2つのオプションのうち1つを選択することができます。

  • 該当無し – 通知メッセージの重複防止のデフォルトの設定です。各着信タスク ペイロードがハッシュされ、最新タスク 500 件のハッシュ値が保持されます。新規タスク ペイロードは、タスク通知メッセージの重複を防ぐためにリストと比較されます。このオプションは、ほとんどのタスクに適用することができます。
  • ExcludeByCachedIds – 最大500個のハッシュ値のキーのキャッシュされたハッシュ値に基づいて、Kore.aiタスクアラートメッセージをフィルタリングしたり重複を防いだりするために使用される、コンマ区切りの一覧に1つ以上の応答識別子キーを入力する場合に選択します。キーのハッシュ値のいずれかが応答オブジェクトと一致した場合、通知メッセージはフィルタリングされ、表示されません。RSS通知タイプの場合、RSS XMLのペイロードはJSONとして解析されます。RSS 項目で絞り込む場合、$..guid[0]._と入力してXMLの < GUID > タグを JSON に解析したものを使用して、以下のようにメッセージの重複を防止します。
    { "guid": [ "_": "some link" ] }

タスクのメッセージが重複しないよう設定を定義するには、下図のように、設定タブで詳細設定セクションの展開アイコンをクリックして、重複戦略セクションを表示します。重複戦略の設定

OVERVIEW
Virtual Assistants
Kore.ai Platform
Key Concepts
Natural Language Processing (NLP)
Accessing Platform
VIRTUAL ASSISTANTS
Virtual Assistant Builder
Virtual Assistant Types
Getting Started
Create a Simple Bot
SKILLS
Storyboard
Dialog Tasks
Introduction
Dialog Builder (New)
Dialog Builder (Legacy)
User Intent Node
Dialog Node
Entity Node
Supported Entity Types
Composite Entities
Supported Colors
Supported Company Names
Form Node
Logic Node
Message Nodes
Confirmation Nodes
Bot Action Node
Service Node
Custom Authentication
2-way SSL for Service nodes
Script Node
Agent Transfer Node
WebHook Node
Grouping Nodes
Connections & Transitions
Manage Dialogs
User Prompts
Knowledge Graph
Terminology
Building
Generation
Importing and Exporting
Analysis
Knowledge Extraction
Train
Build
Alert Tasks
Introduction
Ignore Words and Field Memory
How to Schedule a Smart Alert
Small Talk
Digital Views
Introduction
How to Configure Digital Views
Digital Forms
Overview
How to Configure Digital Forms
NATURAL LANGUAGE
Overview
Machine Learning
Introduction
Model Validation
Fundamental Meaning
Introduction
NLP Guidelines
Knowledge Graph
Traits
Introduction
How to Use Traits
Ranking and Resolver
Advanced NLP Configurations
INTELLIGENCE
Overview
Context Management
Overview
Session and Context Variables
Context Object
How to Manage Context Switching
Manage Interruptions
Dialog Management
Sub Intents & Follow-up Intents
Amend Entity
Multi-Intent Detection
Sentiment Management
Tone Analysis
Sentiment Management
Event Based Bot Actions
Default Conversations
Default Standard Responses
TEST & DEBUG
Talk to Bot
Utterance Testing
Batch Testing
Record Conversations
Conversation Testing
CHANNELS
PUBLISH
ANALYZE
Overview
Dashboard
Custom Dashboard
Overview
How to Create Custom Dashboard
Conversation Flows
NLP Metrics
ADVANCED TOPICS
Universal Bots
Overview
Defining
Creating
Training
Customizing
Enabling Languages
Store
Smart Bots
Defining
koreUtil Libraries
SETTINGS
Authorization
Language Management
PII Settings
Variables
Functions
IVR Integration
General Settings
Management
Import & Export
Delete
Bot Versioning
Collaborative Development
Plan Management
API GUIDE
API Overview
API List
API Collection
SDKs
SDK Overview
SDK Security
SDK App Registration
Web SDK Tutorial
Message Formatting and Templates
Mobile SDK Push Notification
Widget SDK Tutorial
Widget SDK – Message Formatting and Templates
Web Socket Connect & RTM
Using the BotKit SDK
Installing
Configuring
Events
Functions
BotKit SDK Tutorial – Agent Transfer
BotKit SDK Tutorial – Flight Search Sample Bot
Using an External NLP Engine
ADMINISTRATION
HOW TOs
Create a Simple Bot
Create a Banking Bot
Transfer Funds Task
Update Balance Task
Context Switching
Using Traits
Schedule a Smart Alert
Configure UI Forms
Add Form Data into Data Tables
Configuring Digital Views
Add Data to Data Tables
Update Data in Data Tables
Custom Dashboard
Custom Tags to filter Bot Metrics
Patterns for Intents & Entities
Build Knowledge Graph
Global Variables
Content Variables
Using Bot Functions
Configure Agent Transfer
RELEASE NOTES

Alert Task – Advanced Settings

As seen here, in the Advanced Settings section, you can define alert task settings for enabling and limiting the initial set of alert messages displayed to the end-user when the task is set up, define alert message reminders, and if required, prevent duplicate messages sent to the user.

Defined Advanced Settings

In the Advanced Settings section, you can define the initial polling results for a task, define an alert reminder, and specify keys the Bots Platform should use to prevent duplicate alert messages, for example, in a Twitter or Facebook feed.
To define advanced settings for a task, on the Settings tab, click the Expand  icon in the Advanced Settings section as shown in the following illustration.
AlertTask - Settings Tab - Advanced Settings Section

Initial Polling Setup

Initial polling is an option you can define to enable display of events to end-users immediately after they set up the task. For example, for a CNN News Bots, you can enable initial polling to show the last 10 news posts immediately after the end-user adds the task to their application. If initial polling is not defined, the task polling begins after the specified Trigger Interval has elapsed.
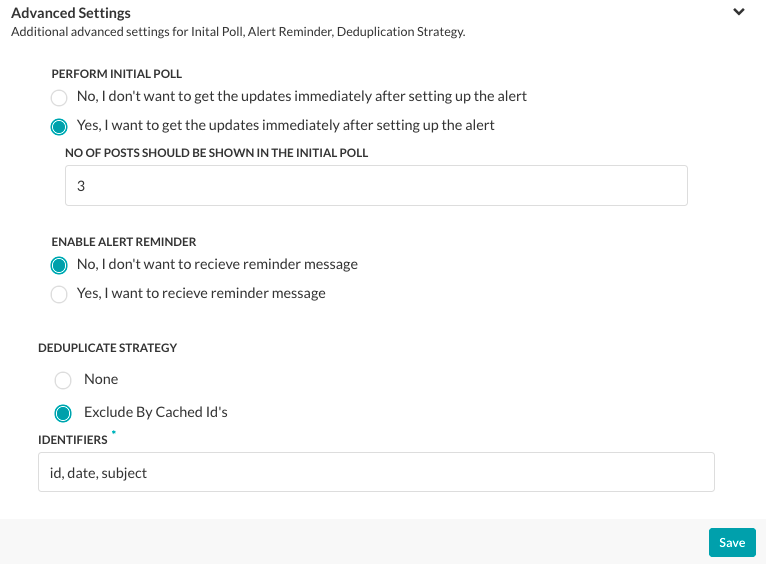
To enable and configure initial polling, in the Perform Initial Poll section, select Yes. In the No of posts field, enter the number of previous posts that should be posted immediately in the end-user application, as shown in the following illustration.
Initial Polling for a Task

Setting Up Alert Reminders

For some tasks, for example, the Google Calendar Event Updates task, you may want to add a reminder to the task. The reminder sends a reminder message to the end-user after receipt of the original task message. For example, the end-user may want to set up a 30-minute and 15-minute reminder before an event with the task message.
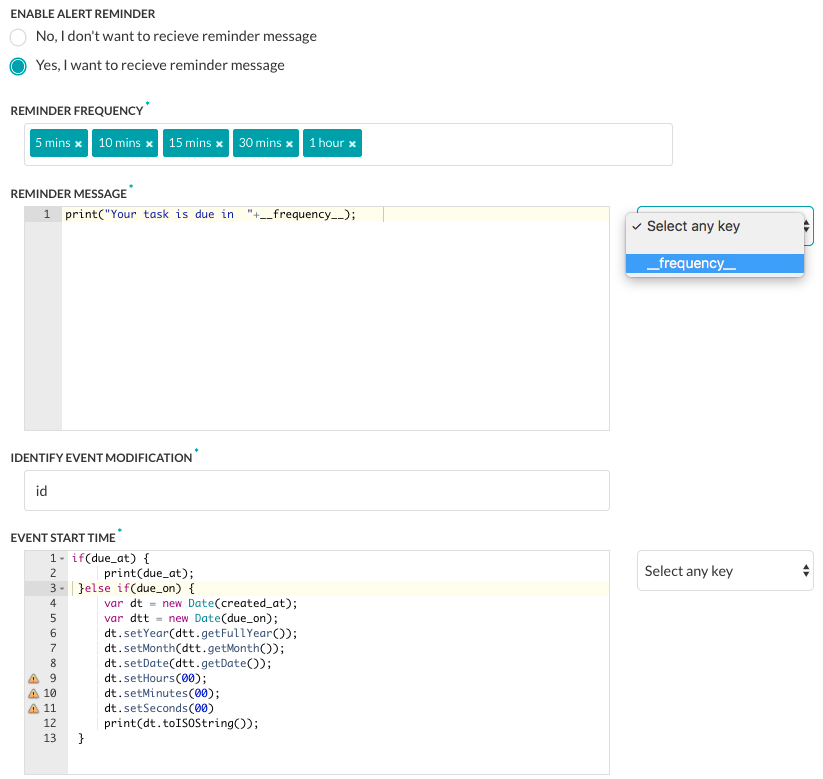
To enable and configure reminders, in the Enable Alert Reminder section, click Yes. The reminder configuration section is displayed as shown in the following illustration.
Task Reminder
Task Reminder Part 2
To configure an alert reminder:

  1. In the Enable Alert Reminder section, click Yes to display the alert reminder settings.
  2. In the Reminder Frequency section, click in the text box to display and select one or more intervals for the frequency of the reminder ranging from 5 mins to 7 days.
  3. In the Reminder Message text area, enter the message to display to the end-user for the event reminder. For example,
    print('Event starts in '+__frequency__);
    To use system generated keys, click Select any key and choose a key from the dropdown list.
  4. In the Identity Event Modification section, enter one or more keys in a comma-separated list used to identify new events. For example, id, LastModifiedDateTime, subject.
  5. In the Event Start Time section, enter the message to display to the end-user for the start date and time of the event using the alert task payload field that contains the event start time. For example,
      if (due_at) {
           print(due_at);
       } else if (due_on) {
           var dt = new Date(created_at);
           var dtt = new Date(due_on);
           dt.setYear(dtt.getFullYear());
           dt.setMonth(dtt.getMonth());
           dt.setDate(dtt.getDate());
           dt.setHours(00);
           dt.setMinutes(00);
           dt.setSeconds(00)
           print(dt.toISOString());
       }
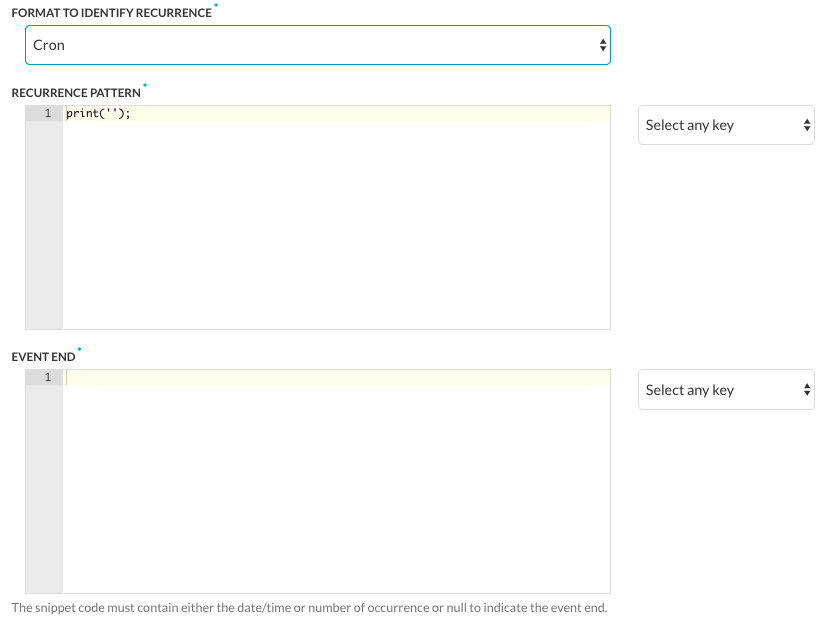
  6. In the Format to Identify Recurrence section, select the type of recurrence pattern format used in the payload as one of RRule or Cron.
    • RRule – A JavaScript library for working with recurrence rules for calendar dates. Use this for iCalendar events. For more information, see Recurrence Rule.
    • Cron – Used for scheduling tasks in the future. For more information, see Cron Expressions.
  7. In the Recurrence Pattern section, define the string displayed to the end-user to show the frequency of a repeating event, such as a recurring weekly meeting. For example,
    if (typeof(Recurrence) !== 'undefined' && Recurrence) {
        var map = new Object();
        map['Daily'] = "DAILY";
        map['Weekly'] = "WEEKLY";
        map['AbsoluteMonthly'] = "MONTHLY";
        map['RelativeMonthly'] = "MONTHLY";
        map['AbsoluteYearly'] = "YEARLY";
        map['AbsoluteYearly'] = "YEARLY";
        map['First'] = 1
        map['Second'] = 2
        map['Third'] = 3
        map['Fourth'] = 4
        map['Last'] = -1
        map['Sunday'] = 'SU'
        map['Monday'] = 'MO'
        map['Tuesday'] = 'TU'
        map['Wednesday'] = 'WE'
        map['Thursday'] = 'TH'
        map['Friday'] = 'FR'
        map['Saturday'] = 'SA'
        var rrule = '';
        if (typeof(Recurrence.Pattern.Type) !== 'undefined') {
            var freq = map[Recurrence.Pattern.Type];
            rrule = rrule + 'FREQ=' + freq + ';';
        }
        if (typeof(Recurrence.Range.StartDate) !== 'undefined') {
            var stDate = new Date(Recurrence.Range.StartDate).toISOString();
            rrule = rrule + 'DTSTART=' + stDate + ';';
        }
        if (typeof(Recurrence.Pattern.Interval) !== 'undefined') {
            var interval = Recurrence.Pattern.Interval
            rrule = rrule + 'INTERVAL=' + interval + ';';
        }
        if (typeof(Recurrence.Range.EndDate) !== 'undefined' && Recurrence.Range.Type !== 'NoEnd') {
            var edDate = new Date(Recurrence.Range.EndDate).toISOString();
            rrule = rrule + 'UNTIL=' + edDate + ';';
        }
        if (typeof(Recurrence.Pattern.Month) !== 'undefined' && Recurrence.Pattern.Month !== 0) {
            rrule = rrule + 'BYMONTH=' + Recurrence.Pattern.Month + ';';
        }
        if (typeof(Recurrence.Pattern.DayOfMonth) !== 'undefined' && Recurrence.Pattern.DayOfMonth !== 0) {
            rrule = rrule + 'BYMONTHDAY=' + Recurrence.Pattern.DayOfMonth + ';';
        }
        if (typeof(Recurrence.Pattern.Index) !== 'undefined') {
            var wno = map[Recurrence.Pattern.Index];
            rrule = rrule + 'BYSETPOS=' + wno + ';';
        }
        if (typeof(Recurrence.Pattern.DaysOfWeek) !== 'undefined') {
            var arr = [];
            for (var i = 0; i < Recurrence.Pattern.DaysOfWeek.length; i++) {
                arr.push(map[Recurrence.Pattern.DaysOfWeek[i]])
            }
            rrule = rrule + 'BYDAY=' + arr.join(',') + ';';
        }
        print(rrule);
    }
  8. If the Format to Identify Recurrence field is set to Cron, then define the Event End section to define the string displayed to the end-user to show the date and time of the last recurring event.

Click Save to save the settings.

Preventing Duplicate Message Alerts

After you add your filters for the response object, you should determine if you need to apply a strategy to prevent the display of duplicate messages to the end-user. For example, if you set up an RSS task, you may want to prevent duplicate messages for the same subject, or for Facebook, prevent duplicate messages each time a comment is added to a post.
In Kore.ai, you can choose one of two options for Deduplicate Strategy:

  • None – This is the default method to prevent duplicate alert messages. Each incoming task payload is hashed and the latest 500 task hash values are persisted. Each new task payload is compared against the list to prevent duplicate task alert messages. This option works for most tasks.
  • ExcludeByCachedIds – Select to enter one or more response identifier keys in a comma-separated list used to filter Kore.ai task alert messages and prevent duplication based on the cached hash value of the key for up to 500 hash values. If any of the key hash values match the response object, then the alert message is filtered and not displayed. For RSS Alert Types, RSS XML payloads are parsed as JSON. To filter by RSS item, enter $..guid[0]._ to prevent duplicate messages using the XML < GUID > tag parsed to JSON as:
    {
        "guid": [
            "_": "some link"
        ]
    }

To define settings to prevent duplication messages for a task, on the Settings tab, click the Expand  icon in the Advanced Settings section to display the Deduplicate Strategy section as shown in the following illustration.
Deduplicate Strategy Settings