グループの管理

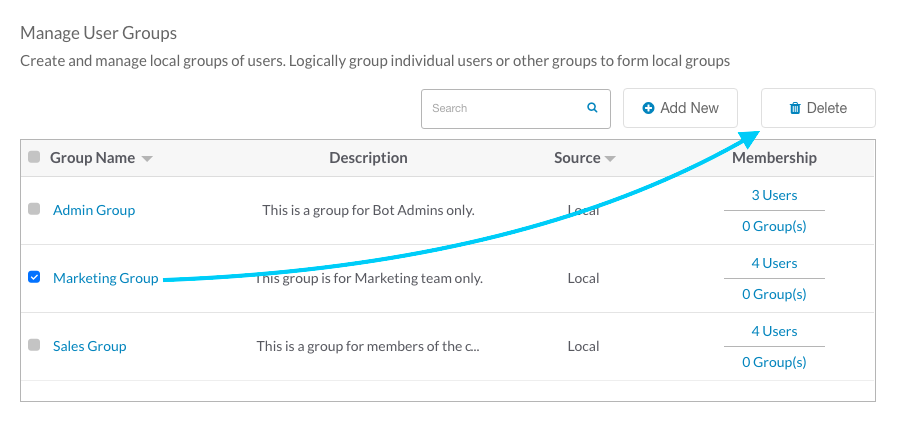
ユーザー管理 モジュールの[グループ] ページで、論理的に関連するユーザーのグループを作成および管理したり、会社の Active Directory グループなどのグループをインポートしたりできます。エンタープライズでは、さまざまな部門やビジネスラインで多様で異なる Bot の要件がある場合、グループを作成し、開発者を追加して、グループにボットを割り当てることをお勧めします。地域別、部門別、共通の関心事別など、ユーザーのカスタム グループを作成することができます。Active Directory を使用して組織単位をインポートすると、グループは自動的に作成されます。以下の図は、[ユーザー管理] モジュールの[グループ] ページの例です。

詳細

列値のリストをソートする場合は、列名の右の[上矢印up-arrow] アイコンまたは [下矢印down-arrow] アイコンをクリックします。次のリストでは、グループリストに表示される列について説明します。

説明
グループ名 グループ名が表示されます。[グループ名]をクリックして、選択したグループ名、説明およびメンバーを編集します。
説明 グループの説明が表示されます。これはオプションフィールドです。
ソース グループの作成に使用するソース。以下のいずれかです。

  • ローカル – グループは[ユーザー管理] モジュールから手動で作成されました。
  • AD – グループは Active Directory を使用してインポートまたは同期化されました。
  • システム – グループは Kore.ai によって、たとえば、すべての人など、デフォルト グループとして作成されました。
メンバーシップ グループ メンバーの数をユーザーとして、グループの数を親グループの子メンバーとして表示します。リンクをクリックすると、選択したグループのKore.ai ユーザーと子グループのリストを編集できます。
検索フィールドの使用

管理者コンソール テーブルのエントリのリストは、会社の規模に応じて非常に大きくなる場合があります。1人以上の特定のユーザーまたはグループを検索するには、[検索] フィールドに少なくとも 3 文字を入力して、 入力時検索を開始します。

注意: 検索クエリ内の検索語数は無制限ですが、各検索語の最初の 20 文字を越えるものを使用すると、検索結果は返されません。

すべてのエントリを表示するには、[検索] フィールドをクリアしてから、[Enter] キーを押します。
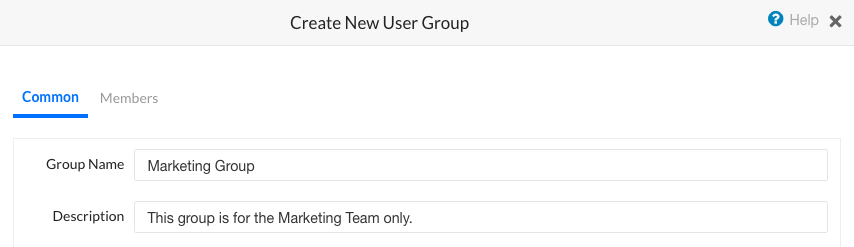
作成

アカウントの中に、例えば関連する興味、部署、場所を持つユーザーのために、1つ以上のユーザー グループを作成することができます。管理者が作成したグループは、ユーザーには表示されず、管理目的でのみ使用されます。このトピックでは、新規グループの定義、ユーザーの追加、またはユーザーの既存グループをそのグループに追加する方法を説明します。

  1. [ユーザー管理] モジュールでは、[グループ] セクションを選択します。
  2. [AddNewButton] ボタンをクリックし、[新規ユーザーグループの作成] ダイアログを表示し、新しい Kore.ai グループをアカウントに追加します。
  3. [新規ユーザーグループの作成] ダイアログが表示されます。
  4. [共通] タブで、
    1. [グループ名] フィールドに、グループの名前を入力します。
    2. 必要に応じて、[説明] フィールドに、グループの説明を入力します。 CreateNewGroup
  5. [メンバー] タブに移動し、このグループに追加するユーザーおよび/またはグループを選択します。[利用可能なユーザー/グループ] セクションから必要なユーザー/グループを探すには、以下の方法があります。
    1. ソートを使用して、[フィルター]を選択すると、新しいグループに追加できるユーザーとグループが表示されます。
    2. [検索] フィールドに名前を入力、または
    3. スクロールして、1人または複数の Kore.ai ユーザーと Kore.ai グループを選択します。
    4. そして、[addsinglearrow]をクリックし、選択したリストを[現在のメンバー] セクションに移動します。
    5. 利用可能なユーザーとグループをすべて追加するには、[]をクリックします。 グループへの参加者の追加
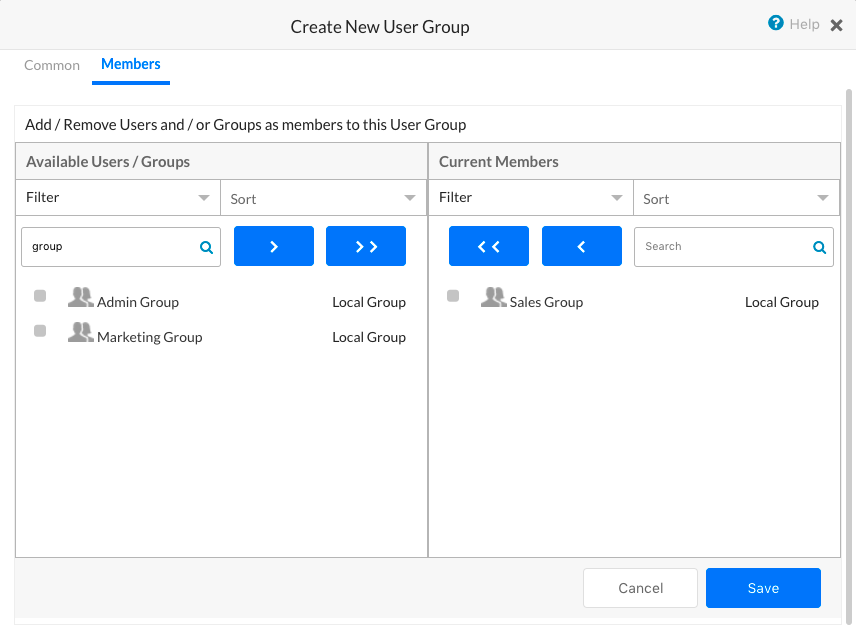
  6. [保存]をクリックします。グループが作成され、[グループ] ページが表示されます。
  7. ページの上部にグループ更新済みメッセージが表示されます。
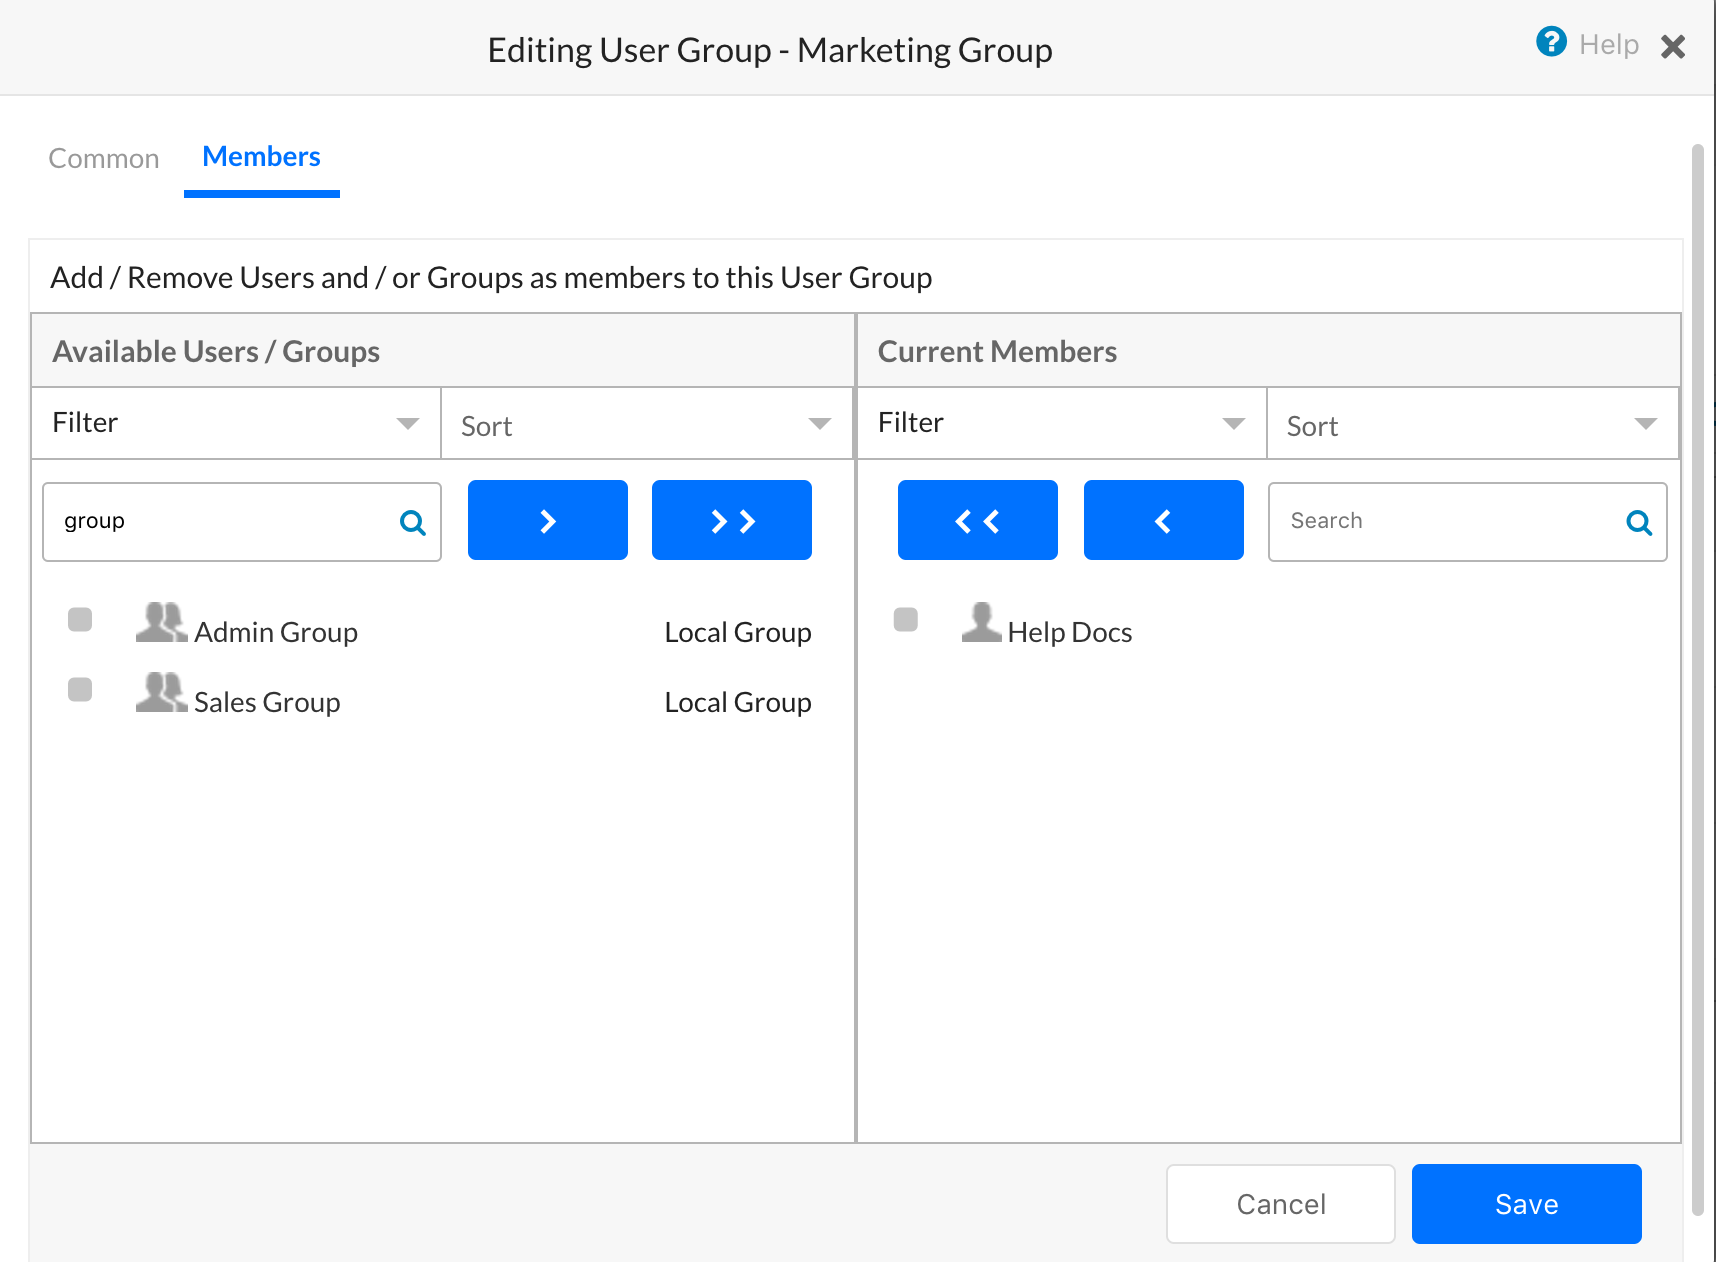
変更

グループのメンバーを変更する必要がある場合があります。このトピックでは、共通のグループ プロパティと既存グループのメンバーシップを変更する方法を説明します。

  1. [ユーザー管理] モジュールの[グループ] ページのグループ名列で、変更するグループの名前をクリックします。
  2. ユーザーグループの編集 – [< グループ名 >] ダイアログが表示されます。
  3. [共通] タブでは、[グループ名] と[説明] フィールドを変更できます。
  4. [メンバー] タブの[利用可能なユーザー/グループ]と[現在のメンバー] セクションで、必要に応じて[ソート]を選択し、[フィルター]を選択すると、追加または削除するユーザーとグループが表示されます。
  5. グループのメンバーを変更するには、以下の方法があります。
    1. [検索] フィールドに名前を入力するか、スクロールして1つまたは複数のユーザーやグループを選択し、[addsinglearrow]をクリックして新しいグループ メンバーを追加するか、[deletesinglearrow_120x30]をクリックして選択したグループ メンバーを削除します。
    2. [adddoublearrow_117x30]をクリックし、利用可能なグループメンバーをすべて追加するか、または [deletedoublearrow_119x30]をクリックして現在のグループメンバーをすべて削除します。
  6.  [保存]をクリックします。グループが変更され、[グループ] ページが表示されます。

ユーザーグループの編集

削除

アカウント内のユーザー グループが不要になる場合があります。グループを削除する前に、グループからすべてのユーザーを削除する必要があります。グループを削除するには、以下の手順で行います。グループを削除する代わりに、共通設定ならびに既存グループのメンバーシップも変更できます。詳細情報については、既存ユーザーグループの変更を参照してください。

  1. [ユーザー管理] モジュールにある[グループ] ページのグループ名列で削除する 1 つまたは複数のグループの名前をクリックします。
  2. アクションバーで、deletebutton_74x30をクリックします。
  3. グループの削除確認ダイアログで、削除をクリックします。

警告: この操作は恒久的で、元に戻すことはできません。

グループが削除されます。 BotsAdminUserManagementGroupsDelete

Managing Your Groups

On the Groups page in the User Management module, you can create and manage logically related groups of users, as well as import groups, such as your company Active Directory groups.

If the enterprise has varied and distinct Bot requirements for various departments or lines of business, creating groups, adding developers and assigning bots to the groups would be the recommended option. You can create a custom group of users, for example, by geographical location, department title, or common interest.

Groups are automatically created when you import organizational units using Active Directory.

The following illustration is an example of the Groups page in the User Management module.

Details

To sort the list of column values, click the Arrow Up up-arrow icon or Arrow Down down-arrow icon to the right of a column name.

The following list describes the columns displayed in the Groups listing.

COLUMN DESCRIPTION
Group Name Displays the group name. Click a group name to edit the the selected group – name, description & members.
Description Displays the description of the group. This is an optional field.
Source The source used to create the group. One of:

  • Local – The group was created manually from the User Management module.
  • AD – The group was imported or synchronized using Active Directory.
  • System – The group was created as a default group by Kore.ai, for example, everyone.
Membership Displays the number of group members as users, and the number of groups as child members of the parent group. Click the link to edit the list of Kore.ai users and child groups for the selected group.
Using the Search Field

The list of entries in an admin console table can be very large depending on the size of your company. To find one or more specific users or groups, in the Search field, enter at least three characters to begin find-as-you-type.

Note: The number of search terms in a search query is unlimited, however, no more than the first 20 characters of each search term is used to return search results.

To view all entries, clear the search field, and then press the Enter key.

Creation

You may want to create one or more groups of users in your account for users with, for example, a related interest, department, or location. Groups created by the admin are not visible to the user and are for administrative purposes only. This topic describes how to define a new group and add users, or existing groups of users to that group.

  1. In the User Management module, select the Groups section.
  2. Click the  AddNewButton button to display the Create New User Group dialog to add a new Kore.ai group to your account.
  3. The Create New User Group dialog is displayed.
  4. In the Common tab,
    1. in the Group Name field, enter the name for the group.
    2. Optionally, in the Description field, enter a description for the group.
      CreateNewGroup
  5. Navigate to the Members tab, and select the user(s) and/or group(s) to be added to this group. You can locate the needed users/groups from the the Available Users/Groups section by
    1. using Sort and then selecting a Filter to display users and groups that can be added to the new group.
    2. entering a name in the Search field, or
    3. scrolling to select one or more Kore.ai users and Kore.ai groups,
    4. Then click addsinglearrow, to move the selected list to the Current Members section.
    5. To add all available users and groups, click
      Adding Participants to a Group
  6. Click Save. The group is created and the Groups page is displayed.
  7. The Group Updated message is displayed at the top of the page.

Modification

You may need to modify the members of a group. This topic describes how to modify the common group properties and the membership of an existing group.

  1. In the User Management module, on the Groups page, in the Group Name column, click the name of the group to modify.
  2. The Editing User Group – < Group Name > dialog is displayed.
  3. On the Common tab, you can modify the Group Name and Description field.
  4. On the Members tab, in the Available Users/Groups and Current Members sections, optionally Sort, and then select a Filter to display users and groups to add or remove.
  5. To modify the members of the group, you can:
    1. Enter a name in the Search field, or scroll to select one or more users and groups, and then click addsinglearrow to add new group members, or click deletesinglearrow_120x30 to remove the selected group members.
    2. Click adddoublearrow_117x30 to add all available group members, or click deletedoublearrow_119x30 to remove all current group members.
  6.  Click Save. The group is modified and the Groups page is displayed.

Editing User Groups

Deletion

You may no longer need a group of users in your account. You must remove all users from a group before you can delete a group. Complete the steps in the following procedure to delete a group.

Instead of deleting a group, you can also modify the common settings as well as the membership of an existing group. For more information, see Modify an Existing User Group.

  1. In the User Management module, on the Groups page, in the Group Name column, select the name of one or more groups to delete.
  2. On the Action bar, click deletebutton_74x30.
  3. In the Delete Group(s) confirmation dialog, click Delete.

Warning: This operation is permanent and cannot be undone.

The group is deleted.
BotsAdminUserManagementGroupsDelete